
On this article, I’m going to elucidate how one can convert animations created utilizing GSAP into animated GIFs utilizing modern-gif.
Right here’s a sneak peek of 1 I made earlier. 👇
On the hyperlinks beneath, you’ll discover a stay preview and all of the code I’ll be referencing all through this text:
- 🚀 Preview:
- Index: https://gsap-animation-to-gif.netlify.app
- Easy: https://gsap-animation-to-gif.netlify.app/easy
- ⚙️ Repo: https://github.com/PaulieScanlon/gsap-animation-to-gif
There are two “pages” within the repo. index incorporates all of the code for the GIF seen above, and easy is a place to begin for the steps lined on this submit.
Easy methods to convert GSAP Animations into GIFs
The strategy I’m utilizing to transform a GSAP animation right into a GIF entails capturing SVG knowledge on every “replace” of the Tween and writing it to an HTML canvas. After the Tween completes I’m then in a position to convert SVG knowledge into Rasterized picture knowledge which can be utilized by modern-gif to create every body of an animated GIF.
Getting Began
Right here’s the code I’ve used within the easy instance, and it’s what I’ll be utilizing to elucidate every of the steps required to create an animated GIF from a GSAP animation.
<html lang='en'>
<head>
  <meta charset='utf-8' />
  <title>Easy</title>
  <script>
    const canvas = doc.getElementById('canvas');
    const ctx = canvas.getContext('second');

    let animationFrames = [];
    let canvasFrames = [];

    .timeline({
      onUpdate: () => {},
      onComplete: () => {},
    })
    .fromTo('#rect', { x: -50 }, { period: 2, x: 350, ease: 'energy.ease2' });
  </script>
</head>
<physique>
  <principal>
    <part>
      <svg
        id='svg'
        xmlns='http://www.w3.org/2000/svg'
        viewBox='0 0 400 200'
        width={400}
        top={200}
        model={{ border: '1px strong pink' }}
      >
        <rect id='rect' x='0' y='75' width='50' top='50' fill='pink'></rect>
      </svg>
      <canvas id='canvas' model={{ border: '1px strong blue' }} width={400} top={200}></canvas>
      <img id='picture' width={400} top={200} model={{ border: '1px strong inexperienced' }} />
      <a id='hyperlink' obtain='easy.gif'>Obtain</a>
    </part>
  </principal>
  <script src='https://unpkg.com/modern-gif'></script>
  <script src='https://cdnjs.cloudflare.com/ajax/libs/gsap/3.12.2/gsap.min.js'></script>
</physique>
</html>
There are a few issues I’d like to elucidate in regards to the above code.
Inline Script
On the high of the file I create a reference to the canvas aspect within the HTML (beneath) and outline a brand new reference to the canvas context known as ctx. This can permit me to reference the canvas aspect and write knowledge to it.
There are two arrays outlined to carry the captured knowledge (I’ll clarify the place every is utilized in a later step):
animationFramescanvasFrames
And final, however not least, an occasion of a GSAP Timeline and Tween that animates an SVG rect aspect within the HTML (beneath).
HTML
- The HTML incorporates an
svgaspect with an ID ofsvgwith a pinkrectaspect with an ID ofrect. Therectis the aspect I’ll be animating. - Beneath the
svgaspect is acanvasaspect. That is the place I’ll write the captured SVG knowledge to be used afterward. - Beneath the
canvasaspect is animgaspect. That is the place the ultimate animated GIF will probably be displayed. - Lastly, there’s an a aspect which can be utilized to “obtain” the GIF.
Script parts
The 2 script parts on the backside are for the modern-gif library and GSAP library. Each must be included within the web page so you should use them.
Capturing SVG Knowledge
Find the GSAP Timeline and make the next modifications:
.timeline({
  onUpdate: () => {
+    const xml = new XMLSerializer().serializeToString(svg);
+    const src = `knowledge:picture/svg+xml;base64,${btoa(xml)}`;
+    animationFrames.push(src);
  },
  onComplete: () => {
+    console.log(animationFrames);
  },
})
.fromTo('#rect', { x: -50 }, { period: 2, x: 350, ease: 'energy.ease2' });
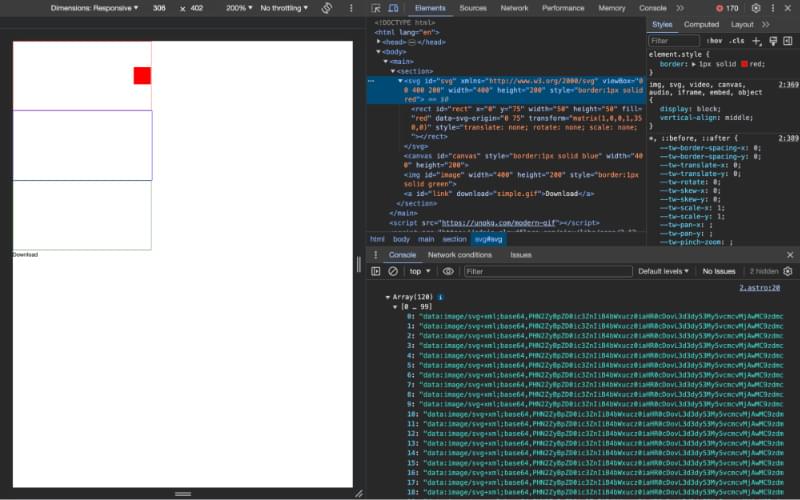
The above code serializes the HTML svg aspect and converts the information to an svg+xml;base64 string. At this level, the “picture knowledge” isn’t fairly what I would like, however by changing it to a string I can retailer it within the animationFrame array to be used afterward.
When you’ve added the console.log within the onComplete operate, it is best to see one thing just like the picture beneath within the console of your browser.
Convert SVG Knowledge to Rasterized Knowledge
.timeline({
  onUpdate: () => {
    const xml = new XMLSerializer().serializeToString(svg);
    const src = `knowledge:picture/svg+xml;base64,${btoa(xml)}`;
    animationFrames.push(src);
  },
  onComplete: () => {
-    console.log(animationFrames);
+    let inc = 0;
+    const renderSvgDataToCanvas = () => {
+      const virtualImage = new Picture();
+      virtualImage.src = animationFrames[inc];
+      virtualImage.onload = () => {
+        ctx.clearRect(0, 0, 400, 200);
+        ctx.drawImage(virtualImage, 0, 0, 400, 200);
+        canvasFrames.push(canvas.toDataURL('picture/jpeg'));
+        inc++;
+        if (inc < animationFrames.size - 1) {
+          renderSvgDataToCanvas();
+        } else {
+          console.log(canvasFrames);
+        }
+      };
+    };
+    renderSvgDataToCanvas();
  },
})
.fromTo('#rect', { x: -50 }, { period: 2, x: 350, ease: 'energy.ease2' });
This step is barely extra concerned and requires that I carry out an motion for every index of the animationFrames array.
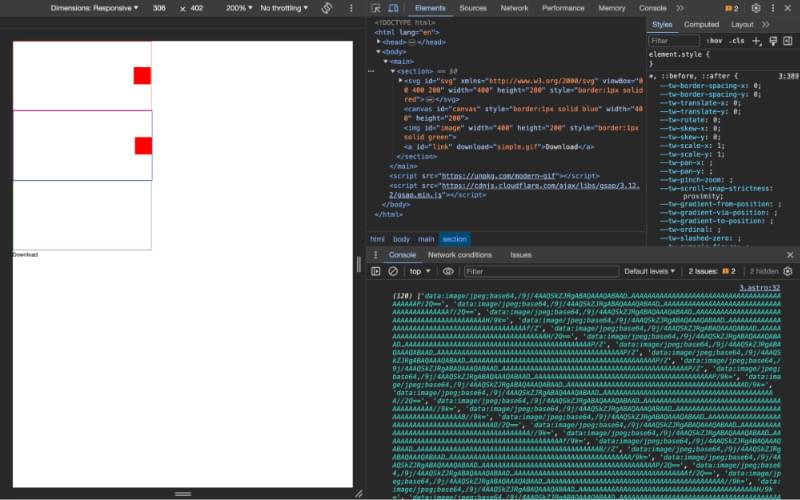
Through the use of a recursive operate, renderSvgDataToCanvas, I can use the picture knowledge from the animationFrames array, write it to the canvas. Then, by utilizing canvas.toDataURL('picture/jpeg') I can retailer rasterized knowledge of every body of the animation within the canvasFrames array.
When you’ve added the console.log within the onComplete operate, it is best to see one thing just like the beneath within the console of your browser. This time, nonetheless, notice the MIME kind of the information: as a substitute of svg+xml, it’s picture/jpeg. That is vital for what I have to do subsequent.
Convert Rasterized Knowledge to GIF
That is the final step and entails passing every index of the canvasFrames array onto modern-gif.
.timeline({
onUpdate: () => {
  const xml = new XMLSerializer().serializeToString(svg);
  const src = `knowledge:picture/svg+xml;base64,${btoa(xml)}`;
  animationFrames.push(src);
},
onComplete: () => {
  let inc = 0;
  const renderSvgDataToCanvas = () => {
    const virtualImage = new Picture();
    virtualImage.src = animationFrames[inc];
    virtualImage.onload = () => {
      ctx.clearRect(0, 0, 400, 200);
      ctx.drawImage(virtualImage, 0, 0, 400, 200);
      canvasFrames.push(canvas.toDataURL('picture/jpeg'));
      inc++;
      if (inc < animationFrames.size - 1) {
        renderSvgDataToCanvas();
      } else {
-          console.log(canvasFrames);
+          generateGif();
      }
    };
  };
+    const generateGif = async () => {
+      const gif = await modernGif.encode({
+        width: 400,
+        top: 200,
+        frames: canvasFrames.map((body) => {
+          return { imageData: body, delay: 0 };
+        }),
+      });
+      const frames = await gif;
+      const blob = new Blob([frames], { kind: 'picture/gif' });
+      const src = URL.createObjectURL(blob);

+      const picture = doc.getElementById('picture');
+      const hyperlink = doc.getElementById('hyperlink');

+      picture.src = src;
+      hyperlink.href = src;
+    };
    renderSvgDataToCanvas();
  },
})
.fromTo('#rect', { x: -50 }, { period: 2, x: 350, ease: 'energy.ease2' });
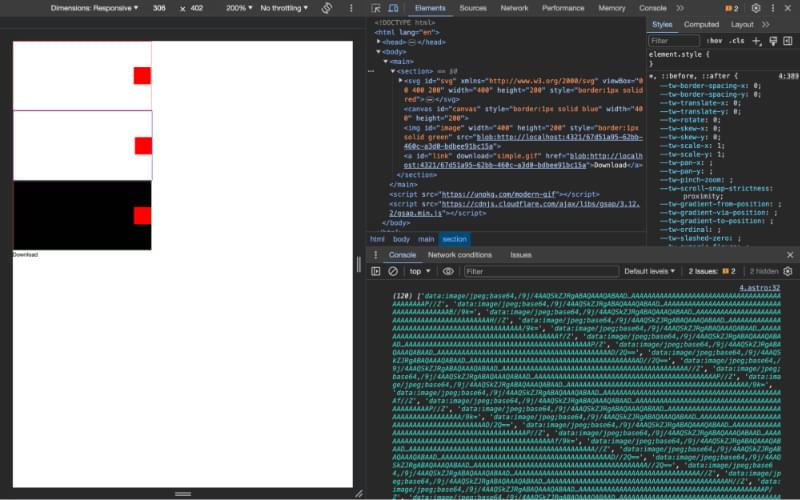
Utilizing modernGif.encode you’ll be able to cross an array of knowledge onto frames and outline a delay for every body, I’ve chosen so as to add a delay of 0 seconds.
The subsequent a part of the code offers with changing the modernGif.ecode knowledge and changing it to “one more” MIME kind, this time picture/gif.
As soon as I’ve a remaining “blob” of knowledge that represents my animated GIF I convert it to a URL after which set the src and href of the picture and hyperlink parts so I can see and obtain the GIF within the browser.
Body Fee
You may discover the ultimate GIF runs fairly slowly, it is because animations that run within the browser will usually play again at 60 frames per second (fps), whereas GIFs usually run at a a lot slower body fee, 12 or 24fps.
To “drop” some frames of the animation I take advantage of an array filter and JavaScript the rest operator to find out if the index is divisible by a sure quantity, in my case, I selected 6. Indexes that aren’t divisible by 6 are filtered out of the array. The ensuing animated GIF, whereas slightly clunky, will playback a lot quicker.
const generateGif = async () => {
  const gif = await modernGif.encode({
    width: 400,
    top: 200,
    frames: canvasFrames
+       .filter((_, index) => index % 6 === 0)
      .map((body) => {
        return { imageData: body, delay: 0 };
      }),
    });
  const frames = await gif;
  const blob = new Blob([frames], { kind: 'picture/gif' });
  const src = URL.createObjectURL(blob);

  const picture = doc.getElementById('picture');
  const hyperlink = doc.getElementById('hyperlink');

  picture.src = src;
  hyperlink.href = src;
};
And that’s how one can go from GSAP SVG Animation to Animated GIF by way of the HTML Canvas!
In case you have any questions on something I’ve described on this submit be happy to search out me on Twitter/X: @PaulieScanlon.