
Dynamic tables are sometimes utilized in net purposes to signify information in a structured format. Sorting and filtering the dataset can velocity up processes when working with massive units of information. On this tutorial, we’ll check out the best way to create a sortable and filterable desk element in React.
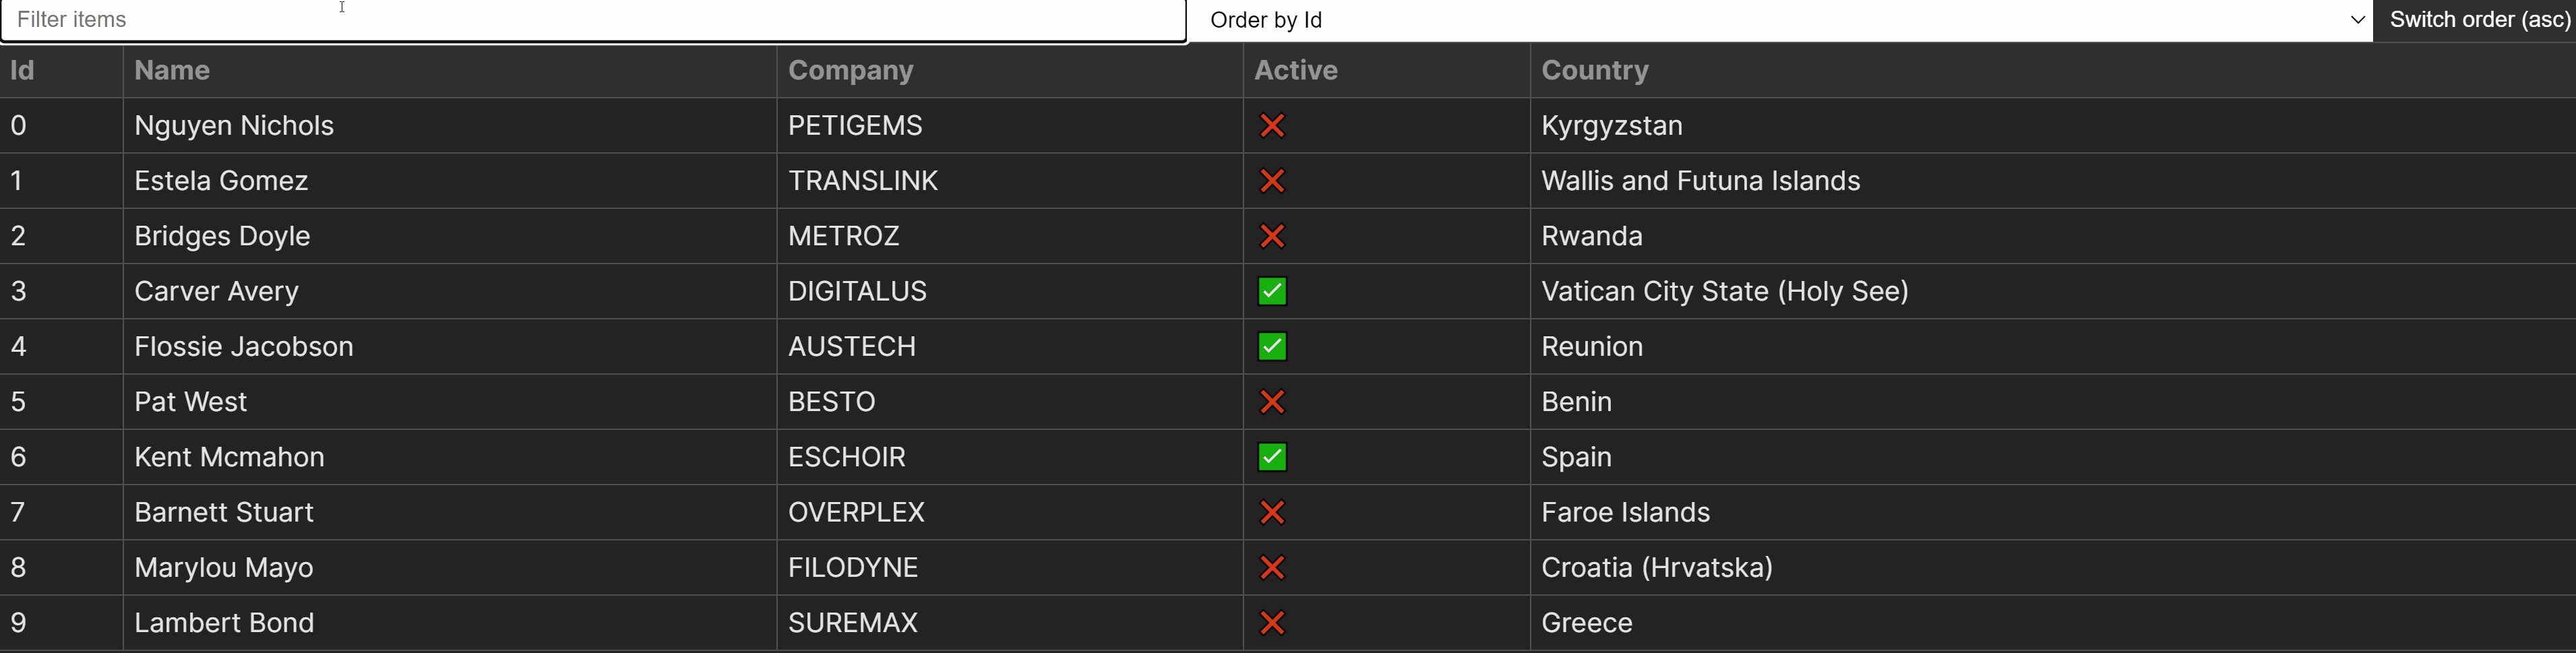
You could find the complete supply code in a single piece hosted on GitHub. The tip result’s pictured beneath.
Stipulations
Earlier than we start, this tutorial assumes you might have a fundamental information of HTML, CSS, JavaScript, and React. Whereas we go over the venture step-by-step, we gained’t clarify core ideas in React or JavaScript array strategies intimately. We’ll additionally use TypeScript, however the identical may be achieved with out it. With that being stated, let’s bounce into coding.
Setting Up The Mission
For this venture, we’ll use Vite, a sturdy and common frontend device. Should you don’t have already got an current React utility, you possibly can bootstrap a brand new venture in Vite utilizing one of many following instructions inside your terminal:
npm create vite@newest folder-title -- --template react-ts


yarn create vite folder-title --template react-ts


pnpm create vite folder-title --template react-ts


bunx create-vite folder-title --template react-ts
When you’re prepared, arrange a brand new folder for the Desk element inside the React venture with the next construction:
src
├─ parts
│  ├─ Desk
│  │  ├─ index.ts
│  │  ├─ desk.css
│  │  ├─ Desk.tsx
├─ App.tsx
index.ts. We’ll use this file to re-exportDesk.tsxto simplify import paths.desk.css. Comprises types related to the element. For this tutorial, we’ll use vanilla CSS.Desk.tsx. The element itself.
Open Desk.tsx and export the next, in order that we will confirm the element hundreds after we import it:
import './desk.css'

export const Desk = () => {
  return (
    <h1>Desk element</h1>
  )
}
Inside index.ts, re-export the element utilizing the next line:
export * from './Desk'
Now that we’ve got the element recordsdata arrange, let’s confirm that it hundreds by importing it into our app. On this tutorial, we’ll use the App element. You probably have an current React venture, you possibly can import it into your required location. Import the Desk element into your app like so:
import { Desk } from './parts/Desk'

const App = () => {
  return (
    <Desk />
  )
}

export default App
Producing the mock information
After all, to work on the desk, we’ll want some mock information first. For this tutorial, we will use JSON Generator, a free service for producing random JSON information. We’ll use the next schema to generate the info:
[
  '{{repeat(10)}}',
  {
    id: '{{index()}}',
    name: '{{firstName()}} {{surname()}}',
    company: '{{company().toUpperCase()}}',
    active: '{{bool()}}',
    country: '{{country()}}'
  }
]
JSON Generator comes with varied built-in functionalities to generate various kinds of information. The above schema will create an array of objects with ten random objects within the type of:
{
  id: 0,
  title: 'Jaime Wallace',
  firm: 'UBERLUX',
  energetic: false,
  nation: 'Peru'
}
Generate a listing of entries utilizing the schema above, then create a brand new file contained in the src folder known as information.ts and export the array within the following method:
export const information = [
  {
    id: 0,
    name: 'Jaime Wallace',
    company: 'UBERLUX',
    active: false,
    country: 'Peru'
  },
  { ... },
]
Open App.tsx, and go this information to the Desk element as a prop known as rows. We’ll generate the desk primarily based on this information:
  import { Desk } from './parts/Desk'
+ import { information } from './information'

  const App = () => {
    return (
-     <Desk />
+     <Desk rows={information} />
    )
  }

  export default App
Creating the Element
Now that we’ve got each the element and information arrange, we will begin engaged on the desk. To dynamically generate the desk primarily based on the handed information, change all the things within the Desk element with the next traces of code:
import { useState } from 'react'

import './desk.css'

export const Desk = ({ rows }) => {
  const [sortedRows, setRows] = useState(rows)

  return (
    <desk>
      <thead>
        <tr>
          {Object.keys(rows[0]).map((entry, index) => (
            <th key={index}>{entry}</th>
          ))}
        </tr>
      </thead>
      <tbody>
        {sortedRows.map((row, index) => (
          <tr key={index}>
            {Object.values(row).map((entry, columnIndex) => (
              <td key={columnIndex}>{entry}</td>
            ))}
          </tr>
        ))}
      </tbody>
    </desk>
  )
}
This may dynamically generate each the desk headings and cells primarily based on the rows prop. Let’s break down the way it works. As we’re going to kind and filter the rows, we have to retailer it in a state utilizing the useState hook. The prop is handed because the preliminary worth to the hook.
To show the desk headings, we will use Object.keys on the primary entry within the array, which can return the keys of the article as a listing of strings:
const rows = [
  {
    id: 0,
    name: 'Jaime Wallace'
  },
  { ... }
]


Object.keys(rows[0]) -> ['id', 'name']


['id', 'name'].map((entry, index) => (...))
To show the desk cells, we have to use Object.values on every row, which returns the worth of every key in an object, versus Object.keys. Intimately, that is how we show desk cells:
const sortedRows = [
  {
    id: 0,
    name: 'Jaime Wallace'
  },
  { ... }
]


{sortedRows.map((row, index) => (<tr key={index}>...</tr>))}


Object.values(row) -> [0, 'Jaime Wallace']
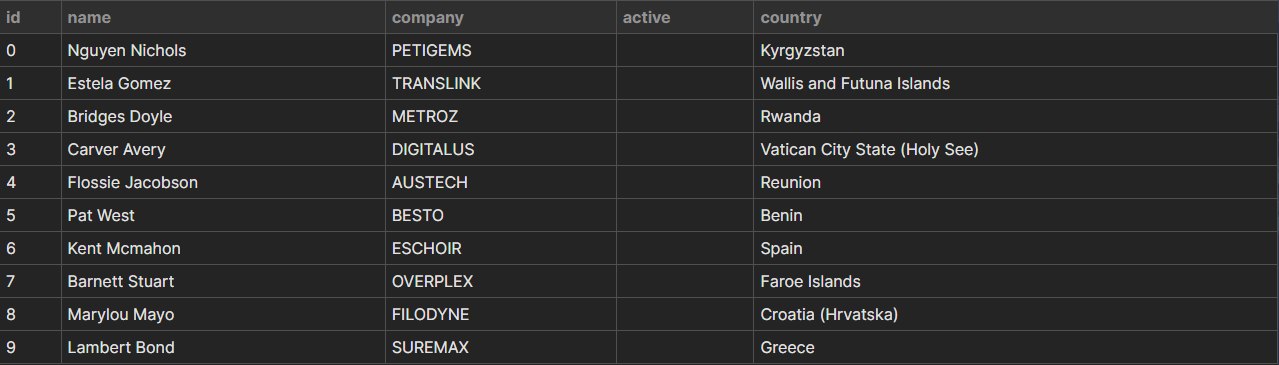
This strategy makes it extraordinarily versatile to make use of any sort of information with our Desk element, with out having to rewrite the logic. To this point, we’ll have the next desk created utilizing our element. Nevertheless, there are some points with the formatting.
Formatting desk cells
Proper now, the energetic column will not be displayed. It is because the values for these fields are Boolean, and so they aren’t printed as strings in JSX. To resolve this problem, we will introduce a brand new perform for formatting entries primarily based on their values. Add the next to the Desk element and wrap entry into the perform within the JSX:
const formatEntry = (entry: string | quantity | boolean) => {
  if (typeof entry === 'boolean') {
    return entry ? '✅' : '❌'
  }

  return entry
}

return (
  <desk>
    <thead>...</thead>
    <tbody>
      {sortedRows.map((row, index) => (
        <tr key={index}>
          {Object.values(row).map((entry, columnIndex) => (
            <td key={columnIndex}>{formatEntry(entry)}</td>
          ))}
        </tr>
      ))}
    </tbody>
  </desk>
)
The formatEntry perform expects an entry, which in our case may be both string, quantity, or boolean, after which returns a formatted worth if the typeof entry is a boolean, which means for true values, we’ll show a inexperienced checkmark, and for false values, we’ll show a purple cross. Utilizing an analogous strategy, we will additionally format the desk headings. Let’s make them capitalized with the next perform:
export const capitalize = (
  str: string
) => str?.change(/bw/g, substr => substr.toUpperCase())
This perform makes use of a regex to seize the primary letter from every phrase and switch it into uppercase. To make use of this perform, we will create a utils.ts file on the root of the src folder, export this perform, then import it into our Desk element to make use of within the following method:
import { capitalize } from '../../utils'

export const Desk = ({ rows }) => {
  ...

  return (
      <desk>
        <thead>
          <tr>
            {Object.keys(rows[0]).map((entry, index) => (
              <th key={index}>{capitalize(entry)}</th>
            ))}
          </tr>
        </thead>
        <tbody>...</tbody>
      </desk>
  )
}
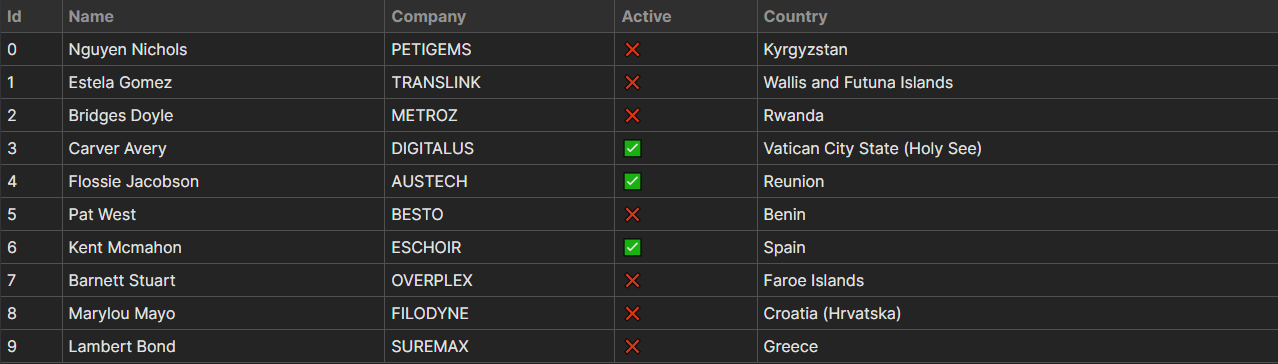
Primarily based on these modifications, we now have a dynamically constructed, formatted desk.
Typing props
Earlier than we bounce into styling the desk after which including controls, let’s correctly sort the rows prop. For this, we will create a varieties.ts file on the root of the src folder and export customized varieties that may be reused all through the venture. Create the file and export the next sort:
export sort Information = {
    id: quantity
    title: string
    firm: string
    energetic: boolean
    nation: string
}[]
To sort the rows prop within the Desk element, merely import this sort and go it to the element within the following method:
import { Information } from '../../varieties'

export sort TableProps = {
  rows: Information
}

export const Desk = ({ rows }: TableProps) => { ... }
Styling the Desk
To type the whole desk element, we’ll solely want a few guidelines. First, we need to set the colours and borders, which we will do utilizing the next types:
desk {
  width: 100%;
  border-collapse: collapse;
}

thead {
  text-align: left;
  coloration: #939393;
  background: #2f2f2f;
}

th,td {
  padding: 4px 6px;
  border: 1px strong #505050;
}
Add the above to desk.css. Be certain to set border-collapse to collapse on the <desk> to keep away from double borders. Because the desk spans the whole display, let’s additionally make some changes and take away the left and proper border, as they aren’t seen anyway:
th:first-child,
td:first-child {
  border-left: 0;
}

th:last-child,
th:last-child {
  border-right: 0;
}
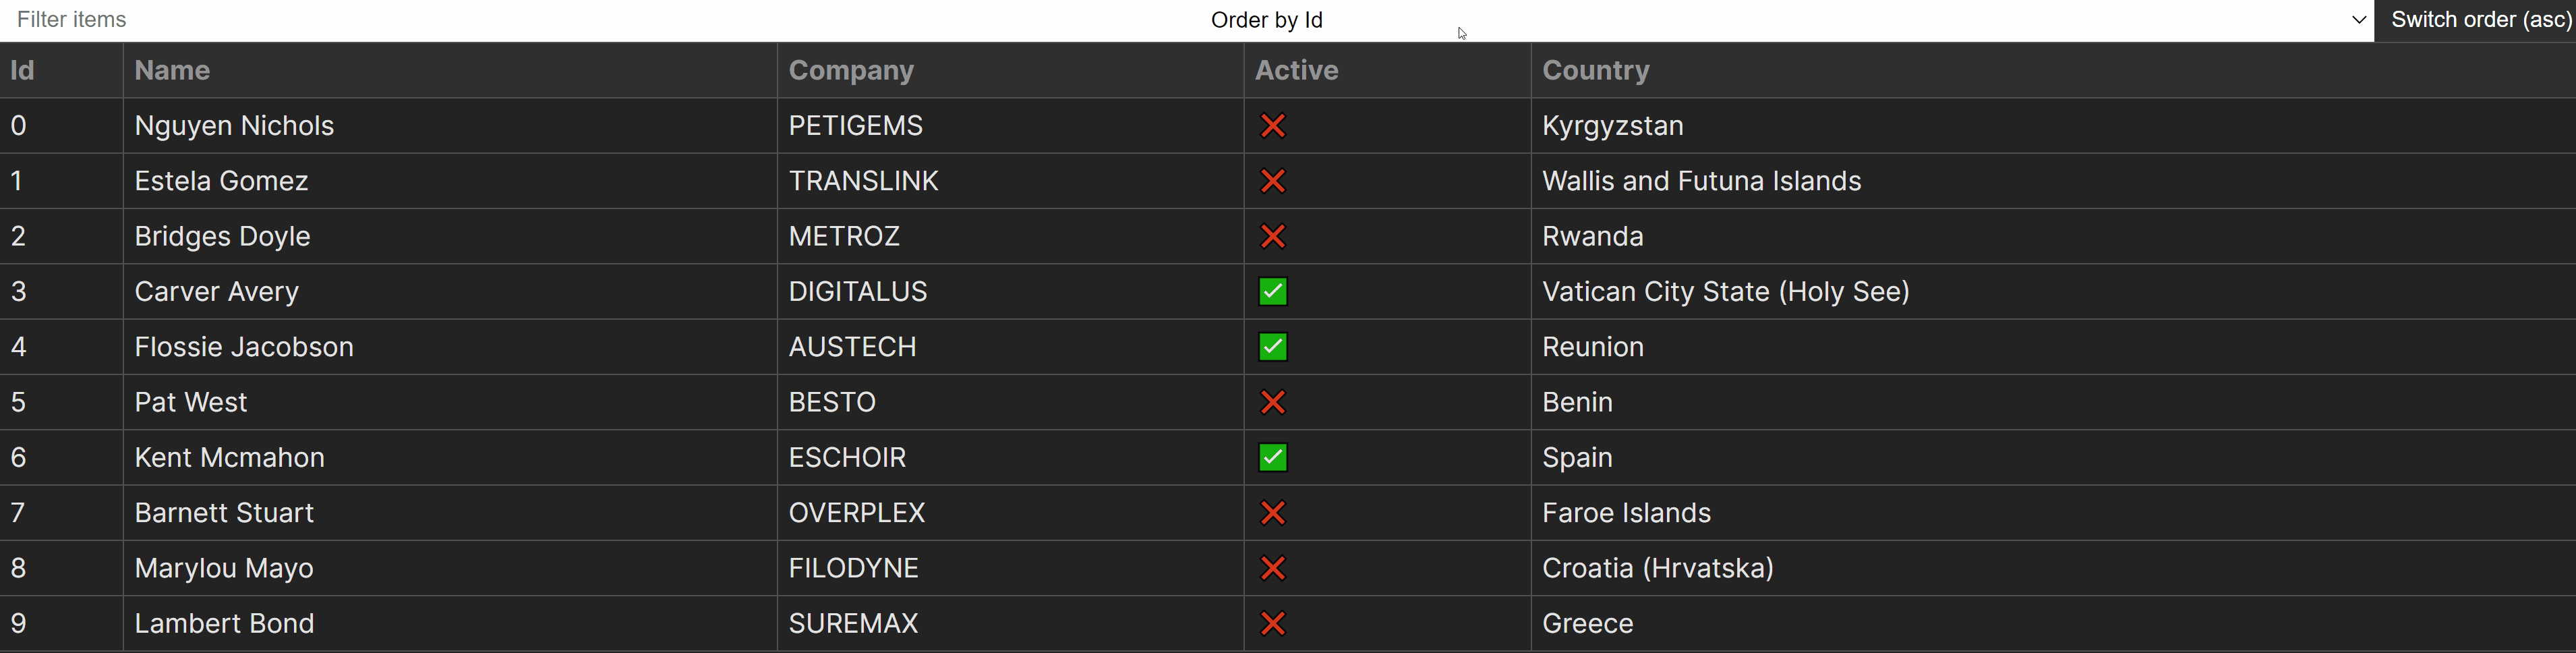
This may do away with the borders on all sides of the <desk>, leading to a cleaner look. Lastly, let’s add a hover impact to the desk rows to help customers visually when looking out the desk:
tr:hover {
  background: #2f2f2f;
}
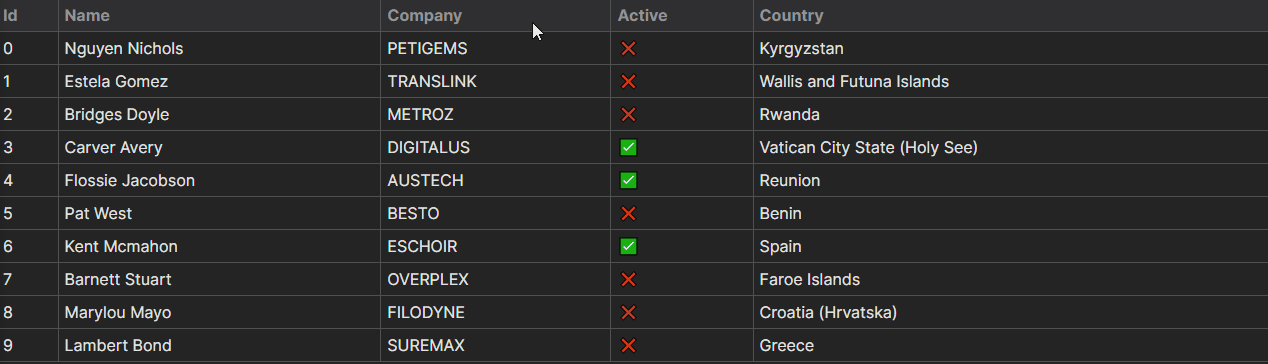
With all the things thus far, we now have the next habits for the element.
Including Controls
Now that we’ve styled the desk, let’s add the controls for the kind and filter performance. We’ll create an <enter> for the filter and a <choose> ingredient for the kind. We’ll additionally embody a button for switching between kind orders (ascending/descending).
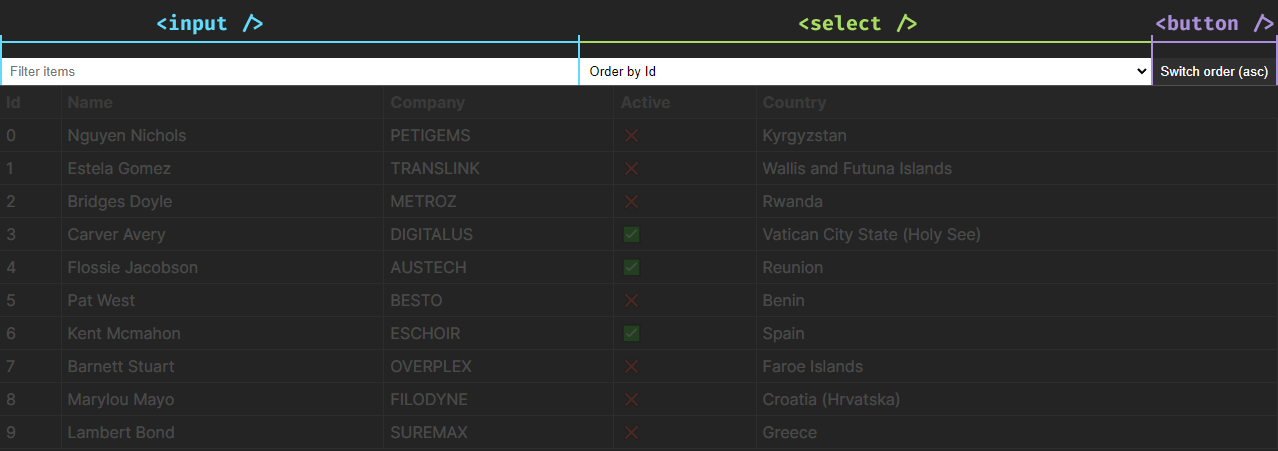
So as to add the inputs, we’ll additionally want new states for the present order (ascending or descending) and a variable to maintain monitor of the kind key (which key within the object is used for sorting). With that in thoughts, lengthen the Desk element with the next:
const [order, setOrder] = useState('asc')
const [sortKey, setSortKey] = useState(Object.keys(rows[0])[0])
const filter = (occasion: React.ChangeEvent<HTMLInputElement>) => {}
const kind = (worth: keyof Information[0], order: string) => {}
const updateOrder = () => {}
return (
<>
<div className="controls">
<enter
sort="textual content"
placeholder="Filter gadgets"
onChange={filter}
/>
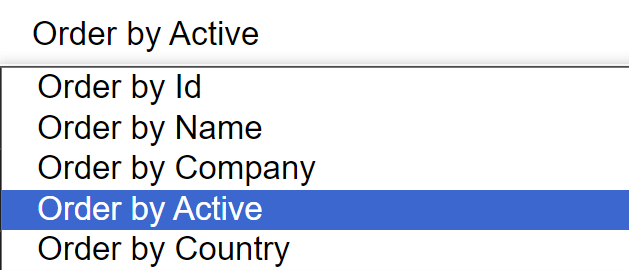
<choose onChange={(occasion) => kind()}>
{Object.keys(rows[0]).map((entry, index) => (
<choice worth={entry} key={index}>
Order by {capitalize(entry)}
</choice>
))}
</choose>
<button onClick={updateOrder}>Change order ({order})</button>
</div>
<desk>...</desk>
</>
)
Let’s go to be able to perceive what modified:
order. First, we have to create a brand new state for the kind order. This may be one amongascordesc. We’ll use its worth within thekindperform.sortKey. We additionally want a state for the kind key. By default, we will seize the important thing of the very first property in our array of objects utilizingObject.keys(rows[0])[0]. We’ll use this to maintain monitor of the kind when switching between orders.filter. We’ll want a perform for filtering outcomes. This must be handed to theonChangeoccasion on the<enter>ingredient. Observe thatReact.ChangeEventis a generic and might settle for the kind of HTML ingredient that triggered the change.kind. Similar to thefilterperform, it will should be hooked up to theonChangeoccasion, however this time, on the<choose>ingredient. It is going to settle for two parameters:
worth. It could take keys of our information object. We will specify the sort utilizing thekeyofkey phrase. It implies thatworthmay be one amongid,title,firm,energetic, ornation.order. The order of the kind, bothascordesc.
updateOrder. Lastly, we additionally want a perform for updating the order. This will probably be triggered on button click on.Observe that we use the identical logic we did for the <th> components for dynamically producing the choices for the <choose>. We will additionally reuse the capitalize utility perform to format the choices.
Styling controls
Let’s type the controls earlier than transferring ahead. This may be performed with only a handful of CSS guidelines. Prolong desk.css with the next:
.controls {
  show: flex;
}

enter,
choose {
  flex: 1;
  padding: 5px 10px;
  border: 0;
}

button {
  background: #2f2f2f;
  coloration: #FFF;
  border: 0;
  cursor: pointer;
  padding: 5px 10px;
}
This may be sure that inputs are aligned subsequent to one another. Through the use of flex: 1 on the <enter> and <choose> components, we will make them take up an equal quantity of width from the obtainable house. The <button> will take up as a lot house as wanted for its textual content.
Filtering the Desk
Now that we’ve got the controls in place, let’s take a look at implementing the performance. For filtering the desk primarily based on any subject, we’ll have to observe this logic:
const rows = [
  {
    id: 0,
    name: 'Jaime Wallace'
  },
  { ... }
]


setRows([ ...rows ].filter(row => { ... }))


Object.values(row) -> [0, 'Jaime Wallace']


[0, 'Jaime Wallace'].be part of('') -> '0Jaime Wallace'


'0Jaime Wallace'.toLowerCase() -> '0jaime wallace'


'0jaime wallace'.contains(worth) -> true / false
With all the things mixed, we will create the return worth for the filter primarily based on the above logic. This leaves us with the next implementation for the filter perform:
const filter = (occasion: React.ChangeEvent<HTMLInputElement>) => {
  const worth = occasion.goal.worth

  if (worth) {
    setRows([ ...rows.filter(row => {
      return Object.values(row)
        .join('')
        .toLowerCase()
        .includes(value)
    }) ])
  } else {
    setRows(rows)
  }
}
Observe that we additionally need to examine if the worth is current. Its absence means the <enter> subject is empty. In such circumstances, we need to reset the state and go the unfiltered rows to setRows to reset the desk.
Sorting the Desk
Now we have the filter performance, however we’re nonetheless lacking sorting. For sorting, we’ve got two separate features:
kind. The perform that can deal with sorting.updateOder. The perform that can swap the order of sorting from ascending to descending and vice versa.
Let’s begin with the kind perform first. At any time when the <choose> modifications, the kind perform will probably be known as. We need to use the worth of the <choose> ingredient to determine which key to make use of for sorting. For this, we will use a easy kind methodology and bracket notation to dynamically evaluate object keys:
const kind = (worth: keyof Information[0], order: string) => {
  const returnValue = order === 'desc' ? 1 : -1

  setSortKey(worth)
  setRows([ ...sortedRows.sort((a, b) => {
    return a[value] > b[value]
      ? returnValue * -1
      : returnValue
  }) ])
}
Let’s undergo the perform from prime to backside to raised perceive the implementation.
returnValue. Primarily based on theorderstate, we wish the return worth to be both 1 or -1. This helps us outline the kind order (1 for descending and -1 for ascending).setSortKey. Theworthhanded to the perform is the worth of the<choose>ingredient. We need to document this worth in our state (sortKey), which we will do by calling thesetSortKeyupdater perform.setRows. The precise sorting occurs on this name. Utilizing bracket notation, we will evaluatea[value]withb[value]and return both -1 or 1.
Let’s take the next for instance:
const rows = [{ id: 0 }, { id: 1 }]
const worth = 'id'


rows.kind((a, b) => a[value] > b[value] ? -1 : 1)


rows.kind((a, b) => a[value] > b[value] ? 1 : -1)
Switching between kind orders
To replace the kind order, we simply have to replace the order state at any time when the button is clicked. We will obtain this with the next performance:
const updateOrder = () => {
  const updatedOrder = order === 'asc' ? 'desc' : 'asc'

  setOrder(updatedOrder)
  kind(sortKey as keyof Information[0], updatedOrder)
}
It’ll set the order to its reverse on every click on. Observe that after we replace the order state utilizing setOrder, we additionally have to name the kind perform to resort the desk primarily based on the up to date order. To deduce the proper sort for the sortKey variable, we will reference the keys of the Information sort utilizing typecasting: as keyof Information[0]. Because the second parameter, we additionally have to go the up to date order.
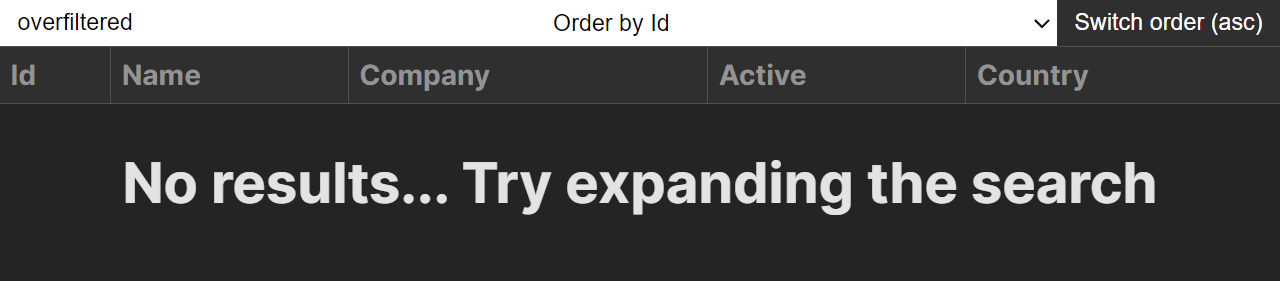
Dealing with Overfiltering
To finish this venture, let’s add some indication for an overfiltered state. We solely need to present an overfiltered state if there are not any outcomes. This may be simply performed by checking the size of our sortedRows state. After the <desk> ingredient, add the next:
return (
  <>
    <div className="controls">...</div>
    <desk>...</desk>
    {!sortedRows.size && (
      <h1>No outcomes... Attempt increasing the search</h1>
    )}
  </>
)
Conclusion
In conclusion, constructing a sortable and filterable desk in React doesn’t should be sophisticated. With array strategies and performance chaining, utilizing the best performance, we will create concise and exact features for dealing with these duties. With all the things included, we managed to suit the whole logic into lower than 100 traces of code.
As seen at the start of this tutorial, the whole venture is accessible in a single piece on GitHub. Thanks for studying via; joyful coding!