
This tutorial explains the advantages of operating Node.js purposes in Docker containers and learn how to create a sensible improvement workflow.
Node.js permits you to create quick and scalable net apps utilizing JavaScript on the server in addition to on the consumer. Your app might run completely in your improvement machine, however are you able to be sure it’ll run in your colleague’s units or manufacturing servers?
Think about these eventualities:
- Chances are you’ll be utilizing macOS when others use Home windows and the server runs Linux.
- You may have Node.js 20 put in, however others use a variety of runtime variations.
- You’re utilizing dependencies similar to databases, which have variations or will not be accessible on different platforms.
- Are you positive your new code can’t do something harmful on one other working system (OS)?
Docker Delivers
Docker helps to unravel these “however it works on my machine” points listed above. Moderately than putting in an utility domestically, you run it in a light-weight remoted digital machine-like atmosphere generally known as a container.
![]()
An actual digital machine emulates PC {hardware} so you’ll be able to set up an OS. Docker emulates an OS so you’ll be able to set up purposes. It’s typical to put in one app per Linux-based container and join them through a digital community to allow them to talk on HTTP ports.
The benefits:
- Your Docker setup can both emulate a manufacturing Linux server or you’ll be able to deploy utilizing containers.
- You may obtain, set up, and configure dependencies in minutes.
- Your containerized app runs identically throughout all units.
- It’s safer. Your app may trash a container’s OS, however it received’t have an effect on your PC and you may restart afresh in seconds.
With Docker, there’s no want to put in Node.js in your PC or use a runtime administration choice similar to nvm.
Your First Script
Set up Docker Desktop on Home windows, macOS, or Linux then create a small script named model.js with the next code:
console.log(`Node.js model: ${ course of.model }`);
You probably have Node.js put in domestically, attempt operating the script. You’ll see the output similar to this if you happen to had model 18 put in:
$ node model.js
Node.js model: v18.18.2
Now you can run the identical script inside a Docker container. The command under makes use of the latest long-term assist (LTS) model of Node.js. cd into the script’s listing and run it on macOS or Linux:
$ docker run --rm --name model
  -v $PWD:/dwelling/node/app
  -w /dwelling/node/app
  node:lts-alpine model.js

Node.js model: v20.9.0
Home windows Powershell customers can use an analogous command with {} brackets round PWD:
> docker run --rm --name model -v ${PWD}:/dwelling/node/app -w /dwelling/node/app node:lts-alpine model.js

Node.js model: v20.9.0
The primary run might take a minute or two to execute as Docker downloads dependencies. Subsequent runs are instantaneous.
Let’s attempt a distinct model of Node — similar to the most recent launch of model 21. On macOS or Linux:
$ docker run --rm --name model
  -v $PWD:/dwelling/node/app
  -w /dwelling/node/app
  node:21-alpine model.js

Node.js model: v21.1.0
On Home windows Powershell:
> docker run --rm --name model -v ${PWD}:/dwelling/node/app -w /dwelling/node/app node:21-alpine model.js

Node.js model: v21.1.0
Keep in mind the script is operating inside a Linux container which has a particular model of Node.js put in.
Argument clarification
For the curious, the command arguments are:
-
docker runbegins a brand new container from an picture — extra about that under. -
--rmremoves the container when it terminates. It’s not essential to retain containers except you have got good cause to restart them once more. -
--name modelassigns a reputation to the container for less complicated administration. -
-v $PWD:/dwelling/node/app(or-v ${PWD}:/dwelling/node/app) bind mounts a quantity. On this case, the present instantly on the host PC is mounted contained in the container at/dwelling/node/app. -
-w /dwelling/node/appunits the Node.js working listing. -
node:lts-alpineis the picture — on this case, the LTS model of Node.js operating in Alpine Linux. The picture comprises the OS and information required to run an utility. Consider it as a disk snapshot. You can begin any variety of containers from the identical picture: all of them reference the identical set of information so every container requires minimal assets. -
model.jsis the command to execute (from contained in the working listing).
Docker photos can be found from Docker Hub and so they’re accessible for purposes and runtimes together with Node.js. Photos are sometimes accessible in a number of variations recognized with a tag similar to :lts-alpine, 20-bullseye-slim, or simply newest.
Word that Alpine is a tiny Linux distribution with a base picture measurement of round 5MB. It doesn’t include many libraries, however it’s ok for easy tasks similar to these on this tutorial.
Operating Complicated Functions
The model.js script above is easy and comprises no dependencies or construct steps. Most Node.js purposes use npm to put in and handle modules in a node_modules listing. You may’t use the command above as a result of:
- You may’t run
npmon the host PC (chances are you’ll not have the Node.js or the right model put in). - Some modules require platform particular binaries. You may’t set up a Home windows binary on the host PC and anticipate it to run in a Linux container.
The answer is to create your individual Docker picture containing:
- an applicable model of the Node.js runtime
- an put in model of your app with all required modules
The next demonstration builds a easy Node.js app utilizing the Specific.js framework. Create a brand new listing named easy and add a bundle.json file with the next content material:
{
  "identify": "easy",
  "model": "1.0.0",
  "description": "easy Node.js and Docker instance",
  "sort": "module",
  "primary": "index.js",
  "scripts": {
    "debug": "node --watch --inspect=0.0.0.0:9229 index.js",
    "begin": "node index.js"
  },
  "license": "MIT",
  "dependencies": {
    "categorical": "^4.18.2"
  }
}
Add an index.js file with JavaScript code:
import categorical from 'categorical';


const cfg = ;


const app = categorical();


app.get('/:identify?', (req, res) => {
  res.ship(`Hi there $!`);
});


app.pay attention(cfg.port, () => {
  console.log(`server listening at http://localhost:${ cfg.port }`);
});
Don’t try to put in dependencies or run this app on the host PC!
Create a file named Dockerfile with the next content material:
# base Node.js LTS picture
FROM node:lts-alpine

# outline atmosphere variables
ENV HOME=/dwelling/node/app
ENV NODE_ENV=manufacturing
ENV NODE_PORT=3000

# create utility folder and assign rights to the node consumer
RUN mkdir -p $HOME && chown -R node:node $HOME

# set the working listing
WORKDIR $HOME

# set the energetic consumer
USER node

# copy bundle.json from the host
COPY --chown=node:node bundle.json $HOME/

# set up utility modules
RUN npm set up && npm cache clear --drive

# copy remaining information
COPY --chown=node:node . .

# expose port on the host
EXPOSE $NODE_PORT

# utility launch command
CMD [ "node", "./index.js" ]
This defines the steps required to put in and execute your app. Word that bundle.json is copied to the picture, then npm set up is run earlier than copying the remaining information. That is extra environment friendly than copying all information directly, as a result of Docker creates a picture layer at each command. In case your utility information (index.js) change, Docker want solely run the ultimate three steps; it doesn’t have to npm set up once more.
Optionally, you’ll be able to add a .dockerignore file. It’s much like .gitignore and stops pointless information being copied into the picture by COPY . .. For instance:
Dockerfile

.git
.gitignore

.vscode
node_modules
README.md
Construct a Docker picture named easy by coming into the next command (be aware the . interval on the finish — which denotes you’re utilizing information within the present listing):
$ docker picture construct -t easy .
The picture ought to construct inside just a few seconds if the node:lts-alpine Docker picture used above hasn’t been deleted out of your system.
Assuming the construct is profitable, begin a container out of your picture:
$ docker run -it --rm --name easy -p 3000:3000 easy

server listening at http://localhost:3000
The -p 3000:3000 publishes or exposes a <host-port> to a <container-port> so port 3000 in your host PC routes to port 3000 contained in the container.
Open a browser and enter the URL http://localhost:3000/ to see “Hi there World!”
Strive including names to the URL — similar to http://localhost:3000/Craig — to see different messages.
Lastly, cease your app operating by clicking the cease icon within the Containers tab of Docker Desktop, or enter the next command in one other terminal window:
docker container cease easy
A Higher Docker Growth Workflow
The method above has some irritating flaws:
-
Any change to your code (in
index.js) requires you to cease the container, rebuild the picture, restart the container, and retest. -
You may’t connect a Node.js debugger such because the one accessible in VS Code.
Docker can enhance your improvement workflow by retaining the present, production-level picture, however operating a container with overrides as a way to do the next:
-
Set atmosphere variables similar to
NODE_ENVtoimprovement. -
Mount the native listing into the container.
-
Begin the app with
npm run debug. This runsnode --watch --inspect=0.0.0.0:9229 index.js, which restarts the app when information change (new in Node.js 18) and begins the debugger with requests permitted from exterior the container. -
Exposes app port 3000 and debugger port 9229 to the host.
You are able to do this with one lengthy docker run command, however I want to make use of Docker Compose. It’s put in with Docker Desktop and is usually used to start out a couple of container. Create a brand new file named docker-compse.yml with the next content material:
model: '3'

companies:

  easy:
    atmosphere:
      - NODE_ENV=improvement
    construct:
      context: ./
      dockerfile: Dockerfile
    container_name: easy
    volumes:
      - ./:/dwelling/node/app
    ports:
      - "3000:3000"
      - "9229:9229"
    command: /bin/sh -c 'npm set up && npm run debug'
Begin your app operating in debug mode with:
$ docker compose up

[+] Constructing 0.0s
[+] Operating 2/2
 ✔ Community simple_default  Created
 ✔ Container easy        Created
Attaching to easy
easy  |
easy  | updated, audited 63 packages in 481ms
easy  |
easy  | > easy@1.0.0 debug
easy  | > node --watch --inspect=0.0.0.0:9229 index.js
easy  |
easy  | Debugger listening on ws://0.0.0.0:9229/de201ceb-5d00-1234-8692-8916f5969cba
easy  | For assist, see: https://nodejs.org/en/docs/inspector
easy  | server listening at http://localhost:3000
Word that older variations of Docker Compose are Python scripts run utilizing docker-compose. Newer variations have Compose performance built-in into the primary executable, so it’s run with docker compose.
Reside utility restarts
Open index.js, make a change (such because the string on line 14), and save the file to see the appliance routinely restart:
easy  | Restarting 'index.js'
easy  | Debugger listening on ws://0.0.0.0:9229/acd16665-1399-4dbc-881a-8855ddf9d34c
easy  | For assist, see: https://nodejs.org/en/docs/inspector
easy  | server listening at http://localhost:3000
Open or refresh your browser at https://localhost:3000/ to view the replace.
Debug with VS Code
Open the VS Code Run and Debug panel and click on create a launch.json file.
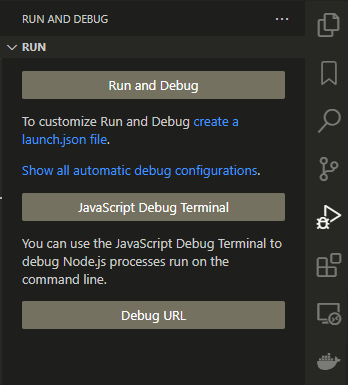
Select Node.js within the dropdown and a .vscode/launch.json file is created and opened within the editor. Add the next code which attaches the debugger to the operating container:
{


  "model": "0.2.0",
  "configurations": [
    {
      "type": "node",
      "request": "attach",
      "name": "Attach to Container",
      "address": "localhost",
      "port": 9229,
      "localRoot": "${workspaceFolder}",
      "remoteRoot": "/home/node/app",
      "skipFiles": [
        "<node_internals>/**"
      ]
    }
  ]
}
Save the file then click on Connect to Container on the high of the Debug pane to start out debugging.

A debugging toolbar seems. Change to index.js and add a breakpoint to line 14 by clicking the gutter to point out a crimson dot.
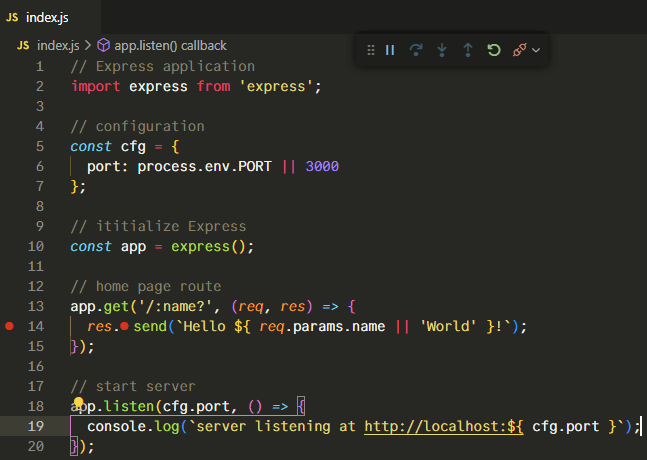
Refresh https://localhost:3000/ in your browser and VS Code will halt execution on the breakpoint and present the state of all utility variables. Click on an icon on the debugging toolbar to proceed operating, step by the code, or disconnect the debugger.
Cease the container
Cease the operating container by opening one other terminal. cd to the appliance listing, and enter:
docker compose down
Abstract
Whereas Docker requires some preliminary set-up time, the long-term advantages of strong, distributable code greater than outweigh the hassle. Docker turns into invaluable if you add additional dependencies similar to databases.
This tutorial explains the fundamentals of operating Node.js apps in Docker containers. To delve additional, contemplate these SitePoint assets: