
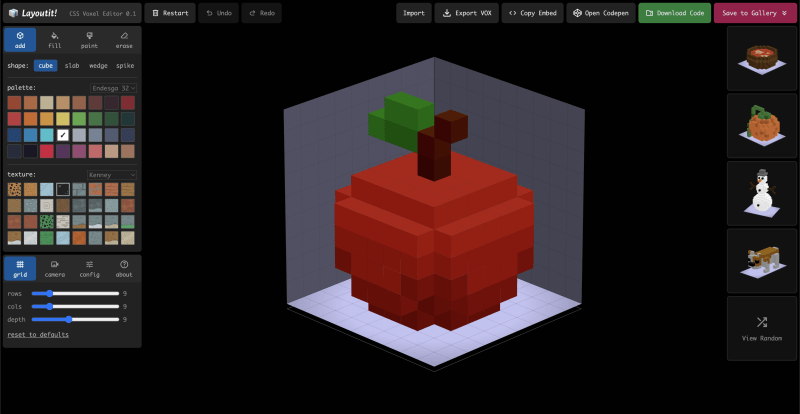
Agustin Capeletto has created a spread of superior instruments at LayoutIt!, together with the CSS Voxel Editor, which showcases the facility of pure CSS for 3D rendering. Many within the frontend neighborhood are already acquainted with his work, and if you happen to haven’t explored it but, now’s the right time. On this article, Agustin takes us behind the scenes of his newest mission, sharing how stacked grids and transforms come collectively to create a totally addressable 3D house—utilizing nothing however CSS.
Remodel and perspective are two of essentially the most highly effective CSS properties: they allow us to break away from the 2D realm and step into an entire new dimension. And when mixed with stacked grids and their areas, they kind the muse for a totally addressable 3D house (full with X, Y, and Z coordinates).
On this article, we’ll dive deep into the method that permits us to construct a voxel rendering engine utilizing nothing however pure CSS. Wish to see it in motion? Try the newly launched CSS Voxel Editor at https://voxels.layoutit.com!
Gaining Perspective
Step one is to create a way of depth in our scene. We do that utilizing the attitude property on a dad or mum component, which controls how little one parts are seen in 3D house. The worth represents the gap from the viewer: a better quantity makes the impact delicate, whereas a decrease one creates a extra dramatic perspective. For our voxel scene, we’ll use a price of 8000px to realize a virtually isometric look with minimal distortion. Whereas it’s doable to omit perspective totally, we discovered that this led to worse efficiency, seemingly as a result of lack of {hardware} acceleration.
<div class="scene">
  <div class="ground">
    <!-- cubes and grid layers will go right here -->
  </div>
</div>
.scene {
perspective: 8000px;
}
.scene * {
transform-style: preserve-3d;
}
.ground {
rework: rotateX(65deg) rotate(45deg);
width: calc(16 * 50px);
top: calc(16 * 50px);
}The transform-style: preserve-3d property utilized to all scene kids is what retains our scene actually three-dimensional. It tells the browser to keep up the 3D place of kid parts, as an alternative of flattening them into their dad or mum’s 2D aircraft. With out it, our cubes and layers would collapse right into a single floor, breaking the impact.
The .ground component is the place the isometric transformation occurs (rotateX(65deg) rotate(45deg)). Its dimensions are calculated by multiplying the grid dimension by the unit dimension. This units the general constraints of our scene and acts because the anchor from which all grid layers are stacked alongside the Z-axis.
HTML Cuboids
Now that our 3D house is about up, we are able to begin constructing the shapes that can dwell inside it. Of their easiest kind, voxels are like 3D pixels, every one representing a place in a tridimensional grid alongside the X, Y, and Z axes. You would possibly acknowledge them from video games like Minecraft, the place an entire world is constructed from blocky parts.
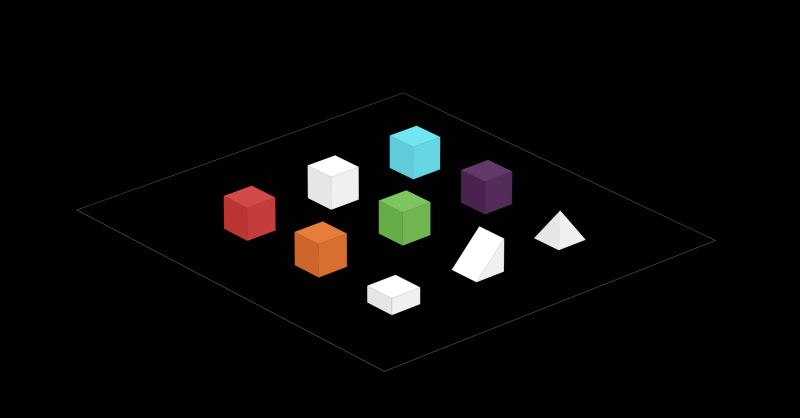
In our voxel scene, these HTML shapes will act because the smallest constructing blocks. We are going to deal with our dice element which is able to encompass a container and 6 remodeled faces. All shapes comply with a unit dimension of 50px, which defines the scale of the voxel, but additionally determines the stacking distance between grid layers alongside the Z-axis.
<div class="dice">
  <div class="face high"></div>
  <div class="face frontRight"></div>
  <div class="face frontLeft"></div>
  <div class="face backLeft"></div>
  <div class="face backRight"></div>
  <div class="face backside"></div>
</div>
.dice {
place: relative;
rework: translateZ(25px);
}
.face {
place: absolute;
background: #fff;
inset: 0;
}
.face.high { rework: translateZ(25px); }
.face.backside { rework: translateZ(-25px); }
.face.frontRight { rework: rotateY(90deg) translateZ(25px); }
.face.frontLeft { rework: rotateX(90deg) translateZ(-25px); }
.face.backLeft { rework: rotateY(90deg) translateZ(-25px); }
.face.backRight { rework: rotateX(90deg) translateZ(25px); }Every face is first rotated to match its orientation in 3D house after which is pushed outward by 25px alongside its native Z-axis. That is half the dice’s dimension, guaranteeing that every face is accurately positioned to kind a whole dice centered on its origin. Lastly, the complete dice is translated alongside the Z-axis by 25px to align its base with the grid.
As a last tweak to spice up the 3D impact, we are able to apply a pseudo-element overlay to every dice face: the highest stays untouched, whereas progressively darker shades are utilized to the edges to simulate lighting. Though elective, this improves the perceived depth of the cubes.
.face:after {
  content material: "";
  show: block;
  place: absolute;
  inset: 0;
}
.face.frontRight:after { background: rgba(0, 0, 0, 0.1); }
.face.frontLeft:after { background: rgba(0, 0, 0, 0.15); }
.face.backLeft:after { background: rgba(0, 0, 0, 0.2); }
.face.backRight:after { background: rgba(0, 0, 0, 0.25); }Crafting a Coordinate System
With our 3D house arrange and our primary shapes parts prepared, we are able to begin putting voxels. To do that, we’ll use CSS Grid as our X/Y coordinate system after which stack a number of grid layers alongside the Z-axis utilizing translateZ.
On this instance, every layer grid container is a 16×16 structure the place each cell represents a novel (x, y) coordinate at that depth degree (z). We are able to use the grid-area property to place a dice inside any cell: as an illustration, grid-area: 8 / 5 / 9 / 6 locations a dice in row 8, column 5 of that grid layer.
<div class="scene">
  <div class="ground">
    <div class="z" type="rework: translateZ(0px);"></div>
    <div class="z" type="rework: translateZ(50px);">
      <div class="dice" type="grid-area: 8 / 5 / 9 / 6;">
        <!-- dice faces -->
      </div>
    </div>
    <div class="z" type="rework: translateZ(100px);"></div>
    <div class="z" type="rework: translateZ(150px);"></div>
    <div class="z" type="rework: translateZ(200px);">
      <div class="dice" type="grid-area: 4 / 3 / 5 / 4;">
        <!-- dice faces -->
      </div>
    </div>
  </div>
</div>
.z {
show: grid;
grid-template-columns: repeat(16, 50px);
grid-template-rows: repeat(16, 50px);
place: absolute;
inset: 0;
}Discover how every layer is translated alongside the Z-axis in 50px increments, matching our voxel unit dimension. This stacking creates a totally addressable 3D house: the CSS grid defines positions alongside the X and Y axes for every layer, whereas the translateZ values assign depth (the Z coordinate) to every degree. Collectively, these strategies allow us to place voxels in a whole 3D coordinate system.
You’ll be able to see a whole instance of a voxel scene on this Codepen.
Optimizing for Efficiency
Rendering a 3D scene with numerous HTML voxels can shortly develop into performance-heavy. To maintain the DOM dimension manageable and guarantee clean rendering, we are able to apply a number of optimizations:
- Face culling: Solely render the seen faces of every voxel. Relying on the digital camera angle and the neighboring voxels, many faces will likely be hidden from view and will be omitted from the DOM. Normally, solely three faces of the dice will likely be seen at a time, so we are able to use this to our benefit.
- Voxel visibility: If a voxel is totally surrounded by others, it will likely be invisible from any angle. These inner voxels will be eliminated totally so solely the outer form of the voxel mannequin is current.
- GPU load: when doable we must always keep away from utilizing opacity, gradients, and transparency, as they’ll result in elevated GPU workload. Stable colours for easy shading are extra environment friendly.
Subsequent Steps
For Layoutit Voxel Editor, our subsequent focus is on open sourcing the code, boosting efficiency, and doubtlessly evolving it right into a devoted library. The long-term aim is to import complicated scenes that scale easily, dealing with bigger voxel counts with out slowing down. One path to realize is by merging adjoining cells throughout all axes, lowering the variety of parts that should be rendered.
Past the editor, this stacked grid method can be utilized to generate recreation property, create hero illustrations, or discover different interactive visible experiences. The chances are nonetheless being uncovered!