
On this article, we’ll stroll by coding this grid interplay, initially conceptualized by Amin Ankward, a artistic designer, former colleague, and now good friend (be happy to comply with him on X 👀).
Earlier than We Begin
We’ll be utilizing Three.js as our WebGL library, and that’s it—no GSAP as we speak. As a substitute, I’d like to indicate you find out how to create animations with out counting on any exterior animation libraries.
I’ve ready a repository so that you can clone if you wish to comply with together with this tutorial. It options primary Three.js scene initialization, a loader, and a few utility features. All of the recordsdata we’ll be utilizing are already created, so you may focus solely on the animations. You possibly can entry it right here.
Right here’s a fast file roundup should you’re following together with my starter:
- MainThree.js – Initializes the Three.js scene, renderer, digital camera, and body loop.
- ExtendedObject3D – An implementation of Object3D that features resize dealing with and an replace operate.
- Grid.js – A category implementing ExtendedObject3D, the place we’ll initialize and handle our playing cards.
- Card.js – A category implementing ExtendedObject3D as properly, representing the playing cards displayed on display.
- AssetsManager.js – The file the place we’ll load, retailer, and retrieve our belongings.
Grid Setup
Let’s begin by organising the grid, defining the variety of rows and columns we would like. In my instance, I’ve determined to position a card each 100 pixels on the display, however be happy to regulate it as wanted.
When you’re following together with my starter, head to scripts/parts/Grid.js and add the next strains:
// scripts/parts/Grid.js

export class Grid extends ExtendedObject3D  1;
  // ...

  resize()  1;
Alright, it’s possible you’ll be questioning two issues:
- Why use static? These variables should be distinctive, and we’ll want them in different recordsdata later. Making them static permits entry from wherever within the venture with out requiring entry to the Grid occasion.
- What is that this “| 1” and what does it do? It’s known as a “Bitwise OR operator.” In our case, it can all the time flip our consequence into an odd quantity. Why would we would like that? For aesthetic functions, having an odd variety of columns and rows permits one to be centered on the display.
Now that we’ve our grid dimensions, let’s create our playing cards:
// scripts/parts/Grid.js

import { Card } from './Card';

export class Grid extends ExtendedObject3D {
  // ...

  constructor() {
    tremendous();

    this.#_createCards();
  }

  #_createCards() {
    for(let i = 0; i < Grid.COLUMNS; i++) {
      for(let j = 0; j < Grid.ROWS; j++) {
        const card = new Card(i, j);
        this.add(card);
      }
    }
  }

  // ...
}
Nothing fancy right here; we’re merely looping by every column and row to position a card at each location. When you’re questioning what this.add() does, we inherit it from the Object3D class. It provides the cardboard as a toddler of the grid in order that it may be displayed on the display (it’s regular if the whole lot remains to be clean in the intervening time).
We additionally cross i and j as parameters to Card. We’ll use these indexes to calculate its place.
Card Initialization
Alright, our display would possibly look fairly clean proper now. Let’s add these playing cards to it. Head to Card.js and insert the next code.
// scripts/parts/Card.js
import {
  Mesh,
  MeshBasicMaterial,
  PlaneGeometry,
  Vector2,
} from "three";

// ...

export class Card extends ExtendedObject3D {
  static Geometry = new PlaneGeometry(1, 1);

  gridPosition = new Vector2();
  mesh;

  constructor(i, j) {
    tremendous();

    this.gridPosition.set(i, j);
    this.#_createMesh();
  }

  #_createMesh() {
    const r = Math.ceil(Math.random() * 255);
    const g = Math.ceil(Math.random() * 255);
    const b = Math.ceil(Math.random() * 255);

    this.mesh = new Mesh(
      Card.Geometry,
      new MeshBasicMaterial({ shade: new Shade(`rgb(${r}, ${g}, ${b})`) })
    );

    this.add(this.mesh);
  }

	// ...
}
Efficiency tip: We’re creating the geometry as static as a result of we’ll have many playing cards, all the similar dimension. Due to this fact, we solely have to create one geometry as an alternative of making one for every card.
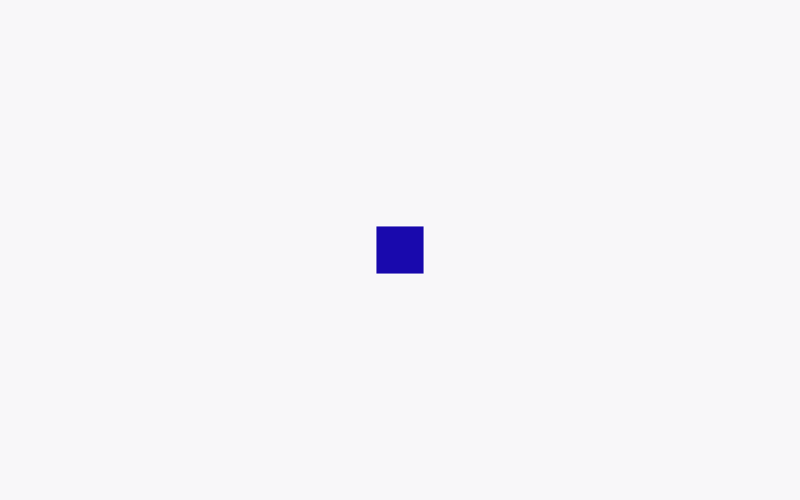
You need to now see a randomly coloured rectangle within the heart of your display, measuring precisely half the width and half the peak of the display.

Okay, that’s cool, however it’s not precisely what we would like. Why is it rectangular after we’ve set each the width and top to 1 in our PlaneGeometry?
When you already know why it behaves this fashion, be happy to skip forward. Nonetheless, should you’re questioning, let’s shortly evaluation earlier than we proceed. This may enable you to higher perceive the calculations we’ll carry out later.
For these nonetheless with us, open the MainThree.js file. You need to see that we’re utilizing an OrthographicCamera.
// scripts/MainThree.js
this.#_Camera = new OrthographicCamera(
	-1, // left
	1, // proper
	1, // prime
	-1 // backside
);
The parameters we’re setting right here correspond to our display coordinates. Let’s check out the diagram under:
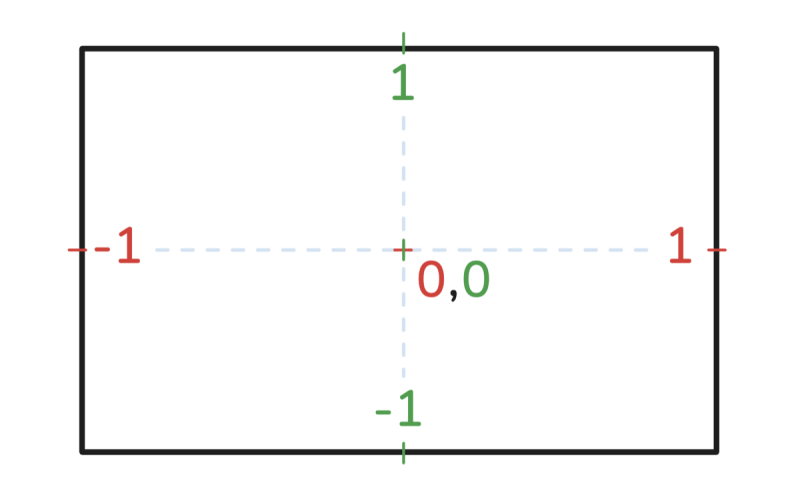
The black rectangle represents your display. No matter its dimensions, the coordinates stay the identical: (-1, 1) marks the top-left nook, (1, -1) marks the bottom-right nook, and (0, 0) represents the middle.
In easy phrases, which means that each the width and top will all the time span a size of two, even when their pixel dimensions differ considerably. That’s why our aircraft seems rectangular proper now. To make it square-shaped, we have to scale it in line with our display’s side ratio.
// scripts/parts/Card.js

import { Grid } from './Grid';
import { MainThree } from "../MainThree";

// ...

export class Card extends ExtendedObject3D {
  static #_DefaultScale = new Vector3();

  // ...

  #_createMesh() {
    // ...

    this.mesh.scale.copy(Card.#_DefaultScale);

    this.add(this.mesh);
  }

  static SetScale() {
    const side = window.innerWidth / window.innerHeight;
    const viewWidth = MainThree.Digital camera.proper - MainThree.Digital camera.left;

    const columnWidth = viewWidth / Grid.COLUMNS;

    this.#_DefaultScale.x = columnWidth;
    this.#_DefaultScale.y = columnWidth * side;
  }

  resize(occasion) {
    this.mesh.scale.copy(Card.#_DefaultScale);
  }

  // ...
}
To find out the width of 1 column, we take the size of our digital camera view and divide it by the variety of columns. Word that we’re utilizing a static methodology right here to compute the dimensions of a card solely as soon as, quite than for every card, as they are going to all share the identical dimension.
To make this efficient, we have to name it in each the Grid constructor and its resize operate.
// scripts/parts/Grid.js
export class Grid extends ExtendedObject3D {
  // ...

  constructor() {
    tremendous();

    Card.SetScale();
    this.#_createCards();
  }

	// ...

  resize()  1;

    Card.SetScale();


  // ...
}
You need to have one thing like this proper now: your aircraft, however squared. It may appear a bit lonely, although, so let’s add its buddies to the grid.
Grid Positioning
You possibly can strive it by yourself first if you wish to problem your self a bit. When you’re undecided find out how to obtain it, right here’s the logic:
As I discussed earlier than, our coordinates are normalized between -1 and 1. To put them accurately, you want to remap the indexes we offered within the parameters in order that they correspond to your grid. To make clear, if in case you have 16 columns, an index of 0 ought to return -1, whereas an index of 15 ought to return 1.
When you’re caught, right here’s the answer I got here up with:
// scripts/parts/Card.js
import { mapLinear } from "three/src/math/MathUtils.js";
// ...

export class Card extends ExtendedObject3D {
  // ...
  #_targetPosition = new Vector3()

  constructor(i, j) {
    tremendous();

    this.gridPosition.set(i, j);

    this.#_createMesh();
    this.#_setTargetPosition();
  }

  // ...

  #_setTargetPosition() {
    let { x, y } = this.gridPosition;

    const cardWidth = Card.#_DefaultScale.x * 0.5;
    const cardHeight = Card.#_DefaultScale.y * 0.5;

    x = mapLinear(x, 0, Grid.COLUMNS, MainThree.Digital camera.left, MainThree.Digital camera.proper) + cardWidth;
    y = mapLinear(y, 0, Grid.ROWS, MainThree.Digital camera.backside, MainThree.Digital camera.prime) + cardHeight;

    this.place.set(x,y, 0)
  }
}
Your display ought to now seem like this:
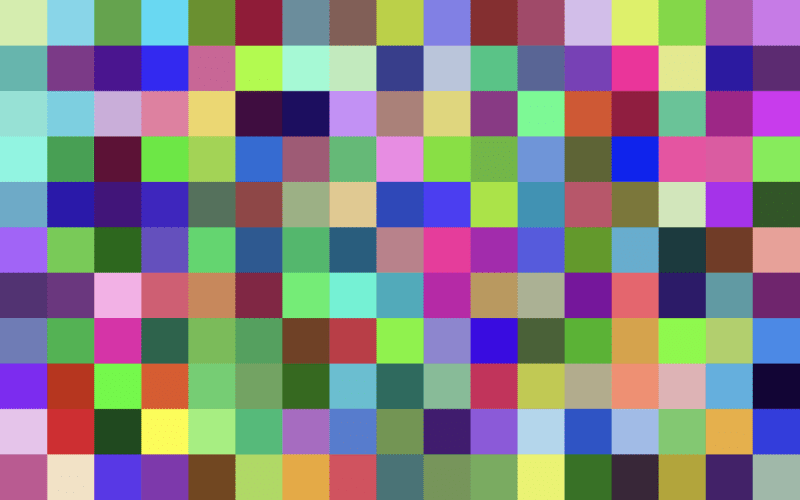
Let’s scale back their dimension barely to create extra space.
// scripts/parts/Card.js
export class Card extends ExtendedObject3D {
  // ...

  #_defaultScale = new Vector3().setScalar(0.4)

  constructor() {
		this.gridPosition.set(i, j);

    this.#_createMesh();
    this.#_setTargetPosition();
    this.scale.copy(this.#_defaultScale);
  }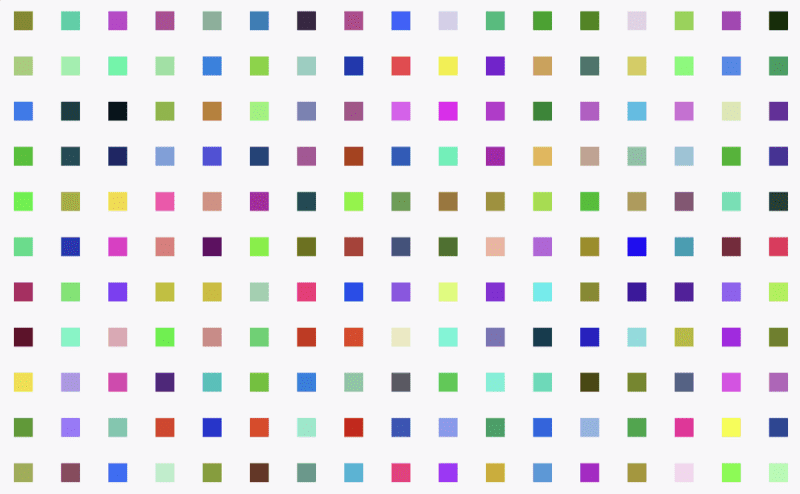
We’re beginning to have one thing fascinating!
Word that we’re not scaling our mesh this time; as an alternative, we’re scaling the
Object3Dthat accommodates it. This strategy permits us to take care of the size based mostly on the side ratio we set earlier whereas additionally scaling it down.
Don’t add the next code; it’s simply an HTML/CSS comparability that will help you higher perceive the transformation we’ve made.
<part id="GRID">
	<div class="card">
		<div class="mesh">that is our aircraft</div>
	</div>
</part>
<model>
  .card {
  	  rework: scale(0.4);
  }

  .mesh {
	  width: 10px;
	  top: 10px;
	  rework: scaleY(OurAspectRatio);
  }
</model>
Hover Interplay
To attain this, we first want to find out the gap between a card and our cursor. Let’s get the mouse place contained in the Grid.
// scripts/parts/Grid.js

export class Grid extends ExtendedObject3D {
  // ...

  static MousePosition = new Vector2();
  #_targetMousePosition = new Vector2();

  constructor() {
    tremendous();

    Card.SetScale();
    this.#_createCards();
    this.#_setListeners();
  }

  #_setListeners() {
    window.addEventListener('mousemove', this.#_updateMousePos)
    window.addEventListener('touchmove', this.#_updateMousePos)
  }

  #_updateMousePos = (occasion) => {
    const isMobile = occasion.kind === 'touchmove';

    const { clientX, clientY } = isMobile ? occasion.changedTouches[0] : occasion;

    const halfW = 0.5 * window.innerWidth;
    const halfH = 0.5 * window.innerHeight;

    // our mouse place, normalized on a [-1, 1] vary.
    const x = (clientX - halfW) / window.innerWidth * 2
    const y = -(clientY - halfH) / window.innerHeight * 2

    this.#_targetMousePosition.set(x, y)
  }

  // ...

  replace(dt) {
    this.#_lerpMousePosition(dt);
  }

  #_lerpMousePosition(dt) {
    Grid.MousePosition.lerp(
	    this.#_targetMousePosition,
	    1 - Math.pow(0.0125, dt)
    );
  }
}
When you’re unfamiliar with lerps and interested in what’s taking place within the replace() methodology right here, I extremely suggest watching this video from Freya or this one from Simon, who explains it a lot better than I might. We’ll use them loads any further, so it’s necessary to know how they work. Briefly, they provide us these easy actions with out counting on exterior animation libraries like GSAP.
We’re setting MousePosition as static right here to simply retrieve it in our Playing cards with out passing a reference to the Grid occasion. The #_targetMousePosition is used solely to interpolate our values and won’t be wanted elsewhere, so we are able to set it as personal.
Okay, now that we’ve our cursor place, let’s compute the gap within the Playing cards file.
export class Card extends ExtendedObject3D {
  static #_DefaultScale = new Vector3();
  static #_MaxScale = new Vector3();

  // ...

  #_defaultScale = new Vector3().setScalar(0.2)
  #_targetScale = new Vector3()


  static SetScale() {
    // ...

	const isPortrait = window.innerWidth < window.innerHeight;
	const scaleFactor = isPortrait ? 8 : 20

    this.#_MaxScale
      .copy(this.#_DefaultScale)
      .multiplyScalar(scaleFactor)
  }

  replace(dt) {
    this.#_updateScale(dt);
  }

  #_updateScale(dt) {
    const side = window.innerWidth / window.innerHeight;

    const distanceX = Grid.MousePosition.x - this.place.x;
    let distanceY = Grid.MousePosition.y - this.place.y;
    distanceY /= side;

    let distance = Math.pow(distanceX, 2) + Math.pow(distanceY, 2);
    distance *= 10;

    this.#_targetScale.lerpVectors(
      Card.#_DefaultScale,
      Card.#_MaxScale,
      Math.max(1 - distance, 0)
    );

    this.mesh.scale.lerp(this.#_targetScale, 1 - Math.pow(0.0002, dt));
  }
}
First, we add a #_MaxScale vector. Our card gained’t be capable of get bigger than the worth we set right here. To take action, we are able to merely copy the default scale we set earlier and multiply it by an element (be happy to regulate it as wanted).
Subsequent, we compute our distance in #_updateScale utilizing the Pythagorean theorem, then use it as our interpolation issue.
If our distance is the same as 0, our card shall be scaled to its most dimension. If the gap is the same as or better than 1, it will likely be scaled to its minimal dimension.
You possibly can regulate the radius by multiplying the gap by an element. The upper the quantity, the smaller the radius.
You need to have one thing that begins resembling our closing consequence proper now!
You would possibly discover one thing off when the playing cards overlap. That’s as a result of all of them share the identical z-position, so our renderer doesn’t know which one to render on prime. Amin ready a render that may enable you to higher visualize what we would like: the nearer the cardboard is to the mouse, the upper its z-position.
export class Card extends ExtendedObject3D {
	// ...

	#_updateScale(dt) {
    // ...
    this.place.z = -distance;
  }
}
Yep, that’s all!
Experimenting with Variables
Now, I counsel you play with among the variables: radius, variety of columns/rows, and the interpolants in our lerp’s pow(). You possibly can obtain outcomes with very totally different feels relying on what you set.
Card Shaders
Let’s do away with these colours and implement our photos by changing the fabric with a customized one.
import { CardMaterial } from "../supplies/CardMaterial";

export class Card extends ExtendedObject3D {
	// ...

	#_createMesh() {
		this.materials = new CardMaterial()

    this.mesh = new Mesh(
      Card.Geometry,
      this.materials
    );

    this.mesh.scale.copy(Card.#_DefaultScale);

    this.add(this.mesh);
  }
}
Your playing cards ought to all have turned pink if the whole lot went properly. Earlier than leaping straight into the shader, let’s describe what we would like and what we have to obtain it.
- We would like a picture → We want textures
- These photos are black and white by default. We would like them to steadily saturate based mostly on our mouse place → We want the gap
I’ve already loaded the textures for you, so that you don’t have to fret about it. You’ll solely have to retrieve them:
import { /* */ Uniform } from "three";

import { CardMaterial } from "../supplies/CardMaterial";

export class Card extends ExtendedObject3D {
	// ...
	static #_Textures = [
      AssetsId.TEXTURE_1,
      AssetsId.TEXTURE_2,
      AssetsId.TEXTURE_3,
      AssetsId.TEXTURE_4,
      AssetsId.TEXTURE_5,
      AssetsId.TEXTURE_6,
      AssetsId.TEXTURE_7,
      AssetsId.TEXTURE_8,
      AssetsId.TEXTURE_9,
      AssetsId.TEXTURE_10,
    ];

	#_createMesh() {
    const randomIndex = Math.flooring(Math.random() * Card.#_Textures.size);
    const textureId = Card.#_Textures[randomIndex];
    const texture = AssetsManager.GetAsset(textureId);

    this.materials = new CardMaterial({
      uniforms: {
        uDistance: new Uniform(0),
        uTexture: new Uniform(texture),
      }
    });
  }

  #_updateScale(dt) {
    // ...
    this.materials.uniforms.uDistance.worth = distance;
  }
}
Okay, our uniforms are arrange. Let’s get this shader now!
// scripts/supplies/CardMaterial.js

import { ShaderMaterial } from "three";

export class CardMaterial extends ShaderMaterial {
  // ...

  #_rewriteVertexShader() {
    return /* glsl */`
      various vec2 vUv;

      void principal() {
        vUv = uv;

        gl_Position = projectionMatrix * modelViewMatrix * vec4(place, 1.);
      }
    `;
  }

  #_rewriteFragmentShader() {
    return /* glsl */`
      uniform sampler2D uTexture;
      uniform float uDistance;

      various vec2 vUv;

      void principal() {
        gl_FragColor = vec4(vec3(vUv, 1.), 1.);
      }
    `;
  }
}
Nothing fancy for the second; we’re simply setting it up so we are able to entry our UVs within the fragment shader and retrieve our uniforms. Your display ought to seem like this proper now:
Now let’s show our picture and grayscale it.
// scripts/supplies/CardMaterial.js

export class CardMaterial extends ShaderMaterial {
  // ...

  #_rewriteFragmentShader() {
    return /* glsl */ `
      uniform sampler2D uTexture;
      uniform float uDistance;

      various vec2 vUv;

      vec3 getLuminance(vec3 shade) {
        vec3 luminance = vec3(0.2126, 0.7152, 0.0722);
        return vec3(dot(luminance, shade));
      }

      void principal() {
        vec4 picture = texture(uTexture, vUv);

        vec3 imageLum = getLuminance(picture.xyz);
        vec3 shade = imageLum;

        gl_FragColor = vec4(shade, 1.);
      }
    `;
  }
}
We’re including a getLuminance operate that provides us a grayscaled model of our picture. I first realized about luminance from this text written by Maxime Heckel. Principally, it represents how the human eye perceives brightness inside colours.
Now, all we’ve to do is apply the impact based mostly on our distance.
// scripts/supplies/CardMaterial.js

export class CardMaterial extends ShaderMaterial {
  // ...

  #_rewriteFragmentShader() {
    return /* glsl */ `
      uniform sampler2D uTexture;
      uniform float uDistance;

      various vec2 vUv;

      vec3 getLuminance(vec3 shade) {
        vec3 luminance = vec3(0.2126, 0.7152, 0.0722);
        return vec3(dot(luminance, shade));
      }

      void principal() {
        vec4 picture = texture(uTexture, vUv);
        float distanceFactor = min(max(uDistance, 0.), 1.);

        vec3 imageLum = getLuminance(picture.xyz);
		vec3 shade = combine(picture.xyz, imageLum, distanceFactor);

        gl_FragColor = vec4(shade, 1.);
      }
    `;
  }
}
And right here we’re!
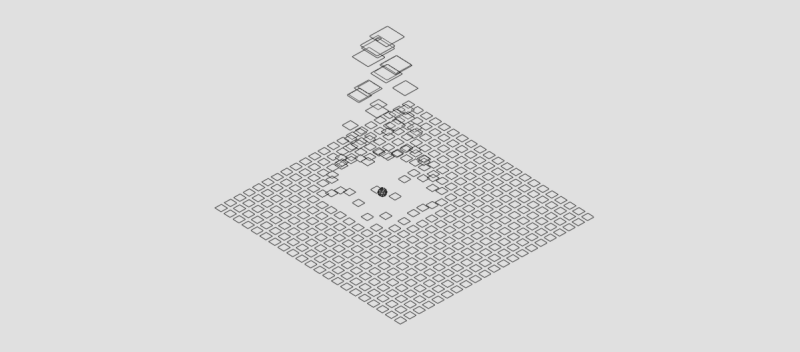
Intro Animation
Let’s put these playing cards again within the heart by commenting out the road the place we set the place, and simply retailer it in a brand new Vector3 for the second.
// scripts/parts/Card.js

export class Card extends ExtendedObject3D {
  // ...
  #_gridPosition = new Vector3();

  #_setTargetPosition() {
    // ...

	// Remark this ⬇️
	// this.place.set(x, y, 0);

    this.#_gridPosition.set(x, y, 0);
  }
The logic of the animation is fairly easy: we make our card transfer to its goal place on the x-axis first. Then, when it’s shut sufficient, we enable it to maneuver to its y place too. That is the trick for reaching that wavy look.
// scripts/parts/Card.js

export class Card extends ExtendedObject3D {
	// ...
	#_targetPosition = new Vector3();

	replace(dt) {
    this.#_updateScale(dt);
    this.#_updatePosition(dt);
  }

	#_updatePosition(dt) {
    const distanceX = Math.abs(this.#_gridPosition.x - this.place.x);

    this.#_targetPosition.set(
      this.#_gridPosition.x,
      distanceX < 0.075 ? this.#_gridPosition.y : 0,
      this.place.z
    );

    this.place.lerp(
      this.#_targetPosition,
      1 - Math.pow(0.005 / Grid.COLUMNS, dt)
    );
  }
}
And we’re accomplished!
Though this impact is already fairly cool, it will possibly nonetheless be improved:
Going Additional
- Dealing with the resize – What I might do might be create a bunch of playing cards (greater than we want) in the course of the preliminary setup and retailer them. That method, should you change to a bigger display dimension, you’ll simply have to show/rearrange them with out creating new ones every time. Simply make certain the inactive ones aren’t operating their replace features each body.
- Including border radius to playing cards – When you verify the unique put up, you’ll see that my playing cards have rounded corners. Strive implementing this by yourself.
- Enable playing cards to have photos with a side ratio aside from 1:1 within the shader – This wasn’t the main focus of the article, so I didn’t deal with instances the place our photos aren’t sq.. They might be stretched in any other case proper now.
- Finishing the intro animation – Within the unique instance, I’ve accomplished an animation the place the playing cards come from under. Attempt to reimplement this by your self; there’s a small trick concerned 👀
And that’s it! Thanks for studying right through; I hope you’ve loved this tutorial and realized one thing alongside the way in which! 🙏