
A current function add (by common demand) in Industrial Vantage is the flexibility to put in writing the machine’s guarantee info to WMI.
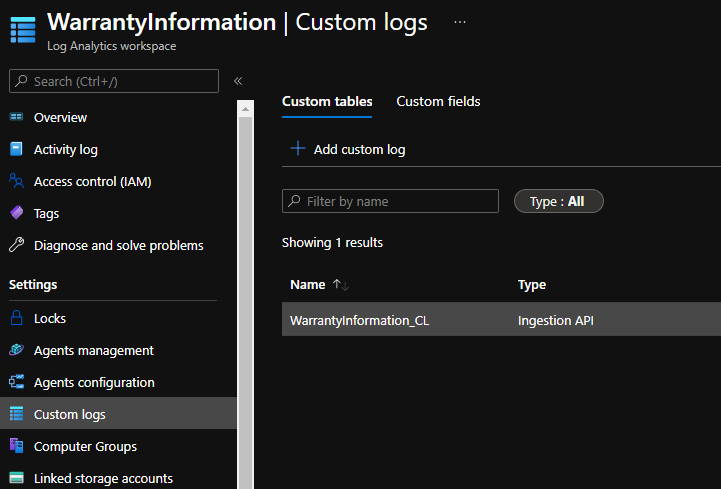
The Lenovo_WarrantyInformation WMI class situated beneath the rootLenovo Namespace is created when the “Write Guarantee Data to WMI” coverage has been enabled on the machine.
On this publish, we will stroll by how this information may be collected from Intune managed units and ingested right into a Log Analytics Workspace in Azure Monitor.
As soon as I obtained the grasp of the workflow, I believed why not try to go after guarantee info? Stepping exterior of my consolation zone, I made a decision to take this a bit additional by delving into Log Analytics and Azure Automation to automate the gathering of this information utilizing a scheduled Runbook. Thankfully, the MS docs have been extremely useful throughout my testing.
Deploy this PowerShell script to a consumer/machine group to get began
Get-CimInstance -Namespace root/Lenovo -ClassName Lenovo_WarrantyInformation | Choose-Object `
    SerialNumber, `
    Product, `
    StartDate, `
    EndDate, `
    LastUpdateTime | ConvertTo-Json

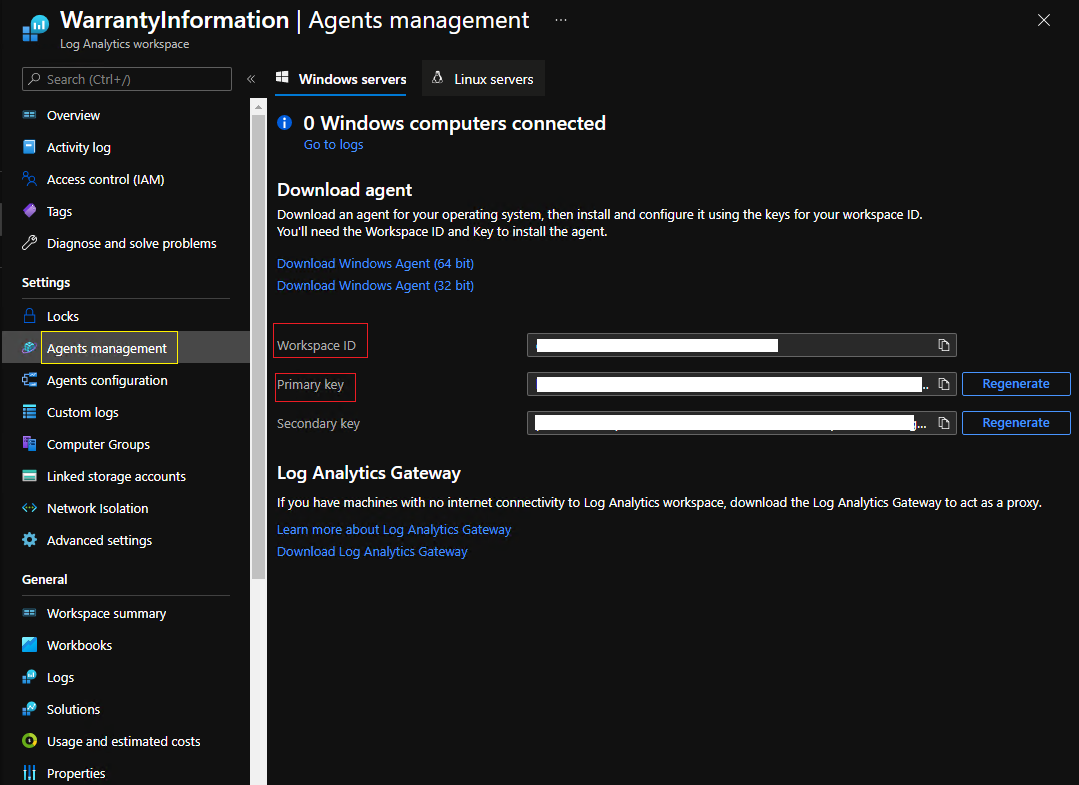
You will discover this info beneath Log Analytics workspace > Brokers administration
Prereqs:
- Azure Automation account. If you have not created one, check with the MS doc on how to do that.
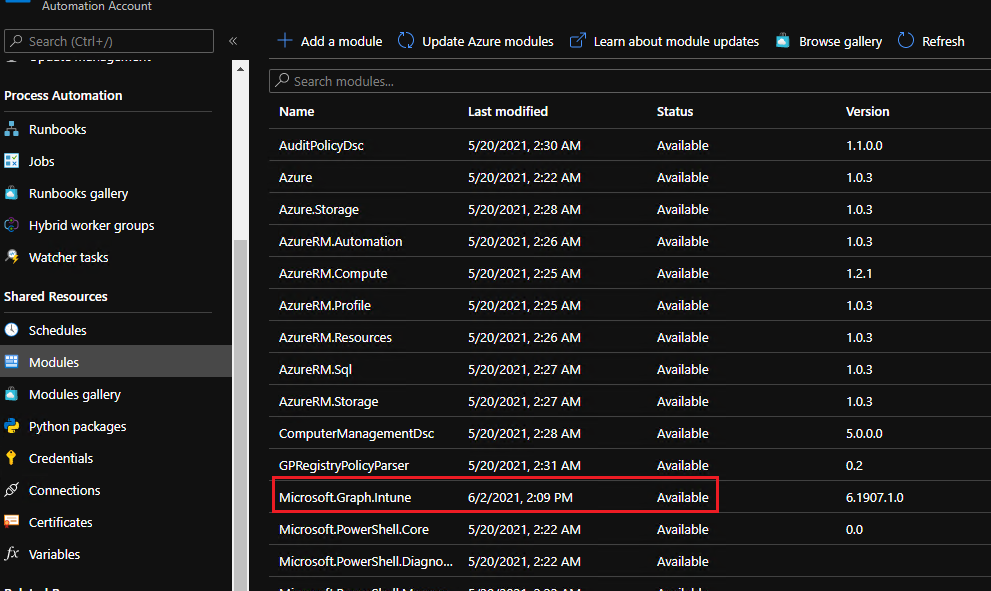
- Intune PowerShell SDK, which supplies help for the Intune API by Graph. This module will have to be imported from the PowerShell Gallery into Azure Automation earlier than continuing. This is a brief script to take action:
$ResourceGroup = '<your useful resource group>'
$AutomationAccount = '<your automation account>'

# URL to Graph bundle: https://www.powershellgallery.com/packages/Microsoft.Graph.Intune
if (!(Get-AzAutomationModule -ResourceGroupName $ResourceGroup -AutomationAccountName $AutomationAccount | The place-Object { $_.Identify -eq $ModuleName -and $_.ProvisioningState -eq 'Succeeded' })) {
    New-AzAutomationModule -Identify $ModuleName -ResourceGroupName $ResourceGroup -AutomationAccountName $AutomationAccount -ContentLinkUri 'https://www.powershellgallery.com/api/v2/bundle/Microsoft.Graph.Intune/6.1907.1.0'
}
Confirm the module’s standing reveals Out there
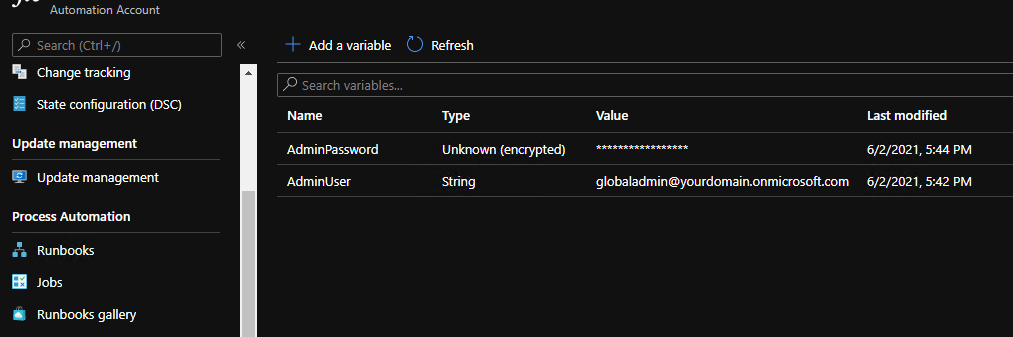
- Two Azure Automation string kind variables that may maintain an Azure consumer account/encrypted password to authenticate to Graph (make certain this account has the suitable permissions). These will likely be referred to as utilizing the Get-AutomationVariable inner cmdlets.
As soon as every part is able to go, select the Azure Automation account you wish to use and click on Runbooks and Create a runbook. Enter a reputation and select PowerShell for the runbook kind.
Copy/paste the beneath script to your runbook
<#
Set inner automation cmdlets for Graph authentication
Reference: https://docs.microsoft.com/en-us/azure/automation/shared-resources/variables?tabs=azure-powershell#internal-cmdlets-to-access-variables
#>
$AdminUser = Get-AutomationVariable -Identify 'AdminUser'
$AdminPassword = Get-AutomationVariable -Identify 'AdminPassword'
$SecureAdminPassword = ConvertTo-SecureString -String $AdminPassword -AsPlainText -Pressure
$Cred = New-Object System.Administration.Automation.PSCredential ($AdminUser, $SecureAdminPassword)

# Connect with Graph Beta API
Replace-MSGraphEnvironment -SchemaVersion 'beta'
Join-MSGraph -PSCredential $Cred | Out-Null

<#
Collect guarantee information from profitable script executions
Reference: https://techcommunity.microsoft.com/t5/device-management-in-microsoft/how-to-collect-custom-inventory-from-azure-ad-joined-devices/ba-p/2280850#.YIGt2nOrV50.hyperlinkedin
#>
$consequence = Invoke-MSGraphRequest -HttpMethod GET -Url 'deviceManagement/deviceManagementScripts/<script id>/deviceRunStates?$increase=managedDevice' | Get-MSGraphAllPages
$success = $consequence | The place-Object -Property errorCode -EQ 0
$resultMessage = $success.resultMessage
$Gadgets = $resultMessage | ConvertFrom-Json
$newjson = $Gadgets | ConvertTo-Json

<#
Beneath pattern request reference:
https://docs.microsoft.com/en-au/azure/azure-monitor/logs/data-collector-api?WT.mc_id=EM-MVP-5002871&ranMID=24542&ranEAID=je6NUbpObpQ&ranSiteID=je6NUbpObpQ-Kk7A3ox8I8XgrRn0d4uDfA&epi=je6NUbpObpQ-Kk7A3ox8I8XgrRn0d4uDfA&irgwc=1&OCID=AID2000142_aff_7593_1243925&tduid=(ir__nxnprvrvwwkfq3kekk0sohzncu2xuln0dh1bwc9k00)(7593)(1243925)(je6NUbpObpQ-Kk7A3ox8I8XgrRn0d4uDfA)()&irclickid=_nxnprvrvwwkfq3kekk0sohzncu2xuln0dh1bwc9k00#sample-requests
#>

# Exchange along with your Workspace ID
$CustomerId = "xxxxxxxx-xxxx-xxxx-xxxx-xxxxxxxxxxxx"

# Exchange along with your Major Key
$SharedKey = "xxxxxxxxxxxxxxxxxxxxxxxxxxxxxx"

# Specify the title of the file kind that you're going to be creating
$LogType = "WarrantyInformation"

# You should utilize an elective area to specify the timestamp from the info. If the time area isn't specified, Azure Monitor assumes the time is the message ingestion time
$TimeStampField = ""

# Create the perform to create the authorization signature
Perform Construct-Signature ($customerId, $sharedKey, $date, $contentLength, $technique, $contentType, $useful resource)
{
    $xHeaders = "x-ms-date:" + $date
    $stringToHash = $technique + "`n" + $contentLength + "`n" + $contentType + "`n" + $xHeaders + "`n" + $useful resource

    $bytesToHash = [Text.Encoding]::UTF8.GetBytes($stringToHash)
    $keyBytes = [Convert]::FromBase64String($sharedKey)

    $sha256 = New-Object System.Safety.Cryptography.HMACSHA256
    $sha256.Key = $keyBytes
    $calculatedHash = $sha256.ComputeHash($bytesToHash)
    $encodedHash = [Convert]::ToBase64String($calculatedHash)
    $authorization = 'SharedKey {0}:{1}' -f $customerId,$encodedHash
    return $authorization
}


# Create the perform to create and publish the request
Perform Publish-LogAnalyticsData($customerId, $sharedKey, $physique, $logType)
{
    $technique = "POST"
    $contentType = "software/json"
    $useful resource = "/api/logs"
    $rfc1123date = [DateTime]::UtcNow.ToString("r")
    $contentLength = $physique.Size
    $signature = Construct-Signature `
        -customerId $customerId `
        -sharedKey $sharedKey `
        -date $rfc1123date `
        -contentLength $contentLength `
        -method $technique `
        -contentType $contentType `
        -resource $useful resource
    $uri = "https://" + $customerId + ".ods.opinsights.azure.com" + $useful resource + "?api-version=2016-04-01"

    $headers = @{
        "Authorization" = $signature;
        "Log-Sort" = $logType;
        "x-ms-date" = $rfc1123date;
        "time-generated-field" = $TimeStampField;
    }

    $response = Invoke-WebRequest -Uri $uri -Methodology $technique -ContentType $contentType -Headers $headers -Physique $physique -UseBasicParsing
    return $response.StatusCode

}

# Submit the info to the API endpoint
Publish-LogAnalyticsData -customerId $customerId -sharedKey $sharedKey -body ([System.Text.Encoding]::UTF8.GetBytes($newjson)) -logType $logType
Click on on Check pane and click on on Begin. After a number of seconds, you must see Full

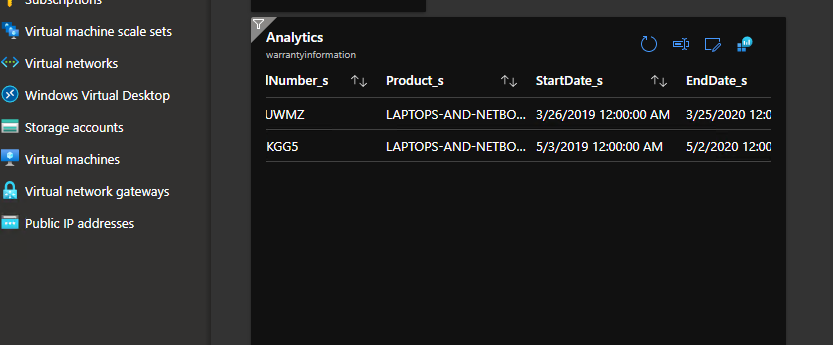
WarrantyInformation_CL
| order by Product_s
| distinct Product_s, StartDate_s, EndDate_s
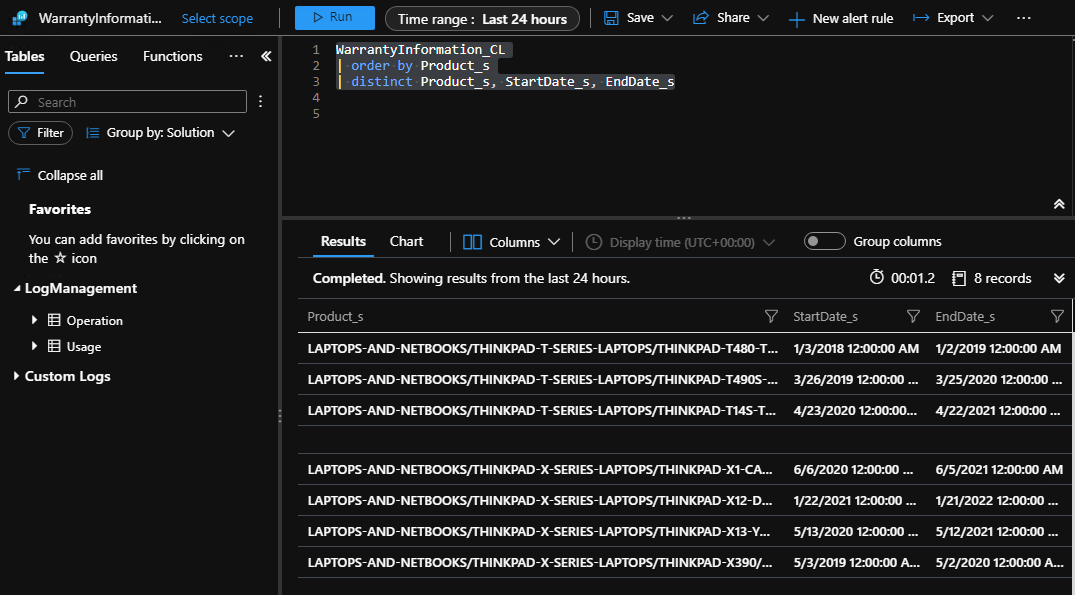
Yay! Guarantee information!
For those who needn’t make any additional adjustments with the Runbook, click on on Publish.
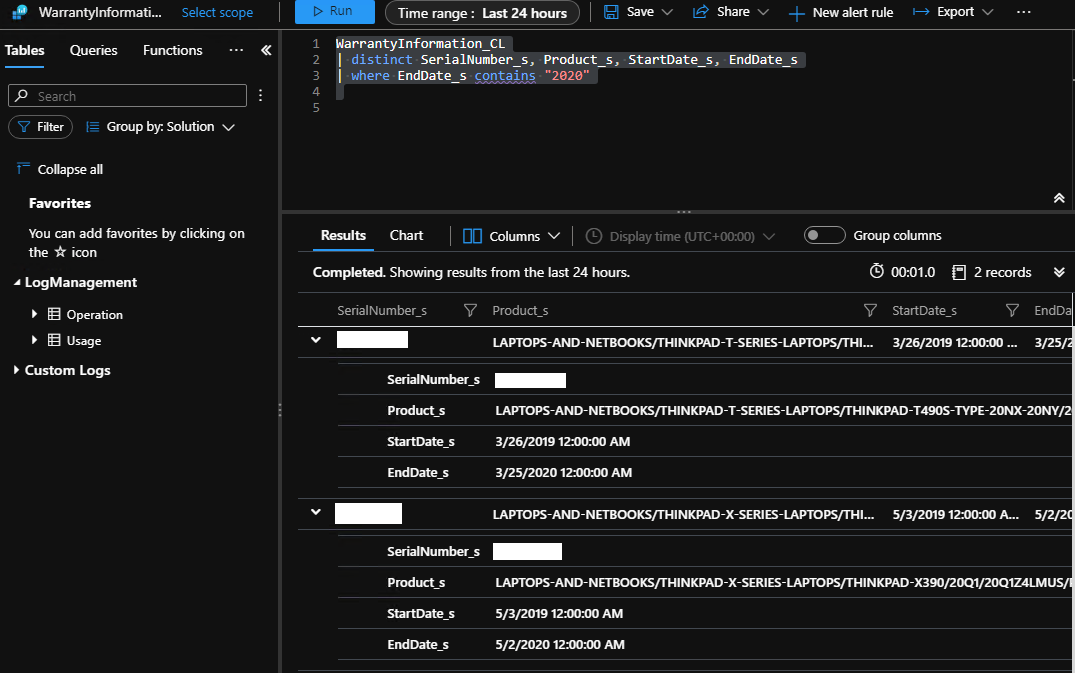
One other instance could be when you wished to solely present units whose Guarantee ended within the 12 months 2020, you can run this question
WarrantyInformation_CL
| distinct SerialNumber_s, Product_s, StartDate_s, EndDate_s
| the place EndDate_s accommodates "2020"
You may also pin a selected question to your dashboard when you need