
Carry this venture to life
Prior to now few weeks, now we have seen in an explosion in reputation for the most recent Secure Diffusion software Fooocus. Fooocus is a Gradio based mostly picture producing software program that has been designed by the notable open-source developer Illyasviel, who additionally introduced us ControlNet. It affords a novel method to the picture synthesis pipeline as an alternative choice to fashionable pipelines like AUTOMATIC1111’s Secure Diffusion Net UI or MidJourney.
On this article, we are going to begin with a short expose on the options and capabilities of this new platform. We intend to spotlight the variations and developments it affords compared to a few of the different instruments now we have showcased previously on this weblog, and current an argument for why this instrument must be added to your picture synthesis toolset. Afterwards, we are going to begin our demo, whereby we are going to stroll via the steps wanted to set the appliance up in a Paperspace Pocket book to start producing photographs. Readers can anticipate to complete this weblog with a full understanding of the intricacies of the Fooocus purposes number of helpful settings and built-in options.
To start out, the very first thing to find out about Fooocus is its dedication to abstracting away lots of the sophisticated settings required to make prime quality generated photographs. They define this of their tech checklist on the github web page, however let’s undergo every of those enhancements right here.
- Fashion – the Fooocus V2 fashion system permits for MidJourney fashion immediate enlargement to change and enhance the textual content illustration utilizing GPT-2 at low price. This immediate enlargement permits for simplified inputs to generate much more various and complicated outputs, and the motifs may be blended and matched to the customers desire
- Native refiner swapping inside one single k-sampler – this enables for seamless carry over of the bottom mannequin’s parameters to the refiner by sustaining the sampler. That is additionally used within the AUTOMATIC1111 Net UI
- Adverse picture facet ratio (ADM) steerage – the very best resolutions of Secure Diffusion XL reportedly don’t include cross-attention, so the Fooocus implementation modifies the optimistic and damaging alerts to compensate for the resultant lack of classifier-free steerage distinction for the very best decision outputs
- Self-Consideration Steering – following the analysis proven right here, the Fooocus growth crew has carried out a type of Self-Consideration Steering at a low setting. Together with the damaging ADM steerage, this helps mitigate a smoothing impact that’s generally reported in picture outputs with SD XL
- Computerized implementation of the “sd_xl_offset_example-lora_1.0.safetensors” LoRA mannequin at a energy of .1. Their experiments decided that values beneath .5 have been at all times higher than these with out
- Sampler parameters are finely adjusted and optimized by the builders
- Applied a tough decision setting based mostly on the optimum facet ratios for picture synthesis with SD XL
These cumulative options make for a low stage of coding information to run the picture technology after setup. Now that now we have mentioned what makes the platform so good to make use of, let’s stroll via establishing the UI on Paperspace earlier than evaluating weighing its execs and cons.
Fooocus demo on Paperspace
Carry this venture to life
Working the demo on Paperspace is comparatively easy. To start out, first begin a Paperspace Pocket book with a GPU of your alternative, and clone the repo to it. We will use the hyperlink above or on the high of this text to shortly open the venture up on Paperspace with the repo as our principal workspace, /notebooks.
Setup
With that accomplished, we will get began. First, open the pocket book fooocus.ipynb. This pocket book has all of the code we’d like within the first cell. To run the demo, we first want to put in conda nonetheless. Use the buttons on the left hand aspect of the window to search out the “Terminals” window, open it, and begin a brand new terminal.
Within the terminal, we’re going to start pasting in every part wanted to run the pocket book. As soon as we’re accomplished, we will simply click on on the shared Gradio hyperlink to get began producing photographs.
First, paste within the following to the terminal:
wget https://repo.anaconda.com/miniconda/Miniconda3-latest-Linux-x86_64.sh
bash Miniconda3-latest-Linux-x86_64.sh
Observe the directions within the terminal to finish the set up by answering sure to every query when prompted. When that is full, shut the terminal utilizing the trash bin icon within the terminal window on the left, after which open a brand new one. This can full the Miniconda set up.
Afterwards, we have to paste in one other set of installs to finish setup:
conda env create -f surroundings.yaml
conda activate fooocus
pip set up -r requirements_versions.txt
These will set up every part wanted to run Fooocus within the Pocket book. Moreover, it is value mentioning that the appliance will obtain a Secure Diffusion XL mannequin from HuggingFace for us to make use of on launch. Once we paste within the closing snippet, we are going to see that happen first earlier than the appliance itself is launched. You’ll want to use the general public hyperlink, in order that we’re capable of entry the hyperlink from our native machine’s browser. The method to finish the launch and set up could take a pair minutes.
python entry_with_update.py --listen --shareUtilizing the Fooocus software
Now, we will start truly synthesizing new photographs. This can share lots of similarities with acquainted Secure Diffusion and MidJourney pipelines, however has some apparent variations in implementation, a few of which we lined above.
The very first thing we need to do is present a fast take a look at of the fundamental picture technology utilizing the bottom settings. To do that, all we have to do is enter in a immediate and hit ‘Generate’. Fooocus could have routinely downloaded a merged mannequin, specifically “juggernautXL_version6Rundiffusion.safetensors”, that’s able to dealing with all kinds of each real looking and creative medium outputs. Above, we will see an instance technology utilizing the Fooocus net ui’s primary enter. The default settings will generate two photographs at a decision of 1152×896 (a 9:7 ratio), and we will watch the diffusion course of happen in real-time.
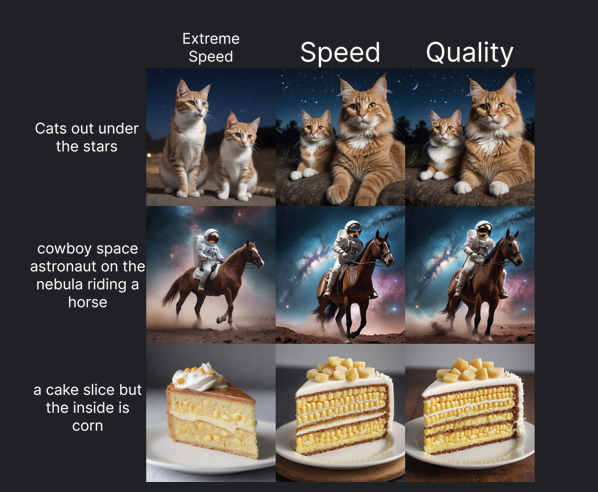
From right here, we will start to take a look at completely different superior settings for the Fooocus by clicking the toggle on the backside of the display. The superior settings can be displayed on the correct, in handy Gradio tabs. The primary, and doubtless most vital tab is the ‘Setting’. Right here, we will see one of many first issues abstracted away from a typical pipeline: the Efficiency settings. These are pre-set and optimized to run a distinct variety of diffusion steps to attain completely different qualities of photographs at completely different speeds. Velocity has 30 steps, High quality has 60, and Excessive Velocity will run for 8. Whereas the appliance appears to have the potential of utilizing different Okay samplers, it appears to be laborious defaulted to make use of “dpmpp_2m_sde_gpu” for all performances.
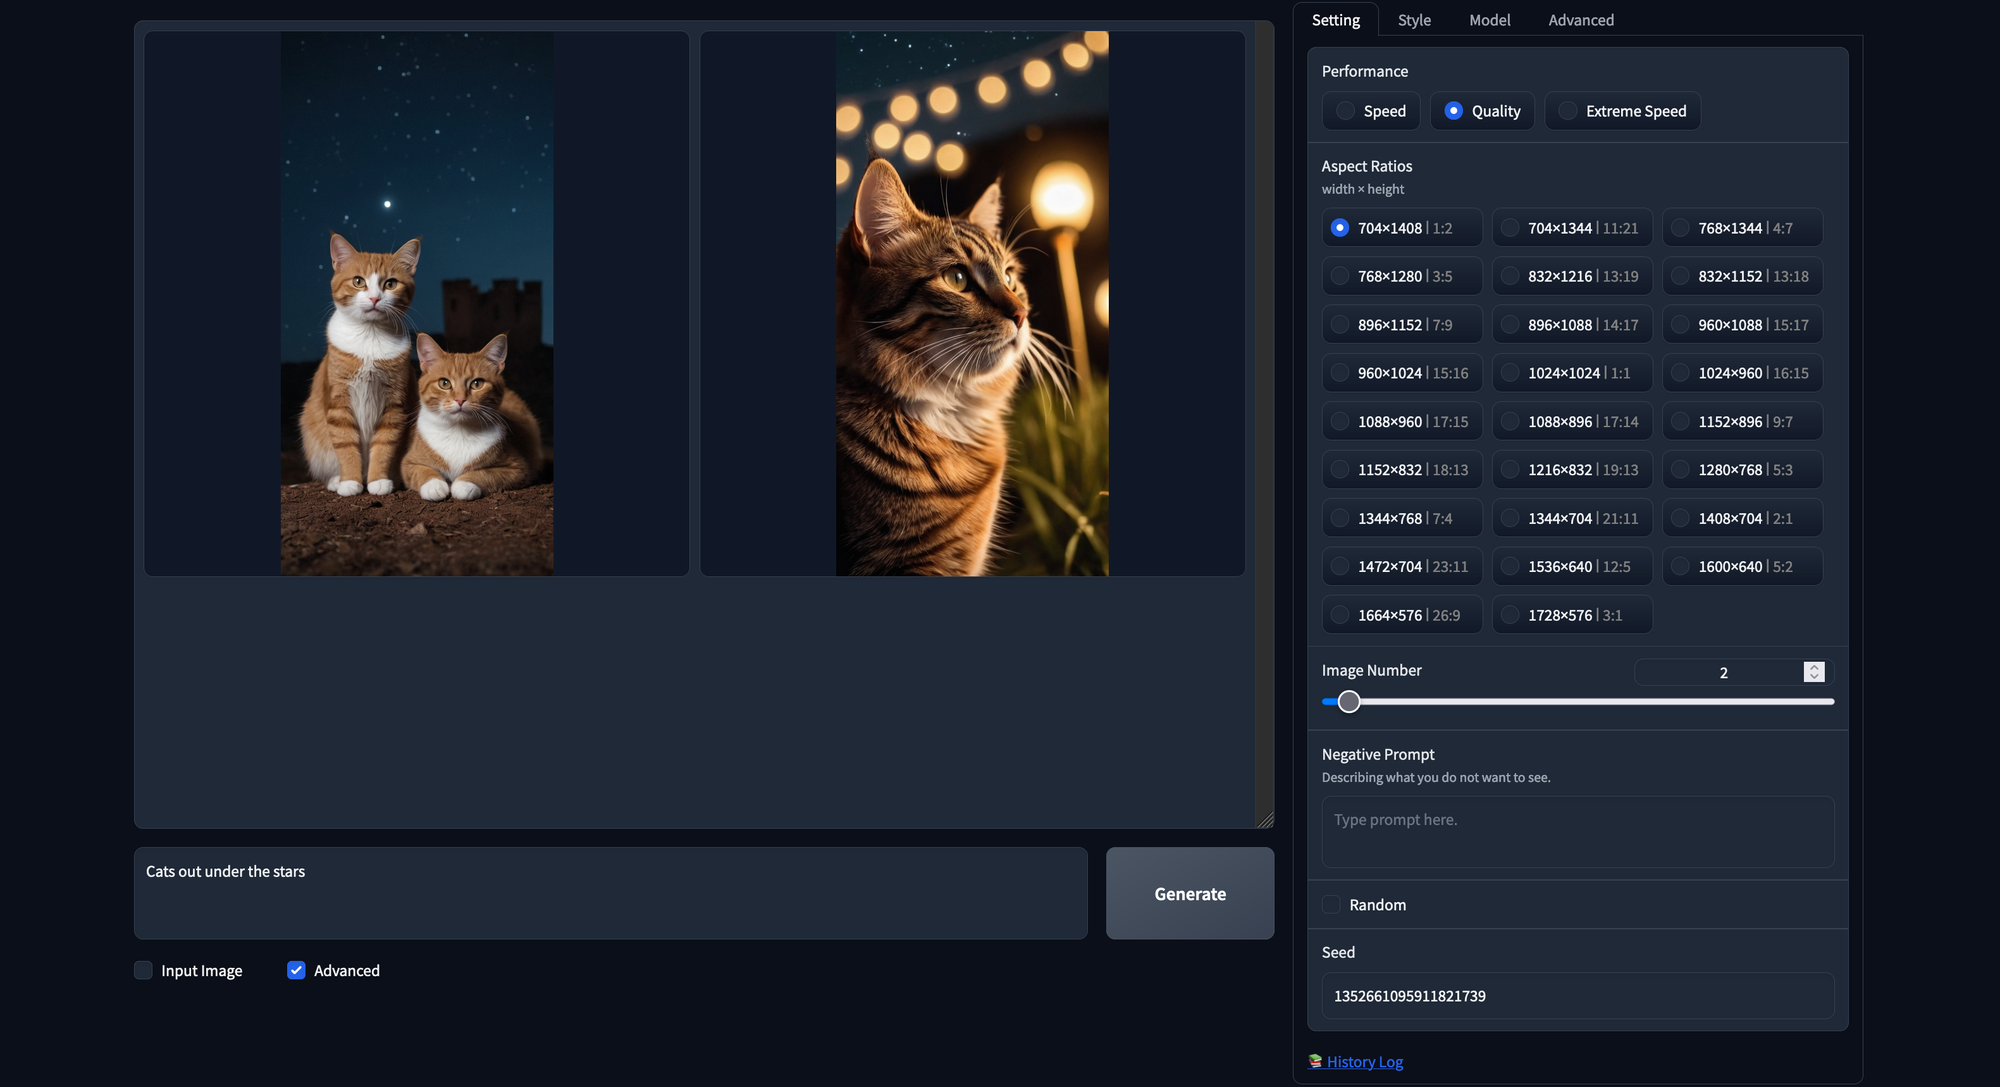
Subsequent, now we have the resolutions. These are all optimized resolutions to run Secure Diffusion XL fashions particularly. They included this tough restriction on picture sizing to additional optimize customers outputs; photographs generated at suboptimal resolutions are much more prone to seem unusual. Above is an instance generated with a 704×1408 decision.

Lastly, now we have the damaging immediate. This features as a form of reverse to our common immediate, and any tokens we embody can be discounted as a lot as attainable by the mannequin. For instance, we could use a damaging immediate to take away undesirable traits from our generated photographs or attempt to mitigate a few of the inborn issues Secure Diffusion has with sure objects. Within the instance above, we used the identical seed as we had within the earlier technology, however added in a further damaging immediate to attempt to alter our output a bit. You possibly can assign the seed by filling the sector left by un-toggling the Random field beneath the damaging immediate area.
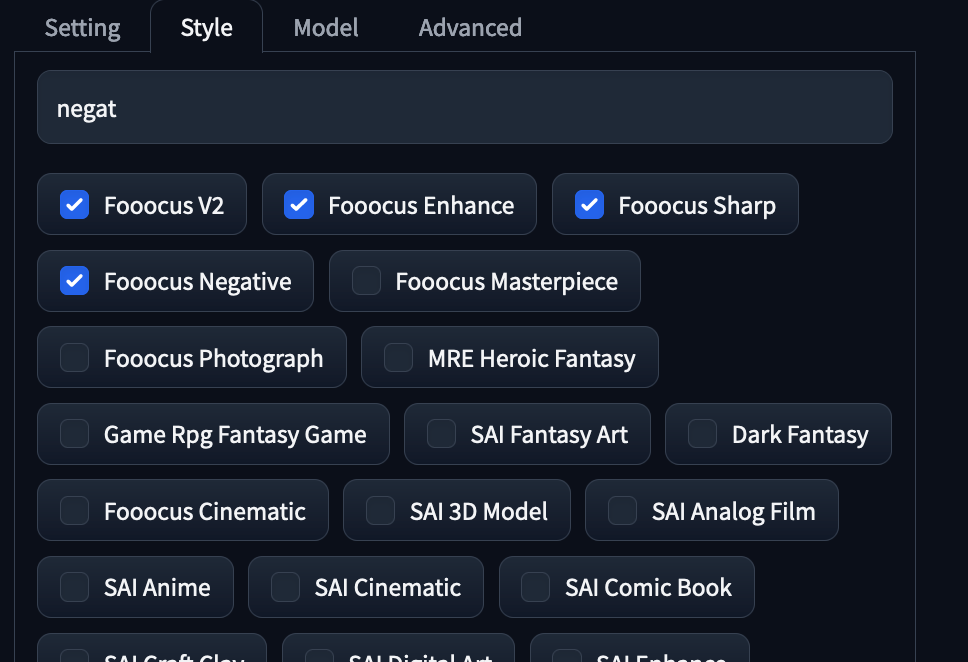
Within the subsequent tab within the superior choices, there’s “Fashion”. These are the GPT2 enhancements supplied by the mannequin to develop our prompts. Check out completely different kinds to see what kind of impact they’ll have on the ultimate outputs. We notably advocate utilizing those above for all generations.
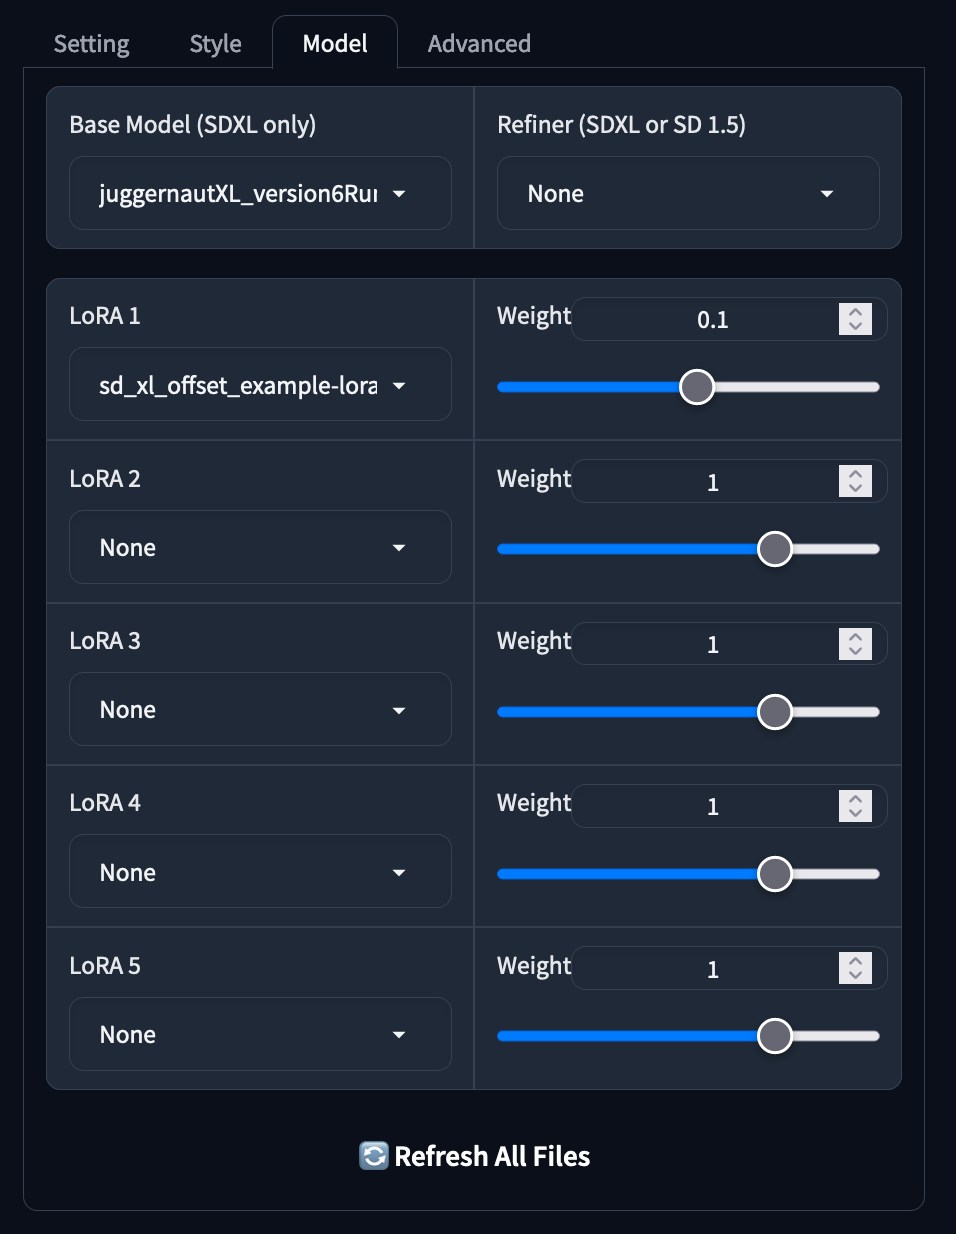
The subsequent tab is the mannequin tab, and it’s in all probability crucial of all of them as a result of it let’s us change out principal checkpoint and LoRAs. It has good sliders that permit us to simply modify the weights of any further fashions, permitting for a extra simplistic strategy to mix the traits of two LoRAs . The applying will even routinely obtain and allocate a weight of on .1 to the ‘sd_xl_offset_example-lora’, which we will select to take away if we so select. If we obtain a mannequin throughout a working session, the refresh all recordsdata button on the backside will permit us to refresh the accessible mannequin lists.
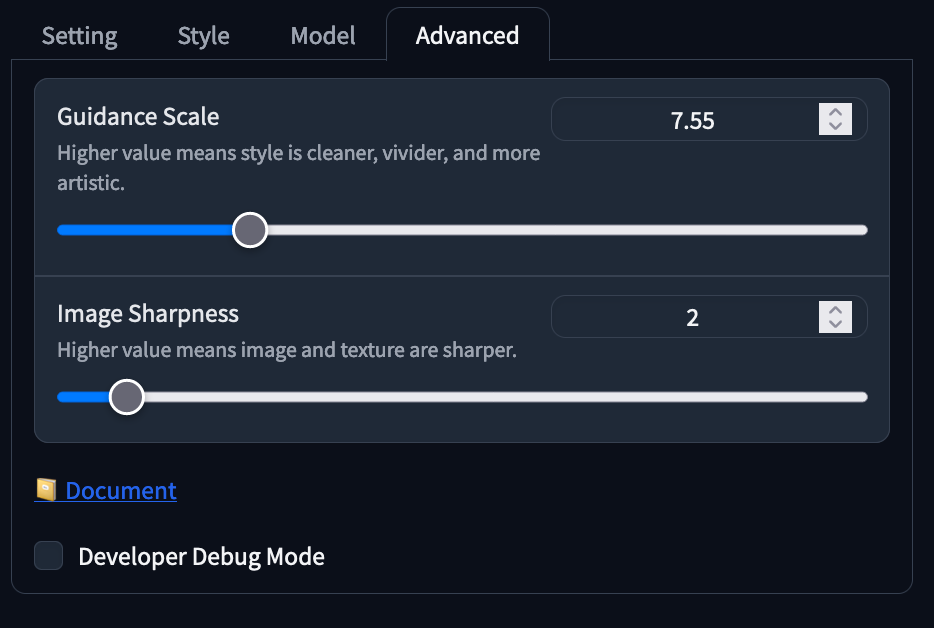
The ultimate tab, superior, has our Steering Scale and Picture Sharpness sliders. The steerage scale controls the impression the immediate has on our closing enter, and works greatest in a spread of 4-10 in our expertise. The picture sharpness worth will sharpen photographs, however enhance the uncanny valley impact if raised too excessive. We recommend leaving it alone until adjustment is especially wanted.

Along with the superior choices toggle, there’s additionally the enter picture toggle proper beside it. That is how we will do Picture-to-Picture technology in Fooocus. Illyasviel, the creator of this venture, was additionally the creator of the favored ControlNet’s. They’ve mixed Picture-to-Picture with a strong ControlNet system to routinely use ControlNet to information inputted generations. It comes with three choices – Upscale or Variation, Picture Immediate, and Inpaint or Outpaint. Let us take a look at what manipulations we will make to the scene above utilizing this immediate:

- Upscale or Variation: there are 5 settings: range (refined), range (sturdy), upscale (1.5x), upscale (2x), and upscale (quick 2x). We will use the primary two to introduce further variation to our picture with our prompts, as proven above with a refined variation. The sturdy variation will make much more adjustments, and the upscale choices will make our photographs larger resolutions
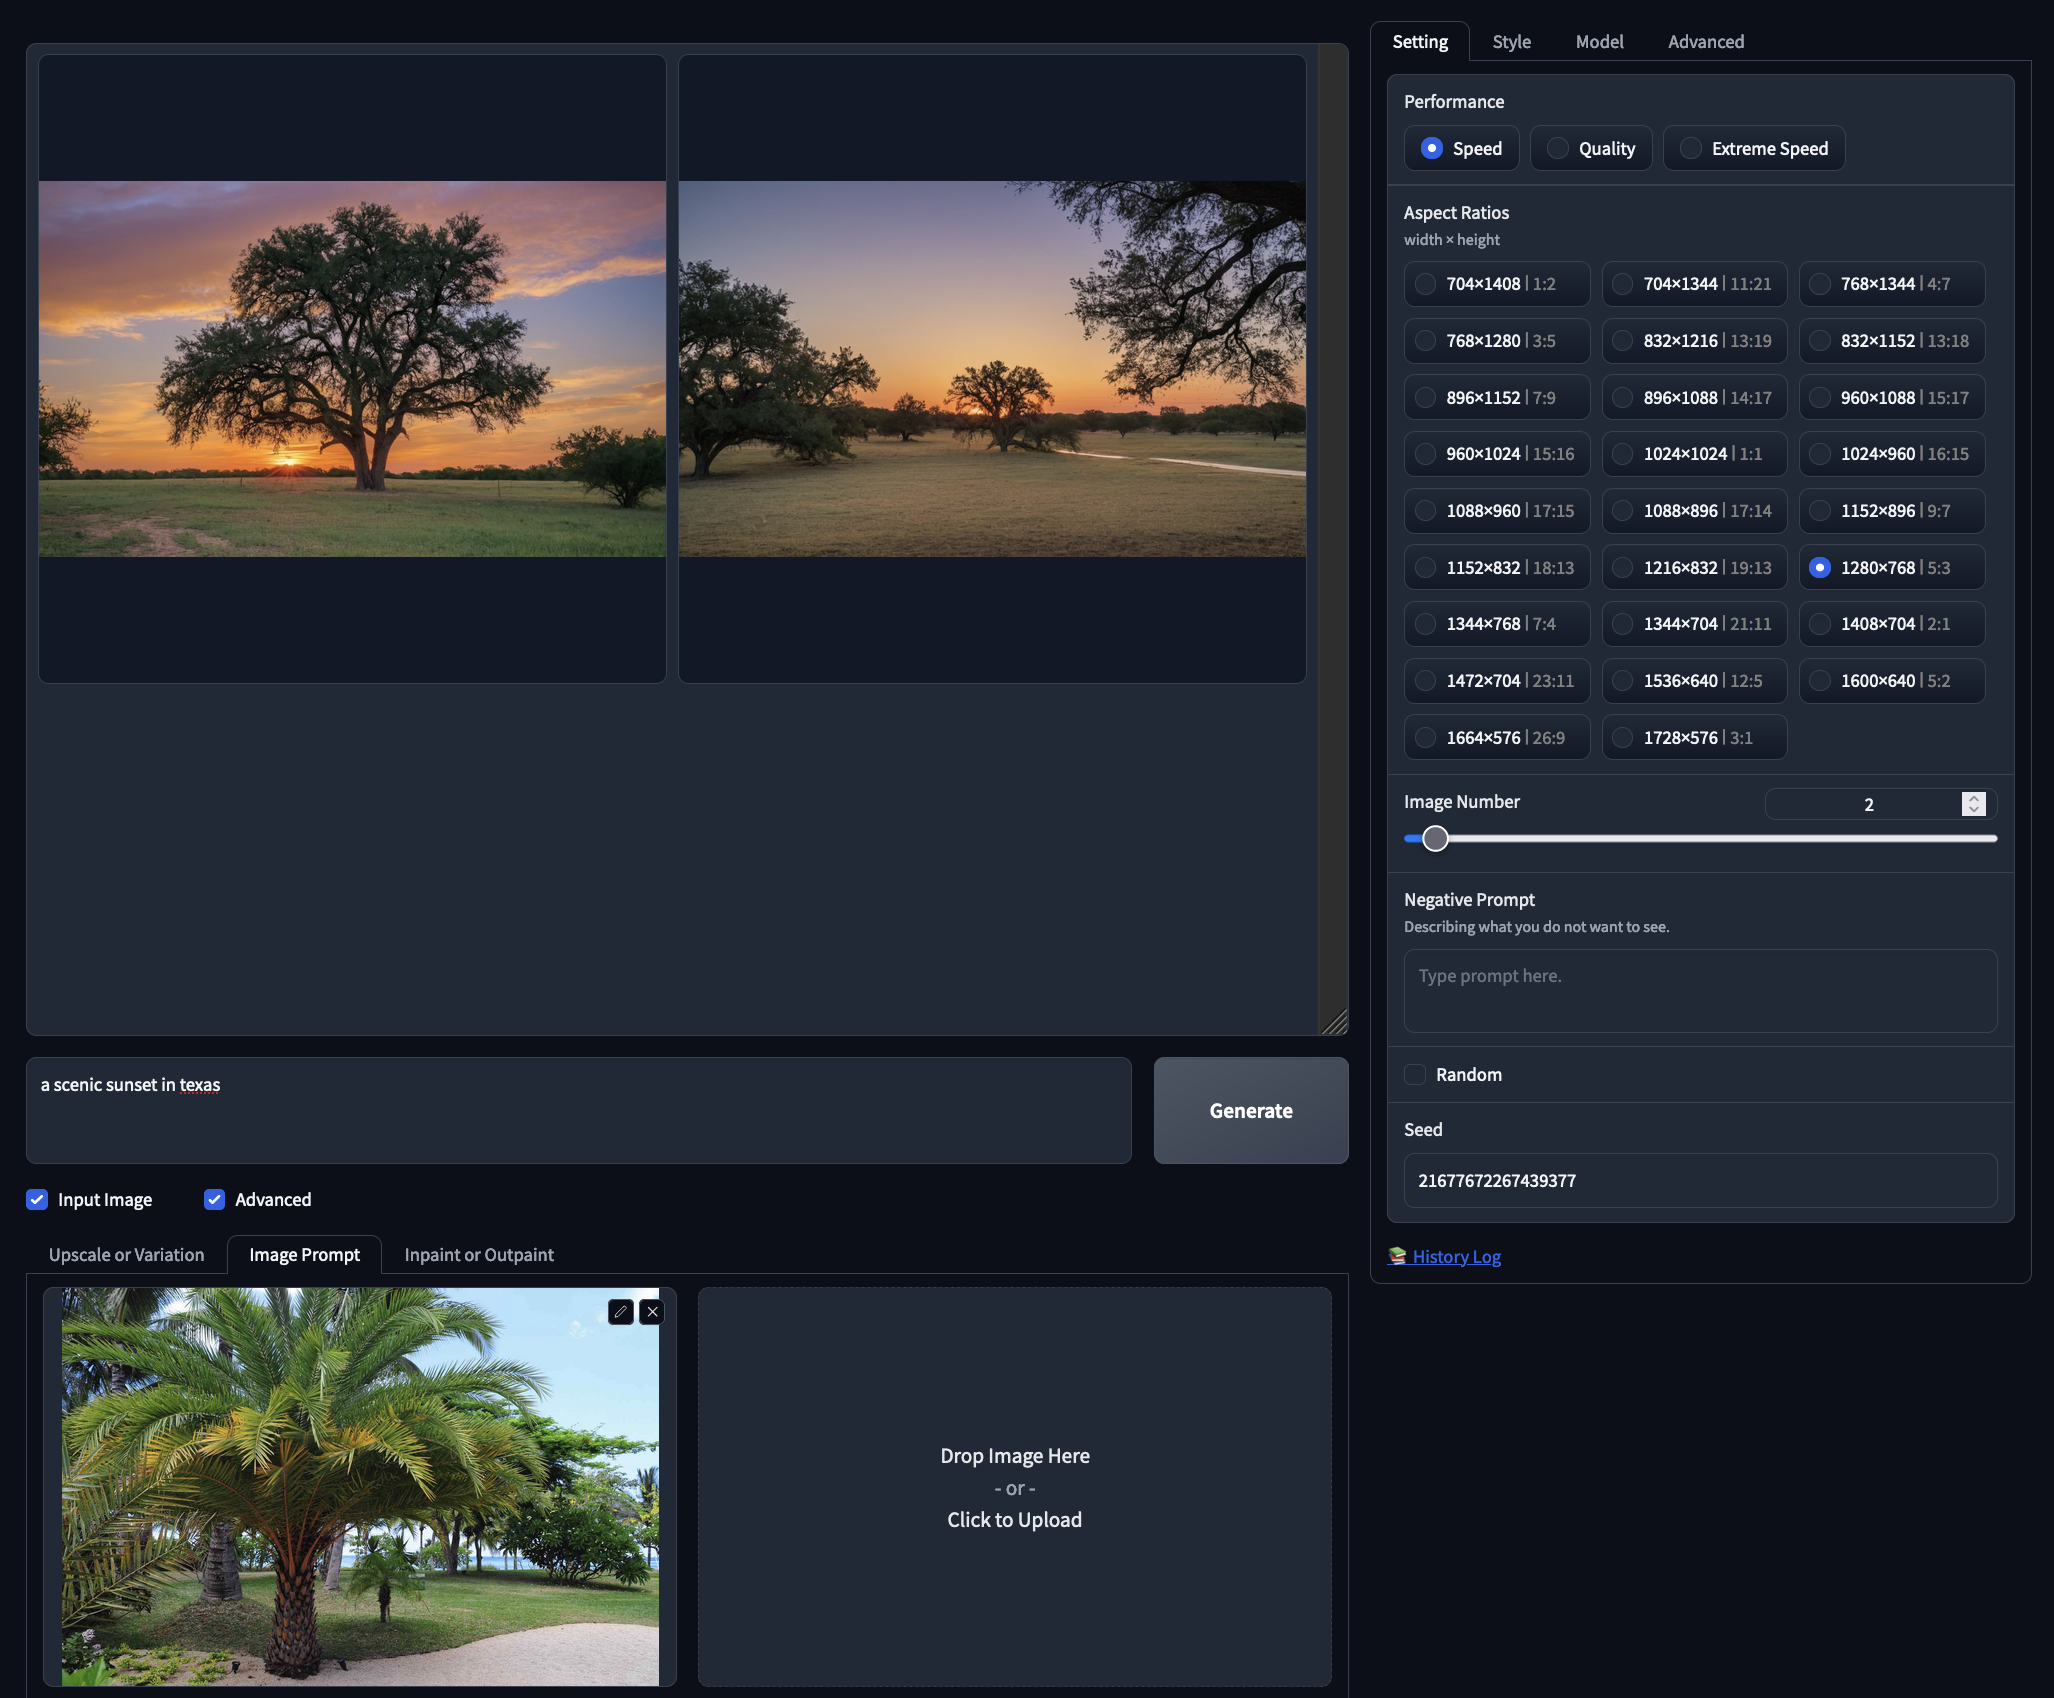
- Picture Immediate: that is akin to Picture-to-Picture modeling with Secure diffusion, however as a substitute of a single picture, we will enter a number of photographs. This enables us to range our outputs utilizing the inputted immediate. Take a look at the instance above the place we added a tree to our output utilizing a distinct tree as enter to affect the ultimate consequence.
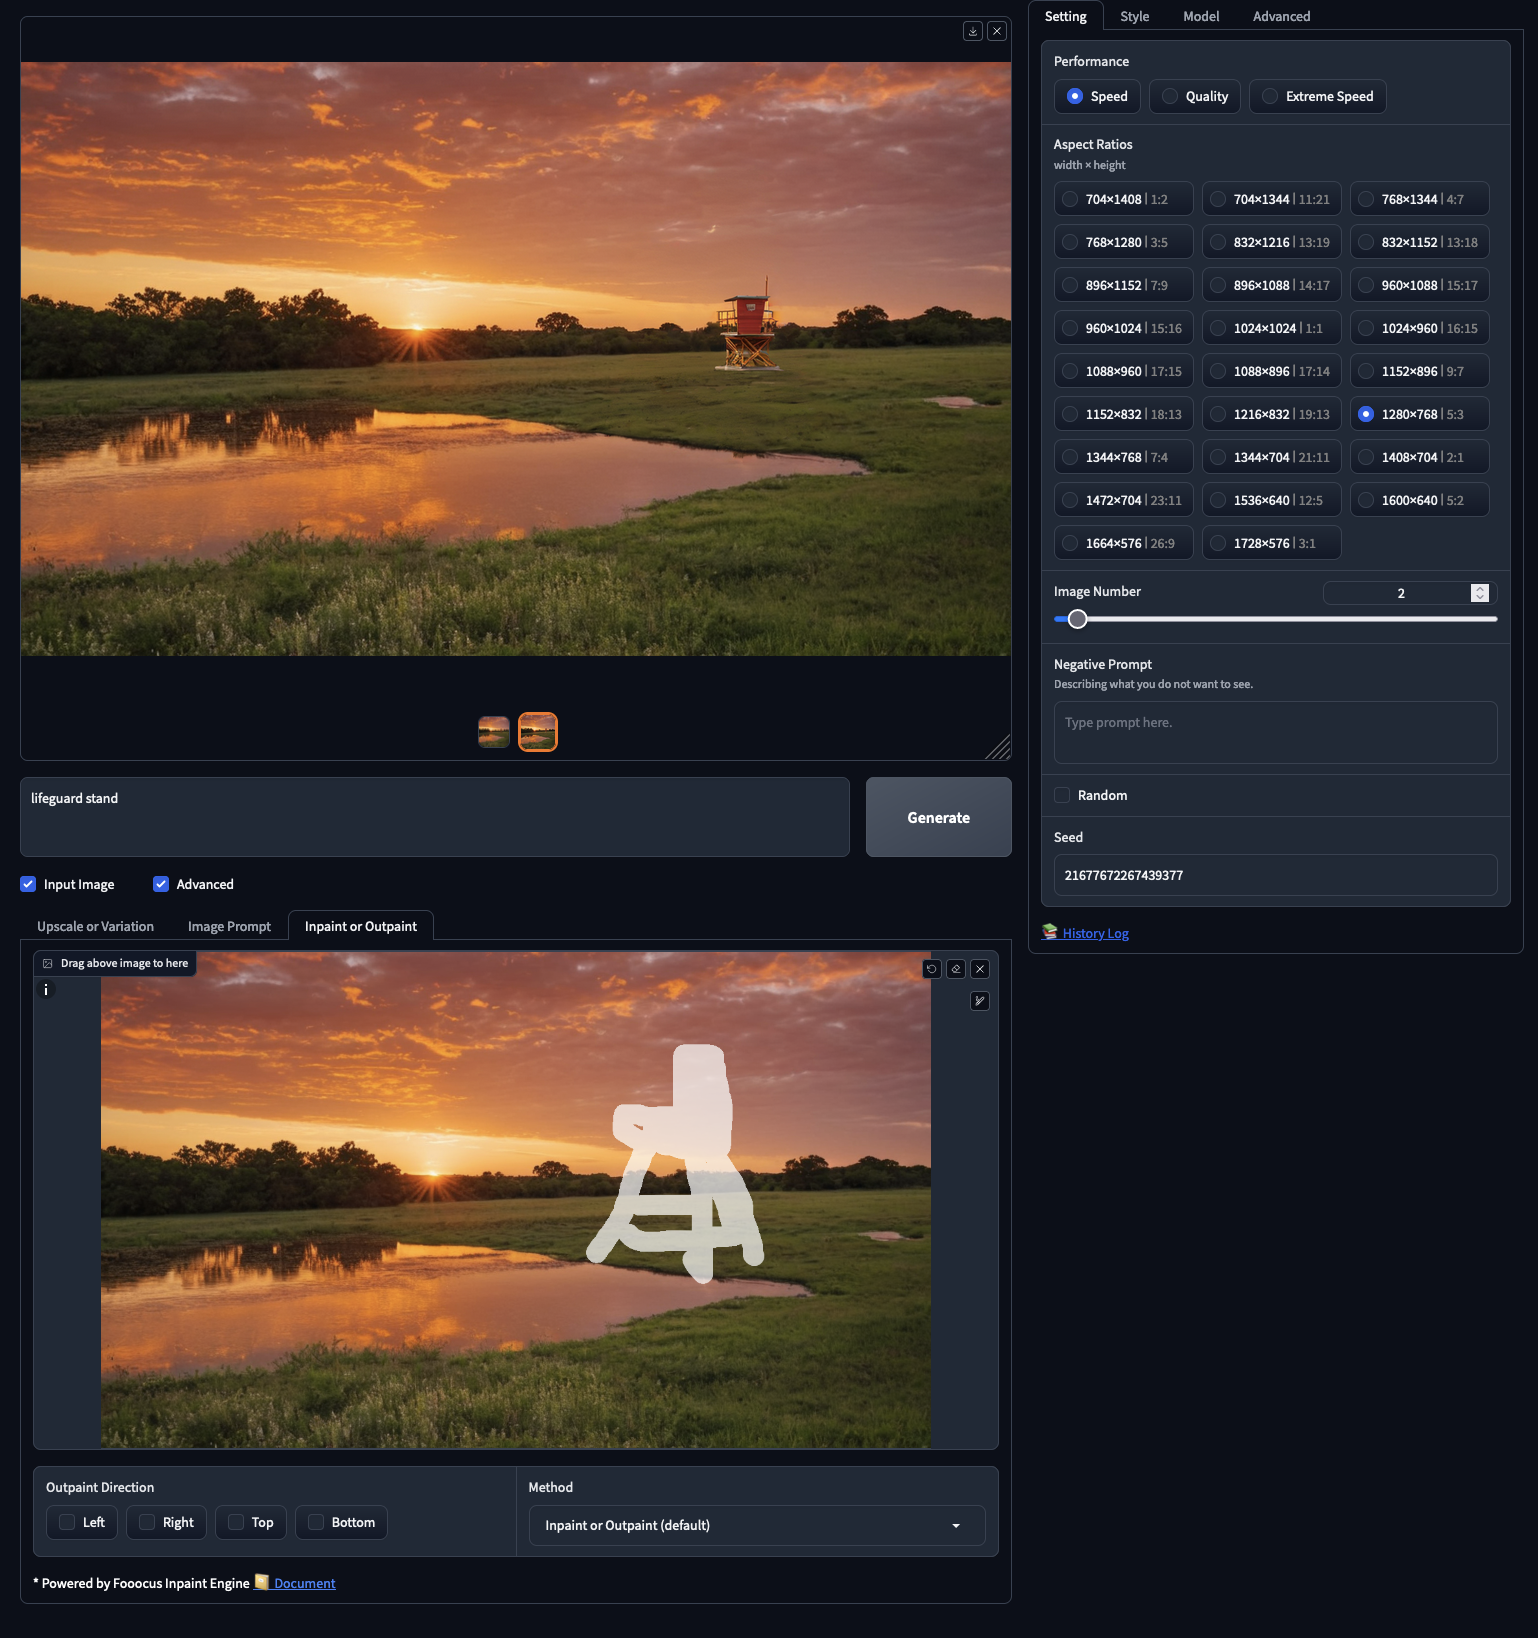
- Inpaint or Outpaint: inpainting permits us so as to add photographs to a masked area of the inputted picture, and outpainting lets us functionally lengthen the perimeters of a picture to foretell what could be outdoors the “digicam” aperture. We will use it so as to add new issues to our photographs, like including this lifeguard stand
We will even use all three collectively to nice impact! You’ll want to take a look at out all of those to see how they match into your workflow, as utilizing present photographs as bases or modifying them to work may be far more environment friendly and efficient than producing wholly new photographs.
Closing Ideas
We have now walked via every part that makes Fooocus such a fantastic instrument for Secure Diffusion, however how does it stack up towards competitors? There are numerous nice instruments on the market for producing photographs, just like the AUTOMATIC1111 Net UI, the ComfyUI, MidJourney, PixArt Alpha, Dalle 3, and extra, so we expect its vital to deal with the place Fooocus differs from earlier iterations of the text-to-image net platform. Primarily, Fooocus is a superb instrument for low coders who don’t need to dig into the intricacies of studying a sophisticated system just like the A1111 Net UI or the Comfortable UI, but it surely additionally affords larger ranges of versatility and applicability than closed supply purposes like MidJourney. For these causes, we advocate Fooocus to customers new to coding and Secure Diffusion, whereas extra skilled coders ought to keep on with the Quick Secure Diffusion implementations of the Net UI and ComfyUI. Look out for the self consideration enhancements to hit these platforms within the close to future, as nicely, as a result of, whereas it can not beat out the intelligent fixes within the A1111 resolutions fixer, it handles lots of issues for the consumer that enhance the standard of life to make use of it considerably.
Thanks for studying, and you’ll want to take a look at our different articles on Secure Diffusion and picture technology!