
When Matsuoka’s WebGPU-powered water simulations began making waves on X, they amazed builders and graphics fans alike with their breathtaking realism and unimaginable efficiency. These simulations aren’t simply stunning—they’re a showcase of what’s attainable with WebGPU. Naturally, we needed to know extra. So, we invited him to share the methods behind these mesmerizing simulations and the way WebGPU is pushing the boundaries of what’s attainable within the browser!
Over the previous few months, I’ve carried out two fluid simulations utilizing WebGPU: WebGPU-Ocean and WaterBall. On this article, I wish to share some insights and methods I gained whereas implementing them.
Whereas growing these two simulations, I persistently centered on two key facets:
- The simulation should be extremely performant.
- My objective is to implement large-scale fluid simulations that run easily in browsers throughout as many units as attainable. They have to carry out effectively on laptops with built-in graphics (iGPU), and ideally, they need to additionally run properly on lower-end units, similar to my six-year-old iPad Air 3!
- The visualization should be visually interesting.
- Even when the simulation performs exceptionally properly, poor visualization can fully spoil the expertise. Subsequently, I must rigorously choose and implement a rendering technique that enhances the fluid’s visible attraction.
Trying again, I can confidently say that these targets have been efficiently achieved! The primary was completed utilizing MLS-MPM (Shifting Least Squares Materials Level Methodology) carried out with WebGPU, whereas the second was achieved via a rendering approach known as Display-House Fluid Rendering. On this article, I’ll present an in depth clarification of those strategies.
Fast Tour of My Tasks
Earlier than diving into the main points of fluid simulation, let’s briefly overview the 2 fluid simulations I’ve carried out to date.
The primary mission is WebGPU-Ocean (GitHub Repository):
The second is WaterBall (GitHub Repository):

After studying this text, I feel you’ll have a greater understanding of what’s occurring inside these simulations.
Fluid Simulation: Physics
There are various completely different strategies for simulating fluids, typically categorized into three approaches.
Particle-based approaches
- Fluids are represented as a set of particles, with their bodily habits simulated via the motion of those particles.
- Examples: SPH (Smoothed Particle Hydrodynamics), MPS (Shifting Particle Semi-Implicit) technique
Grid-based approaches
- Fluids are simulated utilizing a grid that divides house into small, uniform cells. These approaches are significantly efficient for simulating gases.
- Examples: VOF (Quantity of Fluid) technique
Hybrid approaches combining particle-based and grid-based strategies
- Some strategies combine each particles and grids to leverage the benefits of every.
- Examples: FLIP (Fluid Implicit Particle), MPM (Materials Level Methodology)

Right here, I’ll clarify SPH, a classical particle-based method, and MLS-MPM, a comparatively new hybrid method. Please observe that this can be a really temporary clarification for simplicity. If you wish to study extra, I like to recommend watching Coding Journey: Simulating Fluids for SPH and studying the MPM Information for (MLS-)MPM.
SPH (Smoothed Particle Hydrodynamics)
SPH (Smoothed Particle Hydrodynamics) is a well known particle-based technique for fluid simulation, the place the fluid is represented as a set of particles. Since its introduction to interactive fluid simulation within the seminal paper Particle-Based mostly Fluid Simulation for Interactive Purposes by Müller et al. in 2003, SPH has been extensively utilized in many purposes.
A single simulation step of SPH proceeds as follows:
- Calculate the density and strain of every particle by summing the densities of close by particles inside a hard and fast distance.
- Compute forces similar to strain pressure and viscosity pressure by summing the contributions of close by particles. Exterior forces are additionally included on this step.
- Carry out integration utilizing the forces calculated within the earlier step and replace the particle positions accordingly.
Essentially the most computationally costly process within the SPH technique is the neighborhood search, which identifies close by particles. A brute-force search requires quadratic time relative to the variety of particles, making it very sluggish. To speed up this course of, varied optimization methods have been proposed. Utilizing WebGPU, I carried out a quick neighborhood search algorithm on the GPU primarily based on the method introduced within the slide FAST FIXED-RADIUS NEAREST NEIGHBORS: INTERACTIVE MILLION-PARTICLE FLUIDS. This considerably improved the closest neighbor search efficiency in comparison with brute-force strategies, enabling real-time simulation of roughly 30,000 particles on an iGPU.
Nonetheless, I used to be not glad with this efficiency since my objective was to match the effectivity of Fluid Particles by David Li, which achieves real-time simulation of round 100,000 particles on an iGPU on my laptop computer. After additional investigation, I found that this implementation makes use of the PIC/FLIP technique, a hybrid method combining particle-based and grid-based methods. I additionally realized that the first cause for its superior efficiency (in addition to different hybrid approaches) is that it’s fully free from neighborhood searches, which was a significant bottleneck in my SPH implementation.
Subsequently, I made a decision to shift towards implementing a hybrid method to realize larger simulation efficiency. Since implementing PIC/FLIP accurately appeared fairly difficult, I opted for a distinct hybrid technique, which I’ll clarify beneath: MLS-MPM (Shifting Least Squares Materials Level Methodology).
MLS-MPM (Shifting Least Squares Materials Level Methodology)
MPM (Materials Level Methodology) is an algorithm for simulating varied supplies that may be modeled utilizing a constitutive equation. In MPM, a cloth is represented as a set of small particles known as “materials factors.” These materials factors don’t work together straight however as a substitute affect one another not directly via a background grid.
It’s well-known that Disney used this algorithm for snow simulation within the film Frozen, showcasing how successfully MPM can deal with a variety of supplies.
MLS-MPM (Shifting Least Squares Materials Level Methodology), proposed by Hu et al. in 2018, is a sooner model of MPM (paper right here). That is the simulation algorithm I carried out for WebGPU-Ocean and WaterBall to realize high-performance simulation.
Like different hybrid approaches, MPM and MLS-MPM simulate the motion of particles by repeatedly transferring bodily portions between particles and the grid—first by scattering knowledge from particles to the grid (P2G stage), then gathering it again from the grid to the particles (G2P stage). Crucially, these algorithms don’t require neighborhood searches, since info is exchanged by way of the grid fairly than via direct particle-to-particle interactions, as seen in particle-based strategies. In consequence, these algorithms are anticipated to be considerably sooner than SPH, the place neighborhood search was a significant bottleneck in my implementation.
Now, let’s look at how MLS-MPM, carried out in WebGPU, improves simulation efficiency in comparison with SPH. The simulation runs on an iGPU on an AMD Ryzen 7 5825U.


The distinction is clear! Eventually, we’ve achieved real-time simulation of 100,000 particles on an iGPU, because of MLS-MPM.
Fluid Simulation: Rendering
Now that we have now a quick fluid simulation, let’s transfer on to rendering the fluid. Broadly, there are two predominant strategies for real-time fluid rendering primarily based on particle knowledge: Marching Cubes and Display-House Fluid Rendering. Under is a short overview of those strategies.
Marching Cubes
- A mesh representing the fluid floor is generated from the particle knowledge and used for rendering.
- Execs: The computational value stays comparatively unaffected by will increase in rendering decision.
- Cons: Low mesh decision may end up in visible artifacts.
Display-House Fluid Rendering
- Not like Marching Cubes, this technique performs your complete rendering course of in display screen house with out developing a mesh.
- Execs: Allows the real-time technology of a clean and clear fluid floor.
- Cons: Computational value will increase quickly with larger rendering decision.

For WebGPU-Ocean and WaterBall, I selected Display-House Fluid Rendering because the rendering technique. This determination was primarily influenced by the gorgeous rendering outcomes showcased within the GDC 2010 slide. Under, I present a extra detailed clarification of this technique.
Display-House Fluid Rendering
Display-House Fluid Rendering (abbreviated as SSFR beneath) is a comparatively new approach for rendering fluids in real-time. In SSFR, your complete rendering course of is carried out in display screen house with out producing a mesh. Every step of SSFR is described beneath. (Notice: For a extra in-depth understanding of this technique, I like to recommend studying the GDC 2010 slide and the Technical Implementation Particulars within the Babylon.js documentation.)
Step 1: Render the depth of every particle
Step 2: Render the thickness of every particle utilizing additive mixing

Step 3: Apply smoothing to the depth map and thickness map utilizing filters such because the Bilateral Filter and Gaussian Filter.
Step 4: Compute floor normals from the smoothed depth map.

Step 5: Utilizing floor normals, compute reflection, refraction, and specular lighting to render the ultimate end result.
The thickness calculated within the earlier step can be utilized for refraction calculations.

In my view, fluid rendered utilizing SSFR seems very clear and visually interesting! If high-resolution output just isn’t a requirement, this technique is a superb selection for fluid rendering.
A downside of SSFR is that its computational value will increase quickly with larger rendering resolutions. To mitigate this, I restrict the rendering decision to half the window measurement in WaterBall. Moreover, saharan (@shr_id) talked about in their article (Japanese) that they use Marching Cubes as a substitute of SSFR for fluid rendering within the VRChat World as a result of want for high-resolution rendering.
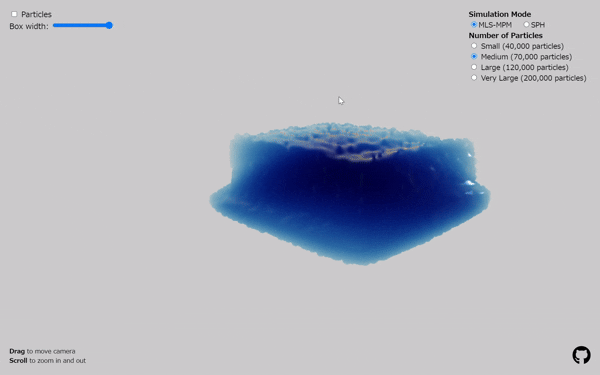
First Mission: WebGPU-Ocean
Now, let’s return to my first fluid simulation carried out in WebGPU: WebGPU-Ocean.

By now, you may in all probability guess how that is carried out—sure, the simulation algorithm is MLS-MPM, and the fluid is rendered utilizing Display-House Fluid Rendering. You possibly can toggle between simulation algorithms to check the efficiency variations between MLS-MPM and SPH. (Notice: On Mac, switching to SPH seems to freeze the simulation.)
Second Mission: WaterBall
As a follow-up mission to WebGPU-Ocean, I carried out the following fluid simulation: WaterBall.

The inspiration for this mission got here from the video beneath. It made me actually wish to create one thing related that permits real-time interplay!
The excellent news is that this simulation runs easily even on my six-year-old iPad Air 3!
The simulation algorithm and rendering technique are basically the identical as in WebGPU-Ocean, however I carried out some rendering enhancements to make it look extra visually putting.
Regulate particle measurement primarily based on density
- In the usual implementation of SSFR, all particles are rendered on the similar measurement. Nonetheless, this seems considerably unnatural, as actual water droplets range in measurement.
- To enhance realism, I modify every particle’s measurement primarily based on its density obtained from the simulation, making remoted particles seem smaller.

Stretch particles within the route of their velocity
- Rendering all particles as circles works properly, however stretching them primarily based on their velocity provides a way of movement and makes the simulation seem extra dynamic.

Edging
- When rendering the fluid, edges are highlighted at depth discontinuities. This enhances the visibility of fluid circulation and droplets, making the movement extra distinct.

I realized these methods by carefully observing simulations and finding out the supply code by saharan (@shr_id), a grasp of real-time physics simulation in browsers. An enormous because of them!
Conclusion
By combining MLS-MPM for simulation and Display-House Fluid Rendering for visualization, it’s attainable to realize real-time, high-quality fluid simulations within the browser. WebGPU makes this method each environment friendly and sensible, permitting complicated physics to run easily even on built-in graphics.
- MLS-MPM (Shifting Least Squares Materials Level Methodology), a hybrid method combining particle-based and grid-based strategies, was used for high-performance fluid simulation. By implementing this technique with WebGPU, real-time simulation of ~100,000 particles on an iGPU is now attainable.
- Display-House Fluid Rendering was employed to render a clear and dynamic fluid floor.
- Utilizing MLS-MPM and Display-House Fluid Rendering, I developed the next fluid simulations:
In my view, because of compute shader assist in WebGPU, implementing physics simulations for browsers utilizing GPGPU has develop into extra accessible than ever. As an example, implementing the P2G stage in MPM utilizing WebGL may be difficult, because it requires additive mixing to scatter particle knowledge to the grid. In distinction, WebGPU makes this course of extra intuitive by offering atomicAdd within the compute shader. Equally, I imagine many different simulation algorithms have develop into simpler to implement because of WebGPU.
At present, WebGPU assist continues to be restricted in some browsers. Nonetheless, as adoption grows, we are able to anticipate to see much more thrilling physics simulations working within the browser. Hopefully, in the future, browser-based physics simulations will rival these created with highly effective engines like Unreal Engine!