
Threepipe is a brand new framework for creating 3D internet purposes utilizing JavaScript or TypeScript. It offers a high-level API constructed on high of Three.js, providing a extra intuitive and environment friendly technique to develop 3D experiences for the online. Threepipe comes with a plugin system (and plenty of built-in plugins), making it simple to increase performance and combine numerous options into your 3D tasks.
On this tutorial, we’ll create an interactive 3D system mockup showcase utilizing Threepipe, that includes a MacBook and an iPhone mannequin, the place customers can work together with the mannequin by clicking and hovering over the objects, and drop photographs to show on the gadgets. Try the last model.
See the Pen
ThreePipe: System Mockup Experiment (Codrops) by Palash Bansal (@repalash).
This could additional be prolonged to create a full internet expertise to showcase web sites, designs, create and render mockups, and so on. That is impressed by an previous three.js experiment to render customized system mockups – carbonmockups.com, which requires much more work when working with solely three.js from scratch. This tutorial will cowl establishing the mannequin, animations in a no-code editor and utilizing code with predefined plugins so as to add consumer interactions for web sites.
Establishing the venture
Codepen
You possibly can rapidly prototype in JavaScript on Codepen. Here’s a starter pen with the fundamental setup: https://codepen.io/repalash/pen/GRbEONZ?editors=0010
Merely fork the pen and begin coding.
Native Setup
To get began with Threepipe domestically, you should have Node.js put in in your machine. Vite Initiatives require Node.js model 18+, so improve in case your bundle supervisor warns about it.
- A brand new venture may be rapidly created utilizing the
npm createcommand. Open your terminal and run the next command:
npm create threepipe- Observe the prompts:
- Select a venture title (e.g., “device-mockup-showcase”)
- Choose “JavaScript” or “TypeScript” based mostly in your desire
- Select “A primary scene” because the template
- This may create a primary venture construction with a 3D scene utilizing Threepipe and bundler setup utilizing Vite.
- Navigate to your venture listing, and run the venture:
cd device-mockup-showcase
npm set up
npm run dev- Open the venture in your browser by visiting
http://localhost:5173/ and you must see a primary 3D scene.
Starter code
After making a primary venture, open the file src/primary.ts.
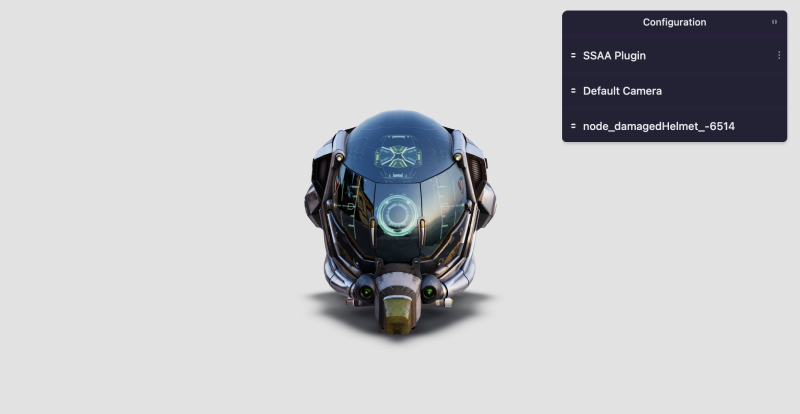
It is a primary setup for a 3D scene utilizing Threepipe that masses a pattern 3D mannequin of a helmet and an atmosphere map(for lighting). The scene is rendered on a canvas aspect with the ID threepipe-canvas(which is added to the file index.html).
The ThreeViewer class is used to create a brand new 3D viewer occasion. The viewer has a number of parts together with a Scene, Digicam(with controls), Renderer, RenderManager, AssetManager, and a few default plugins. It’s set as much as present a quickstart to create a 3.js app with all of the required parts. Moreover plugins like LoadingScreenPlugin, ProgressivePlugin, SSAAPlugin, and ContactShadowGroundPlugin are added to increase the performance of the viewer. We’ll add extra plugins to the viewer for various use circumstances as we progress by way of the tutorial.
Examine the feedback within the code to know what every half does.
import {
  ContactShadowGroundPlugin,
  IObject3D,
  LoadingScreenPlugin,
  ProgressivePlugin,
  SSAAPlugin,
  ThreeViewer
} from 'threepipe';
import {TweakpaneUiPlugin} from '@threepipe/plugin-tweakpane';

async perform init() {

  const viewer = new ThreeViewer({
    // The canvas aspect the place the scene will likely be rendered
    canvas: doc.getElementById('threepipe-canvas') as HTMLCanvasElement,
    // Allow/Disable MSAA
    msaa: false,
    // Set the render scale routinely based mostly on the system pixel ratio
    renderScale: "auto",
    // Allow/Disable tone mapping
    tonemap: true,
    // Add some plugins
    plugins: [
        // Show a loading screen while the model is downloading
        LoadingScreenPlugin,
        // Enable progressive rendering and SSAA
        ProgressivePlugin, SSAAPlugin,
        // Add a ground with contact shadows
        ContactShadowGroundPlugin
    ]
  });

  // Add a plugin with a debug UI for tweaking parameters
  const ui = viewer.addPluginSync(new TweakpaneUiPlugin(true));

  // Load an atmosphere map
  await viewer.setEnvironmentMap('https://threejs.org/examples/textures/equirectangular/venice_sunset_1k.hdr', {
    // The atmosphere map will also be used because the scene background
    setBackground: false,
  });

  // Load a 3D mannequin with auto-center and auto-scale choices
  const consequence = await viewer.load<IObject3D>('https://threejs.org/examples/fashions/gltf/DamagedHelmet/glTF/DamagedHelmet.gltf', {
    autoCenter: true,
    autoScale: true,
  });

  // Add some debug UI components for tweaking parameters
  ui.setupPlugins(SSAAPlugin)
  ui.appendChild(viewer.scene)
  ui.appendChild(viewer.scene.mainCamera.uiConfig)

  // Each object, materials, and so on has a UI config that may be added to the UI to configure it.
  const mannequin = consequence?.getObjectByName('node_damagedHelmet_-6514');
  if (mannequin) ui.appendChild(mannequin.uiConfig, {expanded: false});

}

init();
Creating the 3D scene
For this showcase, we’ll use 3D fashions of a MacBook and an iPhone. You’ll find free 3D fashions on-line or create your personal utilizing software program like Blender.
These are two superb fashions from Sketchfab that we’ll use on this tutorial:
Utilizing the fashions, we’ll create a scene with a MacBook and an iPhone positioned on a desk. The consumer can work together with the scene by rotating and zooming in/out.
Threepipe offers an on-line editor to rapidly create a scene and arrange plugin and object properties which may then be exported as glb and utilized in your venture.
When the mannequin is downloaded from the editor, all of the settings together with the atmosphere map, digital camera views, post-processing, different plugin settings, and so on are included within the glb file. This makes it simple to load the mannequin within the venture and begin utilizing it instantly.
For the tutorial, I’ve created and configured a file named device-mockup.glb which you’ll obtain from right here. Try the video beneath on the way it’s executed within the tweakpane editor – https://threepipe.org/examples/tweakpane-editor/
Including the 3D fashions to the scene
To load the 3D mannequin within the venture, we will both load the file instantly from the URL or obtain the file to the public folder within the venture and cargo it from there.
Since this mannequin consists of all of the settings, together with the atmosphere map, we will take away the atmosphere map loading code from the starter code and cargo the file instantly.
const viewer = new ThreeViewer({
canvas: doc.getElementById('threepipe-canvas') as HTMLCanvasElement,
msaa: true,
renderScale: "auto",
plugins: [
LoadingScreenPlugin, ProgressivePlugin, SSAAPlugin, ContactShadowGroundPlugin,
]
});
const ui = viewer.addPluginSync(new TweakpaneUiPlugin(true));
// Observe - We dont want autoscale and heart, since that's executed within the editor already.
const gadgets = await viewer.load<IObject3D>('https://asset-samples.threepipe.org/demos/tabletop_macbook_iphone.glb')!;
// or if the mannequin is within the public listing
// const gadgets = await viewer.load<IObject3D>('./fashions/tabletop_macbook_iphone.glb')!;
// Discover the objects roots by title
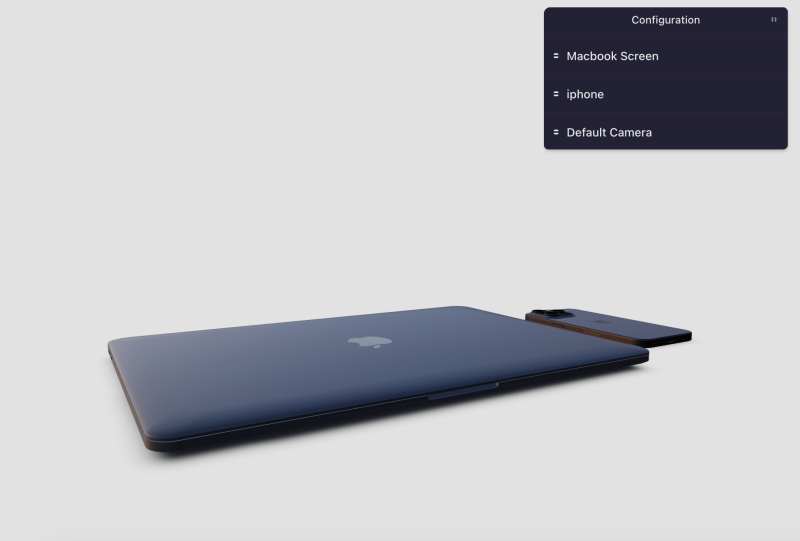
const macbook = gadgets.getObjectByName('macbook')!
const iphone = gadgets.getObjectByName('iphone')!
const macbookScreen = macbook.getObjectByName('Bevels_2')! // the title of the item within the file
macbookScreen.title = 'Macbook Display' // setting the title for simple identification within the UI.
console.log(macbook, iphone, macbookScreen);
// Add the item to the debug UI. The saved Remodel objects may be seen and edited within the UI.
ui.appendChild(macbookScreen.uiConfig, {expanded: false})
ui.appendChild(iphone.uiConfig, {expanded: false})
// Add the Digicam View UI to the debug UI. The saved Digicam Views may be seen and edited within the UI.
ui.setupPluginUi(CameraViewPlugin, {expanded: false})
ui.appendChild(viewer.scene.mainCamera.uiConfig)This code will load the 3D mannequin within the scene and add the objects to the debug UI for tweaking parameters.
Plugins and animations
The file has been configured within the editor with a number of digital camera views(states) and object rework(place, rotation) states. That is executed utilizing the plugins CameraViewPlugin and TransformAnimationPlugin. To see the saved digital camera views and object transforms and work together with them, we have to add them to the viewer and the debug UI.
First, add the plugins to the viewer constructor
const viewer = new ThreeViewer({
   canvas: doc.getElementById('threepipe-canvas') as HTMLCanvasElement,
   msaa: true,
   renderScale: "auto",
   plugins: [
      LoadingScreenPlugin, ProgressivePlugin, SSAAPlugin, ContactShadowGroundPlugin,
      CameraViewPlugin, TransformAnimationPlugin
   ]
});
Then on the finish, add the CameraViewPlugin to the debug UI
ui.setupPluginUi(CameraViewPlugin)We don’t want so as to add the TransformAnimationPlugin to the UI for the reason that states are mapped to things and may be seen within the UI when the item is added.
We are able to now work together with the UI to play the animations and animate to completely different digital camera views.
Remodel states are added to 2 objects within the file, the MacBook Display and the iPhone.
The digital camera views are saved within the plugin and never with any object within the scene. We are able to view and animate to completely different digital camera views utilizing the plugin UI. Right here, we’ve two units of digital camera views, one for the desktop and one for the cellular (with completely different FoV/Place)
Consumer Interplay
Now that we’ve the scene set with the fashions and animations, we will add consumer interplay to the scene. The thought is to barely tilt the mannequin when the consumer hovers over it and absolutely open it when clicked, together with animating the digital camera views. Let’s do it step-by-step.
For the interplay, we will use the PickingPlugin which offers occasions to deal with hover and click on interactions with 3D objects within the scene.
First, add PickingPlugin to the viewer plugins
plugins: [
   LoadingScreenPlugin, ProgressivePlugin, SSAAPlugin, ContactShadowGroundPlugin,
   CameraViewPlugin, TransformAnimationPlugin, PickingPlugin
]
With this, we will now click on on any object within the scene and it is going to be highlighted with a bounding field.
Now, we will configure the plugin to cover this field and subscribe to the occasions offered by the plugin to deal with the interactions.
// get the plugin occasion from the viewer
const choosing = viewer.getPlugin(PickingPlugin)!
const transformAnim = viewer.getPlugin(TransformAnimationPlugin)!

// disable the widget(3D bounding field) that's proven when an object is clicked
choosing.widgetEnabled = false

// subscribe to the hitObject occasion. That is fired when the consumer clicks on the canvas.
choosing.addEventListener('hitObject', async(e) => {
   const object = e.intersects.selectedObject as IObject3D
   // selectedObject is null when the consumer clicks the empty house
   if (!object) {
       // shut the macbook display screen and face down the iphone
      await transformAnim.animateTransform(macbookScreen, 'closed', 500)?.promise
      await transformAnim.animateTransform(iphone, 'facedown', 500)?.promise
      return
   }
   // get the system title from the item
   const system = deviceFromHitObject(object)
   // Change the chosen object to the foundation of the system fashions. That is utilized by the widget or different plugins like TransformControlsPlugin to permit enhancing.
   e.intersects.selectedObject = system === 'macbook' ? macbook : iphone

   // Animate the rework state of the item based mostly on the system title that's clicked
   if(system === 'macbook')
      await transformAnim.animateTransform(macbookScreen, 'open', 500)?.promise
   else if(system === 'iphone')
      await transformAnim.animateTransform(iphone, 'floating', 500)?.promise
})
Right here, the animateTransform perform is used to animate the rework state of the item. The perform takes the item, the state title, and the length as arguments. The promise returned by the perform can be utilized to attend for the animation to finish.
The deviceFromHitObject perform is used to get the system title from the item clicked. This perform traverses the mother and father of the item to search out the system mannequin.
perform deviceFromHitObject(object: IObject3D) {
   let system = ''
   object.traverseAncestors(o => {
      if (o === macbook) system = 'macbook'
      if (o === iphone) system = 'iphone'
   })
   return system
}
With this code, we will now work together with the scene by clicking on the fashions to open/shut the MacBook display screen and face down/floating the iPhone.
Now, we will add digital camera animations as properly to animate to completely different digital camera views when the consumer interacts with the scene.
Get the plugin occasion
const cameraView = viewer.getPlugin(CameraViewPlugin)!Replace the listener to animate the views utilizing the animateToView perform. The views are named ‘begin’, ‘macbook’, and ‘iphone’ within the plugin.
const object = e.intersects.selectedObject as IObject3D
if (!object) {
   await Promise.all([
      transformAnim.animateTransform(macbookScreen, 'closed', 500)?.promise,
      transformAnim.animateTransform(iphone, 'facedown', 500)?.promise,
      cameraView.animateToView('start', 500),
   ])
   return
}
const system = deviceFromHitObject(object)
if(system === 'macbook') {
   await Promise.all([
     cameraView.animateToView('macbook', 500),
     await transformAnim.animateTransform(macbookScreen, 'open', 500)?.promise
   ])
}else if(system === 'iphone') {
   await Promise.all([
     cameraView.animateToView('iphone', 500),
     await transformAnim.animateTransform(iphone, 'floating', 500)?.promise
   ])
}
This is able to now additionally animate the digital camera to the respective views when the consumer clicks on the fashions.
In the identical approach, PickingPlugin offers an occasion hoverObjectChanged that can be utilized to deal with hover interactions with the objects.
That is just about the identical code, however we’re animating to completely different states(with completely different durations) when the consumer hovers over the objects. We don’t must animate the digital camera right here for the reason that consumer will not be clicking on the objects.
// We have to first allow hover occasions within the Selecting Plugin (disabled by default)
choosing.hoverEnabled = true

choosing.addEventListener('hoverObjectChanged', async(e) => {
   const object = e.object as IObject3D
   if (!object) {
      await Promise.all([
         transformAnim.animateTransform(macbookScreen, 'closed', 250)?.promise,
         transformAnim.animateTransform(iphone, 'facedown', 250)?.promise,
      ])
      return
   }
   const system = deviceFromHitObject(object)
   if(system === 'macbook') {
      await transformAnim.animateTransform(macbookScreen, 'hover', 250)?.promise
   }else if(system === 'iphone') {
      await transformAnim.animateTransform(iphone, 'tilted', 250)?.promise
   }
})
On operating this, the MacBook display screen will barely open when hovered over and the iPhone will barely tilt.
Drop recordsdata
To permit customers to drop photographs to show on the gadgets, we will use the DropzonePlugin offered by Threepipe. This plugin permits customers to tug and drop recordsdata onto the canvas and deal with the recordsdata within the code.
The plugins may be arrange by merely passing dropzone property within the ThreeViewer constructor. The plugin is added and arrange routinely.
Let’s set some choices to deal with the photographs dropped on the canvas.
const viewer = new ThreeViewer({
  canvas: doc.getElementById('threepipe-canvas') as HTMLCanvasElement,
  // ...,
  dropzone: {
    allowedExtensions: ['png', 'jpeg', 'jpg', 'webp', 'svg', 'hdr', 'exr'],
    autoImport: true,
    addOptions: {
      disposeSceneObjects: false,
      autoSetBackground: false,
      autoSetEnvironment: true, // when hdr, exr is dropped
    },
  },
  // ...,
});
We’re setting autoSetEnvironment to true right here, which is able to routinely set the atmosphere map of the scene when an HDR or EXR file is dropped on the canvas. This manner a consumer can drop their very own atmosphere map and it is going to be used for lighting.
Now, to set the dropped picture to the gadgets, we will take heed to the loadAsset occasion of the AssetManager and set the picture to the fabric of the system display screen. This occasion is known as for the reason that DropzonePlugin additionally routinely imports as a 3.js Texture object and masses the file within the asset supervisor. To get extra management, you can even subscribe to the occasions within the DropzonePlugin and deal with the recordsdata your self.
// Hearken to when a file is dropped
viewer.assetManager.addEventListener('loadAsset', (e)=>)
This code listens to the loadAsset occasion and checks if the loaded asset is a texture. Whether it is, it units the feel to the fabric of the MacBook and iPhone screens. The feel is about because the emissive map of the fabric to make it glow. The emissive colour is about to white to make the feel seen. The modifications within the materials must be executed solely within the Macbook display screen materials and never the iPhone, since iPhone materials setup was executed within the editor instantly.
Remaining touches
Whereas interacting with the venture, you may discover that the animations aren’t correctly synced. It is because the animations are operating asynchronously and never ready for the earlier animation to finish.
To repair this, we have to keep a state correctly and look ahead to any animations to complete earlier than altering it.
Right here is the ultimate code with correct state administration and different enhancements in typescript. The JavaScript model may be discovered on Codepen.
import {
  CameraViewPlugin, CanvasSnapshotPlugin,
  ContactShadowGroundPlugin,
  IObject3D, ITexture,
  LoadingScreenPlugin, PhysicalMaterial,
  PickingPlugin,
  PopmotionPlugin, SRGBColorSpace,
  ThreeViewer,
  timeout,
  TransformAnimationPlugin,
  TransformControlsPlugin,
} from 'threepipe'
import {TweakpaneUiPlugin} from '@threepipe/plugin-tweakpane'

async perform init() {

  const viewer = new ThreeViewer({
    canvas: doc.getElementById('threepipe-canvas') as HTMLCanvasElement,
    msaa: true,
    renderScale: 'auto',
    dropzone: {
      allowedExtensions: ['png', 'jpeg', 'jpg', 'webp', 'svg', 'hdr', 'exr'],
      autoImport: true,
      addOptions: {
        disposeSceneObjects: false,
        autoSetBackground: false,
        autoSetEnvironment: true, // when hdr, exr is dropped
      },
    },
    plugins: [LoadingScreenPlugin, PickingPlugin, PopmotionPlugin,
      CameraViewPlugin, TransformAnimationPlugin,
      new TransformControlsPlugin(false),
      CanvasSnapshotPlugin,
      ContactShadowGroundPlugin],
  })

  const ui = viewer.addPluginSync(new TweakpaneUiPlugin(true))

  // Mannequin configured within the threepipe editor with Digicam Views and Remodel Animations, verify the tutorial to study extra.
  // Consists of Fashions from Sketchfab by timblewee and polyman Studio and HDR from polyhaven/threejs.org
  // https://sketchfab.com/3d-models/apple-iphone-15-pro-max-black-df17520841214c1792fb8a44c6783ee7
  // https://sketchfab.com/3d-models/macbook-pro-13-inch-2020-efab224280fd4c3993c808107f7c0b38
  const gadgets = await viewer.load<IObject3D>('./fashions/tabletop_macbook_iphone.glb')
  if (!gadgets) return

  const macbook = gadgets.getObjectByName('macbook')!
  const iphone = gadgets.getObjectByName('iphone')!

  const macbookScreen = macbook.getObjectByName('Bevels_2')!
  macbookScreen.title = 'Macbook Display'

  // Canvas snapshot plugin can be utilized to obtain a snapshot of the canvas.
  ui.setupPluginUi(CanvasSnapshotPlugin, {expanded: false})
  // Add the item to the debug UI. The saved Remodel objects may be seen and edited within the UI.
  ui.appendChild(macbookScreen.uiConfig, {expanded: false})
  ui.appendChild(iphone.uiConfig, {expanded: false})
  // Add the Digicam View UI to the debug UI. The saved Digicam Views may be seen and edited within the UI.
  ui.setupPluginUi(CameraViewPlugin, {expanded: false})
  ui.appendChild(viewer.scene.mainCamera.uiConfig)
  ui.setupPluginUi(TransformControlsPlugin, {expanded: true})

  // Hearken to when a picture is dropped and set it because the emissive map for the screens.
  viewer.assetManager.addEventListener('loadAsset', (e)=>)

  // Separate views are created within the file with completely different digital camera fields of view and positions to account for cellular display screen.
  const isMobile = ()=>window.matchMedia('(max-width: 768px)').matches
  const viewName = (key: string) => isMobile() ? key + '2' : key

  const transformAnim = viewer.getPlugin(TransformAnimationPlugin)!
  const cameraView = viewer.getPlugin(CameraViewPlugin)!

  const choosing = viewer.getPlugin(PickingPlugin)!
  // Disable widget(3D bounding field) within the Selecting Plugin (enabled by default)
  choosing.widgetEnabled = false
  // Allow hover occasions within the Selecting Plugin (disabled by default)
  choosing.hoverEnabled = true

  // Set preliminary state
  await transformAnim.animateTransform(macbookScreen, 'closed', 50)?.promise
  await transformAnim.animateTransform(iphone, 'facedown', 50)?.promise
  await cameraView.animateToView(viewName('begin'), 50)

  // Observe the present and the subsequent state.
  const state = {
    targeted: '',
    hover: '',
    animating: false,
  }
  const nextState = {
    targeted: '',
    hover: '',
  }
  async perform updateState() {
    if (state.animating) return
    const subsequent = nextState
    if (subsequent.targeted === state.targeted && subsequent.hover === state.hover) return
    state.animating = true
    const isOpen = state.targeted
    Object.assign(state, subsequent)
    if (state.targeted) {
      await Promise.all([
        transformAnim.animateTransform(macbookScreen, state.focused === 'macbook' ? 'open' : 'closed', 500)?.promise,
        transformAnim.animateTransform(iphone, state.focused === 'iphone' ? 'floating' : 'facedown', 500)?.promise,
        cameraView.animateToView(viewName(state.focused === 'macbook' ? 'macbook' : 'iphone'), 500),
      ])
    } else if (state.hover) {
      await Promise.all([
        transformAnim.animateTransform(macbookScreen, state.hover === 'macbook' ? 'hover' : 'closed', 250)?.promise,
        transformAnim.animateTransform(iphone, state.hover === 'iphone' ? 'tilted' : 'facedown', 250)?.promise,
      ])
    } else {
      const length = isOpen ? 500 : 250
      await Promise.all([
        transformAnim.animateTransform(macbookScreen, 'closed', duration)?.promise,
        transformAnim.animateTransform(iphone, 'facedown', duration)?.promise,
        isOpen ? cameraView.animateToView(viewName('front'), duration) : null,
      ])
    }
    state.animating = false
  }
  async perform setState(subsequent: typeof nextState) {
    Object.assign(nextState, subsequent)
    whereas (state.animating) await timeout(50)
    await updateState()
  }

  perform deviceFromHitObject(object: IObject3D) {
    let system = ''
    object.traverseAncestors(o => {
      if (o === macbook) system = 'macbook'
      if (o === iphone) system = 'iphone'
    })
    return system
  }

  // Fired when the present hover object modifications.
  choosing.addEventListener('hoverObjectChanged', async(e) => {
    const object = e.object as IObject3D
    if (!object) {
      if (state.hover && !state.targeted) await setState({hover: '', targeted: ''})
      return
    }
    if (state.targeted) return
    const system = deviceFromHitObject(object)
    await setState({hover: system, targeted: ''})
  })

  // Fired when the consumer clicks on the canvas.
  choosing.addEventListener('hitObject', async(e) => {
    const object = e.intersects.selectedObject as IObject3D
    if (!object) {
      if (state.targeted) await setState({hover: '', targeted: ''})
      return
    }
    const system = deviceFromHitObject(object)
    // change the chosen object for rework controls.
    e.intersects.selectedObject = system === 'macbook' ? macbook : iphone
    await setState({targeted: system, hover: ''})
  })

  // Shut all gadgets when the consumer presses the Escape key.
  doc.addEventListener('keydown', (ev)=>{
    if (ev.key === 'Escape' && state.targeted) setState({hover: '', targeted: ''})
  })

}

init()
Right here, we’re sustaining the state of the scene and ready for the animations to finish earlier than altering the state. This ensures that the animations are correctly synced and the consumer interactions are dealt with accurately. Since we’re utilizing a single nextState, solely the final interplay is taken into account and the earlier ones are ignored.
Additionally CanvasSnapshotPlugin and TransformControlsPlugin are added to the viewer to permit customers to take snapshots of the canvas and transfer/rotate the gadgets on the desk. Examine the debug UI for each the plugins.
Try the complete venture on Codepen or Github and mess around with the scene.
Codepen: https://codepen.io/repalash/pen/ExBXvby?editors=0010 (JS)
Github: https://github.com/repalash/threepipe-device-mockup-codrops (TS)
Subsequent Steps
This tutorial covers the fundamentals of making an interactive 3D system mockup showcase utilizing Threepipe. You possibly can additional improve the venture by including extra fashions, animations, and interactions.
Extending the mannequin may be executed in each the editor or within the code. Checkout the Threepipe web site for extra.
Listed below are some concepts to increase the venture:
- Add some post-processing plugins like SSAO, SSR, and so on to boost the visuals.
- Create a customized atmosphere map or use a special HDR picture for the scene.
- Add extra 3D fashions and create a whole 3D atmosphere.
- Embed an iframe within the scene to show a web site or a video instantly on the system screens.
- Add video rendering to export 3d mockups of UI designs.