
Quizzes are enjoyable! They’re a good way of studying about new topics, and so they permit you to interact your viewers with one thing enjoyable and playful. From a developer’s perspective, “How do I make a JavaScript quiz?” is likely one of the commonest questions requested by individuals studying net growth, and for good motive.
Coding your individual JavaScript quiz sport is a incredible studying train. It teaches you learn how to take care of occasions, manipulate the DOM, deal with person enter, and use native storage to trace their rating. When you may have a primary quiz up and working, there are a complete bunch of potentialities so as to add extra superior performance, equivalent to pagination.
On this tutorial, I’ll stroll you thru learn how to make a quiz in JavaScript that you just’ll have the ability to adapt to your wants and add to your individual web site. For those who’d wish to see what we’ll be ending up with, you may skip forward and see the working JavaScript quiz code.
For extra in-depth JavaScript information and challenges, get out our free e-book: Be taught to Code with JavaScript.
Key Takeaways
- Constructing a Quiz Construction: How one can create the essential construction of a quiz utilizing HTML, CSS, and JavaScript.
- Dynamic Content material Creation: Dynamically generate quiz questions and solutions with JavaScript.
- Superior JavaScript Options: Acquire sensible expertise with JavaScript options like dealing with inputs, manipulating the DOM, dealing with occasions, and many others.
- Pagination: The tutorial consists of steps to implement pagination with JavaScript to enhance the person expertise.
- Styling: How one can apply easy CSS styling to the quiz to make sure a constant person expertise.
Issues to Be Conscious of Earlier than Beginning
Right here are some things to know earlier than beginning:
- It is a front-end tutorial, which means anybody who is aware of learn how to look via the supply code of a web page can discover the solutions. For critical quizzes, the info must be dealt with via the again finish, which is past the scope of this tutorial.
- The code on this article makes use of trendy JavaScript syntax (ES6+), which means it won’t be suitable with any model of Web Explorer. Nonetheless, it can work simply effective on trendy browsers, together with Microsoft Edge.
- If you must assist older browsers, I’ve written a JavaScript quiz tutorial suitable with IE8. Or, in case you’d like a refresher on ES6, try this course by Darin Haener over on SitePoint Premium.
- You’ll want some familiarity with HTML, CSS, and JavaScript, however every line of code might be defined individually.
Step 1 – The Primary Construction of Your JavaScript Quiz
Ideally, we would like the quiz’s questions and solutions to be in our JavaScript code and have our script robotically generate the quiz app. That approach, we gained’t want to put in writing a variety of repetitive markup, and we are able to add and take away questions simply.
On this instance, we’ll be structuring our challenge utilizing three key information:
- An HTML file for the essential person interface (UI).
- A CSS file for styling.
- A JavaScript file to deal with all of the interactive performance.
Nonetheless, in case you favor, you may as well embody the CSS and JavaScript code straight inside the HTML file as inline code.
When studying learn how to make a quiz in HTML and JavaScript, it’s vital to know how the HTML construction interacts with the JavaScript logic. So, as step one, let’s arrange the HTML construction of our JavaScript quiz sport.
- A <div> to carry the quiz.
- A <button> to submit the solutions.
- A <div> to show the outcomes.
Right here’s how that may look:
<div id="quiz"></div>
<button id="submit">Submit Quiz</button>
<div id="outcomes"></div>
This construction is a straightforward instance of learn how to create quiz HTML code that serves as a basis in your JavaScript quiz template. For those who run the applying now, you’ll simply see a “Submit Quiz” button.
Step 2 – Initialize JavaScript Variables
Now, we are able to use the JavaScript doc.getElementById methodology to pick out the above HTML components and retailer references to them within the JavaScript quiz code like under:
const quizContainer = doc.getElementById('quiz');
const resultsContainer = doc.getElementById('outcomes');
const submitButton = doc.getElementById('submit');
The subsequent factor our quiz app wants is a few inquiries to show. We’ll use JavaScript object literals to signify the person questions and an array to carry all the questions that make up our quiz app. Utilizing an array will make the questions straightforward to iterate over:
const myQuestions = [
  {
    question: "Who invented JavaScript?",
    answers: {
      a: "Douglas Crockford",
      b: "Sheryl Sandberg",
      c: "Brendan Eich"
    },
    correctAnswer: "c"
  },
  {
    question: "Which one of these is a JavaScript package manager?",
    answers: {
      a: "Node.js",
      b: "TypeScript",
      c: "npm"
    },
    correctAnswer: "c"
  },
  {
    question: "Which tool can you use to ensure code quality?",
    answers: {
      a: "Angular",
      b: "jQuery",
      c: "RequireJS",
      d: "ESLint"
    },
    correctAnswer: "d"
  }
];
Be at liberty to place in as many questions or solutions as you need.
Word: As that is an array, the questions will seem within the order they’re listed. If you wish to kind the questions in any approach earlier than presenting them to the person, try our fast tip on sorting an array of objects in JavaScript.
Step 3 – Construct the Quiz Operate
Now that we’ve got our checklist of questions, we are able to present them on the web page. For that, we might be utilizing a operate named buildQuix(). Let’s undergo the next JavaScript line by line to see the way it works:
operate buildQuiz(){
  // variable to retailer the HTML output
  const output = [];

  // for every query...
  myQuestions.forEach(
    (currentQuestion, questionNumber) => {

      // variable to retailer the checklist of potential solutions
      const solutions = [];

      // and for every accessible reply...
      for(letter in currentQuestion.solutions){

        // ...add an HTML radio button
        solutions.push(
          `<label>
            <enter sort="radio" title="query${questionNumber}" worth="${letter}">
            ${letter} :
            ${currentQuestion.solutions[letter]}
          </label>`
        );
      }

      // add this query and its solutions to the output
      output.push(
        `<div class="query"> ${currentQuestion.query} </div>
        <div class="solutions"> ${solutions.be part of('')} </div>`
      );
    }
  );

  // lastly mix our output checklist into one string of HTML and put it on the web page
  quizContainer.innerHTML = output.be part of('');
}
First, we create an output variable to comprise all of the HTML output, together with questions and reply decisions.
Subsequent, we are able to begin constructing the HTML for every query. We’ll have to loop via every query like this:
myQuestions.forEach( (currentQuestion, questionNumber) => {
  // the code we need to run for every query goes right here
});
For brevity, we’re utilizing an arrow operate to carry out our operations on every query. As a result of that is in a forEach loop, we get the present worth, the index (the place quantity of the present merchandise within the array), and the array itself as parameters. We solely want the present worth and the index, which for our functions, we’ll title currentQuestion and questionNumber respectively.
Now let’s have a look at the code inside our loop:
// we'll need to retailer the checklist of reply decisions
const solutions = [];

// and for every accessible reply...
for(letter in currentQuestion.solutions){

  // ...add an html radio button
  solutions.push(
    `<label>
      <enter sort="radio" title="query${questionNumber}" worth="${letter}">
      ${letter} :
      ${currentQuestion.solutions[letter]}
    </label>`
  );
}

// add this query and its solutions to the output
output.push(
  `<div class="query"> ${currentQuestion.query} </div>
  <div class="solutions"> ${solutions.be part of('')} </div>`
);
For every query, we’ll need to generate the proper HTML. So, our first step is to create an array to carry the checklist of potential solutions.s.
Subsequent, we’ll use a loop to fill within the potential solutions for the present query. For every selection, we’re creating an HTML radio button, which we enclose in a <label> component. This ensures that customers can click on wherever on the reply textual content to pick out that reply. If the label was omitted, then customers must click on on the radio button itself, which isn’t very accessible.
Right here, we’re utilizing template literals, that are strings however extra highly effective. We’ll make use of the next options of template literals:
- Multi-line capabilities.
- Don’t want to make use of escape quotes inside quotes as a result of template literals use backticks.
- String interpolation permits embedding JavaScript expressions proper into your strings like this: ${code_goes_here}.
As soon as we’ve got our checklist of reply buttons, we are able to push the query HTML and the reply HTML onto our general checklist of outputs.
Discover that we’re utilizing a template literal and a few embedded expressions to first create the query div after which create the reply div. The be part of expression takes our checklist of solutions and places them collectively in a single string that we are able to output into our solutions div.
Now that we’ve generated the HTML for every query, we are able to be part of all of it collectively and present it on the web page:
quizContainer.innerHTML = output.be part of('');Now, our buildQuiz operate is full, and you must have the ability to run the quiz app and see the questions displayed.
Nonetheless, the construction of your code is vital. Because of one thing referred to as the temporal lifeless zone, you may’t reference your query array earlier than it has been outlined.
To recap, that is the proper construction:
// Features
operate buildQuiz(){ ... }
operate showResults(){ ... }

// Variables
const quizContainer = doc.getElementById('quiz');
const resultsContainer = doc.getElementById('outcomes');
const submitButton = doc.getElementById('submit');
const myQuestions = [ ... ];

// Kick issues off
buildQuiz();

// Occasion listeners
submitButton.addEventListener('click on', showResults);
Step 4 – Displaying the Quiz Outcomes
At this level, we need to construct out our showResults operate to loop over the solutions, verify them, and present the outcomes. It is a essential a part of any quiz sport JavaScript implementation, because it gives speedy suggestions to the person based mostly on their efficiency.
Right here’s the operate, which we’ll undergo intimately subsequent:
operate showResults(){

  // collect reply containers from our quiz
  const answerContainers = quizContainer.querySelectorAll('.solutions');

  // hold observe of person's solutions
  let numCorrect = 0;

  // for every query...
  myQuestions.forEach( (currentQuestion, questionNumber) => {

    // discover chosen reply
    const answerContainer = answerContainers[questionNumber];
    const selector = `enter[name=question${questionNumber}]:checked`;
    const userAnswer = (answerContainer.querySelector(selector) || {}).worth;

    // if reply is appropriate
    if(userAnswer === currentQuestion.correctAnswer){
      // add to the variety of appropriate solutions
      numCorrect++;

      // coloration the solutions inexperienced
      answerContainers[questionNumber].fashion.coloration="lightgreen";
    }
    // if reply is improper or clean
    else{
      // coloration the solutions crimson
      answerContainers[questionNumber].fashion.coloration="crimson";
    }
  });

  // present variety of appropriate solutions out of whole
  resultsContainer.innerHTML = `${numCorrect} out of ${myQuestions.size}`;
}
First, we choose all the reply containers in our quiz’s HTML. Then, we’ll create variables to maintain observe of the person’s present reply and the entire variety of appropriate solutions.
// collect reply containers from our quiz
const answerContainers = quizContainer.querySelectorAll('.solutions');

// hold observe of person's solutions
let numCorrect = 0;
Now, we are able to loop via every query and verify the solutions.
We might be utilizing 3 steps for that:
- Discover the chosen reply within the HTML.
- Deal with what occurs if the reply is appropriate.
- Deal with what occurs if the reply is improper.
Let’s look extra carefully at how we’re discovering the chosen reply in our HTML:
// discover chosen reply
const answerContainer = answerContainers[questionNumber];
const selector = `enter[name=question${questionNumber}]:checked`;
const userAnswer = (answerContainer.querySelector(selector) || {}).worth;
First, we’re ensuring we’re wanting inside the reply container for the present query.
Within the subsequent line, we’re defining a CSS selector that can allow us to discover which radio button is checked.
Then we’re utilizing JavaScript’s querySelector to seek for our CSS selector within the beforehand outlined answerContainer. In essence, because of this we’ll discover which reply’s radio button is checked.
Lastly, we are able to get the worth of that reply by utilizing .worth.
Coping with Incomplete Person Enter
What if the person has left a solution clean? On this case, utilizing .worth would trigger an error as a result of you may’t get the worth of one thing that’s not there. To unravel this, we’ve added ||, which suggests “or”, and {}, which is an empty object. Now, the general assertion says:
- Get a reference to our chosen reply component OR, if that doesn’t exist, use an empty object.
- Get the worth of no matter was within the first assertion.
Because of this, the worth will both be the person’s reply or undefined, which suggests a person can skip a query with out crashing our quiz app.
Evaluating the Solutions and Displaying the Outcome
The subsequent statements in our answer-checking loop will allow us to deal with appropriate and incorrect solutions.
// if reply is appropriate
if(userAnswer === currentQuestion.correctAnswer){
  // add to the variety of appropriate solutions
  numCorrect++;

  // coloration the solutions inexperienced
  answerContainers[questionNumber].fashion.coloration="lightgreen";
}
// if reply is improper or clean
else{
  // coloration the solutions crimson
  answerContainers[questionNumber].fashion.coloration="crimson";
}
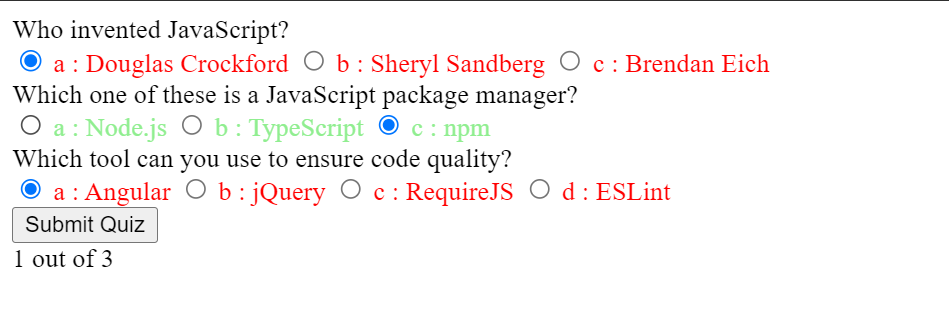
If the person’s reply matches the proper selection, improve the variety of appropriate solutions by one and (optionally) coloration the set of decisions inexperienced. If the reply is improper or clean, coloration the reply decisions crimson (once more, elective).
As soon as the answer-checking loop is completed, we are able to present what number of questions the person acquired proper:
// present variety of appropriate solutions out of whole
resultsContainer.innerHTML = `${numCorrect} out of ${myQuestions.size}`;
And now we’ve got a working JavaScript quiz!
For those who’d like, you may wrap the entire quiz in an IIFE (instantly invoked operate expression), which is a operate that runs as quickly as you outline it. It will hold your variables out of world scope and be certain that your quiz app doesn’t intrude with some other scripts working on the web page.
(operate(){
  // put the remainder of your code right here
})();
Now you’re all set! Be at liberty so as to add or take away questions and solutions and magnificence the quiz nevertheless you want.
Now, in case you run the applying, you may choose the solutions and submit the quiz to get the outcomes.
Step 5 – Including Types
Since now we’ve got a working quiz, let’s make it extra person pleasant by including some kinds. Nonetheless, I gained’t be going into particulars of every fashion. You may straight copy the under code into the kinds.css file.
@import url(https://fonts.googleapis.com/css?household=Work+Sans:300,600);
physique{
font-size: 20px;
font-family: 'Work Sans', sans-serif;
coloration: #333;
font-weight: 300;
text-align: middle;
background-color: #f8f6f0;
}
h1{
font-weight: 300;
margin: 0px;
padding: 10px;
font-size: 20px;
background-color: #444;
coloration: #fff;
}
.query{
font-size: 30px;
margin-bottom: 10px;
}
.solutions {
margin-bottom: 20px;
text-align: left;
show: inline-block;
}
.solutions label{
show: block;
margin-bottom: 10px;
}
button{
font-family: 'Work Sans', sans-serif;
font-size: 22px;
background-color: #279;
coloration: #fff;
border: 0px;
border-radius: 3px;
padding: 20px;
cursor: pointer;
margin-bottom: 20px;
}
button:hover{
background-color: #38a;
}
.slide{
place: absolute;
left: 0px;
high: 0px;
width: 100%;
z-index: 1;
opacity: 0;
transition: opacity 0.5s;
}
.active-slide{
opacity: 1;
z-index: 2;
}
.quiz-container{
place: relative;
peak: 200px;
margin-top: 40px;
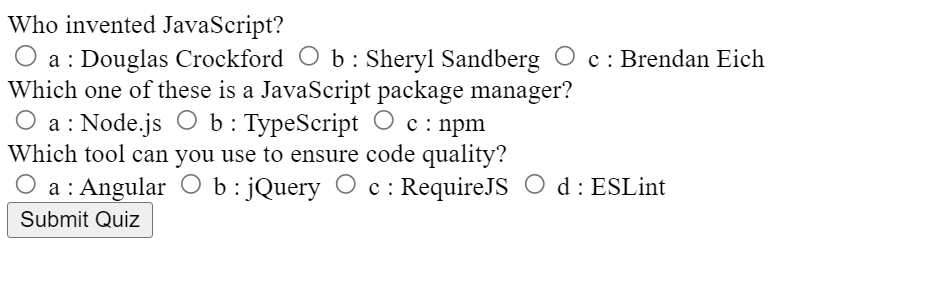
}At this level, your quiz may appear like this (with a tiny little bit of styling):
As you may see within the above photographs, the questions within the quiz are ordered one after one other. Now we have to scroll down to pick out our solutions. Though this appears effective with three questions, you may begin struggling to reply them when the variety of questions will increase. So, we have to discover a solution to present just one query at a time via pagination.
For that, you’ll want:
- A solution to present and conceal questions.
- Buttons to navigate the quiz.
So, let’s make some changes to our code, beginning with HTML:
<div class="quiz-container">
  <div id="quiz"></div>
</div>
<button id="earlier">Earlier Query</button>
<button id="subsequent">Subsequent Query</button>
<button id="submit">Submit Quiz</button>
<div id="outcomes"></div>
Most of that markup is identical as earlier than, however now we’ve added navigation buttons and a quiz container. The quiz container will assist us place the questions as layers that we are able to present and conceal.
Subsequent, contained in the buildQuiz operate, we have to add a <div> component with class slide to carry the query and reply containers that we simply created:
output.push(
  `<div class="slide">
    <div class="query"> ${currentQuestion.query} </div>
    <div class="solutions"> ${solutions.be part of("")} </div>
  </div>`
);
Subsequent, we are able to use some CSS positioning to make the slides sit as layers on high of each other. On this instance, you’ll discover we’re utilizing z-indexes and opacity transitions to permit our slides to fade out and in. Right here’s what that CSS may appear like:
.slide{
  place: absolute;
  left: 0px;
  high: 0px;
  width: 100%;
  z-index: 1;
  opacity: 0;
  transition: opacity 0.5s;
}
.active-slide{
  opacity: 1;
  z-index: 2;
}
.quiz-container{
  place: relative;
  peak: 200px;
  margin-top: 40px;
}
Now we’ll add some JavaScript to make the pagination work. As earlier than, order is vital, so this the revised construction of our code:
// Features
// New capabilities go right here

// Variables
// Identical code as earlier than

// Kick issues off
buildQuiz();

// Pagination
// New code right here

// Present the primary slide
showSlide(currentSlide);

// Occasion listeners
// New occasion listeners right here
We will begin with some variables to retailer references to our navigation buttons and hold observe of which slide we’re on. Add these after the decision to buildQuiz(), as proven above:
// Pagination
const previousButton = doc.getElementById("earlier");
const nextButton = doc.getElementById("subsequent");
const slides = doc.querySelectorAll(".slide");
let currentSlide = 0;
Subsequent we’ll write a operate to indicate a slide. Add this beneath the present capabilities (buildQuiz and showResults):
operate showSlide(n) {
  slides[currentSlide].classList.take away('active-slide');
  slides[n].classList.add('active-slide');
  currentSlide = n;
  if(currentSlide === 0){
    previousButton.fashion.show = 'none';
  }
  else{
    previousButton.fashion.show = 'inline-block';
  }
  if(currentSlide === slides.length-1){
    nextButton.fashion.show = 'none';
    submitButton.fashion.show = 'inline-block';
  }
  else{
    nextButton.fashion.show = 'inline-block';
    submitButton.fashion.show = 'none';
  }
}
Right here’s what the primary three traces do:
- Conceal the present slide by eradicating the active-slide class.
- Present the brand new slide by including the active-slide class.
- Replace the present slide quantity.
The subsequent traces introduce the next JavaScript logic:
- If we’re on the primary slide, disguise the Earlier Slide button. In any other case, present the button.
- If we’re on the final slide, disguise the Subsequent Slide button and present the Submit button. In any other case, present the Subsequent Slide button and conceal the Submit button.
After we’ve written our operate, we are able to instantly name showSlide(0) to indicate the primary slide. This could come after the pagination code:
// Pagination
...

showSlide(currentSlide);
Subsequent we are able to write capabilities to make the navigation buttons work. These go beneath the showSlide operate:
operate showNextSlide() {
  showSlide(currentSlide + 1);
}

operate showPreviousSlide() {
  showSlide(currentSlide - 1);
}
Right here, we’re making use of our showSlide operate to permit our navigation buttons to indicate the earlier slide and the following slide.
Lastly, we’ll have to hook the navigation buttons as much as these capabilities. This comes on the finish of the code:
// Occasion listeners
...
previousButton.addEventListener("click on", showPreviousSlide);
nextButton.addEventListener("click on", showNextSlide);
Now your quiz has working navigation!
What’s Subsequent?
Now that you’ve got a primary JavaScript quiz app, it’s time to get artistic and experiment.
Listed here are some solutions you may attempt:
- Strive alternative ways of responding to an accurate reply or a improper reply.
- Model the quiz properly.
- Add a progress bar.
- Let customers evaluation solutions earlier than submitting.
- Give customers a abstract of their solutions after they submit them.
- Replace the navigation to let customers skip to any query quantity.
- Create customized messages for every stage of outcomes. For instance, if somebody scores 8/10 or larger, name them a quiz ninja.
- Add a button to share outcomes on social media.
- Save your excessive scores utilizing localStorage.
- Add a countdown timer to see if individuals can beat the clock.
- Apply the ideas from this text to different makes use of, equivalent to a challenge value estimator, or a social “which-character-are-you” quiz.
FAQs on How one can Make a Easy JavaScript Quiz
How Can I Add Extra Inquiries to the JavaScript Quiz?
Including extra inquiries to your JavaScript quiz is a straightforward course of. It’s good to add extra objects to the questions array in your JavaScript code. Every object represents a query and has two properties: textual content (the query itself) and responses (an array of potential solutions). Right here’s an instance of how one can add a brand new query:
questions.push({
  textual content: 'What's the capital of France?',
  responses: [
  {
    text: 'Paris',
    correct: true
  },
  {
    text: 'London',
    correct: false
  },
  {
    text: 'Berlin',
    correct: false
  },
  {
    text: 'Madrid',
    correct: false
  }
  ]
});
On this instance, we’re including a query in regards to the capital of France, with 4 potential solutions. The right reply is marked with ‘appropriate: true’.
How Can I Randomize the Order of Questions within the Quiz?
Randomizing the order of questions could make your quiz more difficult and enjoyable. You may obtain this by utilizing the type() methodology mixed with the Math.random() operate. Right here’s how you are able to do it:
questions.kind(
  operate() {
    return 0.5 - Math.random();
  }
);
This code will randomly kind the questions array every time the web page is loaded.
How Can I Add a Timer to the Quiz?
Including a timer could make your quiz extra thrilling. You may simply add a timer to the quiz utilizing the JavaScript setInterval() operate. Right here’s a easy instance:
var timeLeft = 30;
var timer = setInterval(operate() {
  timeLeft--;
  doc.getElementById('timer').textContent = timeLeft;
  if (timeLeft <= 0) {
    clearInterval(timer);
    alert('Time is up!');
  }
}, 1000);
On this instance, the quiz will final for 30 seconds. The timer will replace each second, and when the time is up, an alert might be proven.
How Can I Present the Appropriate Reply if the Person Will get it Unsuitable?
You may present the proper reply by modifying the checkAnswer() operate. You may add an else clause to the if assertion that checks if the reply is appropriate. Right here’s how you are able to do it:
operate checkAnswer(query, response) {
  if (query.responses[response].appropriate) {
    rating++;
  } else {
    alert('The right reply is: ' + query.responses.discover(r => r.appropriate).textual content);
  }
}
On this instance, if the person’s reply is wrong, an alert might be proven with the proper reply.
How Can I Add Photos to the Questions?
You may add photographs to your questions by including an ‘picture’ property to the query objects. You may then use this property to show the picture in your HTML. Right here’s an instance:
questions.push({
 textual content: 'What is that this animal?',
 picture: 'elephant.jpg',
 responses: [
 { text: 'Elephant', correct: true },
 { text: 'Lion', correct: false },
 { text: 'Tiger', correct: false },
 { text: 'Bear', correct: false }
 ]
});
In your HTML, you may show the picture like this:
<img src="" id="questionImage">And in your JavaScript, you may replace the src attribute of the picture when displaying a brand new query:
doc.getElementById('questionImage').src = query.picture;On this instance, a picture of an elephant might be displayed when the query is proven.
How Do I Deal with A number of Appropriate Solutions in a JavaScript Quiz?
Dealing with a number of appropriate solutions entails permitting the person to pick out multiple reply and checking if any of the chosen solutions are appropriate. For instance, right here is how one can replace the above showResults() operate to deal with a number of appropriate solutions.
 operate showResults() {
  const answerContainers = quizContainer.querySelectorAll('.solutions');
  let numCorrect = 0;

  myQuestions.forEach((currentQuestion, questionNumber) => {
    const answerContainer = answerContainers[questionNumber];
    const selector = `enter[name=question${questionNumber}]:checked`;
    const userAnswers = Array.from(answerContainer.querySelectorAll(selector)).map(enter => enter.worth);

    if (userAnswers.kind().toString() === currentQuestion.correctAnswers.kind().toString()) {
      numCorrect++;
      answerContainers[questionNumber].fashion.coloration="lightgreen";
    } else {
      answerContainers[questionNumber].fashion.coloration="crimson";
    }
  });

  resultsContainer.innerHTML = `${numCorrect} out of ${myQuestions.size}`;
}
Is It Essential to Keep Seperate JavaScript File and a CSS File?
Sustaining separate JavaScript and CSS information just isn’t a should. Nonetheless, it’s typically thought of a finest follow because it improves the readability and maintainability of your code.