
On this article, we’ll speak about React kind builders, try their core options, have a look at some vital elements to contemplate when selecting a kind builder, and discover some standard choices.
These standard choices embody:
Kinds play a essential function in partaking customers, amassing important info, enabling vital options in numerous functions, and permitting customers to enter info.
Nonetheless, constructing and controlling numerous sorts of varieties from scratch can take time and an entire lot of effort. And that’s the place kind builders are available.
Type builders are made to simplify kind creation in React functions, making the consumer expertise easy and pleasant.
Understanding React Type Builders
React kind builders make it simple to create and handle varieties in React apps. Among the many options they provide are:
- inputs, drop-downs, and extra are constructed into pre-built varieties
- administration of kind states
- the validation course of
- submission of kind information
Type builders supply numerous advantages, akin to:
- making the event course of quicker as a result of there’s much less code writing and state administration
- providing glossy interactions, clear validation, and user-friendly design
- dealing with on a regular basis duties akin to validation
- providing accessibility options to make varieties extra usable
Type builders supply numerous options to builders, akin to:
- choosing a builder and following its integration information
- integrating the shape based mostly on the builder’s interface (both drag-and-drop or code-based)
- creating parts and defining validation guidelines, labels, and information varieties
- describe how the shape reacts to consumer interactions
The varied options kind builders may supply embody:
- drag-and-drop, which is accessible for non-technical customers
- code customization
- a mixture of code enhancing and drag-and-drop performance
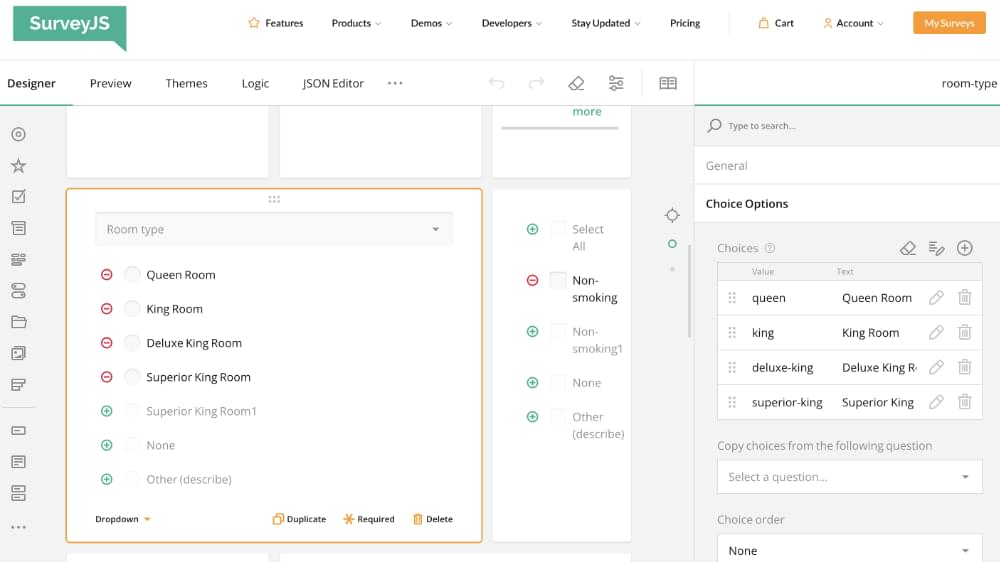
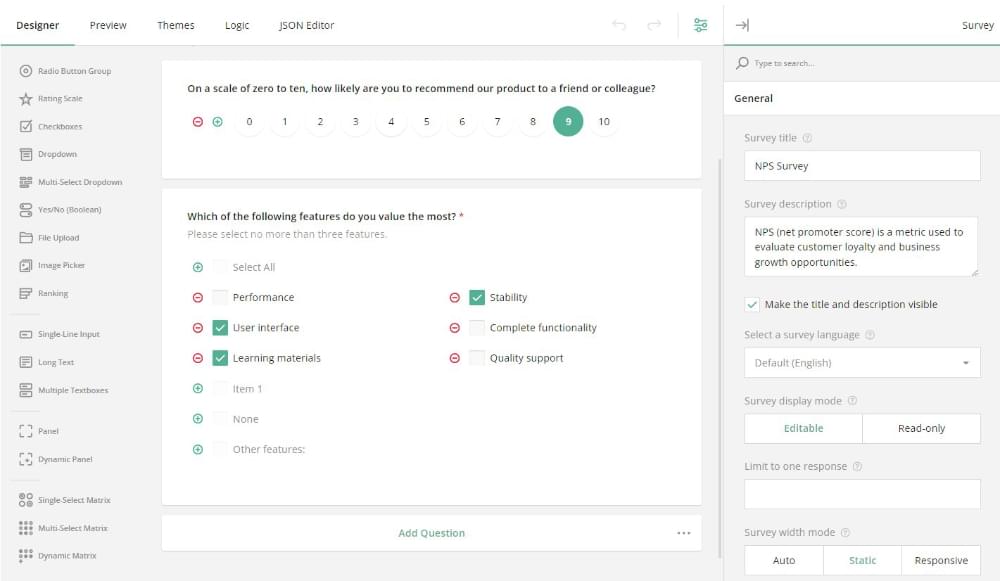
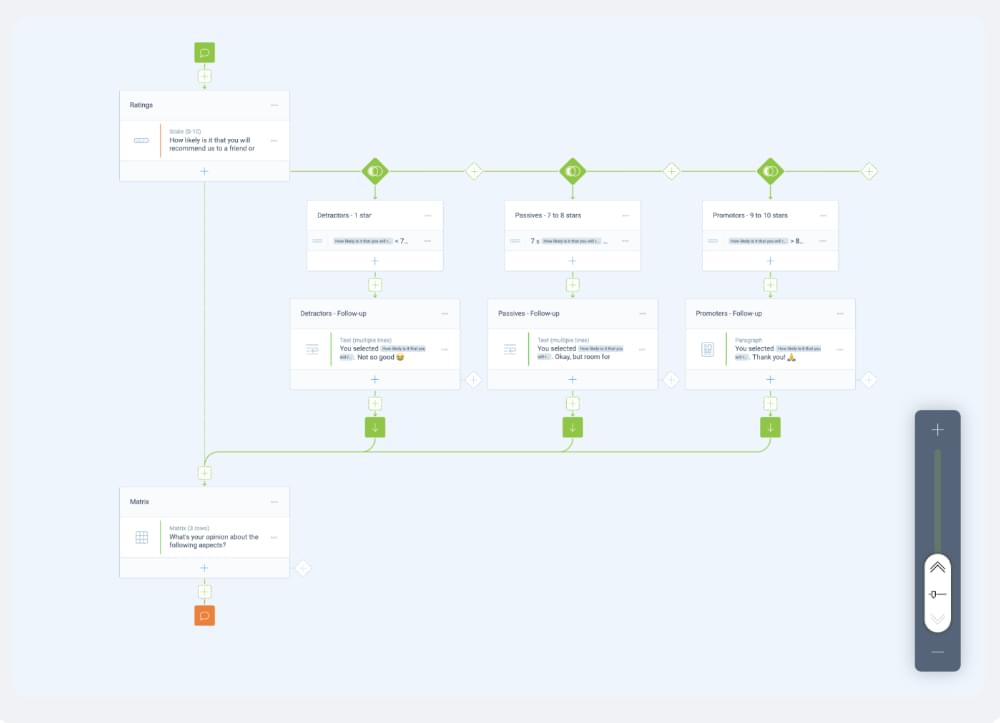
SurveyJS Type Builder is an open-source UI element in React that completely blends with any backend system and offers the chance to create and magnificence many dynamic HTML varieties in a React utility.
You possibly can simply expertise all of the options of this manner builder through this fast demo with none required integration.
SurveyJS options
- a devoted GUI for conditional guidelines
- kind branching and an built-in CSS theme editor for customized kind styling and branding
- TypeScript assist
- integration with any backend framework (examples for PHP, Node.js, and ASP.NET included)
- producing JSON kind definitions (schemas) in actual time
- a no-code, drag-and-drop interface that makes kind creation accessible to anybody
Within the sections beneath, we’ll cowl the step-by-step strategies to get began with the SurveyJS kind builder element in a React utility.
SurveyJS set up
Set up the survey-creator-react npm package deal. The very first thing is to put in the survey-creator-react (rendering code) npm package deal utilizing the command beneath:
npm set up survey-creator-react --saveThe command above makes positive the survey-creator-core package deal is put in mechanically as a dependency.
SurveyJS kinds configuration
The subsequent step is to import the Survey Creator and SurveyJS Type Library stylesheets as indicated beneath:
import "survey-core/defaultV2.min.css";
import "survey-creator-core/survey-creator-core.min.css";
Survey creator configuration
The subsequent step is to configure the Survey Creator element. The code beneath is used to configure the Survey Creator element by specifying its properties in a configuration object:
const creatorOptions = {
showLogicTab: true,
isAutoSave: true
};
The article above allows the next properties:
showLogicTabshows the Logic tab within the tab panelisAutoSavemechanically saves the survey JSON schema on each change
Now, we have to go the configuration object to the SurveyCreator constructor, as proven within the code beneath, to instantiate Survey Creator after which assign the produced occasion to a continuing that will likely be used later to render the element:
import { SurveyCreator } from "survey-creator-react";


export operate SurveyCreatorWidget() {
const creator = new SurveyCreator(creatorOptions);
}
Rendering Survey Creator
To render Survey Creator, all that’s wanted is to import the SurveyCreatorComponent, embody it within the template, and go the occasion we created within the earlier step to the element’s creator attribute:
import { SurveyCreatorComponent, SurveyCreator } from "survey-creator-react";


export operate SurveyCreatorWidget() {
  const creator = new SurveyCreator(creatorOptions);

  return (
    <SurveyCreatorComponent creator={creator} />
  )
}
Saving and loading survey mannequin schemas
By default, Survey Creator makes survey mannequin schemas as JSON objects, which makes it simple to persist the objects on the server, save updates and restore earlier saved schemas.
All that’s wanted to avoid wasting a JSON object is to implement the saveSurveyFunc operate, which accepts two arguments:
saveNo. That is an incremental quantity of the present change.callback. It is a callback operate. When referred to as, thesaveNohave to be handed as the primary argument whereas the second argument is ready totrueorfalsebased mostly on whether or not the server utilized or rejected the change.
The code beneath exhibits the best way to use the saveSurveyFunc operate to avoid wasting a survey mannequin schema in a neighborhood storage or an online service:
export operate SurveyCreatorWidget() {

creator.saveSurveyFunc = (saveNo, callback) => {

  window.localStorage.setItem("survey-json", creator.textual content);
  callback(saveNo, true);


  saveSurveyJson(
      "https://your-web-service.com/",
      creator.JSON,
      saveNo,
      callback
  );
};

}


operate saveSurveyJson(url, json, saveNo, callback) {


}
Extra particulars on the best way to load a survey mannequin schema JSON into Survey Creator and the best way to examine a survey JSON schema earlier than saving it when operating a Node.js server may be discovered right here.
Managing picture uploads in SurveyJS
Including a emblem or background to a survey is a typical requirement. We will both add them within the survey header or inside Picture and Picture Picker questions when making a survey, and SurveyJS has made this simple to do. All that’s wanted is to embed them within the survey and theme JSON schemas as Base64 URLs.
Nonetheless, this technique will increase the schema dimension. One good technique to get round that is to add pictures to a server and save solely picture hyperlinks within the JSON schemas.
The code beneath exhibits the best way to use the onUploadFile occasion. The choices.recordsdata parameter saves the pictures despatched to the server:
export operate SurveyCreatorWidget() {

  creator.onUploadFile.add((_, choices) => {
    const formData = new FormData();
    choices.recordsdata.forEach(file => {
      formData.append(file.title, file);
    });
    fetch("https://instance.com/uploadFiles", {
      technique: "put up",
      physique: formData
    }).then(response => response.json())
      .then(consequence => {
        choices.callback(
          "success",

          "https://instance.com/recordsdata?title=" + consequence[options.files[0].title]
        );
      })
      .catch(error => {
        choices.callback('error');
      });
  });

}
The onUploadFile occasion is used to implement picture add. Its choices.recordsdata parameter shops the pictures we should always ship to our server. When the server returns a picture hyperlink, the choices.callback(standing, imageLink) technique is named with a success because the standing parameter handed and a hyperlink to the uploaded picture because the imageLink parameter.
Now, to view the applying, we have to run npm run begin within the command line and open http://localhost:3000/ within the browser.
Different helpful SurveyJS hyperlinks
You may additionally discover these SurveyJS assets helpful:
The survey-creator supply code is publicly accessible right here on GitHub.
FormBuilder
FormBuilder is a drag-and-drop React kind builder library for creating net varieties with a easy however highly effective net interface.
Right here’s a fast demo to expertise all of the options of the FormBuilder with none required integration.
The next npm packages make up FormBuilder:
FormBuilder options
- an online interface with drag and drop performance
- adaptive structure
- kind validation
- built-in net parts based mostly on React Suite library
- simple integration of customized parts
- export kind to JSON and import kind from JSON
- highly effective internationalization
- customized actions
- computable properties
- templates (varieties inside a kind)
Making a easy kind demo with FormBuilder
To create a easy demo kind, we’ll comply with the directions within the Getting Began part of the FormBuilder docs.
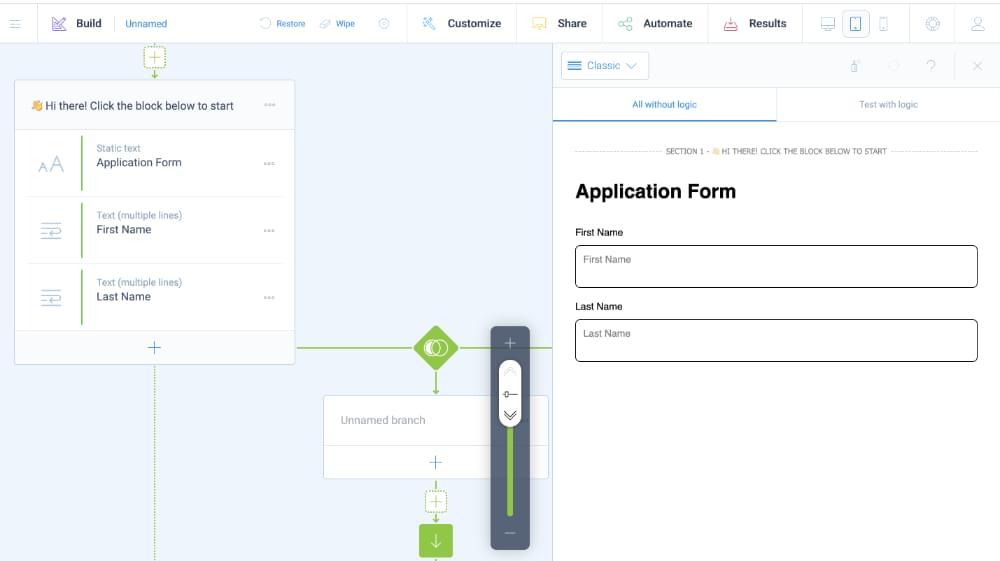
Following the information and opening the demo web page within the browser, we’ll see the shape builder editor web page just like the picture beneath.
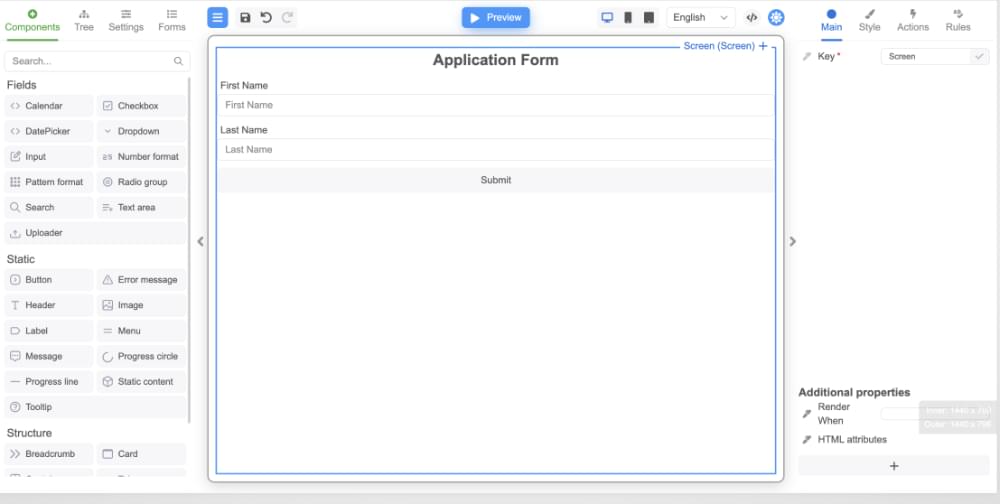
We construct the varieties right here, as seen within the directions information. For the sake of this demo, we’ve created a mini-application kind, added an onClick occasion handler for the shape, and added validation on the enter area. We’ve additionally added a tooltip for the button and adjusted the format of the error message show.
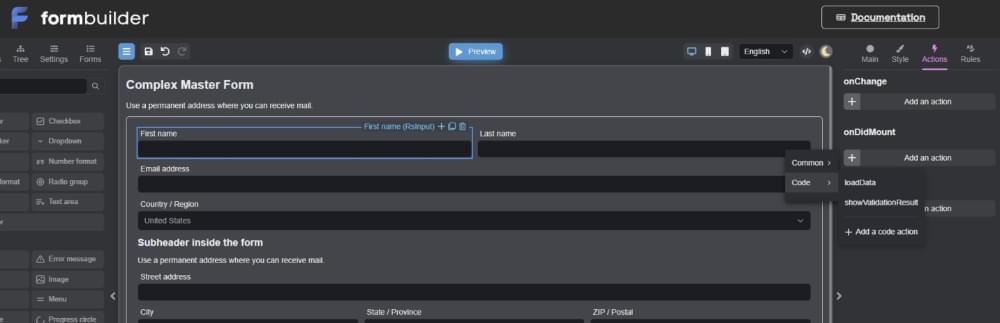
Not like SurveyJS — which permits even non-techies to arrange all kind configurations, together with their conduct, and not using a line of code — FormBuilder requires manually including code for actions, as proven within the picture beneath.
Including the FormViewer element
Now, we are able to add the FormViewer element, answerable for displaying the shape in FormBuilder.
The FormBuilder makes use of the FormViewer element to show the shape within the heart panel.
However we have to set up the package deal first through the use of this command:
npm set up @react-kind-builder/core @react-kind-builder/parts-rsuiteNow, we are able to use the FormViewer element with parts from the React Suite library to render the Software kind by pasting the code beneath within the App.js file:
import React from 'react'
import {view} from '@react-form-builder/components-rsuite'
import {FormViewer} from '@react-form-builder/core'

const kind = `{
  "kind": {
    "key": "Display screen",
    "sort": "Display screen",
    "props": {},
    "kids": [
      {
        "key": "RsInput 1",
        "type": "RsInput",
        "props": {}
      }
    ]
  }
}`

operate App() {
  return <FormViewer view={view} getForm={_ => kind}/>
}

export default App
View a fuller instance
import { FormViewer, IFormViewer } from '@react-form-builder/core'
import { useEffect, useRef } from 'react'
import { view } from '@react-form-builder/components-rsuite'
const FormJSON = `
{
"model": "1",
"actions": {
"logValue": {
"physique": "console.log('FirstName', e.information.title, 'LastName', e.information.lastname)",
"params": {}
}
},
"tooltipType": "RsTooltip",
"errorType": "RsErrorMessage",
"kind": {
"key": "Display screen",
"sort": "Display screen",
"props": {},
"kids": [
{
"key": "RsHeader 1",
"type": "RsHeader",
"props": {
"content": {
"value": "Application Form"
}
},
"css": {
"any": {
"object": {
"textAlign": "center"
}
}
}
},
{
"key": "name",
"type": "RsInput",
"props": {
"label": {
"value": "First Name"
},
"placeholder": {
"value": "First Name"
}
},
"schema": {
"validations": [
{
"key": "required"
},
{
"key": "min",
"args": {
"limit": 3
}
}
]
},
"occasions": {
"onChange": [
{
"name": "validate",
"type": "common"
},
{
"name": "logValue",
"type": "code"
}
]
}
},
{
"key": "lastname",
"sort": "RsInput",
"props": {
"label": {
"worth": "Final Identify"
},
"placeholder": {
"worth": "Final Identify"
}
},
"occasions": {
"onChange": [
{
"name": "validate",
"type": "common"
},
{
"name": "logValue",
"type": "code"
}
]
},
"schema": {
"validations": [
{
"key": "required"
},
{
"key": "min",
"args": {
"limit": 3
}
}
]
}
},
{
"key": "RsButton 1",
"sort": "RsButton",
"props": {
"kids": {
"worth": "Submit"
}
},
"occasions": {
"onClick": [
{
"name": "validate",
"type": "common"
},
{
"name": "logValue",
"type": "code"
}
]
}
}
]
},
"localization": {},
"languages": [
{
"code": "en",
"dialect": "US",
"name": "English",
"description": "American English",
"bidi": "ltr"
}
],
"defaultLanguage": "en-US"
}
`
const formName = 'Instance'
async operate getFormFn(title?: string) {
if (title === formName) return FormJSON
throw new Error(`Type '${title}' is just not discovered.`)
}
operate App() {
const ref = useRef<IFormViewer>(null)
useEffect(() => {
if (ref.present) {
console.log('Viewer', ref.present)
}
}, [])
return (
<FormViewer
view={view}
getForm={getFormFn}
formName={formName}
initialData={({})}
viewerRef={ref}
/>
)
}
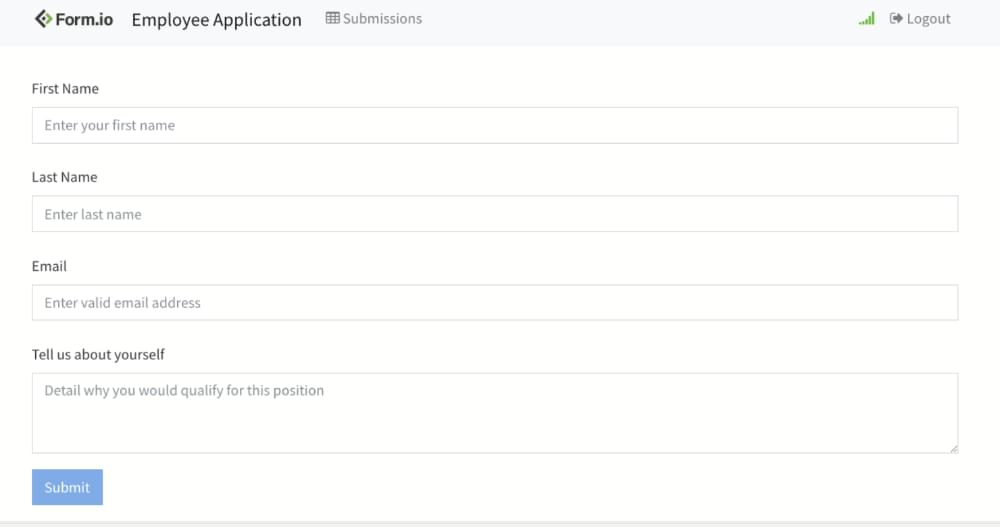
export default AppSubsequent is to verify the shape by visiting localhost:3000 within the browser to view the applying kind.
Under is an instance of what we should always see on the display screen.

Tripetto
Tripetto is a kind software that gives a whole and distinctive resolution for creating and operating varieties and surveys.
Tripetto comes as a SaaS utility, precisely like Typeform and SurveyMonkey.
Tripetto’s operating operation consists of three core pillars:
- a visible kind builder to create varieties (kind designer)
- runners to run these varieties (and acquire responses)
- blocks (query varieties) to be used within the varieties
One benefit of Tripetto is that the operating pillars above can be found as fully client-side parts.
They run within the context of the consumer’s browser and don’t depend on a selected backend, which suggests they’ll serve in any client-side setting that helps JavaScript.
Additionally, it provides whole freedom in dealing with the info that Tripetto generates or consumes.
The backend may also be no matter we would like.
Tripetto options
How Tripetto works
There are numerous choices for utilizing Tripetto’s visible kind builder to create varieties. We will combine it into any mission, however it’s non-compulsory. The only option for any mission is determined by a number of the required wants.
Among the many choices out there are:
However we’ll use the Tripetto Studio net app to create a kind and clarify the best way to use the Tripetto runner to run it.
The Tripetto Studio net app permits anybody who wants a kind or survey. Whether or not they want a kind for an internet site or need to create a survey that may be shared utilizing a direct hyperlink, it’s all attainable with the Studio.
Making a easy demo kind with Tripetto
To create a easy kind, all we have to do is go to tripetto.app and begin constructing our kind.
Right here, we’ve made an utility kind with out creating an account following the documentation information.
But when we need to save (and publish) our kind and retailer it, we have to create an account by clicking on the consumer icon within the high proper nook of the applying.
Now that we’ve constructed our kind, we’ll run it and lengthen the shape to incorporate extra query varieties. Right here’s extra details about doing that within the documentation.
Type.io
Type.io allows the event of form-based progressive net functions. It permits builders to create varieties speedily utilizing a painless drag-and-drop kind builder interface. Creating these varieties generates a JSON schema to render the varieties inside the progressive utility dynamically and mechanically create the API to obtain the info when the shape is submitted.
Type.io gives every part wanted to construct enterprise course of workflow functions with little effort and sophisticated, form-driven functions inside a number of instances with out compromising safety or sanity.
Type.io options
The next are a number of the essential options of Type.io:
- OAuth suppliers
- dynamic varieties
- simple function enhancement
- consumer administration and auth
- varieties and information administration
- role-based entry management
- automated API creation
- a drag-and-drop interface
- superior conditional logic
The Type.io web site incorporates extra particulars about its options.
Getting began with Type.io
To get began with Type.io, listed below are the fundamental steps you’ll be able to take:
Following the described steps above, we’ll find yourself with one thing like the shape pictured beneath.
We will do many different issues with the FormView utility, akin to white labeling, altering the brand, navigating to a thankyou web page, and so forth. For extra details about the FormView utility, please try the FormView consumer information.
A Comparability Between SurveyJS and FormBuilder
| Options | SurveyJS | FormBuilder |
|---|---|---|
| Drag and drop kind builder | Sure | Sure, however requires handbook coding for actions. |
| JSON varieties | Sure | Sure |
| Customizable structure | Sure | Sure |
| Ease of Use | Sure (Nice Documentation) | Sure |
| Language translation | Sure | Sure |
| Conditional Logic | Sure | Sure |
| Pricing | Free with Important options |
Please confer with the documentation for extra options out there in SurveyJS and FormBuilder.
Selecting the Proper Type Builder
When selecting a kind builder software for a corporation or mission, we clearly want to make sure that the software we select has all the suitable options to fulfill our necessities.
Listed below are some normal options to search for when choosing the best kind builder software program for a enterprise or mission:
- user-friendliness
- the power to customise varieties simply
- conditional logic and a variety of query varieties
- simple integration with third-party programs
- automation of labor processes
- free trial and primary demo choices
- an offline options software
- reporting and analytics
Conclusion
Kinds are useful in nearly each enterprise and trade to gather buyer info and suggestions. A robust kind builder software helps us create skilled trying varieties for this function. On this article, we’ve launched 4 highly effective React kind builder instruments and given a short overview of how they work. Optimistically, at the least one in all them could be what you want.
Different choices you may like to take a look at embody Amplify Studio’s Type Builder and the BEEKAI kind builder.
To study extra about working with varieties in React, try Working with Kinds in React.