
When constructing fashionable, inventive web sites, managing complicated interactions and sustaining clear, modular code may be difficult. That’s the place piecesjs is available in—a light-weight front-end framework designed to simplify the method of working with native net elements. It offers the flexibleness to handle elements dynamically, with out the heavy constraints of conventional frameworks.
At its core, a “Piece” is a modular element that may reside anyplace in your webpage. Every Piece operates independently, with its personal encapsulated types and interactions, making it simple to handle and reuse throughout your web site.
Piecesjs dynamically imports solely the required JavaScript and CSS for every web page, optimizing efficiency whereas sustaining flexibility. In contrast to bigger frameworks, it permits you to construct precisely what you want, free from the overhead of pointless code or restrictive architectures.
Designed for inventive web sites that rely closely on JavaScript logic—dealing with a number of steps, states, and occasions—piecesjs presents a streamlined and scalable method for builders trying to create extremely interactive experiences.
The mission is constructed utilizing Vite, offering quick compilation and straightforward asset imports, together with CSS via postCSS (with a sound postCSS configuration).
The primary strains of piecesjs code have been written in March 2024.
In case you’d wish to discover the repository earlier than we dive in, yow will discover it right here:
GitHub: https://github.com/piecesjs/piecesjs
Fundamental Options
- Dynamic JS & CSS Import: Routinely hundreds solely the required JavaScript and CSS for every web page, bettering efficiency.
- Scoped Occasion Administration: Simply handle occasions inside a selected element’s scope utilizing
this.on()andthis.off()strategies. - Handy Entry to Scoped HTMLElements: Shortly entry components throughout the element utilizing
this.$()orthis.domAttr('slug'). - Seamless Communication Between Energetic Elements: Elements can talk effortlessly with one another utilizing
this.name()orthis.emit(). - Environment friendly International CSS Administration: Streamlined dealing with of world CSS imports to maintain your types organized.
- PiecesManager: Gives centralized entry to all energetic items, simplifying element administration.
Why I Created piecesjs
As a former front-end lead and inventive developer at Locomotive, we prioritized establishing shared workflows amongst builders. Our purpose was to create a cohesive unit, facilitating seamless mission transitions and inter-developer help. Locomotive has at all times been dedicated to sharing its methodologies, whether or not via various front-end and back-end boilerplates or instruments like locomotive-scroll. It felt pure for me to proceed constructing my very own instruments, bettering them, and sharing them with others.
Initially of my freelance profession, I used to be nonetheless utilizing the locomotive-front-end-boilerplate, which relied on modularjs. I needed to create one thing extra fashionable, with dynamic imports that load solely the required code whereas preserving key ideas.
I’m not an enormous fan of huge fashionable frameworks for varied causes. Once I develop a workflow, I wish to evolve and adapt it to new requirements and applied sciences. Whether or not working solo or in a group, I’ve at all times discovered it rewarding to develop our personal instruments (like locomotive-scroll) and share them.
On Which Infrastructure Does piecesjs Work?
Piecesjs is very adaptable and might run with varied CMS platforms, constructions, and workflows. As an npm package deal, it integrates seamlessly with totally different setups.
piecesjs has already been examined with the next:
- Astro
- 11ty
- WordPress
- Shopify
It’s coding time
Now, let’s get began with piecesjs. First, we’ll stroll via construct a easy static mission utilizing the framework, so you’ll be able to familiarize your self with its core ideas. Afterward, we’ll take a look at incorporate it right into a extra complicated workflow, utilizing Astro for instance.
Lifecycle of a Piece
In piecesjs, every “Piece” follows a well-defined lifecycle. When you’ve listed and loaded all of your items (we’ll clarify how to do that beneath), the framework routinely handles every one because it’s added to the DOM. When a Piece is inserted into the DOM, it’ll routinely set off its premount() and mount() capabilities, making certain it initializes accurately and is prepared for interplay.
premount(firstHit = true){}
render(){} // if you wish to do a Javascript rendering
mount(firstHit = true){} // firstHit parameter is about to false if the operate is named after an replace or if its content material is modified.
replace(){} //Referred to as if an attribute is modified. Then it'll name unmount(), premount() and mount().
unmount(replace = false){} // replace = true if this unmount() is named after an attribute is modified.
Create Your First Items
Let’s begin by constructing a easy web page with a header, two counters, and a reset button. Every of those three components will likely be a separate “Piece.” On this part, we’ll stroll via creating and loading the items, enabling communication between them, observing their lifecycle, and experimenting with customized occasions.
Set up
npm i piecesjs --saveHeader.js – A Easy Piece Rendered in HTML
You possibly can render a Piece instantly in HTML or use JavaScript to create it as a reactive element—all of it will depend on your preferences. On this instance, we’ll create a header Piece that will likely be rendered instantly within the HTML.
In your index.html:
// The log attribute is helpful to log the lifecycle of the Piece
<c-header log class="c-header">
    <h1>piecesjs</h1>
</c-header>
Create a .js file in /property/js/elements named Header.js:
import { Piece } from 'piecesjs';

class Header extends Piece {
  constructor() {
    // The second argument is non-obligatory in the event you do not want a selected css
    tremendous('Header', {
      stylesheets: [() => import('/assets/css/components/header.css')],
    });
  }
}

// Register the customized ingredient
customElements.outline('c-header', Header);
Create a .css file in /property/css/elements/header.css:
.c-header {
  show: block;
  padding: 20px;
}
Now we will load the Piece in an app.js file:
import { load } from 'piecesjs';

//
// IMPORT elements
//
// ------------------------------------------------------------
load('c-header', () => import('/property/js/elements/Header.js'));
// ------------------------------------------------------------
Lastly, add a script tag to your HTML file to load app.js. Congratulations 🎉—you’ve created your first Piece! It’s going to now be dynamically loaded onto your web page, together with its personal types. In case you’re working with a full web site and the header isn’t displayed on a selected web page, its stylesheet (header.css) received’t be unnecessarily loaded, holding your web site environment friendly.
Counter.js – A Reactive Piece
Now, let’s create a extra complicated Piece—a counter with reactive values, rendered utilizing JavaScript. We’ll construct two counters on this instance.
In your index.html:
<!--
For the primary one, we'll outline a cid attribute to have the ability to talk
with it particularly.
-->
<c-counter cid="firstCounter" class="c-counter" worth="2"></c-counter>
<c-counter class="c-counter" worth="0"></c-counter>
Within the folder /property/js/elements, let’s create a file Counter.js to create a brand new Piece:
import { Piece } from 'piecesjs';

class Counter extends Piece {
  constructor() {
    tremendous('Counter', {
      stylesheets: [() => import('/assets/css/components/counter.css')],
    });
  }

  // We've got a "worth" attribute on our customized ingredient,
  // so we've to init the getter and setter to an easy accessibility.
  get worth() {
    return this.getAttribute('worth');
  }

  set worth(worth) {
    return this.setAttribute('worth', worth);
  }
}

customElements.outline('c-counter', Counter);
Let’s put some type in counter.css within the folder /property/css/elements:
.c-counter {
	show: block;
	border: 1px stable black;
	padding: 20px;
	margin: 10px 0;
	border-radius: 12px;
}
In Counter.js let’s render the html within the Piece. We will try this with the render operate:
render() {
  return `
    <h2>${this.title} element</h2>
    <p>Worth: ${this.worth}</p>
    <button class="c-button">Increment</button>
  `;
}
⚠️ Don’t overlook so as to add your new Piece in your app.js and cargo it to make magic occur:
import { load } from 'piecesjs';

//
// IMPORT elements
//
// ------------------------------------------------------------
load('c-header', () => import('/property/js/elements/Header.js'));
load('c-counter', () => import('/property/js/elements/Counter.js'));
// ------------------------------------------------------------
And right here is the outcome:
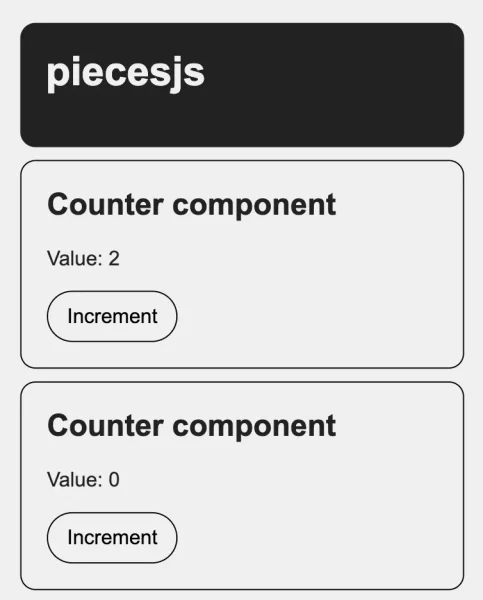
Subsequent, we’ll make the counter interactive by including a click on occasion to the button, permitting it to increment the worth. To realize this, it’s essential add the static get observedAttributes() operate to watch modifications to the worth attribute and set off a re-render when updates happen.
In Counter.js:
mount() {
  // Question with this.$
  this.$button = this.$('button')[0];

  // Occasion listener
  this.on('click on', this.$button, this.increment);
}

increment() {
  this.worth = parseInt(this.worth) + 1;
}

unmount() {
  // All the time necessary to take away the listener right here
  this.off('click on', this.$button, this.increment);
}

// Necessary to routinely name the replace operate if attribute is altering
// and to set off a brand new render
static get observedAttributes() {
  return ['value'];
}
Tada! 🎉 You’ve efficiently created your first reactive Piece!
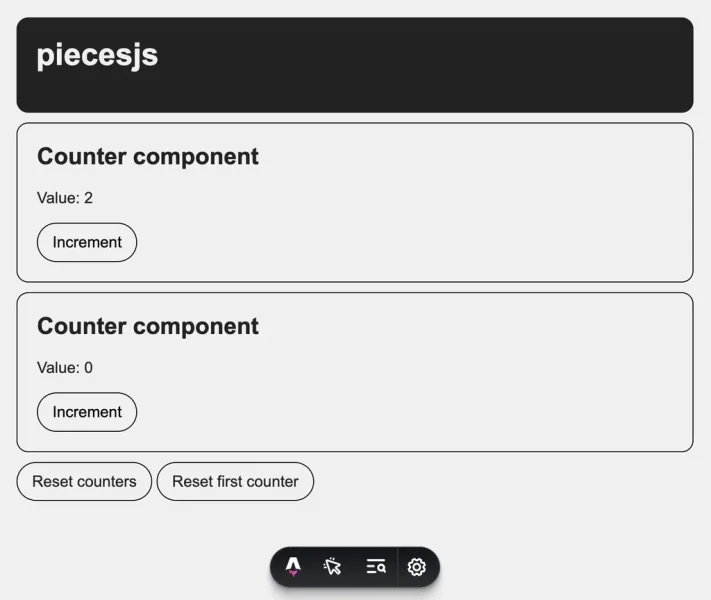
Reset.js – Communication Between Items
Subsequent, we’ll create a Reset Piece to speak with our counters and reset their values. We’ll add two reset elements to the HTML: one to reset all counters, and one other to reset solely the primary counter. To realize this, we’ll use a counterToReset attribute, assigning it the identical worth because the cid of the counter we need to reset.
<c-reset class="c-button"> Reset counters </c-reset>
<c-reset class="c-button" counterToReset="firstCounter"> Reset first counter </c-reset>
In your elements folder you’ll be able to create Reset.js:
import { Piece } from 'piecesjs';

class Reset extends Piece {
  constructor() {
    tremendous('Reset');
  }

  mount() {
    // occasion title, goal, operate, params (non-obligatory)
    this.on('click on', this, this.click on);
  }

  click on(e) {
	  // operate title, params, Piece title, cid of the piece (non-obligatory)
    this.name('reset', {}, 'Counter', this.counterToReset);
  }

  unmount() {
    this.off('click on', this, this.click on);
  }

	// getter and setter for straightforward entry to the counterToReset attribute
	// with a "this.counterToReset"
  get counterToReset() {
    return this.getAttribute('counterToReset');
  }

  set counterToReset(worth) {
    return this.setAttribute('counterToReset', worth);
  }
}

// Register the customized ingredient
customElements.outline('c-reset', Reset);
Let’s take a more in-depth take a look at the click on operate: The name() technique triggers the reset operate outlined within the Counter.js Piece. The final argument of the name() technique is non-obligatory and refers back to the Piece’s cid. If this argument is omitted, the reset operate will likely be utilized to all present Counter elements.
⚠️ Don’t overlook to load this new Piece in your app.js.
Yet one more helpful technique we haven’t lined but is the emit() technique. For instance, if you wish to dispatch a customized occasion to inform all Items of an motion, you are able to do so inside a Piece:
this.emit('one thing', doc, {
  worth: 'One thing is occurred',
});
By default, the occasion is triggered on the doc, however you may also scope it to any particular HTMLElement.
You possibly can then hear for this occasion from any Piece utilizing the next:
mount() {
	this.on('one thing', doc, this.somethingIsHappened);
}

somethingIsHappened(e) {
	console.log(e.element) // {worth: 'One thing is occurred'}
}

// and remember to take away the occasion listener
unmount() {
	this.off('one thing', doc, this.somethingIsHappened);
}
That’s it! I hope you loved this primary half and that it evokes you to discover additional with piecesjs. Up subsequent, we’ll undergo a fast implementation of piecesjs with Astro. However earlier than we dive in, listed below are some helpful particulars:
MEMO: Listing of Strategies, Properties, and Attributes
For a complete record of strategies, properties, and attributes accessible in piecesjs, you’ll be able to seek advice from the official documentation:
Some Suggestions for Bigger Tasks
Web page Transitions
In case your mission entails web page transitions, it’s important to re-trigger your elements load() calls. This operate scans the up to date DOM and initializes any elements that haven’t been loaded but.
load('c-header', () => import('/property/js/elements/Header.js'));To streamline this course of, contemplate placing your load() calls right into a utility operate that may be referred to as after every web page transition, as soon as the brand new container is within the DOM.
The unmount() operate is routinely referred to as when a Piece (or customized ingredient) is faraway from the DOM. This implies there’s no must manually verify which Items must be unmounted throughout a web page transition. Since piecesjs is constructed on native net elements, this cleanup is dealt with for you.
International types
With piecesjs, you may also embody international or shared types to handle variables, utilities, and extra. It’s even attainable to import a complete folder with Vite, making it extremely environment friendly 🔥
For instance, you’ll be able to create a types.js file, import it into your HTML, and cargo the CSS recordsdata like this:
// Import a folder
import.meta.glob('../css/settings/*.css', { keen: true });
import.meta.glob('../css/frequent/*.css', { keen: true });

// Import a file
import '../css/doc.css';
Implementation Instance with Astro
Now, let’s discover combine what we’ve constructed with piecesjs into an Astro mission. This can primarily contain adjusting the mission construction and file paths, however the course of is kind of easy.
To get began, run the next command in your terminal:
npm create astro@newest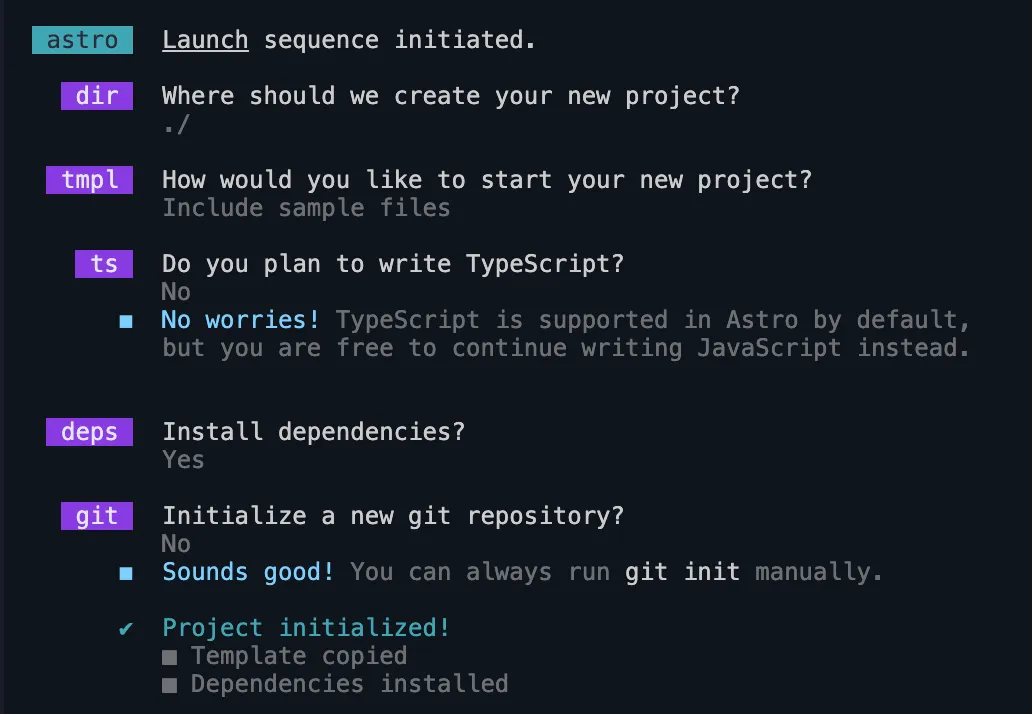
On the second immediate, select “Embody pattern recordsdata”. Then, choose “No” for TypeScript and “Sure” to put in dependencies.
After that, you’ll be able to set up piecesjs by working the next command:
npm i piecesjs --saveIn pages/index.astro you’ll be able to clear up the file and paste our earlier code:
---
import Structure from '../layouts/Structure.astro';
---

<Structure title="Welcome to Astro and piecesjs">

    <c-header log class="c-header">
      <h1>piecesjs</h1>
    </c-header>

    <c-counter cid="firstCounter" class="c-counter" worth="2"></c-counter>
    <c-counter class="c-counter" worth="0"></c-counter>

    <c-reset class="c-button"> Reset counters </c-reset>
    <c-reset class="c-button" counterToReset="firstCounter">Reset first counter</c-reset>

</Structure>
In Structure.astro, you’ll be able to paste this straightforward instance. For ease of implementation, all the pieces wanted to load the items and customary types will likely be included instantly on this file:
---
const { title } = Astro.props;
---

<!doctype html>
<html lang="en">
  <head>
    <meta charset="UTF-8" />
    <meta title="description" content material="Astro description" />
    <meta title="viewport" content material="width=device-width" />
    <hyperlink rel="icon" sort="picture/svg+xml" href="/favicon.svg" />
    <meta title="generator" content material={Astro.generator} />
    <title>{title}</title>
  </head>
  <physique>
    <slot />

    <script>
      import { load } from 'piecesjs';

      load('c-header', () => import('../elements/Header.js'));
      load('c-counter', () => import('../elements/Counter.js'));
      load('c-reset', () => import('../elements/Reset.js'));

      // Frequent types
      // Import a folder
      import.meta.glob('../types/reset/*.css', { keen: true });
      import.meta.glob('../types/frequent/*.css', { keen: true });

      // Import a file
      import '../types/international.css';
    </script>
  </physique>
</html>
Now, place your CSS recordsdata and folders in /src/types and your items in /src/elements. After that, replace the stylesheet paths for every Piece to match the brand new construction. For instance, in Header.js, the trail ought to be up to date as follows:
class Header extends Piece {
  constructor() {
    tremendous('Header', {
      stylesheets: [() => import('/src/styles/components/header.css')],
    });
  }
}

// Register the customized ingredient
customElements.outline('c-header', Header);
And that’s it! Now you’ll be able to discover the whole Astro ecosystem with piecesjs and customise it nonetheless you want—whether or not that’s connecting a CMS or anything you’ll be able to think about.
Thanks, and I hope this evokes you to create superb initiatives with piecesjs!