
Have you ever ever thought-about constructing your personal Chrome extension however thought the method could be too advanced? Properly, you’re in for a shock! Within the subsequent jiffy, we’ll not solely lay out the fundamentals of what a Chrome extension is, but in addition information you thru 5 simple steps to craft your personal.
Curious to see how? Let’s dive in!
What Are We Going To Construct?
In latest instances, we’ve witnessed an explosion in AI capabilities. And whereas our new cyber companions provide unprecedented ranges of help, in addition they include a reminder: don’t share delicate data with them.
I don’t learn about you, however as a rule, my fingers are quicker than my mind. So, to forestall potential slip-ups, we’re going to construct a “molly-guard” for ChatGPT.
Should you’re scratching your head questioning what a molly-guard is, it initially referred to a defend put over a button or change to forestall unintended activation. In our context, it’s a digital guardian guaranteeing we don’t overshare.
Customers can specify a listing of phrases or phrases they deem delicate. Ought to we try and submit a message to ChatGPT containing any of these phrases, the extension will bounce into motion, disabling the submit button and saving us from a possible oversight.
To comply with together with this tutorial, you’ll want a ChatGPT account. Don’t have one? You possibly can join free right here.
The code for this tutorial is accessible on GitHub.
What Is a Google Chrome Extension?
Earlier than we get began, let’s make clear what a Chrome extension is. A Chrome extension is a small piece of software program designed to boost or modify the Chrome searching expertise. Extensions are developed utilizing normal internet applied sciences — HTML, JavaScript, and CSS — they usually can vary from easy instruments, like colour pickers, to extra intricate ones, like password managers. Many of those extensions can be found for obtain on the Chrome Net Retailer.
Word: for these eager on a deeper understanding of Chrome extensions, Google’s official documentation is a useful useful resource.
It’s price noting that Google Chrome extensions can take varied kinds based mostly on their supposed operate. Some have a browser motion, visibly represented by an icon subsequent to the tackle bar, offering fast entry to their options. Others may run silently within the background, throughout all internet pages or solely on particular ones, relying on their design.
For our tutorial, we’ll deal with an extension sort that makes use of a content material script. This script will permit us to work together and manipulate the DOM of a selected web page – in our case, the ChatGPT interface.
Step 1: Create the Extension Information
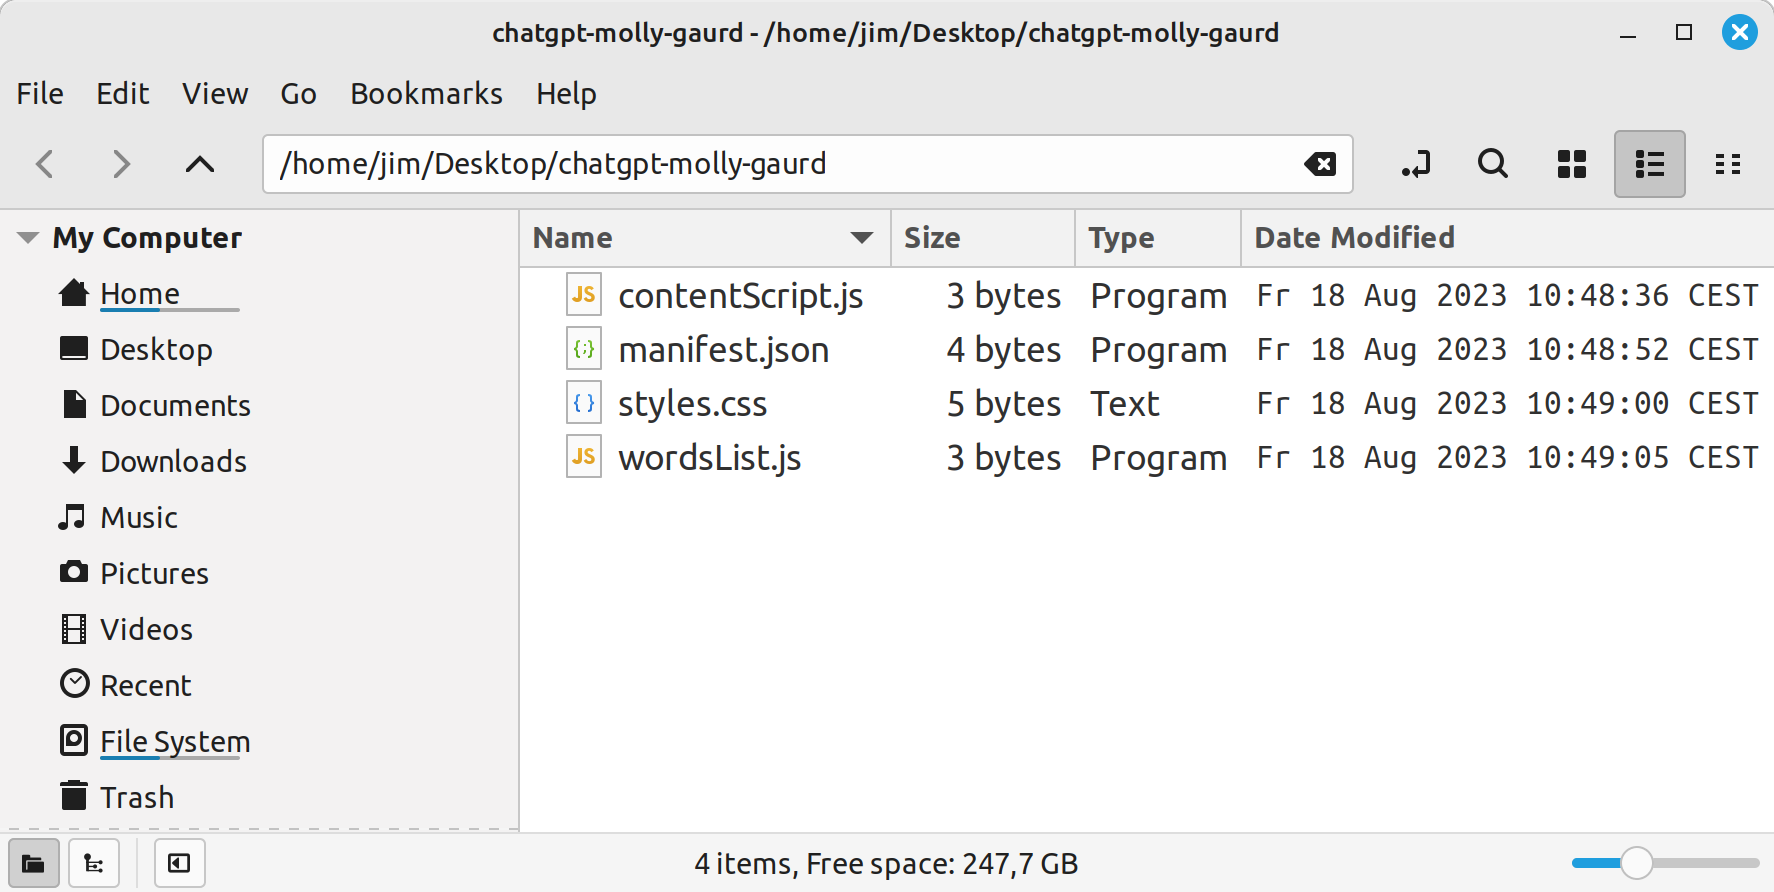
To kick issues off, we have to arrange the essential construction for our Chrome extension. Our extension, named chatgpt-mollyguard, will likely be organized in a devoted folder. This extension listing will comprise all the mandatory information to make our molly-guard operate easily.
Right here’s a breakdown:
- Folder:
chatgpt-molly-guard. That is the foundation listing of our extension. All our information will reside on this folder. - File:
manifest.json. The center and soul of our extension. This file comprises metadata in regards to the extension, equivalent to its identify, model, and permissions it requires. Most significantly, it specifies which scripts to run and on which web sites. - File:
contentScript.js. As its identify suggests, this JavaScript file comprises the content material script. This script has direct entry to the online web page’s content material, permitting us to scan for delicate phrases and modify the web page as wanted. - File:
wordsList.js. A JavaScript file devoted to containing the checklist of delicate phrases or phrases the person specifies. We’ve separated this to make it simple for customers to customise their checklist with out diving into the core performance incontentScript.js. - File:
kinds.css. A stylesheet so as to add some aptitude to our extension. Whereas our main aim is performance, there’s no hurt in making our warnings or prompts look good!
To get began:
- Create a brand new folder in your laptop named
chatgpt-molly-guard. - Inside this folder, create the 4 information listed above.
- With the information in place, we’re prepared to start out filling within the particulars.
Within the subsequent sections, we’ll dive deeper into every file and description its particular function within the extension.
Step 2: Create the Manifest File
The manifest file is a JSON file that gives the browser with important particulars about your extension. This file have to be situated within the extension’s root listing.
Right here’s our manifest construction. Copy this code into manifest.json:
{
  "manifest_version": 3,
  "identify": "ChatGPT Molly-guard",
  "model": "1.0",
  "description": "Prevents submission if particular phrases are typed into chat window",
  "content_scripts": [
    {
      "matches": ["https://chat.openai.com/*"],
      "css": ["styles.css"],
      "js": ["wordsList.js", "contentScript.js"]
    }
  ]
}
The manifest file has three obligatory fields, specifically: manifest_version, identify and model. Every part else is non-obligatory.
Key Manifest Components
manifest_version: an integer specifying the model of the manifest file format. We’re utilizing Manifest V3, the newest model accessible. Remember that Google is actively phasing out Manifest V2 extensions in 2023.identify: a brief, plain textual content string (max 45 characters) that identifies the extension.model: one to 4 dot-separated integers figuring out the model of the extension.description: a plain textual content string (no HTML, max 132 characters) that describes the extension.content_scripts: this key specifies statically loaded JavaScript or CSS information for use each time a web page is opened that matches a URL sample (specified by thematcheskey). Right here, we’re saying that our script ought to run on any URL beginning withhttps://chat.openai.com/.
Of the above fields, Google will use the identify, model and description when displaying your extension on Chrome’s extension administration web page (
Although our manifest is streamlined for our wants, many different fields can add depth and performance to your extensions. Fields such motion, default_locale, icons, and so forth, provide customization choices, UI management, and internationalization help.
For a complete overview of what’s accessible within the manifest.json file, please seek the advice of Google’s official documentation.
Step 3: Create the Content material Script
Content material scripts in a Chrome extension are JavaScript information that run within the context of internet pages. They’ll view and manipulate the DOM of the web page they’re working on, enabling them to switch each the online web page’s content material and habits.
That is our content material script. Copy the next code into the contentScript.js file:
const debounce = (callback, wait) => {
  let timeoutId = null;
  return (...args) => {
    window.clearTimeout(timeoutId);
    timeoutId = window.setTimeout(() => {
      callback.apply(null, args);
    }, wait);
  };
};

operate containsForbiddenWords(worth) {
  return forbiddenWords.some(phrase => worth.toLowerCase().consists of(phrase.toLowerCase()));
}

operate updateUI(goal) {
  const containsForbiddenWord = containsForbiddenWords(goal.worth);
  const sendButton = goal.nextElementSibling;
  const parentDiv = goal.parentElement;

  if (containsForbiddenWord) {
    sendButton.disabled = true;
    parentDiv.classList.add('forbidden-div');
  } else {
    sendButton.disabled = false;
    parentDiv.classList.take away('forbidden-div');
  }
}

doc.physique.addEventListener('keyup', debounce((occasion) => {
  if (occasion.goal.id === 'prompt-textarea') updateUI(occasion.goal);
}, 300));

doc.addEventListener('keydown', (e) => {
  if (e.goal.id === 'prompt-textarea' && e.key === 'Enter') {
    if (containsForbiddenWords(e.goal.worth)) {
      e.stopPropagation();
      e.preventDefault();
    }
  }
}, true);
Let’s break this down, step-by-step.
On the high of the file we declare a debounce operate. We’ll use this to make sure that we don’t verify for forbidden phrases each time the person presses a key. That may be numerous checks! As a substitute, we’ll wait till the person cease typing earlier than doing something. I’ve taken this snippet from Josh W. Comeau’s web site, so you may try his put up for a proof of the way it works.
Subsequent comes a containsForbiddenWords operate. Because the identify implies, this operate returns true if the textual content handed to it comprises any of our forbidden phrases. We’re lower-casing each values to make sure that the comparability is case-insensitive.
The updateUI operate determines if any forbidden phrases are current within the chat field. If they’re, it disables the ship button and provides a CSS class (forbidden-div) to the chat field’s mother or father div. We’ll leverage this within the subsequent step to offer a visible cue to the person.
The script lastly registers two occasion listeners:
- The primary is about to set off on a
keyupoccasion. It checks if the modified component is our goal (the chat window) after which calls theupdateUIoperate. Because of ourdebounceoperate, this gained’t run repeatedly, however solely after a short pause in typing. - The second occasion listener is listening for a
keydownoccasion on our goal. Particularly, it’s expecting the Enter keypress, which, if pressed whereas a forbidden phrase is within the textual content space, will forestall the the browser’s default motion (on this case a type submission).
This successfully stops messages with forbidden phrases from being despatched, each by disabling the ship button and by intercepting and halting the Enter keypress.
You’ll additionally notice that we’re utilizing occasion delegation, because the ChatGPT interface is an SPA. In SPAs, segments of the person interface are dynamically changed based mostly on person interactions, which may inadvertently detach any occasion listeners sure to those parts. By anchoring our occasion listeners to the broader DOM and selectively focusing on particular parts, we will circumvent this subject.
Step 4: Including Some Styling
Whereas the core performance of our extension is to forestall sure submissions, it’s vital for customers to immediately acknowledge why their motion is being blocked. Let’s add some styling to offer a visible cue and improve the person expertise.
Right here’s the rule we’re utilizing. Add it to the kinds.css file:
.forbidden-div {
  border: 2px strong crimson !vital;
  background-color: #ffe6e6 !vital;
}
This provides a outstanding crimson border and a refined crimson background to the enter space at any time when forbidden phrases are detected. It instantly attracts consideration and signifies that one thing isn’t proper. By toggling a category on a mother or father div, we will simply flip this on and off.
The !vital flag can also be price noting. When coping with internet pages that you just don’t personal — like on this case with ChatGPT — the prevailing kinds may be very particular. To make sure our kinds take priority and are utilized accurately, the !vital flag overrides any potential conflicts as a result of present kinds’ specificity.
Step 5: Take a look at the Extension
There’s one final step: populating the checklist of forbidden phrases that our extension ought to monitor for. We are able to add these in forbiddenWords.js:
const forbiddenWords = [
  "my-company.com",
  "SitePoint",
  "Jim",
];
Now that our customized Google Chrome extension is all arrange, it’s time to check its performance and guarantee every part is working as supposed.
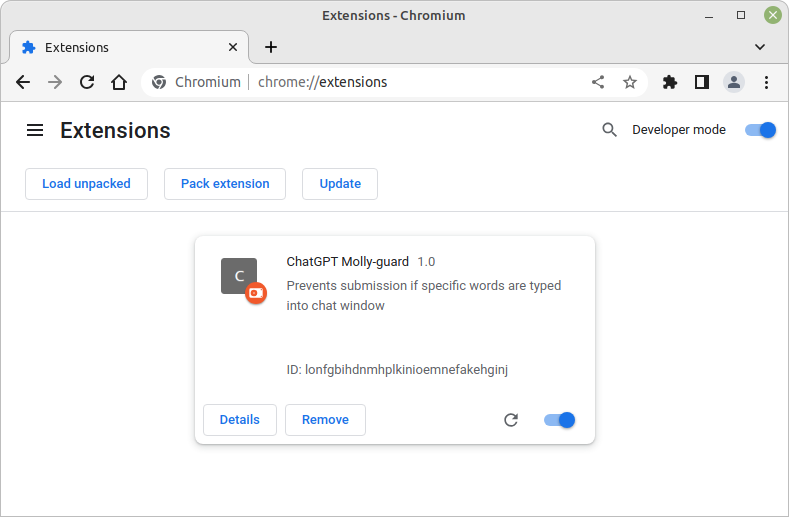
- Open Chrome and navigate to
- Activate the Developer mode toggle, situated on the high proper nook.
- Click on on the Load unpacked button, which is able to now be seen.
- Navigate to and choose the listing of your extension (
chatgpt-molly-guardin our case) and click on Choose. Our extension ought to now seem within the checklist of put in extensions.
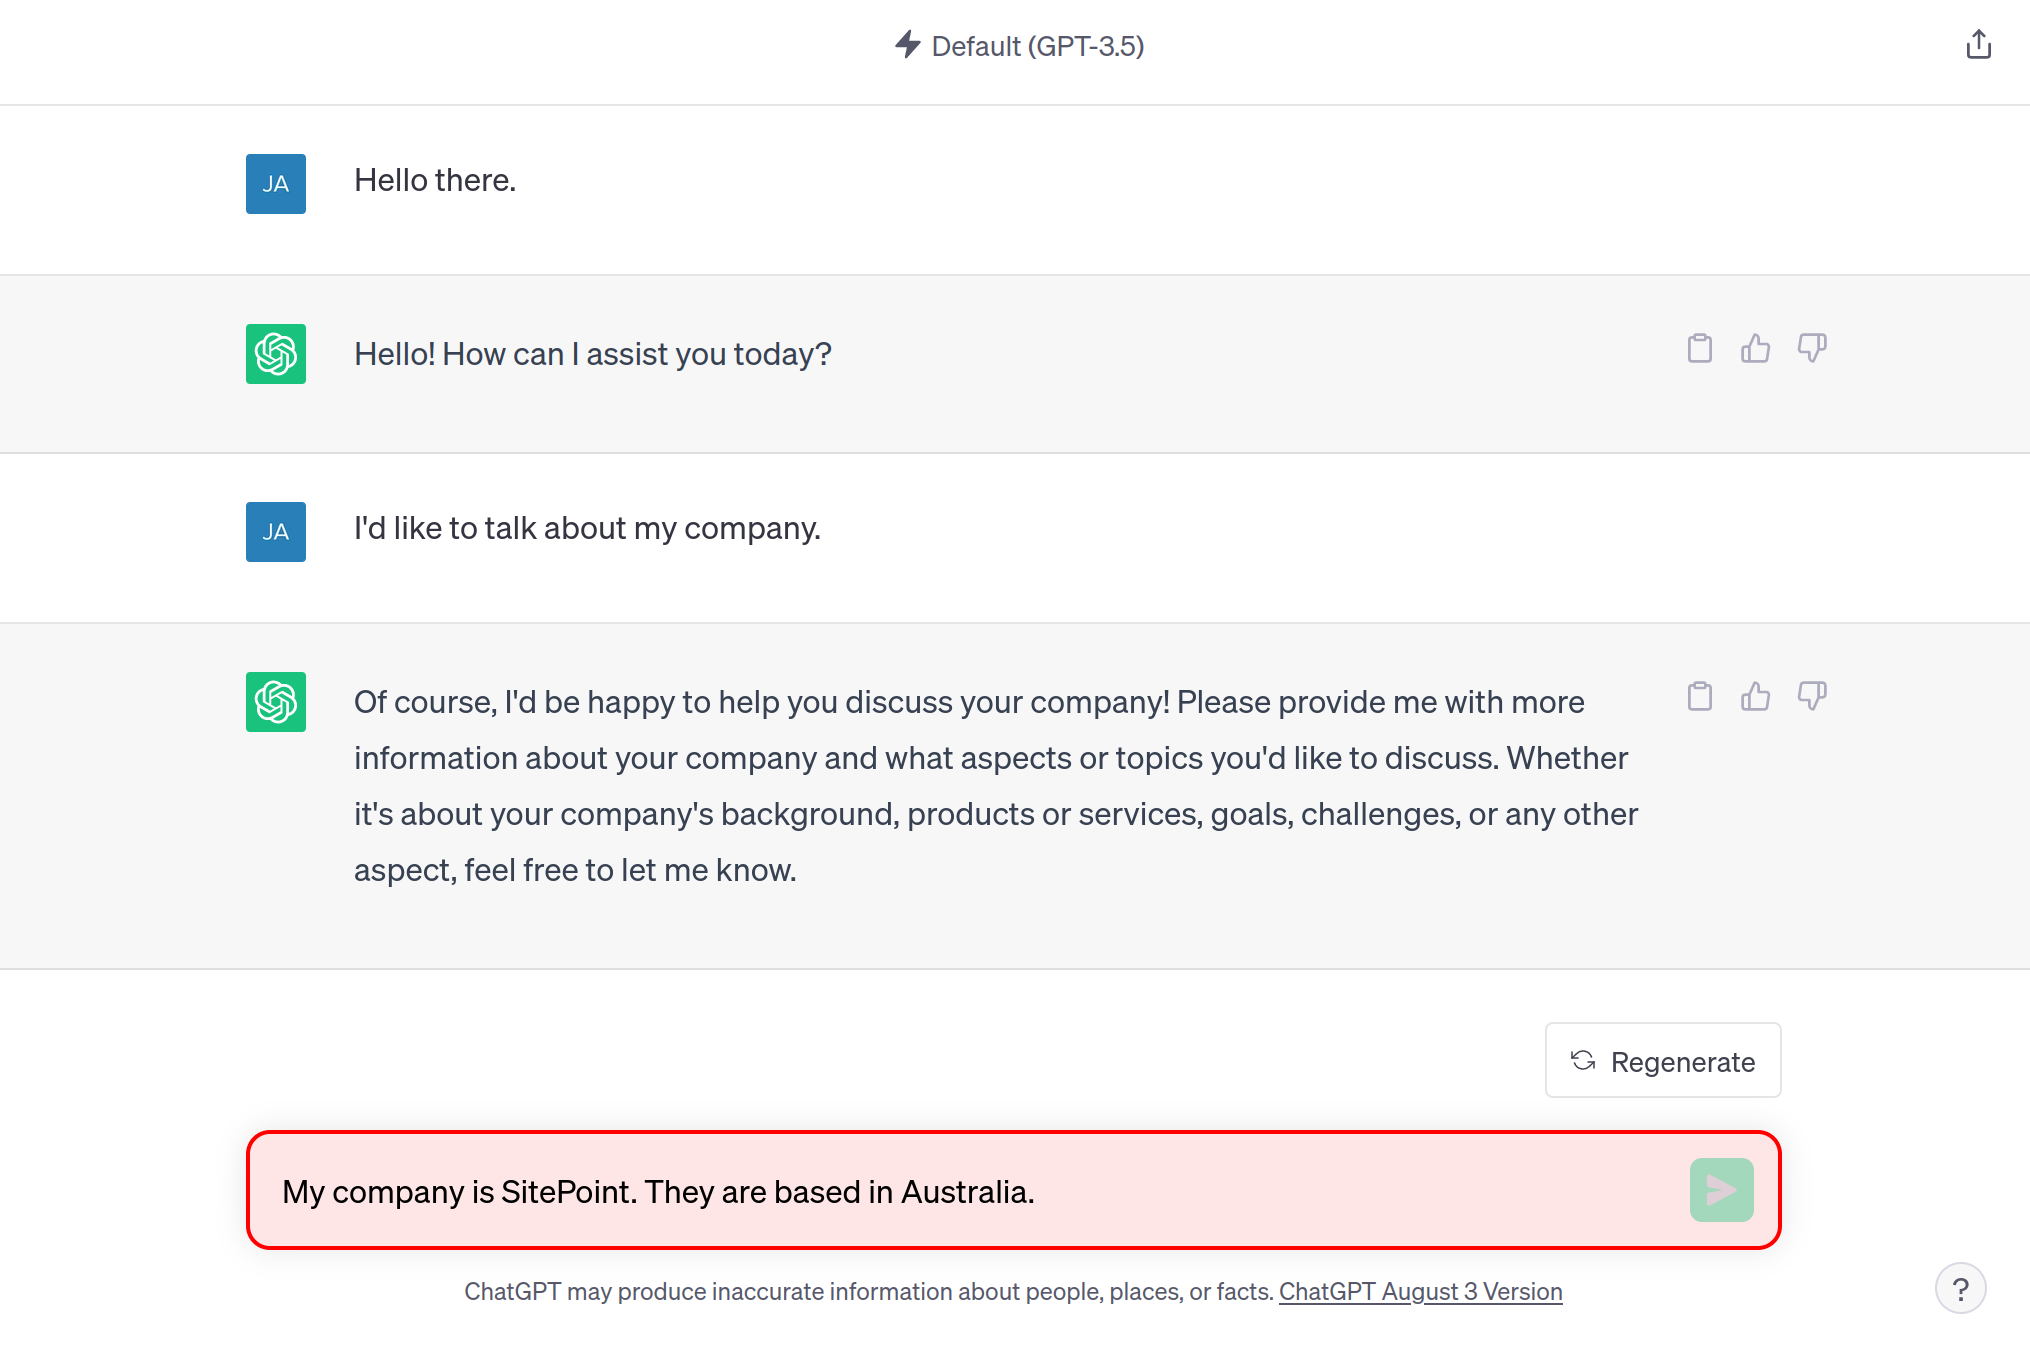
Now, to check out the performance, navigate to ChatGPT, refresh the web page and take a look at typing in your restricted phrases to see if the extension behaves as anticipated.
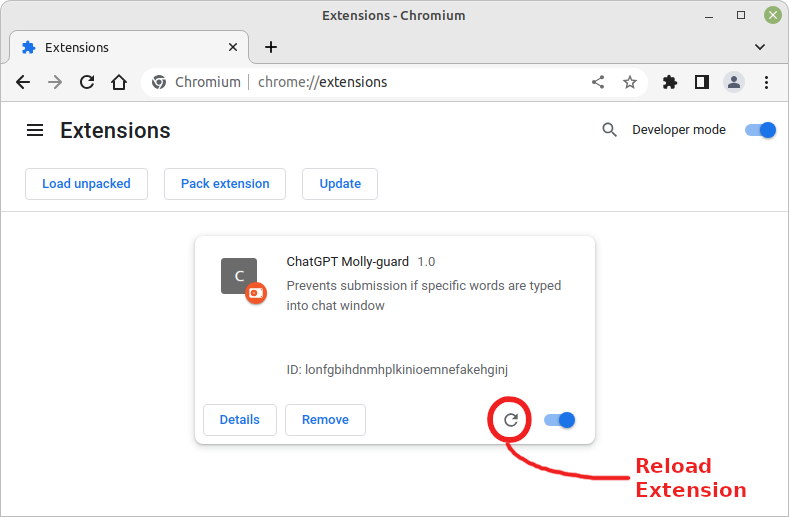
If all has gone in response to plan, it is best to see one thing like the image under.
Should you make any adjustments to your extension code — equivalent to updating the thesaurus — you should definitely hit the round arrow within the backside right-hand nook on the extension’s card on the extension web page. This may reload the extension. You’ll then must reload the web page that your extension is focusing on.
Taking it Additional
Our present primary Chrome extension serves its goal, however there’s at all times room for enchancment. Should you’re desperate to refine the extension additional and develop its capabilities, there are some strategies under.
1. Person Interface for Phrase Record Enhancing
At the moment, our extension depends on a predefined checklist of restricted phrases. Implementing a user-friendly interface would permit customers to dynamically add, take away, or modify phrases on the go. This may be accomplished utilizing a popup UI (browser motion) that opens when the extension icon is clicked, the place customers can handle their checklist. You’ll additionally must persist the phrases to storage.
2. Dealing with Mouse Paste Occasions
Whereas our extension detects keypresses, customers can bypass this by pasting delicate data utilizing the mouse’s right-click menu. To plug this loophole, we may add an occasion listener for the paste occasion (or consolidate each to hear for enter). This may make sure that, whether or not data is typed or pasted, the filter stays strong.
3. Contextual Override
Blocking sure phrases is usually a bit too generic. For instance, I would wish to block mentions of “Jim” (my identify) however haven’t any points referencing “Jim Carey”. To handle this, take into account introducing a function which might disable the molly-guard till the following submit occasion happens.
You can even try the Firefox model of this extension, the place this performance has been applied.
Conclusion
As we’ve found, constructing your personal Google Chrome extension isn’t an insurmountable problem. We began with a transparent goal: to create a protecting layer for ChatGPT, guaranteeing that delicate data stays confidential. All through this tutorial, we’ve seen how a handful of information and a little bit of code may end up in a purposeful and helpful browser extension.
For these desperate to dive deeper, Google’s official Chrome Extension documentation is a wonderful beginning place. Moreover, the Chrome Extension migration information affords insights on the transition to Manifest V3, which is essential given the approaching phase-out of Manifest V2 in 2023.
Now that you just’ve seen the way it’s accomplished, I encourage you to refine, improve, and adapt the extension to fit your wants. You’re welcome to hit me up on Twitter and let me learn about any enhancements you’ve made.