
On this article, we’ll discover methods to enhance rendering efficiency with out sacrificing graphical high quality, based mostly on the SINGULARITY demo I constructed with Fiber + Drei. (In case you’re utilizing Vanilla Three.js, don’t fear—you may nonetheless discover one thing helpful!)
Mannequin Planning and Choice
Not all objects in a scene require the identical stage of element. Distant objects can have simplified fashions and low-resolution textures with out considerably impacting the visible expertise. Subsequently, it’s essential to first perceive how objects can be positioned relative to the digicam.
Low-poly fashions cut back the variety of triangles processed, reducing the load on the CPU and GPU. It’s important to strike a stability between element and efficiency by selecting optimized property. Ideally, your scene ought to be as light-weight as doable and reduce the variety of on-screen polygons.
The place can you discover low-poly property? On websites like Sketchfab, you may examine the load and variety of triangles of assorted property, so optimization begins right here (I like to recommend downloading in GLB format). In case you use property particularly created in your mission, maintain the beforehand talked about components in thoughts.
One other factor to think about is the scale of the textures: smaller is healthier, however it is dependent upon the place the mesh is positioned relative to the digicam and the way detailed the feel must be. I recommend utilizing textures with resolutions which might be multiples of two (128, 256, …, 1024) for optimum reminiscence administration.
Asset Pre-Optimization
For this step, we’ll be utilizing Blender, which presents quite a lot of important instruments for mannequin optimization.
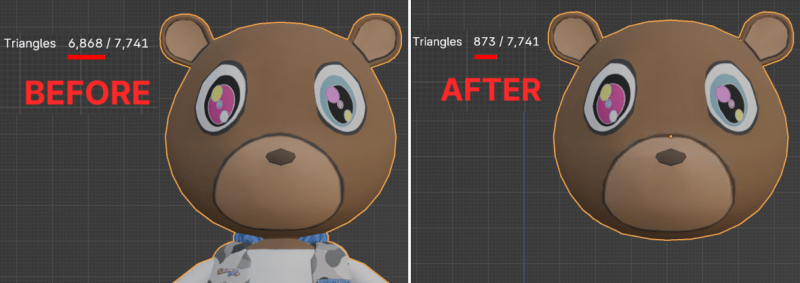
- Within the editor, you may view the wireframe of your fashions and take away any unused elements.
- Decimate Modifier: This device reduces the variety of polygons whereas sustaining the general form. You could find it beneath Modifiers > Generate > Decimate.
Right here’s a comparability exhibiting the earlier than and after outcomes of those two easy steps.
If the objects are static and the lighting doesn’t change, you should use a course of referred to as texture baking to pre-render lights and shadows into the textures. I like to recommend plugins like Simplebake, however there are additionally free options. Right here’s an instance:

Exporting the Asset
I normally choose exporting in .glb or .gltf. The distinction between the 2 is that .glb contains all textures and the mannequin in a single file, whereas .gltf retains them separate, permitting for higher flexibility in the event that they should be modified or compressed later.
Blender’s export choices provide a texture compression device (beneath the Textures possibility). In case you export in .gltf, you may additional compress the textures utilizing free instruments like compresspng.com or compressjpeg.com.
Utilizing gltfjsx
The gltfjsx package deal permits for additional compression of fashions and generates a React element to import them into your scene. For the demo, I used the next command:
npx gltfjsx mannequin.glb -S -T -t-Spermits mesh simplification.-Ttransforms the asset for the online (Draco compression, pruning, resizing).-tprovides TypeScript definitions.
In my case, this step lowered the asset’s dimension by 90%!
Three.js Scene Optimization
There are a number of instruments you should use to watch the efficiency and metrics of a Three.js scene. Right here’s a listing of the instruments I used to investigate the influence of assorted optimization strategies:
- r3f-perf for react-three-fiber (my favourite) shows statistics on shaders, textures, and the variety of vertices.
- stats.js, much like r3f-perf, is suitable with vanilla Three.js.
- spector.js is a Chrome and Firefox extension for monitoring WebGL purposes. It information every draw name by taking a snapshot of the information and producing a screenshot. Appropriate with vanilla Three.js and Fiber, it’s extraordinarily helpful for understanding what occurs in each single body of your scene.
- Chrome DevTools Efficiency Monitoring: This device information brief periods and lets you analyze reminiscence, GPU, and CPU utilization. It’s significantly useful for monitoring efficiency throughout key moments, similar to consumer interactions.
Now, we’re able to implement some optimizations in our scene.
Canvas and Pixel Ratio
Think about enjoying a online game on a PC: your display screen has a set decision, however the recreation can render at a distinct one. By decreasing the rendering decision and disabling sure options, we will enhance efficiency. Subsequently, it’s essential to know the boundaries to set with a view to keep away from efficiency points, particularly for customers with high-resolution screens.
The Pixel Ratio signifies the ratio between bodily pixels and CSS pixels (learn extra right here). It may be obtained by calling window.devicePixelRatio and varies based mostly on the kind and backbone of the display screen.
Right here’s easy methods to set the dpr (gadget pixel ratio):
const [dpr, setDpr] = useState(getDevicePixelRatio());
<Canvas dpr={dpr} />;
In case you determine to restrict DPR, you should use this method:
const getDevicePixelRatio = () => {
	const desktopMaxPixelRatio = 1;
	const mobileMaxPixelRatio = 1.5;

	// right here you may implement your gadget kind detection logic
	if (isMobile()) {
		return Math.min(mobileMaxPixelRatio, window.devicePixelRatio);
	}

	return Math.min(desktopMaxPixelRatio, window.devicePixelRatio);
}
Understand that the DPR can dynamically change over time (e.g., if the consumer strikes the tab to a second display screen), so it’s higher to pay attention for adjustments with an occasion listener!
Utilizing the PerformanceMonitor, you may monitor your software and dynamically alter parameters as efficiency fluctuates. Right here’s how I carried out it within the demo:
<PerformanceMonitor
	bounds={() => [30, 500]} // body/second restrict to set off capabilities
	flipflops={1} // most adjustments earlier than onFallback
	onDecline={() => {
		setDpr(dpr * 0.8); // decrease dpr by 20%
		setIsPPEnabled(false); // disable put up processing
	}}
	onFallback={() => setLowSetting(true)}
/>
On this case, the conduct is sort of aggressive: I first attempt to alter the DPR and disable post-processing. If that’s not sufficient, I take away some objects from the scene utilizing setLowSetting.
Setting antialias: false on the canvas can even enhance efficiency, however it compromises graphic high quality, particularly at low dpr. I like to recommend disabling it when efficiency drops or in case you are utilizing post-processing. We’ll delve deeper into this matter later.
Suspending Rendering When Not Wanted
To stop the appliance from persevering with to render when it isn’t seen on the display screen, you may dynamically alter the canvas frameloop. This additionally prevents the Efficiency Monitor from triggering unnecessarily, as browsers restrict assets allotted to inactive tabs after just a few seconds.
const [frameloop, setFrameloop] = useState<'at all times' | 'by no means'>('at all times');

useEffect(() => {
  const handleVisibilityChange = () => setFrameloop(doc.hidden ? 'by no means' : 'at all times');
  doc.addEventListener('visibilitychange', handleVisibilityChange);
  return () => doc.removeEventListener('visibilitychange', handleVisibilityChange);
}, []);

<Canvas frameloop={frameloop} />;
Instancing
Quoting the Three.js documentation: “If it is advisable to render a lot of objects with the identical geometry and supplies, however with completely different world transformations, this may assist you cut back the variety of draw calls and thus enhance general rendering efficiency.“
The problem, nevertheless, lies on this half: “with the identical geometry and supplies.” In my case, I’ve many meshes that repeat however all have completely different textures. To deal with this, I created a small element that situations the repeated meshes and, on every body, applies the world transformations to the non-instanced meshes containing the textures. This permits the creation of situations for the sections which might be frequent between completely different meshes—on this case, the plastic cowl of the CD.
Here’s a primary model of what I carried out:
// imported 3D mannequin
const { nodes } = useGLTF('/models-transformed/cd-transformed.glb') as GLTFResult;
const textures = useLoader(THREE.TextureLoader, texturesSrc);

const situations = useRef<THREE.InstancedMesh>(null);
const meshRefs = useMemo(() => texturesSrc.map(() => React.createRef<THREE.Group>()), [texturesSrc]);

// We'll apply the feel to a aircraft
const geometry = useMemo(() => new THREE.PlaneGeometry(1.05, 1.01), []);

// Right here we synchronize the world transformations of the occasion with the feel aircraft
useFrame(() => {
	if (!situations.present) return;

	situations.present.youngsters
		.filter(occasion => !!occasion.occasion)
		.forEach((occasion, i) => {

			const p = new THREE.Vector3();
			const r = new THREE.Quaternion();

			if (meshRefs[i]?.present) {
				meshRefs[i].present?.getWorldPosition(p);
				meshRefs[i].present?.getWorldQuaternion(r);
			}

			occasion.setRotationFromQuaternion(r);
			occasion.place.set(p.x, p.y, p.z);
		});
});

return (
	<Cases ref={situations} >
		<bufferGeometry {...nodes.object.geometry} />
		<meshStandardMaterial />
		{textures.map((texture: THREE.Texture, i: quantity) => (
			<React.Fragment key={`cd-fragment-${i}`}>
				<Occasion key={`cd-i-${i}`} />

				<mesh key={`mesh-${i}`} geometry={geometry} >
					<meshBasicMaterial map={texture} aspect={THREE.DoubleSide} />
				</mesh>
			</React.Fragment>
		))}
	</Cases>
);
This code permits all duplicated meshes to be rendered in a single draw name:

As you may see, the plastic part of the CD case is rendered in a single draw name. These pictures had been captured utilizing the Spector.js extension.
Understand that this technique can have synchronization points, particularly when used with shifting objects. If you recognize a greater approach to deal with this, let me know within the feedback!
Physics
I made a decision to make use of Rapier, because it’s straightforward to implement because of the react-three-rapier package deal.
Environment friendly Collider Selection
I used easy shapes (field, sphere) for colliders as an alternative of letting the engine generate them robotically. This helps lighten the simulation, particularly when there are a lot of objects on display screen
<CuboidCollider place={[0, -3, 0]} args={[1000, 3, 1000]} />Decreasing the physics replace frequency can additional lower the computational load. Nonetheless, be cautious—this will alter the conduct of the simulation!
<Physics timeStep={1 / 30}/>To attain the springy drag-and-drop impact on particular person meshes, I created a element that integrates DragControls with Rapier’s RigidBody. Hyperlink to code

In observe, if you click on on a mesh, it transforms right into a static object that’s programmatically up to date by the DragControl. Upon launch, it returns to being dynamic. This method lets you keep physics even in the course of the drag.
Lights and Submit-Processing
Dynamic lights are performance-intensive. As soon as once more, much less is healthier. I choose utilizing setting maps to attain reasonable lighting with out considerably impacting the scene’s efficiency.
<Surroundings
	information="https://dl.polyhaven.org/file/ph-assets/HDRIs/hdr/1k/hanger_exterior_cloudy_1k.hdr"
	floor={{ peak: 50, radius: 150, scale: 50 }}
/>
On this case, I additionally enabled floor projection to create an setting for the scene. It’s doable to make use of the setting solely for lighting with out displaying it within the scene.
You possibly can add static or dynamic lighting with glorious graphic high quality utilizing Lightformer. Right here’s a information on easy methods to implement it in React and vanilla Three.js.
Submit-Processing
To reinforce the graphic high quality, I used post-processing results by way of the react-postprocessing library, which can be out there for vanilla Three.js. These are the consequences I utilized:
- Tone mapping for extra reasonable colour administration.
- Hue and saturation changes to reinforce colours.
- Depth of discipline so as to add a delicate blur impact.
- N8AO Ambient Occlusion by @N8Programs.
I additionally utilized this configuration to the canvas, as really useful within the library’s documentation:
<Canvas
	gl={{
		powerPreference: "high-performance",
		alpha: false,
		antialias: false,
		stencil: false,
		depth: false,
	}}
/>
Understand that some post-processing results may be resource-intensive. As talked about earlier within the Canvas and Pixel Ratio part, if efficiency isn’t optimum, you may dynamically disable these results and/or alter particular parameters to scale back the load.
Conclusions
With all of those steps carried out, we will confidently show:
- 27 meshes
- 184 textures
- 49 shaders
- 40k triangles
- Physics simulations
- Excessive-quality lighting
- Submit-processing results
All working at a secure body price, with a whole asset dimension of simply 2.1 MB!
On this article, I’ve shared all of the strategies I used to create this demo. In case you’re focused on diving deeper into the subject, I like to recommend studying these two articles:
I hope you discovered this beneficial! When you have ideas, be happy to ship me a DM. To remain up to date on my work, you’ll find me on X/Twitter. Have a terrific day!