On this article, we’ll discover Houdini’s options by setting up a 3D card flip animation. It will aid you uncover Houdini’s core ideas and information you thru sensible code implementation.
We’ll discover how one can elevate your improvement workflow and obtain cutting-edge CSS animations utilizing CSS Houdini, thereby gaining extra management over your animation course of.
Conventional CSS animations, whereas highly effective, usually confine builders to a predefined set of instruments and results. Then again, Houdini — a set of experimental browser APIs — breaks these limitations, granting unprecedented management over the browser’s rendering engine. It provides builders the flexibility to create customized visible experiences that had been beforehand unimaginable, thereby pushing the boundaries of internet design.
Key Ideas Coated on this Article
Right here’s a breakdown of the important thing ideas you’ll study on this article:
The best way to Work with Houdini’s Main Triad
CSS Houdini is a set of browser APIs that empower builders to increase and improve the capabilities of the browser’s rendering engine. With Houdini, builders can create customized animations, results, and kinds, pushing the boundaries of internet design.
Within the upcoming sections, we’ll delve into an in depth rationalization of the three main APIs, unlocking their potential and understanding how they will elevate your internet design and improvement capabilities.
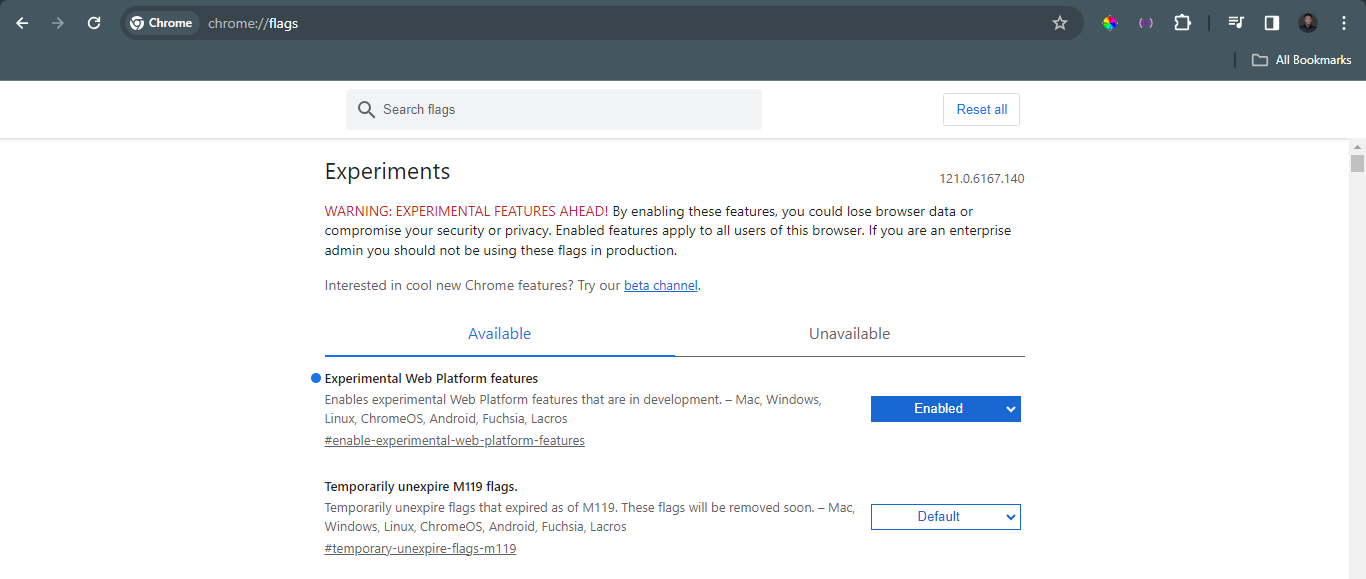
Observe: to allow Houdini in your browser, enter chrome://flags/ within the handle bar, then seek for experiments and activate it.
Worklets
Houdini worklets are JavaScript modules that function inside the browser’s rendering engine, permitting builders to outline customized paint, structure, and animation behaviors, thereby extending the capabilities of CSS. With worklets, you are able to do the next:
-
Create dynamic animations. Think about animating the stroke width of a path based mostly on person interplay or dynamically controlling the velocity of an animation based mostly on scroll place. These are among the prospects that may be achieved with Houdini worklets.
-
Craft interactive results. Create customized results like particle programs, ripple animations, and even interactive textual content manipulation, all powered by worklet logic.
-
Prolong visible kinds. Generate customized gradients, patterns, and even textures based mostly on complicated algorithms, all inside the worklet surroundings.
-
Bridge the hole with JavaScript. Combine your current JavaScript libraries and functionalities seamlessly into your CSS kinds utilizing worklet communication channels.
Getting Began with Worklets
As talked about, worklets allow builders to create extra complicated and customizable results in actual life purposes. As an example additional, let’s construct a starry night time impact utilizing Houdini worklets:
<html lang="en">
<head>
<meta charset="UTF-8">
<meta identify="viewport" content material="width=device-width, initial-scale=1.0">
<hyperlink rel="stylesheet" href="kinds.css">
<title>Starry Evening Sky</title>
</head>
<physique>
<part id="night-sky">
</part>

<script>
CSS.paintWorklet.addModule('./app.js');
</script>
</physique>
</html>
Within the code snippet above, we put together a devoted part within the HTML, able to accommodate the worklet impact when it’s applied:
<script>
    CSS.paintWorklet.addModule('./app.js');
</script>
The road CSS.paintWorklet.addModule('./app.js') tells the browser to seize the JavaScript code defining our paint worklet.
physique {
margin: 0;
background-color: #000;
}

#night-sky {
width: 100vw;
peak: 100vh;
background-image: paint(starrySky);
}
Within the CSS code above, background-image: paint(starrySky) tells the #night-sky component to make use of our registered paint worklet named starrySky to generate the background as an alternative of a picture.
The JavaScript code beneath immediately employs a typical loop and canvas drawing methods to generate a different starry sky impact with customizable colours, sizes, and random star positions:
class Star {
paint(ctx, geom, properties) {
const numStars = 100;
const starColors = properties.get('--star-colors') || ['white', 'grey', 'darkorange'];
const sizeRange = properties.get('--star-size-range') || '2,3';

for (let i = 0; i < numStars; i++) {
 const randomColor = starColors[Math.floor(Math.random() * starColors.length)];
 const minSize = parseFloat(sizeRange.break up(',')[0]);
 const maxSize = parseFloat(sizeRange.break up(',')[1]);
 const starSize = Math.random() * (maxSize - minSize) + minSize;
 const x = Math.random() * geom.width;
 const y = Math.random() * geom.peak;
 ctx.fillStyle = randomColor;
 ctx.beginPath();
 ctx.arc(x, y, starSize, 0, 2 * Math.PI);
 ctx.fill();
 ctx.closePath();
}
}
}

registerPaint('starrySky', Star);
Listed here are some issues to notice within the code above:
class Star. This defines our paint worklet, a blueprint for drawing a single star.paint(ctx, geom, properties). That is the core of the worklet.ctxoffers drawing instruments,geomprovides details about the component’s measurement, andpropertiesaccesses our customized CSS properties for star colours and measurement.- Loop and randomness. We draw a number of stars in a loop, selecting their place and coloration randomly for a pure starry impact.
registerPaint('starrySky', Star). This registers ourStarclass as a paint worklet namedstarrySky, making it accessible from CSS.

CSS Houdini Customized Properties
Customized properties in CSS Houdini are superior variables providing enhanced management in internet improvement. They transcend conventional CSS variables, offering options like kind checking, syntax definition, and customized logic for dynamic styling.
A round progress bar with customized rendering
Let’s dive right into a sensible instance that showcases the ability of paint worklets in creating visually fascinating progress bars, a easy instance.
The easy HTML construction beneath establishes the muse for our progress bar. A <div> component with the category progress serves because the canvas, whereas the data-progress attribute dynamically shops the present progress worth:
<html lang="en">
<head>
<meta charset="UTF-8">
<meta identify="viewport" content material="width=device-width, initial-scale=1.0">
<title>Transferring Round Progress Bar</title>
<hyperlink rel="stylesheet" href="kinds.css">
</head>
<physique>
<div class="progress" data-progress="0"></div>

<script src="app.js"></script>
</physique>
The CSS snippet beneath employs Houdini’s customized properties to craft a round progress bar. The @property rule introduces --progress with a <proportion> syntax, initialized at 0%, making certain non-inheritance. Subsequently, the .progress class kinds the round container, using a conic gradient to depict progress dynamically. This concise code harnesses the flexibleness of Houdini customized properties for creating visually participating round progress parts in internet improvement:
@property --progress {
 syntax: '<proportion>';
 inherits: false;
 initial-value: 0%;
}

.progress {
 --progress: 0%;
 width: 200px;
 peak: 200px;
 border-radius: 50%;
 background: conic-gradient(rgb(255, 58, 255) 0%, rgb(255, 58, 255) var(--progress), clear var(--progress), clear 100%);
 place: relative;
 overflow: hidden;
}

.progress::earlier than {
 content material: attr(data-progress);
 place: absolute;
 high: 50%;
 left: 50%;
 rework: translate(-50%, -50%);
 font-size: 24px;
 font-weight: bolder;
 coloration: purple;
 text-align: heart;
}
Subsequent, we’ve the customized property definition (@property rule):
@property --progress {
 syntax: '<proportion>';
 inherits: false;
 initial-value: 0%;
}
Some issues to notice within the code above:
- The
@propertyrule is a part of the Houdini CSS Typed OM specification. - It defines a customized CSS property named
--progresswith the syntax of<proportion>. inherits: false;specifies that the customized property doesn’t inherit its worth from its mother or father parts.initial-value: 0%;units the preliminary worth of the customized property to 0%.
Subsequent, let’s model the round progress bar:
.progress {
 --progress: 0%;
 width: 200px;
 peak: 200px;
 border-radius: 50%;
 background: conic-gradient(#ccc 0%, #ccc var(--progress), clear var(--progress), clear 100%);
 place: relative;
 overflow: hidden;
}
Some issues to notice above:
--progress: 0%;initializes the customized property to 0%.- The
.progressclass kinds the round progress bar. widthandpeakset the size of the round container.border-radius: 50%;creates an ideal circle.backgroundmakes use of a conic gradient to create the round progress impact, with the progress decided by the--progressproperty.place: relative;andoverflow: hidden;are used for positioning and overflow administration.
Subsequent, we’ll create our paint worklet.
Our round progress bar springs to life by way of the dynamic partnership of CSS Houdini and JavaScript. Leveraging CSS Houdini, we outline a customized property, --progress, whereas the paint worklet takes cost of customized portray. This synergy permits real-time updates to our progress bar based mostly on the evolving worth of the customized property. This collaboration not solely enhances flexibility but additionally offers a potent avenue for creating distinctive rendering results, leading to an enticing and visually fascinating round progress bar for our internet software:
class PaintWorklet {
 paint(ctx, { width, peak, progress }) {
 ctx.clearRect(0, 0, width, peak);
 ctx.beginPath();
 ctx.arc(width / 2, peak / 2, width / 2, 0, (Math.PI * 2 * progress) / 100);
 ctx.fillStyle = '#42f445';
 ctx.fill();
 }
}
Listed here are some factors to not within the code above:
class PaintWorkletis a JavaScript class representing a paint worklet, a part of the Houdini Paint API.- The
painttechnique defines the customized portray logic for the round progress bar. ctxis the 2D rendering context, and it’s used to attract the round progress.
Subsequent, we register the paint worklet and customized property:
CSS.paintWorklet.addModule('paint-worklet.js');
const progressElements = doc.querySelectorAll('.progress');
progressElements.forEach(component => {
 const paintWorklet = new PaintWorklet();
 CSS.registerProperty({
 identify: '--progress',
 syntax: '<proportion>',
 inherits: false,
 initialValue: '0%',
 paint: (ctx, geometry, properties) => {
 paintWorklet.paint(ctx, {
 width: geometry.width,
 peak: geometry.peak,
 progress: parseFloat(properties.get('--progress').toString()),
 });
 },
 });
});
Some factors to notice within the code above:
CSS.paintWorklet.addModule('paint-worklet.js');hundreds the paint worklet module.CSS.registerPropertyregisters the customized property--progressand associates it with the paint worklet.- The
painttechnique is known as to offer the customized portray logic based mostly on the present worth of--progress.
Now let’s set the progress over time:
let currentProgress = 0;
perform updateProgress() {
 currentProgress += 0.1;
 if (currentProgress > 100) {
 currentProgress = 0;
 }
 progressElements.forEach(component => {
 component.dataset.progress = currentProgress.toFixed(2);
 component.model.setProperty('--progress', `${currentProgress.toFixed(2)}%`);
 });

 requestAnimationFrame(updateProgress);
}

updateProgress();
Some factors to notice within the code above:
currentProgressis incremented over time to simulate the progress.component.dataset.progressandcomponent.model.setPropertyreplace the DOM and customized property to mirror the progress.requestAnimationFrameensures clean animation by requesting the following body.

Introducing the Paint API
The Paint API is integral to CSS Houdini, and it revolutionizes internet portray by enabling dynamic and customised visible kinds. It empowers builders to create on-the-fly designs utilizing user-defined customized properties. Discover its secrets and techniques to unleash unparalleled potential.
Simplified foundations
Listed here are some Paint API options:
- Paint worklet. A JavaScript perform that acts as your inventive genie, conjuring up visuals based mostly in your directions.
- Customized properties. Variables you outline utilizing CSS’s
var()syntax, holding values that may be dynamically referenced and manipulated. - The
paint()perform. The magic wand that calls upon your paint worklet to weave its visible enchantment onto parts.
Portray with code: a sensible instance
As an example “portray with code” in motion, let’s dive right into a sensible instance that showcases the ability of the CSS Paint API.
This code snippet beneath demonstrates how builders can create dynamic and customizable patterns that break away from the constraints of static photographs, respiration life into internet experiences:
<html lang="en">
<head>
<meta charset="UTF-8">
<meta identify="viewport" content material="width=device-width, initial-scale=1.0">
<hyperlink rel="stylesheet" href="kinds.css">
<title>Paint API Demo</title>
</head>
<physique>
<part id="display screen">
</part>

<script>
CSS.paintWorklet.addModule('./app.js');
</script>
</physique>
</html>
Linking the paint worklet
CSS.paintWorklet.addModule('./app.js') registers the customized paint worklet outlined in app.js, enabling its use in CSS.
The CSS snippet offered beneath exemplifies the utilization of the Paint API in CSS Houdini. The background-image: paint(awesomePattern) property integrates the awesomePattern paint worklet, exemplifying the ability and ease of dynamically producing visuals:
physique {
  margin: 0px;
  padding: 0px;
}

#display screen {
  box-sizing: border-box;
  margin: 10px;
  padding: 0px;
  width: calc(100vw - 20px);
  peak: calc(100vh - 20px);
  background-color: #111;
  background-image: paint(awesomePattern);
}
Making use of the paint worklet
background-image: paint(awesomePattern) applies the registered paint worklet as a background picture to the #display screen component, showcasing CSS Houdini’s capacity to create dynamic visuals.
CSS properties can management the sample’s look:
--numShapes: variety of circles--shapeSize: measurement of circles--colors: coloration palette
Within the JavaScript code beneath, the Form class takes heart stage. Its paint technique, fueled by user-defined properties like --numShapes, --shapeSize and --colors, orchestrates the creation of a canvas adorned with randomized shapes. The registration of the awesomePattern paint worklet solidifies the mixing of CSS and JavaScript, delivering a seamless synergy of dynamic visible parts:
class Form {
paint(ctx, geom, properties) {

  const numShapes = properties.get('--numShapes') || 30;
  const shapeSize = properties.get('--shapeSize') || 50;
  const colours = properties.get('--colors') || ['#F28500', '#00FFFF', 'limegreen'];

  const getRandomColor = () => colours[Math.floor(Math.random() * colors.length)];
  for (let i = 0; i < numShapes; i++) {
    const x = Math.random() * geom.width;
    const y = Math.random() * geom.peak;
    const radius = Math.random() * shapeSize;
    const coloration = getRandomColor();
    ctx.fillStyle = coloration;
    ctx.beginPath();
    ctx.arc(x, y, radius, 0, 2 * Math.PI);
    ctx.fill();
    ctx.closePath();
    }
  }
}

registerPaint('awesomePattern', Form);
Defining the paint worklet
class Form { ... }defines a category with apaint()technique, the core of the Paint API.properties.get()retrieves customization choices from CSS, demonstrating Houdini’s integration with CSS properties.- The
paint()technique makes use of canvas-like drawing instructions to create the dynamic circle sample, highlighting Houdini’s capacity to increase CSS with customized rendering capabilities. registerPaint('awesomePattern', Form)registers theFormclass as a paint worklet, making it accessible to be used in CSS.

Crafting Interactive 3D Animations with CSS Houdini
That is our strategy of constructing a fascinating 3D card flip animation utilizing CSS Houdini, worklets, Paint API, and customized Houdini properties. CSS Houdini permits for the creation of customized paint worklets, enabling a extra versatile and dynamic strategy to styling. The animation is triggered by a hover occasion, showcasing the ability of Houdini in seamlessly combining each the visible and interactive features of internet improvement.
Within the code beneath, you’ll discover the whole code, with concise explanations of the CSS Houdini parts:
<html lang="en">
<head>
<meta charset="UTF-8">
<meta identify="viewport" content material="width=device-width, initial-scale=1.0">
<hyperlink rel="stylesheet" href="kinds.css">
<script kind="module" src="app.js" defer></script>
</head>
<physique>
<div class="card" id="flip-card">
<div class="card-inner" id="flip-card-inner">
<div class="card-front">

Entrance Content material

</div>
<div class="card-back">

Again Content material

</div>
</div>
</div>
</physique>
</html>
The CSS code beneath establishes the foundational construction for a card component in an online undertaking. The structure facilities inside the viewport utilizing Flexbox properties, and the cardboard itself is outlined with particular dimensions and a three-dimensional perspective.
Notably, the Houdini characteristic, paint: card-flip;, applies a customized paint worklet to the .card-inner component, introducing a dynamic flip impact on hover. The transition is managed by the rework property, easily animating a 180-degree rotation. Styling particulars embody vibrant background colours, font properties, and border-radius for a refined look on each back and front faces. The code achieves a visually interesting and interactive card design:
physique {
  show: flex;
  align-items: heart;
  justify-content: heart;
  peak: 100vh;
  margin: 0;
  background-color: #f0f0f0;
}

.card {
  width: 200px;
  peak: 300px;
  perspective: 1000px;
}

.card-inner {
  --card-rotation: 0deg;
  paint: card-flip;
  paint-order: regular;
  width: 100%;
  peak: 100%;
  transform-style: preserve-3d;
  transition: rework 0.6s;
  rework: rotateY(var(--card-rotation));
}

.card:hover .card-inner {
  --card-rotation: 180deg;
}

.card-front,
.card-back {
  width: 100%;
  peak: 100%;
  place: absolute;
  backface-visibility: hidden;
  show: flex;
  align-items: heart;
  justify-content: heart;
  font-size: 20px;
  coloration: white;
  border-radius: 10px;
}

.card-front {
  background-color: #3498db;
}

.card-back {
  background-color: #e74c3c;
  rework: rotateY(180deg);
}
Within the JavaScript code beneath — from app.js — the script checks if the browser helps the paintWorklet characteristic, and if that’s the case, it provides a paint worklet module named paintWorklet.js. Moreover, an occasion listener is hooked up to the component with the ID flip-card, toggling the flipped class on a click on occasion:
if ('paintWorklet' in CSS) {
  CSS.paintWorklet.addModule('paintWorklet.js')
  .catch(error => console.error('Did not register paint worklet:', error));
}

doc.getElementById('flip-card').addEventListener('click on', perform () {
  this.classList.toggle('flipped');
});
The paintWorklet.js file extends the JavaScript performance by registering a customized paint worklet named card-flip with CSS. This worklet, seamlessly built-in with the present code, dynamically paints the flipping animation of the cardboard component utilizing canvas operations.
The --card-rotation property controls the rotation angle. Along with the interactive click on occasion listener, this modular strategy enhances the general visible attraction of the online undertaking.
paintWorklet.js
class CardFlipPainter {
  static get inputProperties() {
    return ['--card-rotation'];
  }

  paint(ctx, geom, properties)  0) * (Math.PI / 180));
    ctx.fillRect(-geom.width / 2, -geom.peak / 2, geom.width, geom.peak);
    ctx.restore();

}

registerPaint('card-flip', CardFlipPainter);
class CardFlipPainter { ... }defines the customized paint worklet.static get inputProperties() { ... }accepts the--card-rotationproperty.paint(ctx, geom, properties) { ... }performs the customized portray logic utilizing canvas operations.registerPaint('card-flip', CardFlipPainter);registers the worklet with CSS.

Increasing upon the Card Flip
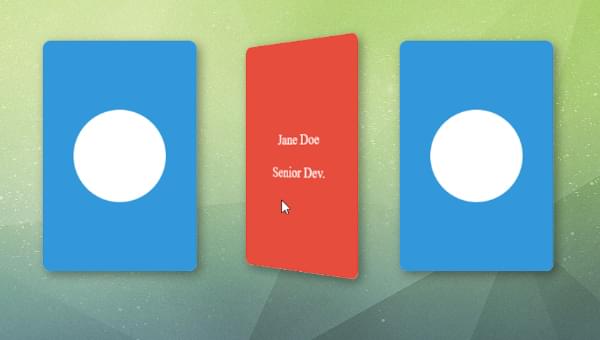
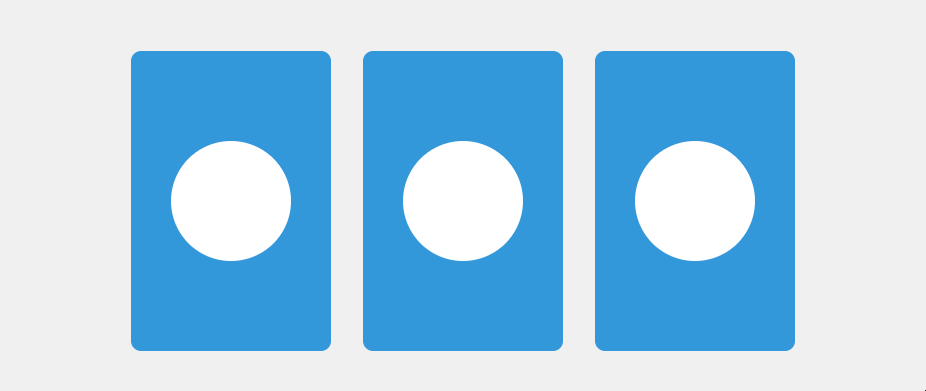
Right here’s how the cardboard flip, created with Houdini, will be integrated into an organization website. Enable me to current a real-project state of affairs:
<html lang="en">
<head>
<meta charset="UTF-8">
<meta identify="viewport" content material="width=device-width, initial-scale=1.0">
<hyperlink rel="stylesheet" href="kinds.css">
<script kind="module" src="app.js" defer></script>
</head>
<physique>
<div class="flex-container">
<div class="card" id="flip-card">
<div class="card-inner" id="flip-card-inner">
<div class="card-front">
<div class="picture">
</div>
</div>
<div class="card-back">
<div class="content material">

<p>John Doe</p>
<p> Advertising Lead </p>

</div>
</div>
</div>
</div>

<div class="card" id="flip-card">
<div class="card-inner" id="flip-card-inner">
<div class="card-front">
<div class="picture">
</div>
</div>

<div class="card-back">
<div class="content material">

<p>Jane Doe</p>
<p> Senior Dev. </p>

</div>
</div>
</div>
</div>

<div class="card" id="flip-card">
<div class="card-inner" id="flip-card-inner">
<div class="card-front">
<div class="picture">
</div>
</div>

<div class="card-back">
<div class="content material">

<p>Mike Doe</p>
<p>Dev Ops</p>

</div>
</div>
</div>
</div>
</div>
</physique>
</html>
I’ve designed a workers part for the web site the place the cardboard flip is utilized to show the workers members’ photographs because the entrance content material, with their job title and identify revealed on the again.
Let’s undergo a couple of of the adjustments I made to the code.
Prepare all of the playing cards inside a flex container:
<div class="flex-container">
</div>
Within the card entrance part, I’ve integrated a picture div, the place you may simply combine any picture of your selection by using a background picture within the CSS.
<div class="card-front">
  <div class="picture">
  </div>
</div>
Within the card again part, you’ll discover a content material div that features particular particulars just like the workers member’s identify (“Mike Doe”) and job title (“Dev Ops”). These parts have been assigned the category content material for ease of CSS styling. Be at liberty to personalize this info to align along with your particular content material necessities.
<div class="card-back">
  <div class="content material">
    <p>Mike Doe</p>
    <p>Dev Ops</p>
  </div>
</div>
The forthcoming CSS code snippet showcases sensible adjustments to exhibit the appliance of the CSS card flip in an actual internet undertaking. Regulate these kinds in accordance with your preferences:
physique {
  show: flex;
  align-items: heart;
  justify-content: heart;
  peak: 100vh;
  margin: 0;
  background-color: #f0f0f0;
}

.card {
  width: 200px;
  peak: 300px;
  perspective: 1000px;
}

.card-inner {
  --card-rotation: 0deg;
  paint: card-flip;
  paint-order: regular;
  width: 100%;
  peak: 100%;
  transform-style: preserve-3d;
  transition: rework 0.6s;
  rework: rotateY(var(--card-rotation));
}

.card:hover .card-inner {
  --card-rotation: 180deg;
}

.card-front,
.card-back {
  width: 100%;
  peak: 100%;
  place: absolute;
  backface-visibility: hidden;
  show: flex;
  align-items: heart;
  justify-content: heart;
  font-size: 20px;
  coloration: white;
  border-radius: 10px;
}

.card-front {
  background-color: #3498db;
}

.card-back {
  background-color: #e74c3c;
  rework: rotateY(180deg);
}

.flex-container {
  show: flex;
  hole: 2rem;
}

.content material {
  text-align: heart;
}

.picture {
  peak: 120px;
  width: 120px;
  border-radius: 50%;
  background-color: #fff;

}
Within the container that encompasses all of the playing cards, the CSS code makes use of flex show and units a spot of two rem between the playing cards. Regulate the hole worth in accordance with your design preferences.
.flex-container {
  show: flex; hole: 2rem;
}
The CSS code for the content material class facilities the textual content inside the specified component. Regulate as essential to attain the specified alignment to your content material:
.content material {
  text-align: heart;
}
The CSS code for the picture class within the entrance card content material units a round picture with a peak and width of 120px, a border-radius of fifty%, and a white background coloration. Moreover, there’s a commented-out line for a background picture; you may uncomment this line and supply the suitable URL for the picture you need to use. Regulate the size and background properties as wanted to fit your design preferences:
.picture {
  peak: 120px;
  width: 120px;
  border-radius: 50%;
  background-color: #fff;

}
Conclusion
In abstract, the article explores the transformative options of Houdini, specializing in a 3D card flip animation. It highlights the ability of worklets for dynamic animations, interactive results, and increasing visible kinds. Customized properties and the Paint API supply extra flexibility and artistic prospects.
The sensible examples, together with a round progress bar and the mixing of the 3D card flip into an organization website, showcase Houdini’s real-world purposes. The article encourages you to embrace Houdini’s limitless potential, offering instruments to redefine internet design and encourage inventive improvement.