
“Aurel’s Grand Theater” is an experimental, unconventional solo portfolio undertaking that invitations customers to learn case
research, remedy mysteries to unlock secret pages, or freely discover the theater – leaping round and even smashing
issues!
I had an absolute blast engaged on it, although it took for much longer than I anticipated. As soon as I lastly settled on a
artistic course, the undertaking took a couple of 12 months to finish – however reaching that course took almost two years on
its personal. All through the journey, I balanced a full-time job as a lead net developer, freelance gigs, and an surprising
relocation to the opposite facet of the world. The cherry on high? I went by way of
means
too many inventive iterations. It ‘s my longest solo undertaking thus far, but additionally one of the crucial enjoyable and creatively
rewarding. It gave me the possibility to dive deep into artistic coding and design.
This text takes you behind the scenes of the undertaking – masking every little thing from design to code, together with instruments,
inspiration, undertaking structure, design patterns, and even characteristic breakdowns with code snippets you may adapt for
your personal work.
The Artistic Course of: Behind the Curtain
Genesis
After eight years, my portfolio now not mirrored my expertise or creativity. I wished to create one thing unconventional – an expertise the place guests turn into energetic individuals relatively than passive observers. Most significantly, I wished it to be one thing I ‘d genuinely take pleasure in constructing. I used to be wrapping up “ Leap for Mankind” on the time and had a blast engaged on it, mixing storytelling with sport and interactive parts. I wished to create one other experimental web site that mixes sport mechanics with a story expertise.
From the start, I envisioned a small character that would freely discover its setting – smashing objects, interacting with surrounding parts, and navigating not simply the ground but additionally vertical areas by leaping onto tables and chairs. The purpose was to remodel the portfolio from a passive viewing expertise right into a enjoyable, interactive one. On the similar time, I acknowledged that some content material calls for readability over creativity. For instance, case research require a extra conventional format that emphasizes readability.
One of many key challenges, then, was designing a portfolio that would seamlessly transition between an immersive 3D sport world and extra standard documentation pages – with out disrupting the general expertise.
Constructing the Basis
I had a basic idea of the web site in thoughts, so I began coding a proof of idea (POC) for the sport again in
2022. On this early model, the participant may transfer round, stumble upon objects, and leap – laying the muse for the
interactive world I envisioned. Curiously, a lot of the core code construction from that POC made it into the ultimate
product. Whereas the technical facet was coming collectively, I nonetheless hadn ‘t discovered the inventive course at that
level.
Trials and Errors
As a full-time net developer, I not often discover myself wrestling with inventive course. Till now, each freelance and
facet undertaking I took on started with a transparent artistic imaginative and prescient that merely wanted technical execution.
This time was totally different. At first, I leaned towards a cartoonish aesthetic with daring outlines, pondering it could
emphasize my creativity. I attempted to persuade myself it labored, however one thing felt off – particularly when pairing the
visible type with the consumer interface. The disconnect between my imaginative and prescient and its execution was unfamiliar territory, and
it led me down an extended and winding path of artistic exploration.

I experimented with different types too, like painterly visuals, which held promise however proved too time-consuming. Every
inventive course felt both not appropriate for me or past my sensible capabilities as a developer moonlighting as
a designer.
The theater idea – which finally turned central to the portfolio ‘s identification – arrived surprisingly late. It
wasn ‘t a part of the unique imaginative and prescient however surfaced solely after numerous iterations and discarded concepts. In complete,
discovering a creative course that actually resonated took almost two years – a journey additional difficult by a significant
relocation throughout continents, ongoing work and freelance commitments, and private duties.
The prolonged timeline wasn ‘t on account of technical complexity, however to an surprising battle with artistic identification. What
started as a simple portfolio refresh developed right into a deeper exploration of merge skilled
presentation with private expression – pushing me far past code and into the world of artistic course.
Instruments & Inspiration: The Coronary heart of Creation
After quite a few iterations and deserted ideas, I lastly arrived at a artistic course that resonated with my
imaginative and prescient. Reasonably than detailing each inventive detour, I ‘ll deal with the instruments and course that finally led to the
closing product.
Design Stack
Beneath is the stack I exploit to design my 3D initiatives:
UI/UX & Visible Design
-
Figma
: Once I first began, every little thing was specified by a Photoshop file. Over time, I attempted varied design instruments,
however I ‘ve been utilizing Figma constantly since 2018 – and I ‘ve been actually glad with it ever since. -
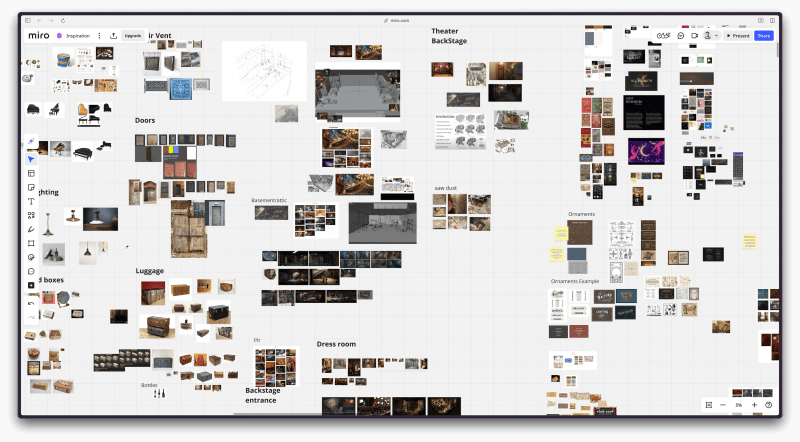
Miro
: reat for moodboarding and early ideation. It helps me visually arrange ideas and discover ideas in the course of the
preliminary part.
3D Modeling & Texturing
-
Blender
: My favourite device for 3D modeling. It ‘s extremely highly effective and versatile, although it does have a steep studying
curve at first. Nonetheless, it ‘s effectively well worth the effort for the extent of artistic management it provides. -
Adobe Substance 3D Painter
: The gold normal in my workflow for texture portray. It’s costly, however the high quality and precision it delivers
make it indispensable.
Picture Enhancing
-
Krita
: I solely want gentle picture modifying, and Krita handles that completely with out locking me into Adobe ‘s ecosystem – a
sensible and environment friendly different.
Drawing Inspiration from Storytellers
Whereas I drew inspiration from many sources, probably the most influential had been Studio Ghibli and the paranormal world of Harry
Potter. Ghibli ‘s meticulous consideration to environmental element formed my understanding of ambiance, whereas the
enchanting realism of the Harry Potter universe helped outline the temper I wished to evoke. I additionally browsed platforms
like ArtStation and Pinterest for broader visible inspiration, whereas websites like Behance, FWA, and Awwwards influenced
the extra granular facets of UX/UI design.
Initially, I organized these references on an InVision board. Nevertheless, when the platform shut down mid-project, I had
emigrate every little thing to Miro – an surprising transition and symbolic disruption that echoed the broader delays within the
undertaking.
Designing the Theater
The theater idea emerged as the proper metaphor for a portfolio: an area the place totally different works could possibly be introduced
as “performances,” whereas sustaining a cohesive setting. It additionally aligned superbly with the nostalgic,
pre-digital vibe impressed by lots of my visible references.
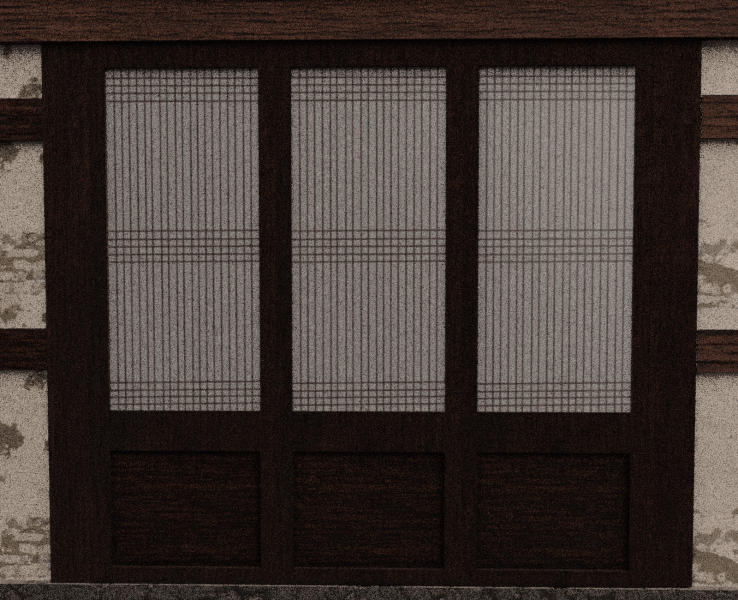
Atmosphere design is a specialised self-discipline I wasn ‘t very aware of initially. To create a theater that felt
visually partaking and plausible, I studied strategies from the
FZD Faculty
. These approaches had been invaluable in conceptualizing areas that actually really feel alive: locations the place you may sense individuals
residing their lives, working, and interacting with the setting.
To make the setting really feel genuinely inhabited, I included particulars that counsel human presence: scattered props,
instruments, theater posters, meals objects, pamphlets, and even bits of miscellaneous junk all through the house. These
seemingly minor parts had been essential in remodeling the static 3D mannequin right into a setting wealthy with historical past, temper, and
character.
The 3D Modeling Course of
Optimizing for Internet Efficiency
Creating 3D environments for the online comes with distinctive challenges that differ considerably from video modelling. When
scenes must be rendered in real-time by a browser, each polygon issues.
To handle this, I adopted a strict low-poly method and targeted closely on constructing reusable modular parts.
These parts could possibly be instantiated all through the setting with out duplicating pointless geometry or textures.
Whereas the ultimate outcome remains to be comparatively heavy, this modular system allowed me to assemble extra advanced and
detailed scenes whereas sustaining affordable obtain sizes and rendering efficiency, which wouldn ‘t have been
doable with out this method.
Texture Over Geometry
Reasonably than modeling intricate particulars that will improve polygon counts, I leveraged textures to counsel complexity.
Adobe Substance 3D turned my main device for creating wealthy materials surfaces that would convey element with out
overloading the renderer. This method was significantly efficient for parts like the standard Hanok home windows
with their intricate picket lattice patterns. As a substitute of modeling every panel, which might have been
performance-prohibitive, I painted the main points into textures and utilized them to easy geometric types.
Frameworks & Patterns: Behind the Scenes of Growth
Tech Stack
It is a complete overview of the know-how stack I used for Aurel’s Grand Theater web site, leveraging my
present experience whereas incorporating specialised instruments for animation and 3D results.
Core Framework
-
Vue.js
: Whereas I beforehand labored with React, Vue has been my main framework since 2018. Past merely having fun with and
loving this framework, it is sensible for me to keep up consistency between the instruments I exploit at work and on my facet
initiatives. I additionally use Vite and Pinia.
Animation & Interplay
-
GSAP
: A cornerstone of my improvement toolkit for almost a decade, primarily utilized on this undertaking for:- ScrollTrigger performance
- MotionPath animations
- Timeline and tweens
-
As a private problem, I created my very own text-splitting performance for this undertaking (because it wasn ‘t shopper
work), however I extremely suggest GSAP ‘s SplitText for many use instances.
-
Lenis
: My go-to library for clean scrolling. It integrates superbly with scroll animations, particularly when working
with Three.js.
3D Graphics & Physics
-
Three.js
: My favourite 3D framework and a key a part of my toolkit since 2015. I take pleasure in utilizing it to carry interactive 3D
parts to the online. -
Cannon.js
: Powers the location ‘s physics simulations. Whereas I thought of alternate options like Rapier, I caught with Cannon.js since
it was already built-in into my 2022 proof-of-concept. Changing it could have launched pointless delays.
Styling
-
Queso
: A headless CSS framework developed at MamboMambo (my office). I selected it for its complete starter
parts and seamless integration with my workflow. Regardless of being in beta, it ‘s already dependable and versatile.
This tech stack strikes a steadiness between acquainted instruments and specialised libraries that allow the visible and
interactive parts that outline the location’s expertise.
Structure
I observe Clear Code ideas and different trade finest practices, together with aiming to maintain my recordsdata small,
impartial, reusable, concise, and testable.
I’ve additionally adopted the part folder structure developed at my office. As a substitute of inserting
Vue
recordsdata straight contained in the
./parts
listing, every part resides in its personal folder. This folder comprises the
Vue
file together with associated sorts, unit checks, supporting recordsdata, and any youngster parts.
Though initially designed for
Vue
parts, I ‘ve discovered this construction works equally effectively for organizing logic with
Typescript
recordsdata,
utilities
,
directives
, and extra. It ‘s a clear, constant system that improves code readability, maintainability, and scalability.
MyFile
├── MyFile.vue
├── MyFile.check.ts
├── MyFile.sorts.ts
├── index.ts (export the categories and the vue file)
├── information.json (non-obligatory recordsdata wanted in MyFile.vue similar to .json recordsdata)
│
├── parts
│   ├── MyFileChildren
│   │   ├── MyFileChildren.vue
│   │   ├── MyFileChildren.check.ts
│   │   ├── MyFileChildren.sorts.ts
│   │   ├── index.ts
│   ├── MyFileSecondChildren
│   │   ├── MyFileSecondChildren.vue
│   │   ├── MyFileSecondChildren.check.ts
│   │   ├── MyFileSecondChildren.sorts.ts
│   │   ├── index.ts
The general undertaking structure follows the high-level construction outlined under.
src/
├── property/             # Static property like pictures, fonts, and types
├── parts/         # Vue parts
├── composables/        # Vue composables for shared logic
├── fixed/           # Challenge large constants
├── information/               # Challenge large information recordsdata
├── directives/         # Vue customized directives
├── router/             # Vue Router configuration and routes
├── companies/           # Companies (e.g i18n)
├── shops/             # State administration (Pinia)
├── three/
│   ├── Expertise/
│   │   ├── Theater/                 # Theater expertise
│   │   │   ├── Expertise/          # Core expertise logic
│   │   │   ├── Progress/            # Loading and progress administration
│   │   │   ├── Digital camera/              # Digital camera configuration and controls
│   │   │   ├── Renderer/            # WebGL renderer setup and configuration
│   │   │   ├── Sources/             # Checklist of assets
│   │   │   ├── Physics/             # Physics simulation and interactions
│   │   │   │   ├── PhysicsMaterial/ # Physics Materials
│   │   │   │   ├── Shared/          # Physics for fashions shared throughout scenes
│   │   │   │   │   ├── Pit/         # Physics simulation and interactions
│   │   │   │   │   │   ├── Pit.ts   # Physics for fashions within the pit
│   │   │   │   │   │   ├── ...
│   │   │   │   ├── Triggers/         # Physics Triggers
│   │   │   │   ├── Scenes/           # Physics for About/Leap/Mont-Saint-Michel
│   │   │   │   │   ├── Leap/
│   │   │   │   │   │   ├── Leap.ts   # Physics for Leap For Mankind's fashions
│   │   │   │   │   │   ├── ...
│   │   │   │   │   └── ...
│   │   │   ├── World/               # 3D world setup and administration
│   │   │   │   ├── World/           # Predominant world configuration and setup
│   │   │   │   ├── PlayerModel/     # Participant character mannequin and controls
│   │   │   │   ├── CameraTransition/ # Digital camera motion and transitions
│   │   │   │   ├── Environments/    # Atmosphere setup and administration
│   │   │   │   │   ├── Atmosphere.ts # Atmosphere configuration
│   │   │   │   │   └── sorts.ts     # Atmosphere kind definitions
│   │   │   │   ├── Scenes/          # Completely different scene configurations
│   │   │   │   │   ├── Leap/
│   │   │   │   │   │   ├── Leap.ts  # Leap For Mankind mannequin's logic
│   │   │   │   │   └── ...
│   │   │   │   ├── Tutorial/        # Tutorial meshes & logic
│   │   │   │   ├── Bleed/           # Bleed impact logic
│   │   │   │   ├── Hen/            # Hen mannequin logic
│   │   │   │   ├── Markers/         # Factors of curiosity
│   │   │   │   ├── Shared/          # Fashions & meshes used throughout scenes
│   │   │   │   └── ...
│   │   │   ├── SharedMaterials/     # Reusable Three.js supplies
│   │   │   └── PostProcessing/      # Submit-processing results
│   │   │
│   │   ├── Basement/                # Basement expertise
│   │   ├── Idle/                    # Idle state expertise
│   │   ├── Error404/                # 404 error expertise
│   │   ├── Fixed/                # Three.js associated constants
│   │   ├── Factories/               # Three.js manufacturing facility code
│   │   │   ├── RopeMaterialGenerator/
│   │   │   │   ├── RopeMaterialGenerator.ts
│   │   │   │   └── ...
│   │   │   ├── ...
│   │   ├── Utils/                   # Three.js utilities different reusable features
│   │   └── Shaders/                 # Shaders applications
├── sorts/              # Challenge-wide TypeScript kind definitions
├── utils/              # Utility features and helpers
├── distributors/            # Third-party vendor code
├── views/              # Web page parts and layouts
├── employees/            # Internet Employees
├── App.vue             # Root Vue part
└── predominant.ts             # Software entry level
This structured method helps me handle the code base effectively and keep clear separation of considerations
all through the codebase, making each improvement and future upkeep considerably extra easy.
Design Patterns
Singleton
Singletons play a key function in such a undertaking structure, enabling environment friendly code reuse with out incurring
efficiency penalties.
import Expertise from "@/three/Expertise/Expertise";
import kind { Scene } from "@/sorts/three.sorts";

let occasion: SingletonExample | null = null;

export default class SingletonExample {
  personal scene: Scene;
  personal expertise: Expertise;

  constructor() {
    if (occasion) {
      return occasion;
    }
    occasion = this;

    this.expertise = new Expertise();
    this.scene = this.expertise.scene;
  }

  init() {
    // initialize the singleton
  }

  someMethod() {
    // some technique
  }

  replace() {
    // replace the singleton
  }

  update10fps() {
    // Non-compulsory: replace strategies capped at 10FPS
  }

  destroySingleton() {
    // clear up three.js + destroy the singleton
  }
}
Cut up Duty Structure
As proven earlier within the undertaking structure part, I intentionally separated physics administration from mannequin dealing with
to supply smaller, extra maintainable recordsdata.
World Administration Recordsdata:
These recordsdata are answerable for initializing factories and managing meshes inside the principle loop. They might additionally embody
features particular to particular person world objects.
Right here’s an instance of 1 such file:
// src/three/Expertise/Theater/mockFileModel/mockFileModel.ts
import Expertise from "@/three/Expertise/Theater/Expertise/Expertise";

import kind {
  Checklist,
  LoadModel
} from "@/sorts/expertise/expertise.sorts";
import kind { Scene } from "@/sorts/three.sorts";
import kind Physics from "@/three/Expertise/Theater/Physics/Physics";
import kind { Sources } from "@/three/Expertise/Utils/Ressources/Sources";
import kind { MaterialGenerator } from "@/sorts/expertise/materialGeneratorType";


let occasion: mockWorldFile | null = null;
export default class mockWorldFile {
  personal expertise: Expertise;
  personal record: Checklist;
  personal physics: Physics;
  personal assets: Sources;
  personal scene: Scene;
  personal materialGenerator: MaterialGenerator;
  public loadModel: LoadModel;
  constructor() {
    //    Singleton
    if (occasion) {
      return occasion;
    }

    occasion = this;

    this.expertise = new Expertise();
    this.scene = this.expertise.scene;
    this.assets = this.expertise.assets;
    this.physics = this.expertise.physics;

    // factories
    this.materialGenerator = this.expertise.materialGenerator;
    this.loadModel = this.expertise.loadModel;

     // Many of the materials are init in a file known as sharedMaterials
    const bakedMaterial = this.expertise.world.sharedMaterials.bakedMaterial;
    // physics infos similar to place, rotation, scale, weight and so forth.
    const paintBucketPhysics = this.physics.objects.paintBucket;

    // Array of objects of fashions. This shall be used to replace it is place, rotation, scale, and so forth.
    this.record = {
      paintBucket: [],
      ...
    };

    // get the useful resource file
    const resourcePaintBucket = this.assets.objects.paintBucketWhite;

     //Reusable code so as to add fashions with physics to the scene. I'll speak about that later.
    this.loadModel.setModels(
      resourcePaintBucket.scene,
      paintBucketPhysics,
      "paintBucketWhite",
      bakedMaterial,
      true,
      true,
      false,
      false,
      false,
      this.record.paintBucket,
      this.physics.mock,
      "metalBowlFalling",
    );
  }

  otherMethod() {
    ...
  }

  destroySingleton() {
    ...
  }
}
Physics Administration Recordsdata
These recordsdata set off the factories to use physics to meshes, retailer the ensuing physics our bodies, and replace mesh
positions on every body.
// src/three/Expertise/Theater/pathTo/mockFilePhysics
import Expertise from "@/three/Expertise/Theater/Expertise/Expertise";

import additionalShape from "./additionalShape.json";

import kind {
  PhysicsResources,
  TrackName,
  Checklist,
  modelsList
} from "@/sorts/expertise/expertise.sorts";
import kind { cannonObject } from "@/sorts/three.sorts";
import kind PhysicsGenerator from "../Factories/PhysicsGenerator/PhysicsGenerator";
import kind UpdateLocation from "../Utils/UpdateLocation/UpdateLocation";
import kind UpdatePositionMesh from "../Utils/UpdatePositionMesh/UpdatePositionMesh";
import kind AudioGenerator from "../Utils/AudioGenerator/AudioGenerator";

let occasion: MockFilePhysics | null = null;

export default class MockFilePhysics {
  personal expertise: Expertise;
  personal record: Checklist;
  personal physicsGenerator: PhysicsGenerator;
  personal updateLocation: UpdateLocation;
  personal modelsList: modelsList;
  personal updatePositionMesh: UpdatePositionMesh;
  personal audioGenerator: AudioGenerator;

  constructor() {
    //    Singleton
    if (occasion) {
      return occasion;
    }
    occasion = this;

    this.expertise = new Expertise();
    this.debug = this.expertise.debug;
    this.physicsGenerator = this.expertise.physicsGenerator;
    this.updateLocation = this.expertise.updateLocation;
    this.updatePositionMesh = this.expertise.updatePositionMesh;
    this.audioGenerator = this.expertise.audioGenerator;

    // Array of objects of physics. This shall be used to replace the mannequin's place, rotation, scale and so forth.
    this.record = {
      paintBucket: [],
    };
  }

  setModelsList() {
    //When the load progress reaches a sure share, we will set the fashions record, avoiding some potential bugs or pointless conditional logic. Please observe that the tactic replace isn't run till the scene is absolutely prepared.
    this.modelsList = this.expertise.world.constructionToolsModel.record;
  }

  addNewItem(
    aspect: PhysicsResources,
    listName: string,
    trackName: TrackName,
    sleepSpeedLimit: quantity | null = null,
  ) {

    // manufacturing facility so as to add physics, I'll speak about that later
    const itemWithPhysics = this.physicsGenerator.createItemPhysics(
      aspect,
      null,
      true,
      true,
      trackName,
      sleepSpeedLimit,
    );

    // Extra non-obligatory shapes to the merchandise if wanted
    change (listName) {
      case "broom":
        this.physicsGenerator.addMultipleAdditionalShapesToItem(
          itemWithPhysics,
          additionalShape.broomHandle,
        );
        break;

    }

    this.record[listName].push(itemWithPhysics);
  }

  // this strategies is named everyfame.
  replace() {
    // reusable code to replace the place of the mesh
    this.updatePositionMesh.updatePositionMesh(
      this.modelsList["paintBucket"],
      this.record["paintBucket"],
    );
  }


  destroySingleton() {
    ...
  }
}
For the reason that logic for updating mesh positions is constant throughout the undertaking, I created reusable code that may be
utilized in almost all physics-related recordsdata.
// src/three/Expertise/Utils/UpdatePositionMesh/UpdatePositionMesh.ts

export default class UpdatePositionMesh {
  updatePositionMesh(meshList: MeshList, physicList: PhysicList) {
    for (let index = 0; index < physicList.size; index++) {
      const physic = physicList[index];
      const mannequin = meshList[index].mannequin;

      mannequin.place.set(
        physic.place.x,
        physic.place.y,
        physic.place.z
      );
      mannequin.quaternion.set(
        physic.quaternion.x,
        physic.quaternion.y,
        physic.quaternion.z,
        physic.quaternion.w
      );
    }
  }
}
Manufacturing unit Patterns
To keep away from redundant code, I constructed a system round reusable code. Whereas the undertaking consists of a number of factories, these
two are probably the most important:
Mannequin Manufacturing unit
: LoadModel
With few exceptions, all fashions—whether or not instanced or common, with or with out physics—are added by way of this manufacturing facility.
// src/three/Expertise/factories/LoadModel/LoadModel.ts
import * as THREE from "three";
import Expertise from "@/three/Expertise/Theater/Expertise/Expertise";

import kind {
  PhysicsResources,
  TrackName,
  Checklist,
  modelListPath,
  PhysicsListPath
} from "@/sorts/expertise/expertise.kind";
import kind { loadModelMaterial } from "./sorts";
import kind { Materials, Scene, Mesh } from "@/sorts/Three.sorts";
import kind Progress from "@/three/Expertise/Utils/Progress/Progress";
import kind AddPhysicsToModel from "@/three/Expertise/factories/AddPhysicsToModel/AddPhysicsToModel";

let occasion: LoadModel | null = null;


export default class LoadModel {
  public expertise: Expertise;
  public progress: Progress;
  public mesh: Mesh;
  public addPhysicsToModel: AddPhysicsToModel;
  public scene: Scene;


  constructor() {
    if (occasion) {
      return occasion;
    }
    occasion = this;

    this.expertise = new Expertise();
    this.scene = this.expertise.scene;
    this.progress = this.expertise.progress;
    this.addPhysicsToModel = this.expertise.addPhysicsToModel;
  }


  async setModels(
    mannequin: Mannequin,
    record: PhysicsResources[],
    physicsList: string,
    bakedMaterial: LoadModelMaterial,
    isCastShadow: boolean = false,
    isReceiveShadow: boolean = false,
    isIntancedModel: boolean = false,
    isDoubleSided: boolean = false,
    modelListPath: ModelListPath,
    physicsListPath: PhysicsListPath,
    trackName: TrackName = null,
    sleepSpeedLimit: quantity | null = null,
  ) {
    const loadedModel = isIntancedModel
      ? await this.addInstancedModel(
          mannequin,
          bakedMaterial,
          true,
          true,
          isDoubleSided,
          isCastShadow,
          isReceiveShadow,
          record.size,
        )
        : await this.addModel(
            mannequin,
            bakedMaterial,
            true,
            true,
            isDoubleSided,
            isCastShadow,
            isReceiveShadow,
          );


    this.addPhysicsToModel.loopListThenAddModelToSceneThenToPhysics(
      record,
      modelListPath,
      physicsListPath,
      physicsList,
      loadedModel,
      isIntancedModel,
      trackName,
      sleepSpeedLimit,
    );
  }


  addModel = (
    mannequin: Mannequin,
    materials: Materials,
    isTransparent: boolean = false,
    isFrustumCulled: boolean = true,
    isDoubleSided: boolean = false,
    isCastShadow: boolean = false,
    isReceiveShadow: boolean = false,
    isClone: boolean = true,
  ) => {
    mannequin.traverse((youngster: THREE.Object3D) => {
      !isFrustumCulled ? (youngster.frustumCulled = false) : null;
      if (youngster instanceof THREE.Mesh) {
        youngster.castShadow = isCastShadow;
        youngster.receiveShadow = isReceiveShadow;

        materials
          && (youngster.materials = this.setMaterialOrCloneMaterial(
              isClone,
              materials,
            ))


        youngster.materials.clear = isTransparent;
        isDoubleSided ? (youngster.materials.facet = THREE.DoubleSide) : null;
        isReceiveShadow ? youngster.geometry.computeVertexNormals() : null; // https://discourse.threejs.org/t/gltf-model-shadows-not-receiving-with-gltfmeshstandardsgmaterial/24112/9
      }
    });

    this.progress.addLoadedModel(); // Replace the variety of objects loaded
    return { mannequin: mannequin };
  };


  setMaterialOrCloneMaterial(isClone: boolean, materials: Materials) {
    return isClone ? materials.clone() : materials;
  }


  addInstancedModel = () => {
   ...
  };

  // different strategies


  destroySingleton() {
    ...
  }
}
Physics Manufacturing unit: PhysicsGenerator
This manufacturing facility has a single duty: artistic physics properties for meshes.
// src/three/Expertise/Utils/PhysicsGenerator/PhysicsGenerator.ts
import Expertise from "@/three/Expertise/Theater/Expertise/Expertise";
import * as CANNON from "cannon-es";

import CannonUtils from "@/utils/cannonUtils.js";

import kind {
  Quaternion,
  PhysicsItemPosition,
  PhysicsItemType,
  PhysicsResources,
  TrackName,
  CannonObject,
} from "@/sorts/expertise/expertise.sorts";

import kind { Scene, ConvexGeometry } from "@/sorts/three.sorts";
import kind Progress from "@/three/Expertise/Utils/Progress/Progress";
import kind AudioGenerator from "@/three/Expertise/Utils/AudioGenerator/AudioGenerator";
import kind Physics from "@/three/Expertise/Theater/Physics/Physics";
import kind { physicsShape } from "./PhysicsGenerator.sorts"

let occasion: PhysicsGenerator | null = null;

export default class PhysicsGenerator {
  public expertise: Expertise;
  public physics: Physics;
  public currentScene: string | null = null;
  public progress: Progress;
  public audioGenerator: AudioGenerator;

  constructor() {
    //    Singleton
    if (occasion) {
      return occasion;
    }
    occasion = this;

    this.expertise = new Expertise();
    this.assets = this.expertise.assets;
    this.audioGenerator = this.expertise.audioGenerator;
    this.physics = this.expertise.physics;
    this.progress = this.expertise.progress;

    this.currentScene = this.expertise.currentScene;
  }


  //#area add physics to an object

  createItemPhysics(
    supply: PhysicsResources, // object containing physics information similar to mass, form, place....
    convex?: ConvexGeometry | null = null,
    allowSleep?: boolean = true,
    isBodyToAdd?: boolean = true,
    trackName?: TrackName = null,
    sleepSpeedLimit?: quantity | null = null
  ) {
    const setSpeedLimit = sleepSpeedLimit ?? 0.15;

    // For this undertaking I wanted to detect if the consumer was within the Mont-Saint-Michel, Leap For Mankind, About or Archives scene.
    const localCurrentScene = supply.areas[this.currentScene]
      ? this.currentScene
      : "about";

    change (supply.kind as physicsShape) {
      case "field": {
        const boxShape = new CANNON.Field(new CANNON.Vec3(...supply.form));
        const boxBody = new CANNON.Physique({
          mass: supply.mass,
          place: new CANNON.Vec3(
            supply.areas[localCurrentScene].place.x,
            supply.areas[localCurrentScene].place.y,
            supply.areas[localCurrentScene].place.z
          ),
          allowSleep: allowSleep,
          form: boxShape,
          materials: supply.materials
            ? supply.materials
            : this.physics.physics.defaultMaterial,
          sleepSpeedLimit: setSpeedLimit,
        });

        supply.areas[localCurrentScene].quaternion
          && (boxBody.quaternion.y =
              supply.areas[localCurrentScene].quaternion.y);

        this.physics.physics.addBody(boxBody);
        this.updatedLoadedItem();

        // Add non-obligatory SFX that shall be performed if the merchandise collides with one other physics merchandise
        trackName
          && this.audioGenerator.addEventListenersToObject(boxBody, TrackName);

        return boxBody;
      }

      // Then it is basicly the identical logic for all different instances
      case "sphere": {
        ...
      }

      case "cylinder": {
       ...
      }

      case "airplane": {
       ...
      }

      case "set off": {
      ...
      }

      case "torus": {
        ...
      }

      case "trimesh": {
       ...
      }

      case "polyhedron": {
        ...
      }

      default:
        ...
        break;
    }
  }

  updatedLoadedItem() {
    this.progress.addLoadedPhysicsItem(); // Replace the variety of merchandise loaded (physics solely)
  }

  //#endregion add physics to an object

  // different

  destroySingleton() {
    ...
  }
}
FPS Capping
With over 100 fashions and roughly 150 physics objects loaded in the principle scene, Aurel’s Grand Theater required
performance-driven coding from the outset.
I had been to rebuild the undertaking right this moment, I might leverage GPU computing way more intensively. Nevertheless, after I began the
proof of idea in 2022, GPU computing for the online was nonetheless comparatively new and never absolutely mature—a minimum of, that was
my notion on the time. Reasonably than recoding every little thing, I labored with what I had, which additionally introduced an important
private problem. Along with utilizing low-poly fashions and using basic optimization strategies, I extensively
used instanced meshes for all small, reusable objects—even these with physics. I additionally relied on many different
under-the-hood strategies to maintain the efficiency as clean as doable on this CPU-intensive web site.
One significantly useful method I applied was adaptive body charges. By capping the FPS to totally different ranges (60,
30, or 10), relying on whether or not the logic required rendering at these charges, I optimized efficiency. In spite of everything, some
logic doesn ‘t require rendering each body. It is a easy but efficient method that may simply be included
into your personal undertaking.
Now, let ‘s check out the file answerable for managing time within the undertaking.
// src/three/Expertise/Utils/Time/Time.ts
import * as THREE from "three";
import EventEmitter from "@/three/Expertise/Utils/EventEmitter/EventEmitter";

let occasion: Time | null = null;
let animationFrameId: quantity | null = null;
const clock = new THREE.Clock();

export default class Time extends EventEmitter {
  personal lastTick60FPS: quantity = 0;
  personal lastTick30FPS: quantity = 0;
  personal lastTick10FPS: quantity = 0;

  personal accumulator60FPS: quantity = 0;
  personal accumulator30FPS: quantity = 0;
  personal accumulator10FPS: quantity = 0;

  public begin: quantity = 0;
  public present: quantity = 0;
  public elapsed: quantity = 0;
  public delta: quantity = 0;
  public delta60FPS: quantity = 0;
  public delta30FPS: quantity = 0;
  public delta10FPS: quantity = 0;

  constructor() {
    if (occasion) {
      return occasion;
    }
    tremendous();
    occasion = this;
  }

  tick() {
    const currentTime: quantity = clock.getElapsedTime() * 1000;

    this.delta = currentTime - this.present;
    this.present = currentTime;

    // Accumulate the time that has handed
    this.accumulator60FPS += this.delta;
    this.accumulator30FPS += this.delta;
    this.accumulator10FPS += this.delta;

    // Set off uncapped tick occasion utilizing the undertaking's EventEmitter class
    this.set off("tick");

    // Set off 60FPS tick occasion
    if (this.accumulator60FPS >= 1000 / 60) {
      this.delta60FPS = currentTime - this.lastTick60FPS;
      this.lastTick60FPS = currentTime;

      // Similar logic as "this.set off("tick")" however for 60FPS
      this.set off("tick60FPS");
      this.accumulator60FPS -= 1000 / 60;
    }

    // Set off 30FPS tick occasion
    if (this.accumulator30FPS >= 1000 / 30) {
      this.delta30FPS = currentTime - this.lastTick30FPS;
      this.lastTick30FPS = currentTime;

      this.set off("tick30FPS");
      this.accumulator30FPS -= 1000 / 30;
    }

    // Set off 10FPS tick occasion
    if (this.accumulator10FPS >= 1000 / 10) {
      this.delta10FPS = currentTime - this.lastTick10FPS;
      this.lastTick10FPS = currentTime;

      this.set off("tick10FPS");
      this.accumulator10FPS -= 1000 / 10;
    }

    animationFrameId = window.requestAnimationFrame(() => {
      this.tick();
    });
  }
}
Then, within the
Expertise.ts
file, we merely place the strategies in keeping with the required FPS.
constructor() {
   if (occasion) {
      return occasion;
    }

    ...

    this.time = new Time();

    ...


    //  The sport loops (right here known as tick) are up to date when the EventEmitter class is triggered.
    this.time.on("tick", () => {
      this.replace();
    });
    this.time.on("tick60FPS", () => {
      this.update60();
    });
    this.time.on("tick30FPS", () => {
      this.update30();
    });
    this.time.on("tick10FPS", () => {
      this.update10();
    });
    }


  replace() {
    this.renderer.replace();
  }

  update60() {
    this.digicam.update60FPS();
    this.world.update60FPS();
    this.physics.update60FPS();
  }

  update30() {
    this.physics.update30FPS();
    this.world.update30FPS();
  }

  update10() {
    this.physics.update10FPS();
    this.world.update10FPS();
  }
Chosen Characteristic Breakdown: Code & Rationalization
Cinematic Web page Transitions: Return Animation Results
Impressed by strategies from the movie trade, the transitions between the 3D sport and the extra historically
structured pages, such because the Case Research, About, and Credit pages, had been fastidiously designed to really feel seamless and
cinematic.
The primary-time go to animation supplies context and immerses customers into the web site expertise. In the meantime, the opposite
web page transitions play an important function in guaranteeing a clean shift between the sport and the extra standard structure of
the Case Research and About web page, preserving immersion whereas naturally guiding customers from one expertise to the subsequent.
With out these transitions, it could really feel like abruptly leaping between two completely totally different worlds.
I’ll do a deep dive into the code for the animation when the consumer returns from the basement stage. It’s a bit less complicated
than the opposite cinematic transitions however the underlying logic is similar, which makes it simpler so that you can adapt it
to a different undertaking.
Right here the bottom file:
// src/three/Expertise/Theater/World/CameraTransition/CameraIntroReturning.ts

import { Vector3, CatmullRomCurve3 } from "three";
import Expertise from "@/three/Expertise/Theater/Expertise/Expertise";
import { DebugPath } from "@/three/Expertise/Utils/DebugPath/DebugPath";

import { createSmoothLookAtTransition } from "./cameraUtils";
import { setPlayerPosition } from "@/three/Expertise/Utils/playerPositionUtils";

import { gsap } from "gsap";
import { MotionPathPlugin } from "gsap/MotionPathPlugin";

import {
  CAMERA_POSITION_SEAT,
  PLAYER_POSITION_RETURNING,
} from "@/three/Expertise/Fixed/PlayerPosition";

import kind { Debug } from "@/three/Expertise/Utils/Debugger/sorts";
import kind { Scene, Digital camera } from "@/sorts/three.sorts";


const DURATION_RETURNING_FORWARD = 5;
const DURATION_LOOKAT_RETURNING_FORWARD = 4;
const RETURNING_PLAYER_QUATERNION = [0, 0, 0, 1];
const RETURNING_PLAYER_CAMERA_FINAL_POSITION = [
  7.3927162062108955, 3.4067893207543367, 4.151297331541345,
];
const RETURNING_PLAYER_ROTATION = -0.3;
const RETURNING_PLAYER_CAMERA_FINAL_LOOKAT = [
  2.998858990830107, 2.5067893207543412, -1.55606797749978944,
];

gsap.registerPlugin(MotionPathPlugin);

let occasion: CameraIntroReturning | null = null;

export default class CameraIntroReturning {
  personal scene: Scene;
  personal expertise: Expertise;
  personal timelineAnimation: GSAPTimeline;
  personal debug: Debug;
  personal debugPath: DebugPath;
  personal digicam: Digital camera;
  personal lookAtTransitionStarted: boolean = false;

  constructor() {
    if (occasion) {
      return occasion;
    }
    occasion = this;

    this.expertise = new Expertise();
    this.scene = this.expertise.scene;
    this.debug = this.expertise.debug;

    this.timelineAnimation = gsap.timeline({
      paused: true,
      onComplete: () => {
        this.timelineAnimation.clear().kill();
      },
    });
  }
  init() {
    this.digicam = this.expertise.digicam.occasion;
    this.initPath();
  }

  initPath() {
    ...
  }

  initTimeline() {
    ...
  }

  createSmoothLookAtTransition(
   ...
  }

  setPositionPlayer() {
   ...
  }

  playAnimation() {
   ...
  }

  ...

  destroySingleton() {
   ...
  }
}
The
init
technique, known as from one other file, initiates the creation of the animation. At first, we set the trail for the
animation, then the timeline.
init() {
    this.digicam = this.expertise.digicam.occasion;
    this.initPath();
 }

initPath() {
  // create the trail for the digicam
  const pathPoints = new CatmullRomCurve3([
    new Vector3(CAMERA_POSITION_SEAT[0], CAMERA_POSITION_SEAT[1], 15),
    new Vector3(5.12, 4, 8.18),
    new Vector3(...RETURNING_PLAYER_CAMERA_FINAL_POSITION),
  ]);

  // init the timeline
  this.initTimeline(pathPoints);
}

initTimeline(path: CatmullRomCurve3) {
 ...
}
The timeline animation is break up into two: a) The digicam strikes vertically from the basement to the theater, above the
seats.
...

initTimeline(path: CatmullRomCurve3) {
    // get the factors
    const pathPoints = path.getPoints(30);

    // create the gsap timeline
    this.timelineAnimation
      // set the preliminary place
      .set(this.digicam.place, {
        x: CAMERA_POSITION_SEAT[0],
        y: CAMERA_POSITION_SEAT[1] - 3,
        z: 15,
      })
      .add(() => {
        this.digicam.lookAt(3.5, 1, 0);
      })
      //   Begin the animation! On this case the digicam is shifting from the basement to above the seat
      .to(this.digicam.place, {
        x: CAMERA_POSITION_SEAT[0],
        y: CAMERA_POSITION_SEAT[1],
        z: 15,
        length: 3,
        ease: "elastic.out(0.1,0.1)",
      })
      .to(
        this.digicam.place,
        {
		      ...
        },
      )
      ...
  }
b) The digicam follows a path whereas easily transitioning its view to the ultimate location.
 .to(
    this.digicam.place,
    {
      // then we use movement path to maneuver the digicam to the participant behind the raccoon
      motionPath: {
        path: pathPoints,
        curviness: 0,
        autoRotate: false,
      },
      ease: "power1.inOut",
      length: DURATION_RETURNING_FORWARD,
      onUpdate: operate () {
        const progress = this.progress();

        // wait till progress reaches a sure level to rotate to the digicam on the participant LookAt
        if (
          progress >=
            1 -
              DURATION_LOOKAT_RETURNING_FORWARD /
                DURATION_RETURNING_FORWARD &&
          !this.lookAtTransitionStarted
        ) {
	         this.lookAtTransitionStarted = true;

           // Create a brand new Vector3 to retailer the present look course
           const currentLookAt = new Vector3();

            // Get the present digicam's ahead course (the place it is wanting)
            occasion!.digicam.getWorldDirection(currentLookAt);

            // Lengthen the look course by 100 models and add the digicam's place
            // This creates a degree in house that the digicam is presently
            currentLookAt.multiplyScalar(100).add(occasion!.digicam.place);

            // clean lookAt animation
	          createSmoothLookAtTransition(
	            currentLookAt,
	            new Vector3(...RETURNING_PLAYER_CAMERA_FINAL_LOOKAT),
	            DURATION_LOOKAT_RETURNING_FORWARD,
	            this.digicam
	          );
        }
      },
    },
  )
  .add(() => {
    // animation is accomplished, you may add some code right here
  });
As you observed, I used a utility operate known as
smoothLookAtTransition
since I wanted this performance in a number of locations.
import kind { Vector3 } from "three";
import { gsap } from "gsap";

import kind { Digital camera } from "@/sorts/three.sorts";

export const createSmoothLookAtTransition = (
  from: Vector3,
  to: Vector3,
  length: quantity,
  digicam: Digital camera,
  ease: string = "power2.out",
) => {
  const lookAtPosition = { x: from.x, y: from.y, z: from.z };
  return gsap.to(lookAtPosition, {
    x: to.x,
    y: to.y,
    z: to.z,
    length,
    ease: ease,
    onUpdate: () => {
      digicam.lookAt(lookAtPosition.x, lookAtPosition.y, lookAtPosition.z);
    },
  });
};
With every little thing prepared, the animation sequence is run when
playAnimation()
is triggered.
playAnimation() {
    // first set the place of the participant
    this.setPositionPlayer();
    // then play the animation
    this.timelineAnimation.play();
  }

  setPositionPlayer() {
   // an easy utils to replace the place of the participant when the consumer land within the scene, return or change scene.
    setPlayerPosition(this.expertise, {
      place: PLAYER_POSITION_RETURNING,
      quaternion: RETURNING_PLAYER_QUATERNION,
      rotation: RETURNING_PLAYER_ROTATION,
    });
  }
Scroll-Triggered Animations: Showcasing Books on About Pages
Whereas the sport is enjoyable and crammed with particulars, the case research and about pages are essential to the general expertise,
although they observe a extra standardized format. These pages nonetheless have their very own distinctive enchantment. They’re crammed
with delicate particulars and animations, significantly scroll-triggered results similar to break up textual content animations when
paragraphs enter the viewport, together with fade-out results on SVGs and different property. These animations create a vibe
that mirrors the mysterious but intriguing ambiance of the sport, inviting guests to maintain scrolling and exploring.
Whereas I can’t cowl each animation intimately, I ‘d wish to share the technical method behind the e book animations
featured on the about web page. This impact blends DOM scroll occasion monitoring with a Three.js scene, making a seamless
interplay between the consumer ‘s scrolling habits and the 3D-rendered books. As guests scroll down the web page, the
books transition elegantly and reply dynamically to their motion.
Earlier than we dive into the
Three.js
file, let ‘s look into the
Vue
part.
//src/parts/BookGallery/BookGallery.vue
<template>
  <!-- the ID is used within the three.js file -->
  <div class="book-gallery" id="bookGallery" ref="bookGallery"></div>
</template>

<script setup lang="ts">
import { onBeforeUnmount, onMounted, onUnmounted, ref } from "vue";

import gsap from "gsap";
import { ScrollTrigger } from "gsap/ScrollTrigger";

import kind { BookGalleryProps } from "./sorts";

gsap.registerPlugin(ScrollTrigger);

const props = withDefaults(defineProps<BookGalleryProps>(), {});

const bookGallery = ref<HTMLBaseElement | null>(null);

const setupScrollTriggers = () => {
 ...
};

const triggerAnimation = (index: quantity) => {
  ...
};

onMounted(() => {
  setupScrollTriggers();
});

onUnmounted(() => {
  ...
});
</script>

<type lang="scss" scoped>
.book-gallery {
  place: relative;
  peak: 400svh; // 1000svh * 4 books
}
</type>
Thresholds are outlined for every e book to find out which one shall be energetic – that’s, the e book that may face the
digicam.
const setupScrollTriggers = () => {
  if (!bookGallery.worth) return;

  const galleryHeight = bookGallery.worth.clientHeight;
  const scrollThresholds = [
    galleryHeight * 0.15,
    galleryHeight * (0.25 + (0.75 - 0.25) / 3),
    galleryHeight * (0.25 + (2 * (0.75 - 0.25)) / 3),
    galleryHeight * 0.75,
  ];

  ...
};
Then I added some
GSAP
magic by looping by way of every threshold and attaching scrollTrigger to it.
const setupScrollTriggers = () => {

	...

	scrollThresholds.forEach((threshold, index) => {
	    ScrollTrigger.create({
	      set off: bookGallery.worth,
	      markers: false,
	      begin: `high+=${threshold} middle`,
	      finish: `high+=${galleryHeight * 0.5} backside`,
	      onEnter: () => {
	        triggerAnimation(index);
	      },
	      onEnterBack: () => {
	        triggerAnimation(index);
	      },
	      as soon as: false,
	    });
	  });
};
On scroll, when the consumer enters or re-enters a piece outlined by the thresholds, a operate is triggered inside a
Three.js
file.
const triggerAnimation = (index: quantity) => {
  window.expertise?.world?.books?.createAnimation(index);
};
Now let ‘s take a look at
Three.js
file:
// src/three/Expertise/Basement/World/Books/Books.ts

import * as THREE from "three";
import Expertise from "@/three/Expertise/Basement/Expertise/Expertise";

import { SCROLL_RATIO } from "@/fixed/scroll";

import { gsap } from "gsap";

import kind { Guide } from "./books.sorts";
import kind { Materials, Scene, Texture, ThreeGroup } from "@/sorts/three.sorts";
import kind { Sizes } from "@/three/Expertise/Utils/Sizes/sorts";
import kind LoadModel from "@/three/Expertise/factories/LoadModel/LoadModel";
import kind MaterialGenerator from "@/three/Expertise/factories/MaterialGenerator/BasicMaterialGenerator";
import kind Sources from "@/three/Expertise/Utils/Ressources/Sources";

const GSAP_EASE = "power2.out";
const GSAP_DURATION = 1;
const NB_OF_VIEWPORTS_BOOK_SECTION = 5;

let occasion: Books | null = null;

export default class Books {
  public scene: Scene;
  public expertise: Expertise;
  public assets: Sources;
  public loadModel: LoadModel;
  public sizes: Sizes;

  public materialGenerator: MaterialGenerator;
  public resourceDiffuse: Texture;
  public resourceNormal: Texture;
  public bakedMaterial: Materials;

  public startingPostionY: quantity;
  public originalPosition: Guide[];
  public activeIndex: quantity = 0;
  public isAnimationRunning: boolean = false;

  public bookGalleryElement: HTMLElement | null = null;
  public bookSectionHeight: quantity;
  public booksGroup: ThreeGroup;


  constructor() {
    if (occasion) {
      return occasion;
    }
    occasion = this;

    this.expertise = new Expertise();
    this.scene = this.expertise.sceneSecondary; // I'm utilizing a second scene for the books, so it is not affected by the first scene (basement within the background)
    this.sizes = this.expertise.sizes;

    this.assets = this.expertise.assets;
    this.materialGenerator = this.expertise.materialGenerator;

    this.init();
  }

  init() {
    ...
  }

  initModels() {
   ...
  }

  findPosition() {
   ...
  }

  setBookSectionHeight() {
   ...
  }

  initBooks() {
   ...
  }

  initBook() {
   ...
  }

  createAnimation() {
    ...
  }

  toggleIsAnimationRunning() {
    ...
  }

  ...

  destroySingleton() {
    ...
  }
}
When the file is initialized, we arrange the textures and positions of the books.
init() {
  this.initModels();
  this.findPosition();
  this.setBookSectionHeight();
  this.initBooks();
}

initModels() {
  this.originalPosition = [
      {
      name: "book1",
      meshName: null, // the name of the mesh from Blender will dynamically be written here
      position: { x: 0, y: -0, z: 20 },
      rotation: { x: 0, y: Math.PI / 2.2, z: 0 }, // some rotation on y axis so it looks more natural when the books are pilled
    },
    {
      name: "book2",
      meshName: null,
      position: { x: 0, y: -0.25, z: 20 },
      rotation: { x: 0, y: Math.PI / 1.8, z: 0 },
    },
    {
      name: "book3",
      meshName: null,
      position: { x: 0, y: -0.52, z: 20 },
      rotation: { x: 0, y: Math.PI / 2, z: 0 },
    },
    {
      name: "book4",
      meshName: null,
      position: { x: 0, y: -0.73, z: 20 },
      rotation: { x: 0, y: Math.PI / 2.3, z: 0 },
    },
  ];

  this.resourceDiffuse = this.assets.objects.bookDiffuse;
  this.resourceNormal = this.assets.objects.bookNormal;

    // a reusable class to set the fabric and regular map
  this.bakedMaterial = this.materialGenerator.setStandardMaterialAndNormal(
    this.resourceDiffuse,
    this.resourceNormal
  );
}

//#area place of the books

// Finds the preliminary place of the e book gallery within the DOM
findPosition() {
  this.bookGalleryElement = doc.getElementById("bookGallery");

  if (this.bookGalleryElement) {
    const rect = this.bookGalleryElement.getBoundingClientRect();
    this.startingPostionY = (rect.high + window.scrollY) / 200;
  }
}

//  Units the peak of the e book part based mostly on viewport and scroll ratio
setBookSectionHeight() {
  this.bookSectionHeight =
    this.sizes.peak * NB_OF_VIEWPORTS_BOOK_SECTION * SCROLL_RATIO;
}

//#endregion place of the books
Every e book mesh is created and added to the scene as a
THREE.Group
.
init() {
  ...
  this.initBooks();
}

...

initBooks() {
  this.booksGroup = new THREE.Group();
  this.scene.add(this.booksGroup);

  this.originalPosition.forEach((place, index) => {
    this.initBook(index, place);
  });
}

initBook(index: quantity, place: Guide) {
  const bookModel = this.expertise.assets.objects[position.name].scene;
  this.originalPosition[index].meshName = bookModel.youngsters[0].title;

  //Reusable code to set the fashions. Extra particulars below the Design Parterns part
  this.loadModel.addModel(
    bookModel,
    this.bakedMaterial,
    false,
    false,
    false,
    true,
    true,
    2,
    true
  );

  this.scene.add(bookModel);

  bookModel.place.set(
    place.place.x,
    place.place.y - this.startingPostionY,
    place.place.z
  );

  bookModel.rotateY(place.rotation.y);
  bookModel.scale.set(10, 10, 10);
  this.booksGroup.add(bookModel);
}
Every time a e book
enters
or
reenters
its thresholds, the triggers from the
Vue
file run the animation
createAnimation
on this file, which rotates the energetic e book in entrance of the digicam and stacks the opposite books right into a pile.
...

createAnimation(activeIndex: quantity) {
    if (!this.originalPosition) return;

    this.originalPosition.forEach((merchandise: Guide) => {
      const bookModel = this.scene.getObjectByName(merchandise.meshName);
      if (bookModel) {
        gsap.killTweensOf(bookModel.rotation);
        gsap.killTweensOf(bookModel.place);
      }
    });
    this.toggleIsAnimationRunning(true);

    this.activeIndex = activeIndex;
    this.originalPosition.forEach((merchandise: Guide, index: quantity) => {
      const bookModel = this.scene.getObjectByName(merchandise.meshName);

      if (bookModel) {
        if (index === activeIndex) {
          gsap.to(bookModel.rotation, {
            x: Math.PI / 2,
            z: Math.PI / 2.2,
            y: 0,
            length: 2,
            ease: GSAP_EASE,
            delay: 0.3,
            onComplete: () => {
              this.toggleIsAnimationRunning(false);
            },
          });
          gsap.to(bookModel.place, {
            y: 0,
            length: GSAP_DURATION,
            ease: GSAP_EASE,
            delay: 0.1,
          });
        } else {
        // pile unactive e book
          gsap.to(bookModel.rotation, {
            x: 0,
            y: 0,
            z: 0,
            length: GSAP_DURATION - 0.2,
            ease: GSAP_EASE,
          });

          const newYPosition = activeIndex < index ? -0.14 : +0.14;

          gsap.to(bookModel.place, {
            y: newYPosition,
            length: GSAP_DURATION,
            ease: GSAP_EASE,
            delay: 0.1,
          });
        }
      }
    });
  }


  toggleIsAnimationRunning(bool: boolean) {
    this.isAnimationRunning = bool;
  }
Interactive Physics Simulations: Rope Dynamics
The sport is the principle attraction of the web site. Your complete idea started again in 2022, after I got down to construct a small
mini-game the place you would leap on tables and smash issues and it was my favourite half to work on.
Past being enjoyable to develop, the interactive physics parts make the expertise extra partaking, including a complete new
layer of pleasure and exploration that merely isn’t doable in a flat, static setting.
Whereas I can ‘t probably cowl all of the physics-related parts, certainly one of my favorites is the rope system close to the menu.
It’s a delicate element, but it surely was one of many first issues I coded after I began leaning right into a extra theatrical,
inventive course.
The ropes had been additionally constructed with efficiency in thoughts—optimized to look and behave convincingly with out dragging down the
framerate.
That is the bottom file for the meshes:
// src/three/Expertise/Theater/World/Theater/Rope/RopeModel.ts

import * as THREE from "three";
import Expertise from "@/three/Expertise/Theater/Expertise/Expertise";
import RopeMaterialGenerator from "@/three/Expertise/Factories/MaterialGenerator/RopeMaterialGenerator";

import ropesLocation from "./ropesLocation.json";

import kind { Location, Checklist } from "@/sorts/expertise/expertise.sorts";
import kind { Scene, Sources, Physics, RopeMesh, CurveQuad } from "@/sorts/three.sorts";

let occasion: RopeModel | null = null;

export default class RopeModel {
  public scene: Scene;
  public expertise: Expertise;
  public assets: Sources;
  public physics: Physics;
  public materials: Materials;
  public record: Checklist;
  public ropeMaterialGenerator: RopeMaterialGenerator;

  public ropeLength: quantity = 20;
  public ropeRadius: quantity = 0.02;
  public ropeRadiusSegments: quantity = 8;

  constructor() {
    //    Singleton
    if (occasion) {
      return occasion;
    }
    occasion = this;

    this.expertise = new Expertise();
    this.scene = this.expertise.scene;
    this.assets = this.expertise.assets;
    this.physics = this.expertise.physics;
    this.ropeMaterialGenerator = new RopeMaterialGenerator();

    this.ropeLength = this.expertise.physics.rope.numberOfSpheres || 20;
    this.ropeRadius = 0.02;
    this.ropeRadiusSegments = 8;

    this.record = {
      rope: [],
    };

    this.initRope();
  }

  initRope() {
   ...
  }

  createRope() {
    ...
  }

  setArrayOfVertor3() {
    ...
  }

  setYValues() {
    ...
  }

  setMaterial() {
    ...
  }

  addRopeToScene() {
    ...
  }

  //#area replace at 60FPS
  replace() {
   ...
  }

  updateLineGeometry() {
   ...
  }
  //#endregion replace at 60FPS

  destroySingleton() {
    ...
  }
}
Mesh creation is initiated contained in the constructor.
// src/three/Expertise/Theater/World/Theater/Rope/RopeModel.ts

 constructor() {
	...
    this.initRope();
  }

  initRope() {
    // Generate the fabric that shall be used for all ropes
    this.setMaterial();

    // Create a rope at every location specified within the ropesLocation configuration
    ropesLocation.forEach((location) => {
      this.createRope(location);
    });
  }

  createRope(location: Location) {
    // Generate the curve that defines the rope's path
    const curveQuad = this.setArrayOfVertor3();
    this.setYValues(curveQuad);

    const tube = new THREE.TubeGeometry(
      curveQuad,
      this.ropeLength,
      this.ropeRadius,
      this.ropeRadiusSegments,
      false
    );

    const rope = new THREE.Mesh(tube, this.materials);

    rope.geometry.attributes.place.needsUpdate = true;

    // Add the rope to the scene and arrange its physics. I will clarify it later.
    this.addRopeToScene(rope, location);
  }

  setArrayOfVertor3() {
    const arrayLimit = this.ropeLength;
    const setArrayOfVertor3 = [];
    // Create factors in a vertical line, spaced 1 unit aside
    for (let index = 0; index < arrayLimit; index++) {
      setArrayOfVertor3.push(new THREE.Vector3(10, 9 - index, 0));
      if (index + 1 === arrayLimit) {
        return new THREE.CatmullRomCurve3(
          setArrayOfVertor3,
          false,
          "catmullrom",
          0.1
        );
      }
    }
  }

  setYValues(curve: CurveQuad) {
    // Set every level's Y worth to its index, making a vertical line
    for (let i = 0; i < curve.factors.size; i++) {
      curve.factors[i].y = i;
    }
  }

  setMaterial(){
	  ...
  }
For the reason that rope texture is utilized in a number of locations, I exploit a manufacturing facility sample for effectivity.
...

setMaterial() {
    this.materials = this.ropeMaterialGenerator.generateRopeMaterial(
      "rope",
      0x3a301d, // Brown coloration
      1.68, // Regular Repeat
      0.902, // Regular Depth
      21.718, // Noise Energy
      1.57, // UV Rotation
      9.14, // UV Peak
      this.assets.objects.ropeDiffuse, // Diffuse texture map
      this.assets.objects.ropeNormal // Regular map for floor element
    );
  }
// src/three/Expertise/Factories/MaterialGenerator/RopeMaterialGenerator.ts
import * as THREE from "three";
import Expertise from "@/three/Expertise/Theater/Expertise/Expertise";
import vertexShader from "@/three/Expertise/Shaders/Rope/vertex.glsl";
import fragmentShader from "@/three/Expertise/Shaders/Rope/fragment.glsl";
import kind { ResourceDiffuse, RessourceNormal } from "@/sorts/three.sorts";
import kind Debug from "@/three/Expertise/Utils/Debugger/Debug";
let occasion: RopeMaterialGenerator | null = null;
export default class RopeMaterialGenerator {
public expertise: Expertise;
personal debug: Debug;
constructor() {
// Singleton
if (occasion) {
return occasion;
}
occasion = this;
this.expertise = new Expertise();
this.debug = this.expertise.debug;
}
generateRopeMaterial(
title: string,
uLightColor: quantity,
uNormalRepeat: quantity,
uNormalIntensity: quantity,
uNoiseStrength: quantity,
uvRotate: quantity,
uvHeight: quantity,
resourceDiffuse: ResourceDiffuse,
ressourceNormal: RessourceNormal
) {
const normalTexture = ressourceNormal;
normalTexture.wrapS = THREE.RepeatWrapping;
normalTexture.wrapT = THREE.RepeatWrapping;
const diffuseTexture = resourceDiffuse;
diffuseTexture.wrapS = THREE.RepeatWrapping;
diffuseTexture.wrapT = THREE.RepeatWrapping;
const customUniforms = {
uAddedLight: {
worth: new THREE.Coloration(0x000000),
},
uLightColor: {
worth: new THREE.Coloration(uLightColor),
},
uNormalRepeat: {
worth: uNormalRepeat,
},
uNormalIntensity: {
worth: uNormalIntensity,
},
uNoiseStrength: {
worth: uNoiseStrength,
},
uShadowStrength: {
worth: 1.296,
},
uvRotate: {
worth: uvRotate,
},
uvHeight: {
worth: uvHeight,
},
uLightPosition: {
worth: new THREE.Vector3(60, 100, 60),
},
normalMap: {
worth: normalTexture,
},
diffuseMap: {
worth: diffuseTexture,
},
uAlpha: {
worth: 1,
},
};
const shaderUniforms = THREE.UniformsUtils.clone(
THREE.UniformsLib["lights"]
);
const shaderUniformsNormal = THREE.UniformsUtils.clone(
THREE.UniformsLib["normalmap"]
);
const uniforms = Object.assign(
shaderUniforms,
shaderUniformsNormal,
customUniforms
);
const materialFloor = new THREE.ShaderMaterial({
uniforms: uniforms,
vertexShader: vertexShader,
fragmentShader: fragmentShader,
precision: "lowp",
});
return materialFloor;
}
destroySingleton() {
...
}
}
The vertex and its fragment
// src/three/Expertise/Shaders/Rope/vertex.glsl

uniform float uNoiseStrength;      // Controls the depth of noise impact
uniform float uNormalIntensity;    // Controls the power of regular mapping
uniform float uNormalRepeat;       // Controls the tiling of regular map
uniform vec3 uLightColor;          // Coloration of the sunshine supply
uniform float uShadowStrength;     // Depth of shadow impact
uniform vec3 uLightPosition;       // Place of the sunshine supply
uniform float uvRotate;            // Rotation angle for UV coordinates
uniform float uvHeight;            // Peak scaling for UV coordinates
uniform bool isShadowBothSides;    // Flag for double-sided shadow rendering


various float vNoiseStrength;      // Passes noise power to fragment shader
various float vNormalIntensity;    // Passes regular depth to fragment shader
various float vNormalRepeat;       // Passes regular repeat to fragment shader
various vec2 vUv;                  // UV coordinates for texture mapping
various vec3 vColorPrimary;        // Main coloration for the fabric
various vec3 viewPos;              // Place in view house
various vec3 vLightColor;          // Gentle coloration handed to fragment shader
various vec3 worldPos;             // Place in world house
various float vShadowStrength;     // Shadow power handed to fragment shader
various vec3 vLightPosition;       // Gentle place handed to fragment shader

// Helper operate to create a 2D rotation matrix
mat2 rotate(float angle) {
    return mat2(cos(angle), -sin(angle), sin(angle), cos(angle));
}

void predominant() {
    // Calculate rotation angle and its sine/cosine parts
    float angle = 1.0 * uvRotate;
    float s = sin(angle);
    float c = cos(angle);

    // Create rotation matrix for UV coordinates
    mat2 rotationMatrix = mat2(c, s, -s, c);

    // Outline pivot level for UV rotation
    vec2 pivot = vec2(0.5, 0.5);

    // Rework vertex place to clip house
    gl_Position = projectionMatrix * viewMatrix * modelMatrix * vec4(place, 1.0);

    // Apply rotation and peak scaling to UV coordinates
    vUv = rotationMatrix * (uv - pivot) + pivot;
    vUv.y *= uvHeight;

    // Move varied parameters to fragment shader
    vNormalRepeat = uNormalRepeat;
    vNormalIntensity = uNormalIntensity;
    viewPos = vec3(0.0, 0.0, 0.0);  // Initialize view place
    vNoiseStrength = uNoiseStrength;
    vLightColor = uLightColor;
    vShadowStrength = uShadowStrength;
    vLightPosition = uLightPosition;
}
// src/three/Expertise/Shaders/Rope/fragment.glsl
// Uniform textures for regular and diffuse mapping
uniform sampler2D normalMap;
uniform sampler2D diffuseMap;
// Various variables handed from vertex shader
various float vNoiseStrength;
various float vNormalIntensity;
various float vNormalRepeat;
various vec2 vUv;
various vec3 viewPos;
various vec3 vLightColor;
various vec3 worldPos;
various float vShadowStrength;
various vec3 vLightPosition;
// Constants for lighting calculations
const float specularStrength = 0.8;
const vec4 colorShadowTop = vec4(vec3(0.0, 0.0, 0.0), 1.0);
void predominant() {
// regular, diffuse and light-weight accumulation
vec3 samNorm = texture2D(normalMap, vUv * vNormalRepeat).xyz * 2.0 - 1.0;
vec4 diffuse = texture2D(diffuseMap, vUv * vNormalRepeat);
vec4 addedLights = vec4(0.0, 0.0, 0.0, 1.0);
// Calculate diffuse lighting
vec3 lightDir = normalize(vLightPosition - worldPos);
float diff = max(dot(lightDir, samNorm), 0.0);
addedLights.rgb += diff * vLightColor;
// Calculate specular lighting
vec3 viewDir = normalize(viewPos - worldPos);
vec3 reflectDir = replicate(-lightDir, samNorm);
float spec = pow(max(dot(viewDir, reflectDir), 0.0), 16.0);
addedLights.rgb += specularStrength * spec * vLightColor;
// Calculate high shadow impact. On this case, this increased is it, the darker it will get.
float shadowTopStrength = 1.0 - pow(vUv.y, vShadowStrength) * 0.5;
float shadowFactor = smoothstep(0.0, 0.5, shadowTopStrength);
// Combine diffuse coloration with shadow.
vec4 mixedColorWithShadowTop = combine(diffuse, colorShadowTop, shadowFactor);
// Combine lighting with shadow
vec4 addedLightWithTopShadow = combine(addedLights, colorShadowTop, shadowFactor);
// Remaining coloration composition with regular depth management
gl_FragColor = combine(mixedColorWithShadowTop, addedLightWithTopShadow, vNormalIntensity);
}
As soon as the fabric is created and added to the mesh, the
addRopeToScene
operate provides the rope to the scene, then calls the
addPhysicsToRope
operate from the physics file.
// src/three/Expertise/Theater/World/Theater/Rope/RopeModel.ts
  addRopeToScene(mesh: Mesh, location: Location) {
    this.record.rope.push(mesh); //Add the rope to an array, which shall be utilized by the physics file to replace the mesh
    this.scene.add(mesh);
    this.physics.rope.addPhysicsToRope(location); // similar as src/three/Expertise/Theater/Physics/Theater/Rope/Rope.addPhysicsToRope(location)
  }
Let ‘s now deal with the physics file.
// src/three/Expertise/Theater/Physics/Theater/Rope/Rope.ts

import * as CANNON from "cannon-es";

import Expertise from "@/three/Expertise/Theater/Expertise/Expertise";

import kind { Location } from "@/sorts/expertise.sorts";
import kind Physics from "@/three/Expertise/Theater/Physics/Physics";
import kind { Scene, SphereBody } from "@/sorts/three.sorts";

let occasion: Rope | null = null;

const SIZE_SPHERE = 0.05;
const ANGULAR_DAMPING = 1;
const DISTANCE_BETWEEN_SPHERES = SIZE_SPHERE * 5;
const DISTANCE_BETWEEN_SPHERES_BOTTOM = 2.3;
const DISTANCE_BETWEEN_SPHERES_TOP = 6;
const LINEAR_DAMPING = 0.5;
const NUMBER_OF_SPHERES = 20;

export default class Rope {
  public expertise: Expertise;
  public physics: Physics;
  public scene: Scene;
  public record: record[];

  constructor() {
    //    Singleton
    if (occasion) {
      return occasion;
    }
    occasion = this;

    this.expertise = new Expertise();
    this.scene = this.expertise.scene;
    this.physics = this.expertise.physics;

    this.record = {
      rope: [],
    };
  }

  //#area add physics
  addPhysicsToRope() {
   ...
  }

  setRopePhysics() {
    ...
  }

  setMassRope() {
   ...
  }

  setDistanceBetweenSpheres() {
    ...
  }

  setDistanceBetweenConstraints() {
   ...
  }

  addConstraints() {
    ...
  }
  //#endregion add physics

  //#area replace at 60FPS
  replace() {
    ...
  }

  loopRopeWithPhysics() {
    ...
  }

  updatePoints() {
    ...
  }
  //#endregion replace at 60FPS

  destroySingleton() {
    ...
  }
}
The rope’s physics is created from the mesh file utilizing the strategies
addPhysicsToRope
, known as utilizing
this.physics.rope.addPhysicsToRope(location);.
addPhysicsToRope(location: Location) {
  this.setRopePhysics(location);
}

setRopePhysics(location: Location) {
  const sphereShape = new CANNON.Sphere(SIZE_SPHERE);
  const rope = [];

  let lastBody = null;
  for (let index = 0; index < NUMBER_OF_SPHERES; index++) {
    // Create physics physique for every sphere within the rope. The spheres shall be what collide with the participant
    const spherebody = new CANNON.Physique({ mass: this.setMassRope(index) });

    spherebody.addShape(sphereShape);
    spherebody.place.set(
      location.x,
      location.y - index * DISTANCE_BETWEEN_SPHERES,
      location.z
    );
    this.physics.physics.addBody(spherebody);
    rope.push(spherebody);
    spherebody.linearDamping = LINEAR_DAMPING;
    spherebody.angularDamping = ANGULAR_DAMPING;

    // Create constraints between consecutive spheres
    lastBody !== null
      ? this.addConstraints(spherebody, lastBody, index)
      : null;

    lastBody = spherebody;

    if (index + 1 === NUMBER_OF_SPHERES) {
      this.record.rope.push(rope);
    }
  }
}

setMassRope(index: quantity) {
  return index === 0 ? 0 : 2; // first sphere is mounted (mass 0)
}

setDistanceBetweenSpheres(index: quantity, locationY: quantity) {
  return locationY - DISTANCE_BETWEEN_SPHERES * index;
}

setDistanceBetweenConstraints(index: quantity) {
// because the consumer solely work together the spheres are the underside, so the gap between the spheres is gradualy rising from the underside to the highest//For the reason that consumer solely interacts with the spheres which can be on the backside, the gap between the spheres is regularly rising from the underside to the highest
  if (index <= 2) {
    return DISTANCE_BETWEEN_SPHERES * DISTANCE_BETWEEN_SPHERES_TOP;
  }
  if (index > 2 && index <= 8) {
    return DISTANCE_BETWEEN_SPHERES * DISTANCE_BETWEEN_SPHERES_BOTTOM;
  }
  return DISTANCE_BETWEEN_SPHERES;
}

addConstraints(
  sphereBody: CANNON.Physique,
  lastBody: CANNON.Physique,
  index: quantity
) {
  this.physics.physics.addConstraint(
    new CANNON.DistanceConstraint(
      sphereBody,
      lastBody,
      this.setDistanceBetweenConstraints(index)
    )
  );
}
When configuring physics parameters, technique is vital. Though customers gained ‘t consciously discover throughout gameplay, they
can solely work together with the decrease portion of the rope. Due to this fact, I concentrated extra physics element the place it issues –
by including extra spheres to the underside of the rope.
of the rope than on the high of the rope.
Rope meshes are then up to date each body from the physics file.
 //#area replace at 60FPS
 replace() {
  this.loopRopeWithPhysics();
}

loopRopeWithPhysics() {
  for (let index = 0; index < this.record.rope.size; index++) {
    this.updatePoints(this.record.rope[index], index);
  }
}

updatePoints(aspect: CANNON.Physique[], indexParent: quantity) {
  aspect.forEach((merchandise: CANNON.Physique, index: quantity) => {
    // Replace the mesh with the situation of every of the physics spheres
    this.expertise.world.rope.record.rope[
      indexParent
    ].geometry.parameters.path.factors[index].copy(merchandise.place);
  });
}
//#endregion replace at 60FPS
Animations within the DOM – ticket tearing particles
Whereas the web site closely depends on Three.js to create an immersive expertise, many parts stay DOM-based. Considered one of
my targets for this portfolio was to mix each worlds: the wealthy, interactive 3D environments and the effectivity of
conventional DOM parts. Moreover, I genuinely take pleasure in coding DOM-based micro-interactions, so skipping out on them
wasn ‘t an possibility!
Considered one of my favourite DOM animations is the ticket-tearing impact, particularly the particles flying away. It ‘s delicate,
however provides a little bit of appeal. The impact is just not solely enjoyable to look at but additionally comparatively straightforward to adapt to different initiatives.
First, let ‘s take a look at the construction of the parts.
TicketBase.vue
is a reasonably easy file with minimal styling. It handles the tearing animation and some fundamental features. All the things
else associated to the ticket such because the type is dealt with by different parts handed by way of slots.
To make issues clearer, I ‘ve cleaned up my
TicketBase.vue
file a bit to focus on how the particle impact works.
import { computed, ref, watch, useSlots } from "vue";
import { useAudioStore } from "@/shops/audio";

import kind { TicketBaseProps } from "./sorts";

const props = withDefaults(defineProps<TicketBaseProps>(), {
  isTearVisible: true,
  isLocked: false,
  cardId: null,
  isFirstTear: false,
  runTearAnimation: false,
  isTearable: false,
  markup: "button",
});

const { setCurrentFx } = useAudioStore();

const emit = defineEmits(["hover:enter", "hover:leave"]);

const particleContainer = ref<HTMLElement | null>(null);
const particleContainerTop = ref<HTMLElement | null>(null);
const timeoutParticles = ref<NodeJS.Timeout | null>(null);
const isAnimationStarted = ref<boolean>(false);
const isTearRipped = ref<boolean>(false);

const isTearable = computed(
  () => isTearVisible || (!isTearVisible && isFirstTear)
);

const handleClick = () => {
  ...
};

const runTearAnimation = () => {
  ...
};

const createParticles = () => {
  ...
};

const deleteParticles = () => {
  ...
};

const toggleIsAnimationStarted = () => {
...
};

const cssClasses = computed(() => [
  ...
]);


.ticket-base {
   ...
 }


/* particles cannot be scoped */
.particle {
...
}
When a ticket is clicked (or the consumer presses Enter), it runs the operate
handleClick()
, which then calls
runTearAnimation()
.
const handleClick = () => ;

...

const runTearAnimation = () => {
  toggleIsAnimationStarted(true);

  createParticles(particleContainerTop.worth, "backside");
  createParticles(particleContainer.worth, "high");
  isTearRipped.worth = true;
  // add different features such advert tearing SFX
};


...

const toggleIsAnimationStarted = (bool: boolean) => {
  isAnimationStarted.worth = bool;
};
The
createParticles
operate creates a number of new
<div>
parts, which act because the little particles. These divs are then appended to both the principle a part of the ticket or the
torn half.
const createParticles = (containerSelector: HTMLElement, course: string) => {
  const numParticles = 5;
  for (let i = 0; i < numParticles; i++) {
    const particle = doc.createElement("div");
    particle.className = "particle";

    // Calculate left place based mostly on index and add small random offset
    const baseLeft = (i / numParticles) * 100;
    const randomOffset = (Math.random() - 0.5) * 10;
    particle.type.left = `calc(${baseLeft}% + ${randomOffset}%)`;

    // Assign distinctive animation properties
    const length = Math.random() * 0.3 + 0.1;
    const translateY = (i / numParticles) * -20 - 2;
    const scale = Math.random() * 0.5 + 0.5;
    const delay = ((numParticles - i - 1) / numParticles) * 0;

    particle.type.animation = `flyAway ${length}s ${delay}s ease-in forwards`;
    particle.type.setProperty("--translateY", `${translateY}px`);
    particle.type.setProperty("--scale", scale.toString());

    if (course === "backside") {
      particle.type.animation = `flyAwayBottom ${length}s ${delay}s ease-in forwards`;
    }

    containerSelector.appendChild(particle);

    // Take away particle after animation ends
    particle.addEventListener("animationend", () => {
      particle.take away();
    });
  }
};
The particles are animated utilizing a CSS keyframes animation known as
flyAway
or
flyAwayBottom
.
.particle {
  place: absolute;
  width: 0.2rem;
  peak: 0.2rem;
  background-color: var(--color-particles); /* === #655c52 */

  animation: flyAway 3s ease-in forwards;
}

@keyframes flyAway {
  0% {
    remodel: translateY(0) scale(1);
    opacity: 1;
  }
  100% {
    remodel: translateY(var(--translateY)) scale(var(--scale));
    opacity: 0;
  }
}

@keyframes flyAwayBottom {
  0% {
    remodel: translateY(0) scale(1);
    opacity: 1;
  }
  100% {
    remodel: translateY(calc(var(--translateY) * -1)) scale(var(--scale));
    opacity: 0;
  }
}
Extra Featured Animations
There are such a lot of options, particulars easter eggs and animation I wished to cowl on this article, but it surely’s merely not
doable to undergo every little thing as it could be an excessive amount of and lots of deserve their very own tutorial.
That mentioned, listed here are a few of my favorites to code. They positively deserve a spot on this article.
navigation animation, collision animation.
Reflections on Aurel’s Grand Theater
Despite the fact that it took longer than I initially anticipated, Aurel ‘s Grand Theater was an extremely enjoyable and rewarding
undertaking to work on. As a result of it wasn ‘t a shopper undertaking, it provided a uncommon alternative to freely experiment, discover
new concepts, and push myself exterior my consolation zone, with out the same old constraints of budgets or deadlines.
Wanting again, there are positively issues I ‘d method in a different way if I had been to begin once more. I ‘d spend extra time
defining the artwork course upfront, lean extra closely into GPU, and maybe implement Rapier. However regardless of these
reflections, I had a tremendous time constructing this undertaking and I ‘m glad with the ultimate outcome.
Whereas recognition was by no means the purpose, I ‘m deeply honored that the location was acknowledged. It acquired FWA of the Day,
Awwwards Web site of the Day and Developer Award, in addition to GSAP’s Web site of the Week and Web site of the Month.
I ‘m actually grateful for the popularity, and I hope this behind-the-scenes look and shared code snippets encourage you
in your personal artistic coding journey.