
On this beginner-friendly tutorial, inventive developer Paola Demichelis takes us behind the scenes of one among her playful interactive experiments. She reveals us how she introduced this stunning impact to life utilizing Three.js and customized shaders—breaking it down step-by-step so you may comply with alongside, even in case you’re simply getting began with shaders.
Ciao! I prefer to think about that letters generally get tired of being caught on their inflexible, two-dimensional floor. From time to time, they want a little bit push to stretch and break away from their flat existence.
I’ve put collectively this fast tutorial for anybody getting began with shaders in Three.js. It covers the fundamentals of making a ShaderMaterial, the basics of interplay utilizing Raycasting, and the best way to mix the 2. With only a few strains of code, you’ll see how straightforward it’s to create a enjoyable and dynamic interactive impact just like the one proven beneath.
Put together Your Property
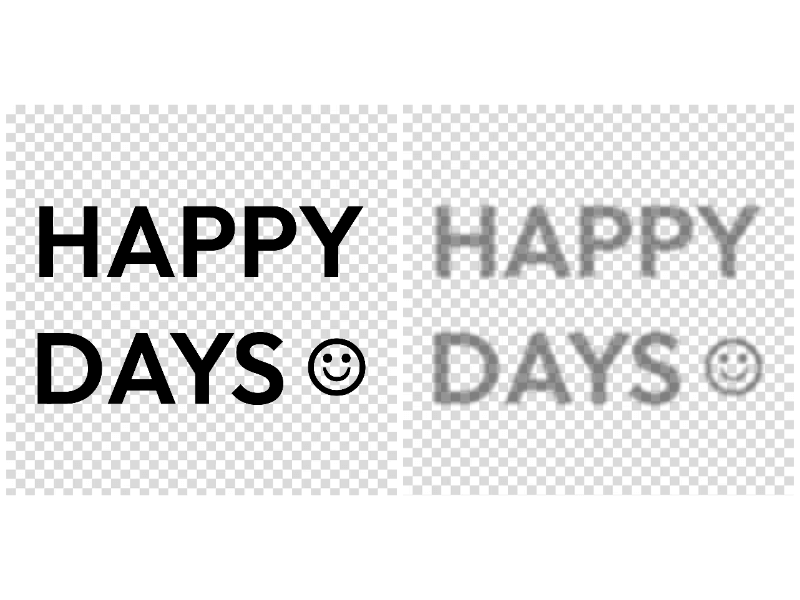
First, let’s put together the textures we’ll be utilizing for displacement.
For this undertaking, we’d like two variations, each in PNG format: one is a strong black texture, and the opposite is the shadow texture—a blurred and semi-transparent model of the primary. (Technically, you can generate the blur impact utilizing a GLSL shader, however it may be fairly performance-heavy. Since our textual content will likely be static, this straightforward trick works simply wonderful!)
A fast notice on the ratio: each textures are sq. (1:1), however in case you resolve to make use of a special ratio, keep in mind to regulate the side ratio of the airplane geometry accordingly.
Create a Fundamental Scene
Time to begin coding! If that is your first time making a scene in Three.js, take a look at this hyperlink for an amazing introduction to all the elemental components wanted to render a fundamental scene—such because the scene itself, the digicam, the renderer, and extra. For this undertaking, I’ve opted for an Orthographic Digital camera and positioned it to offer a diagonal view, giving us an optimum perspective on the displacement impact.
On this fundamental scene, we’re additionally introducing our hero component: the airplane, the place we’ll apply the displacement impact.
All of the magic occurs inside its customized ShaderMaterial. For now, this materials merely maps the feel picture onto the airplane utilizing its UV coordinates. To do that, we go the feel we created earlier into the shader as a uniform.
Beneath, you’ll see the beginning code for our ShaderMaterial, together with the corresponding Vertex Shader and Fragment Shader.
You will discover extra detailed details about ShaderMaterial at this hyperlink.
//fundamental texture shader
let shader_material = new THREE.ShaderMaterial({
  uniforms: {
    uTexture: { sort: "t", worth: new THREE.TextureLoader().load(texture) }
  },
  vertexShader: `
  various vec2 vUv;

  void essential() {
    vUv = uv;
    gl_Position = projectionMatrix * modelViewMatrix * vec4(place,1.0);
  }
`,
  fragmentShader: `
   various vec2 vUv;
   uniform sampler2D uTexture;

   void essential(){
    vec4 shade =  texture2D(uTexture, vUv);
    gl_FragColor = vec4(shade) ;
  }`,
  clear: true,
  facet: THREE.DoubleSide
});
See the Pen
Fundamental Aircraft Scene by Paola Demichelis (@Paola-Demichelis-the-lessful)
on CodePen.
Good! We’ve received one thing—however it’s nonetheless a bit boring. We have to add some interplay!
Interplay with Raycaster
Raycaster is a robust function in Three.js for detecting interactions between the mouse and objects in a 3D scene. You will discover extra about it at this hyperlink. The Raycaster checks for intersections between a ray and the objects within the scene. Not solely does it return an inventory of intersected objects, however it additionally offers worthwhile details about the precise level of collision—which is strictly what we’d like.
We create an invisible, a lot bigger airplane that serves as a goal for raycasting. Though it’s invisible, it nonetheless exists within the 3D world and may be interacted with. This airplane is known as “hit”, permitting us to uniquely establish it when performing raycasting within the scene.
To assist visualize how raycasting works, we use a small pink sphere as a marker for the intersection level between the ray and the floor of the hit airplane. This sphere strikes to the purpose of intersection, indicating the place the displacement—or every other interplay—will happen.
Within the onPointerMove occasion (which triggers each time the mouse strikes), we forged a ray from the mouse place. The ray checks for intersections with the invisible hit airplane. When a success is detected, the intersection level is calculated and we replace the pink sphere’s place to match. This makes it appear to be the sphere is “following” the mouse because it strikes throughout the display screen.
To recap, right here’s probably the most important a part of this course of:
const raycaster = new THREE.Raycaster();
const pointer = new THREE.Vector2();
window.addEventListener("pointermove", onPointerMove);

perform onPointerMove(occasion) {
  pointer.x = (occasion.clientX / window.innerWidth) * 2 - 1;
  pointer.y = -(occasion.clientY / window.innerHeight) * 2 + 1;

  raycaster.setFromCamera(pointer, digicam);
  const intersects = raycaster.intersectObject(hit);

  if (intersects.size > 0) {
    sphere.place.set(
      intersects[0].level.x,
      intersects[0].level.y,
      intersects[0].level.z
    );
  }
}
See the Pen
Raycasting by Paola Demichelis (@Paola-Demichelis-the-lessful)
on CodePen.
Add the Displacement
We now have all the required components: the airplane, and the purpose the place the mouse intersects it. Right here’s the best way to mix them in 4 steps:
1) Passing the Collision Level to the Shader: Because the coordinates of the collision level are the identical because the place of the pink sphere, we will ship these coordinates on to the shader. That is performed by passing the world coordinates of the collision level as a uniform to the shader.
So, we add the uDisplacement uniform to the shader.
uniforms: {
  uTexture: { sort: "t", worth: new THREE.TextureLoader().load(texture) },
  uDisplacement: { worth: new THREE.Vector3(0, 0, 0) }
},
And within the onPointerMove occasion:
shader_material.uniforms.uDisplacement.worth = sphere.place;2) Calculating the Distance within the Vertex Shader: Within the vertex shader, we’ll use these world coordinates to calculate the distance from every vertex of the airplane to the collision level. Because the collision level is in world house, it’s vital that we carry out this calculation in world coordinates as nicely to make sure correct outcomes.
vec4 localPosition = vec4( place, 1.);
vec4 worldPosition = modelMatrix * localPosition;
float dist = (size(uDisplacement - worldPosition.rgb));
3) Defining the Displacement Radius: We are able to outline a radius across the collision level inside which the displacement impact will likely be utilized. If a vertex falls inside this radius, we displace it alongside the Z-axis. This creates the phantasm of a “ripple” or “bump” impact on the airplane, reacting to the mouse place.
//min_distance is the radius of displacement
float min_distance = 3.;
if (dist < min_distance){
 ....
}
4) Making use of Displacement Primarily based on Distance: Contained in the vertex shader, we calculate the space between the hit level and every vertex. If the space is smaller than the outlined radius, we apply a displacement impact by adjusting the Z-axis worth of that vertex. This creates the visible impact of the floor being displaced across the level of intersection.
float distance_mapped = map(dist, 0., min_distance, 1., 0.);
float val = easeInOutCubic(distance_mapped);
new_position.z += val;
…after which:
gl_Position = projectionMatrix * modelViewMatrix * vec4(new_position,1.0);To make the impact smoother, I’ve added an easing perform that creates a extra gradual transition from the outer radius to the middle of the collision level. I extremely advocate experimenting with easing features like these ones, as they’ll add a extra pure really feel to your impact. Since these easing features require values between 0 and 1, I used the map perform from p5.js to scale the space vary appropriately.
If the displacement seems blocky as an alternative of clean, it’s probably as a result of you must improve the variety of segments defining the subdivision floor of the PlaneGeometry:
var geometry = new THREE.PlaneGeometry(15, 15, 100, 100);Right here is the total materials up to date:
let shader_material = new THREE.ShaderMaterial({
  uniforms: {
    uTexture: { sort: "t", worth: new THREE.TextureLoader().load(texture) },
    uDisplacement: { worth: new THREE.Vector3(0, 0, 0) }
  },

  vertexShader: `
  various vec2 vUv;
  uniform vec3 uDisplacement;

float easeInOutCubic(float x) {
  return x < 0.5 ? 4. * x * x * x : 1. - pow(-2. * x + 2., 3.) / 2.;
}

float map(float worth, float min1, float max1, float min2, float max2) {
  return min2 + (worth - min1) * (max2 - min2) / (max1 - min1);
}

  void essential() {
   vUv = uv;
   vec3 new_position = place;

   vec4 localPosition = vec4( place, 1.);
   vec4 worldPosition = modelMatrix * localPosition;

   //dist is the space to the displacement level
   float dist = (size(uDisplacement - worldPosition.rgb));

   //min_distance is the radius of displacement
   float min_distance = 3.;

    if (dist < min_distance){
      float distance_mapped = map(dist, 0., min_distance, 1., 0.);
      float val = easeInOutCubic(distance_mapped) * 1.; //1 is the max peak of displacement
      new_position.z +=  val;
    }

   gl_Position = projectionMatrix * modelViewMatrix * vec4(new_position,1.0);
  }
`,
  fragmentShader: `
    various vec2 vUv;
    uniform sampler2D uTexture;
    void essential()
    {
       vec4 shade =  texture2D(uTexture, vUv);
       gl_FragColor = vec4(shade) ;
    }`,
  clear: true,
  depthWrite: false,
  facet: THREE.DoubleSide
});
See the Pen
Displacement by Paola Demichelis (@Paola-Demichelis-the-lessful)
on CodePen.
Shadow Impact
Though it’s already wanting nice, we will push it a bit additional by including a shadow impact to create a extra real looking 3D look. To do that, we’d like a second airplane. Nevertheless, this time we don’t want displacement—as an alternative, we’ll modify the colours to simulate illumination and shadow, utilizing the blurred texture we ready in step one.
Whereas we beforehand centered extra on the Vertex Shader, now we’ll shift our consideration to the Fragment Shader to create the shadow impact. Utilizing the identical logic as earlier than, we calculate the space within the Vertex Shader, then go it to the Fragment Shader as a various variable to find out the alpha worth of the feel.
One vital notice: the radius for the minimal distance wants to stay constant between each planes. This ensures the shadow impact aligns appropriately with the displacement, making a seamless consequence.
let shader_material_shadow = new THREE.ShaderMaterial({
  uniforms: {
    uTexture: {
      sort: "t",
      worth: new THREE.TextureLoader().load(shadow_texture)
    },
    uDisplacement: { worth: new THREE.Vector3(0, 0, 0) }
  },

  vertexShader: `
  various vec2 vUv;
  various float dist;
  uniform vec3 uDisplacement;

  void essential() {
   vUv = uv;

   vec4 localPosition = vec4( place, 1.);
   vec4 worldPosition = modelMatrix * localPosition;
   dist = (size(uDisplacement - worldPosition.rgb));
   gl_Position = projectionMatrix * modelViewMatrix * vec4(place,1.0);
  }
`,
  fragmentShader: `
    various vec2 vUv;
    various float dist;
    uniform sampler2D uTexture;

float map(float worth, float min1, float max1, float min2, float max2) {
  return min2 + (worth - min1) * (max2 - min2) / (max1 - min1);
}

    void essential()
    {
       vec4 shade =  texture2D(uTexture, vUv);
       float min_distance = 3.;

       if (dist < min_distance){
        float alpha = map(dist, min_distance, 0., shade.a , 0.);
        shade.a  = alpha;
        }

       gl_FragColor = vec4(shade) ;
    }`,
  clear: true,
  depthWrite: false,
  facet: THREE.DoubleSide
});
See the Pen
Shadow by Paola Demichelis (@Paola-Demichelis-the-lessful)
on CodePen.
What’s Subsequent?
That is the tip of the tutorial—however the starting of your experiments! I’m excited to see what you’ll create. For instance, I made a special model the place I used one thing a bit extra unconventional than a mouse, or added extra distortion to the displacement.
Have enjoyable, and blissful days ☺