
On this article, you’ll get a complete understanding of caching in Django and internet growth as a complete. You’ll study what caching is, the advantages of caching, how you can arrange caching in Django, the backend programs that Django helps, and the perfect practices of caching.
By the top of the article, as a backend internet developer, you’ll have a strong understanding of caching and how one can implement it in your Django initiatives for the perfect efficiency.
The Django framework is likely one of the hottest backend frameworks utilized by internet builders nowadays. As a developer, constructing internet purposes with excessive efficiency must be one of many targets in your listing. So constructing an internet software in Django for top efficiency shouldn’t be a trouble, since Django comes with a caching framework that lets you use numerous caching backends like in-memory cache, file-based cache, database cache, and extra.
Introduction to Django Caching
Caching in internet growth is a method utilized by internet builders to enhance the efficiency of internet purposes. Each internet software possesses sources that its customers persistently need to make the most of. A useful resource might be something from an easy internet web page to information saved in a database. Caching performs a major function in maximizing the velocity at which sources are accessed.
Widespread caching eventualities and use instances
The Django caching framework offers a variety of eventualities and use instances that allow a developer to cache often accessed information. The next are the frequent caching eventualities:
-
Web page Caching. This can be a state of affairs the place often visited pages on a web site are solely cached. The appliance fetches the cached variations of the pages and renders them when a request is made, versus creating the content material of the web page from scratch.
-
Database Question Caching. Database question caching is an efficient strategy for purposes that rely on often requesting the database for info. A collection of requests might be happy by the identical piece of cached information with out the necessity to hit the database, therefore decreasing database hits and dashing up server response time.
-
Session and Authentication Caching. Caching could also be used to supply a streamlined person expertise and a faster response time. Since cached information will allow customers to maneuver simply throughout the authenticated sections of an software, caching authentication and session particulars might help to cut back redundant authentication operations.
Advantages of Django caching
Caching has grown extra advantageous to internet builders on this fashionable atmosphere the place information is of the essence and velocity is extra important. These are among the advantages of caching:
-
Improved Efficiency. Caching enhances the efficiency of internet purposes by decreasing server load. When the server will get requests from the appliance, Caching ensures that some requests are happy utilizing beforehand cached information. This prevents the server from having to conduct these operations from scratch. Because of this, the customers’ expertise is improved total, and response occasions are sped up.
-
Decreased response time. Caching minimizes response time by decreasing database hits. Caching allows the information to be fetched from a handy location moderately than immediately from the database every time it’s wanted. Since some information want dear calculations that may take a while to finish, fetching information each time it’s wanted from the database may not be your best option for all information. By saving the information and promptly making it obtainable each time wanted, caching saves the day.
-
Useful resource Optimization. Caching information or sources in an internet software, permits sources to be accessible and retrievable with out performing repetitive operations that output the identical sources.
Organising A Django Mission
The principle duties on this part are to create the digital atmosphere and set up the required modules for the mission. To create the digital atmosphere, enter this command in your terminal:
$ python -m venv mission
All of the modules for the mission can be put in inside this atmosphere, so to start out utilizing it, we have to activate it.
On Home windows use this:
$ .missionScriptsactivate
And on macOS or Linux, use this:
$ supply mission/bin/activate
Earlier than we implement caching, the very first thing to do is about up a Django mission. So let’s first set up Django. Open your terminal, and run this command:
$ pip set up django
After efficiently putting in Django, let’s create a Django mission and software. To create a Django mission run:
$ django-admin startproject cachedproject
Navigate into the mission’s folder. Right here, we’ll create a Django software. Run this command:
$ cd cachedproject
After which run this:
$ python handle.py startapp cachedapplication
After efficiently creating the mission and the appliance, we’ve to register the appliance to the mission. Open the settings.py file, and make the INSTALLED_APPS listing appear like this:
INSTALLED_APPS = [
    'django.contrib.admin',
    'django.contrib.auth',
    'django.contrib.contenttypes',
    'django.contrib.sessions',
    'django.contrib.messages',
    'django.contrib.staticfiles',

    'cachedapplication',
]
Notice: to make use of the appliance in your Django mission, it should be registered within the INSTALLED_APPS listing.
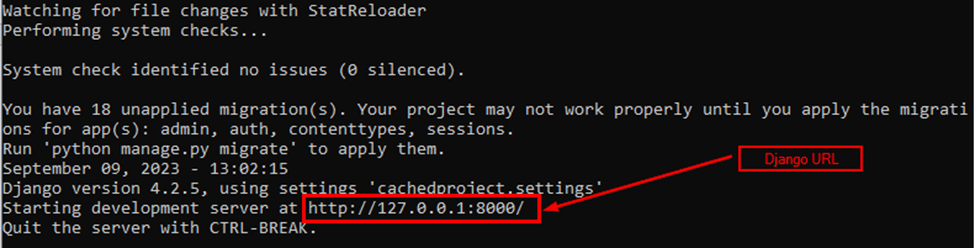
Now, to confirm that the Django framework has been put in efficiently, let’s check it. Within the terminal, run this command:
$ python handle.py runserver
Be sure to get the output pictured beneath.
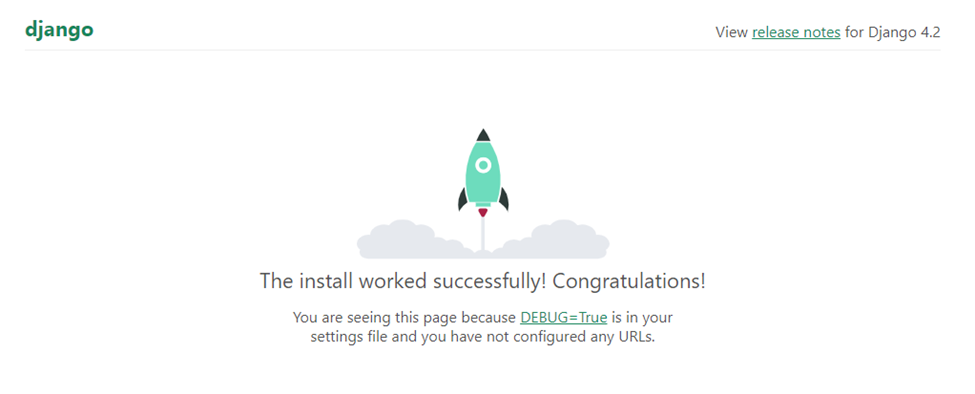
Now copy the URL and paste it into the online browser. The anticipated output is pictured beneath.
Notice: you may learn extra about shortly beginning a Django mission and a Django app on SitePoint.
Configuring Totally different Caching Settings in settings.py
To make use of caching, we have to configure it in our Django mission, so on this part, we’ll have a look at how we are able to configure totally different caching programs obtainable in Django.
Native reminiscence caching
As its identify implies, Native Reminiscence Cache, generally abbreviated as locmem, shops cached information within the RAM of the internet hosting machine.
Django routinely makes use of native reminiscence caching because the default caching system in the event you don’t present an alternate caching mechanism in your settings.py file. Its thread-safe, fast, and responsive caching method is notable.
Native Reminiscence Cache is much less acceptable to be used in manufacturing environments, because it features a per-process mechanism that stops any type of cross-process caching and makes particular person processes preserve separate non-public cache cases. It’s nonetheless a sensible choice, however, for growth.
To configure native reminiscence caching in your software, add the next code within the settings.py file:
CACHES = {

    "default": {

        "BACKEND": "django.core.cache.backends.locmem.LocMemCache",


        "LOCATION": "unique-snowflake",
    }
}
File-based caching
In file-based caching, every cache worth is serialized and saved individually in a file when caching. It’s helpful for small-scale purposes or the place memory-based caching isn’t sensible.
The draw back of this caching system is that it’s comparatively slower in comparison with memory-based caching.
To configure file-based caching in your software, add the next code within the settings.py file:
CACHES = {

    "default": {

        "BACKEND": "django.core.cache.backends.filebased.FileBasedCache",


        "LOCATION": "/var/tmp/django_cache",
    }
}
In case you’re on Home windows, be sure you begin the situation’s path with the respective drive letter like this:
CACHES = {
    "default": {
        "BACKEND": "django.core.cache.backends.filebased.FileBasedCache",
        "LOCATION": "C:/my/path-to/file",
    }
}
Database caching
Other than storing caches in information and internet hosting the machine’s RAM, Django additionally offers the flexibility to retailer the cache in a database.
This works greatest in the event you’ve bought a quick, well-indexed database server.
To make use of database caching in your software, add the next code contained in the settings.py:
CACHES = {

    "default": {

        "BACKEND": "django.core.cache.backends.db.DatabaseCache",


        "LOCATION": "my_cache_table",
    }
}
Use the next command to assemble the database desk talked about within the setup above earlier than utilizing the cache:
python handle.py createcachetable
The command above creates a desk within the database in a correct format that Django’s database cache system expects. The identify of the desk is taken from the LOCATION. On this case, the desk’s identify can be my_cache_table.
Memcached caching
Memcached is an in-memory caching system that’s utilized by internet builders even in a number of common corporations to cut back database entry and enhance web site efficiency.
In distinction to the locmem cache, Memcached operates as a daemon, which means that the Memcached server runs as a background course of, independently of any direct person interplay. Memcached should subsequently be put in individually in your machine. Then in your Django software, set up and configure one among its bindings, corresponding to pylibmc or pymemcache, to make use of Memcached.
A Django software might be linked to a Memcached daemon by including the cache settings, location, IP deal with, and different particulars, as proven beneath:
CACHES = {

    "default": {

        "BACKEND": "django.core.cache.backends.memcached.PyMemcacheCache",


        "LOCATION": "127.0.0.1:11211",
    }
}
Memcached know-how is very fitted to purposes with excessive learn or question hundreds, because it was designed for quick information storage and retrieval.
The draw back of Memcached is that, for the reason that information is saved in reminiscence, it will likely be misplaced in case your server crashes.
Redis
Redis is an in-memory database that can be utilized for caching. It caches information utilizing the Redis in-memory information storage. Redis is famend for its quickness and flexibility, making it an excellent choice for distributed programs and high-performance caching.
To cache information utilizing Redis in your software, you want a Redis server operating both regionally or on a distant machine. To arrange Redis in your machine, learn the Redis getting began information.
After establishing the Redis server, you’ll want to put in Python bindings for Redis. Use this command to put in it:
$ pip set up django-redis
The redis-py interface is the binding supported natively by Django or utilizing the django-redis and redis packages.
To configure Redis caching in your software, provided that your Redis server is operating on localhost (127.0.0.1), port=6379, add the next code within the settings.py:
CACHES = {

    "default": {

        "BACKEND": "django.core.cache.backends.redis.RedisCache",


        "LOCATION": "redis://127.0.0.1:6379",
    }
}
Redis’ complexity and reliance on outdoors providers are its trade-offs. Redis set up and configuration might be trickier than with sure different cache backends. It wants a second server and maintenance when on-line. Redis utilization creates a reliance on an outdoor service. Your software’s caching capabilities could also be affected if Redis has issues or goes down.
Performing Caching in Django Utilizing Redis
Okay, that’s sufficient principle. On this part, we’ll exhibit how you can carry out caching in a Django software. We’ll deal with three types of caching:
- view caching
- template fragment caching
- per-site caching
However earlier than we carry out every caching type intimately, let’s first arrange the mission correctly. We’ll create, register, and populate the fashions, configure the appliance’s URLs, create a template, set up the Django debug toolbar, and configure it.
Contained in the cachedapplication app, open the fashions.py file and make it appear like this:
from django.db import fashions

class Programmer(fashions.Mannequin):
    identify = fashions.CharField(max_length=50)
    dob = fashions.CharField(max_length=20)
    language = fashions.CharField(max_length=20)
    quote = fashions.CharField(max_length=150)

    def __str__(self):
        return f"{self.identify}"
Subsequent, open the admin.py file and paste this code:
from django.contrib import admin
from .fashions import Programmer

admin.web site.register(Programmer)
This code snippet registers the mannequin Programmer within the Django admin dashboard.
Earlier than populating the fashions, let’s do some migrations. Within the terminal, run this:
$ python handle.py makemigrationsAnd in addition run this:
$ python handle.py migrateIn Django, we are able to populate our fashions in two methods: through the terminal, and through the admin dashboard. However for simplicity’s sake, we’ll use the admin dashboard. For the reason that admin dashboard is for the superuser solely, we have to create one. Within the terminal, run the next command:
$ python handle.py createsuperuser
This command will immediate you to enter superuser particulars like username, electronic mail, and the 2 passwords.
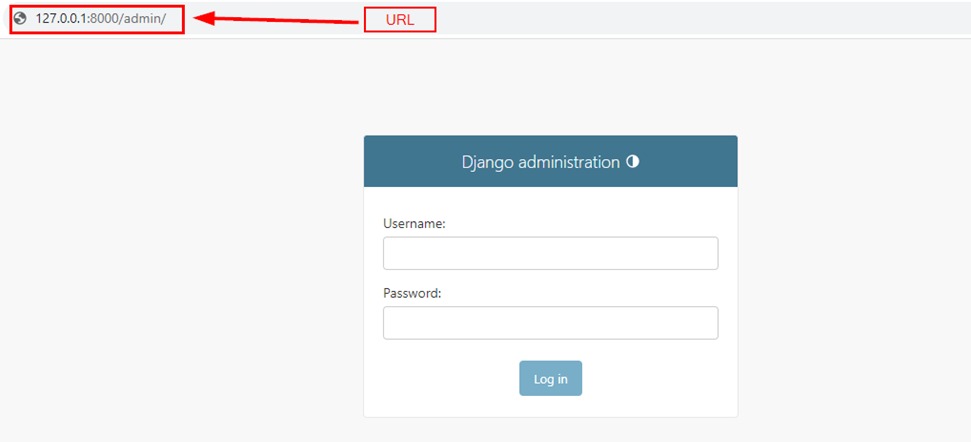
After efficiently creating the superuser, hearth up the native server, and in your browser enter this URL: http://127.0.0.1:8000/admin/. The picture beneath exhibits the web page you’ll be taken to.
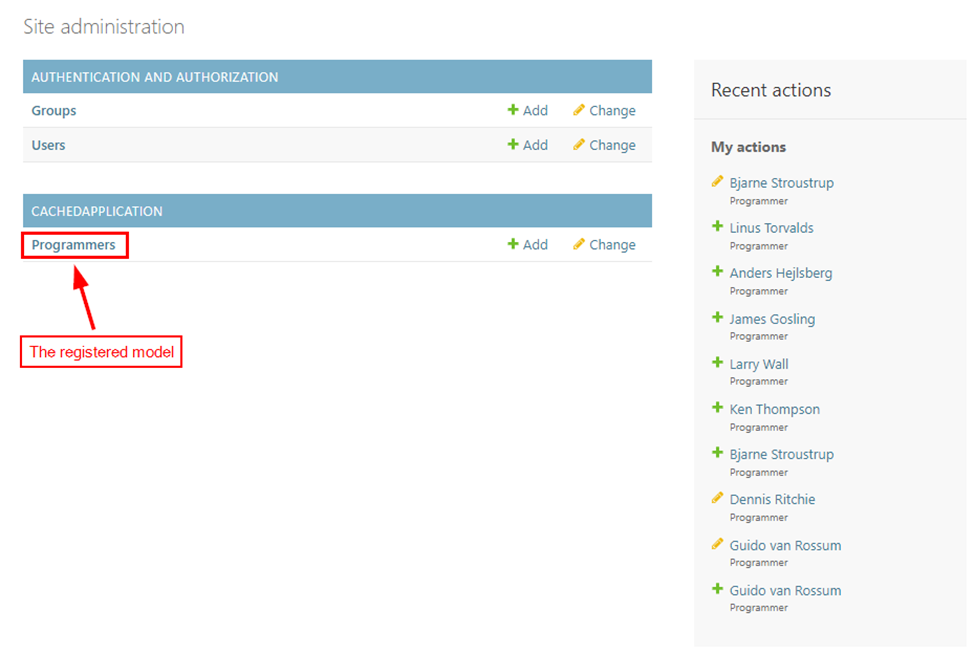
To log in, present the superuser credentials, and when you’re in, populate the fashions with information, as pictured beneath.
Inside the appliance, create a templates folder, and inside it create a list_all.html file. For now, go away the HTML file empty. Open the views.py file and make it appear like this:
from django.shortcuts import render
from .fashions import Programmer

def dwelling(request):

    programmers = Programmer.objects.all()

    context = {
        'programmers': programmers
    }

    return render(request, 'list_all.html', context)
Now let’s register the house view within the mission’s urls.py file. Contained in the cachedproject folder, open the urls.py file and paste this code:
from django.contrib import admin
from django.urls import path, embrace
from cachedapplication import views

urlpatterns = [
    path('admin/', admin.site.urls),

    path('home/', views.home, name='home'),
]
Now open the list_all.html file and paste the next code:
<!DOCTYPE html>
<html lang="en">
<head>
    <meta charset="UTF-8">
    <meta identify="viewport" content material="width=device-width, initial-scale=1.0">
    <title>Caching</title>
    <hyperlink href="https://cdnjs.cloudflare.com/ajax/libs/mdb-ui-kit/6.4.2/mdb.min.css" rel="stylesheet"/>
</head>
<physique>
    <div class="container py-5">
        <desk class="desk">
           <thead>
              <tr>
                 <th>Title</th>
                 <th>DOB</th>
                 <th>Language</th>
                 <th>Quote</th>
              </tr>
           </thead>
           <tbody>
              {% for programmer in programmers %}

              <tr>
                 <td>{{programmer.identify}}</td>
                 <td>{{programmer.dob}}</td>
                 <td>{{programmer.language}}</td>
                 <td>{{programmer.quote}}</td>
              </tr>
              {% endfor %}
           </tbody>
        </desk>
     </div>
</physique>
</html>
Let’s set up a Django debug toolbar. This can be a Python bundle that helps builders monitor the efficiency of their Django purposes, offering detailed details about database queries, HTTP requests, template rendering occasions, and extra. So in your terminal, enter this command:
pip set up django-debug-toolbar
To configure the django-debug-toolbar, open the settings.py file and edit the INSTALLED_APPS listing to appear like this:
INSTALLED_APPS = [
    'django.contrib.admin',
    'django.contrib.auth',
    'django.contrib.contenttypes',
    'django.contrib.sessions',
    'django.contrib.messages',
    'django.contrib.staticfiles',

    'cachedapplication',


    'debug_toolbar',
]
Add the debug toolbar to the MIDDLEWARE listing:
MIDDLEWARE = [


    'debug_toolbar.middleware.DebugToolbarMiddleware',
]
Make the debug toolbar middleware come proper after this:
django.middleware.csrf.CsrfViewMiddleware
It also needs to come earlier than this:
django.contrib.auth.middleware.AuthenticationMiddleware
Add the Redis cache configurations as follows:
CACHES = {
    "default": {
        "BACKEND": "django_redis.cache.RedisCache",
        "LOCATION": "redis://127.0.0.1:6379/1",
        "OPTIONS": {
            "CLIENT_CLASS": "django_redis.shopper.DefaultClient",
        }
    }
}
Additionally, add this code to the to the settings.py file:
INTERNAL_IPS = [

    '127.0.0.1',
]
Lastly, let’s configure the debug toolbar URLs within the urls.py file. Just under the imports, add this line of code:
import debug_toolbar
Contained in the urlpatterns listing add this code:
urlpatterns = [


    path('__debug__/', include(debug_toolbar.urls)),
]
Having reached this far, we’re good to go. Run the server and paste this URL into your browser: http://127.0.0.1:8000/dwelling/. The picture beneath exhibits the web page we get.
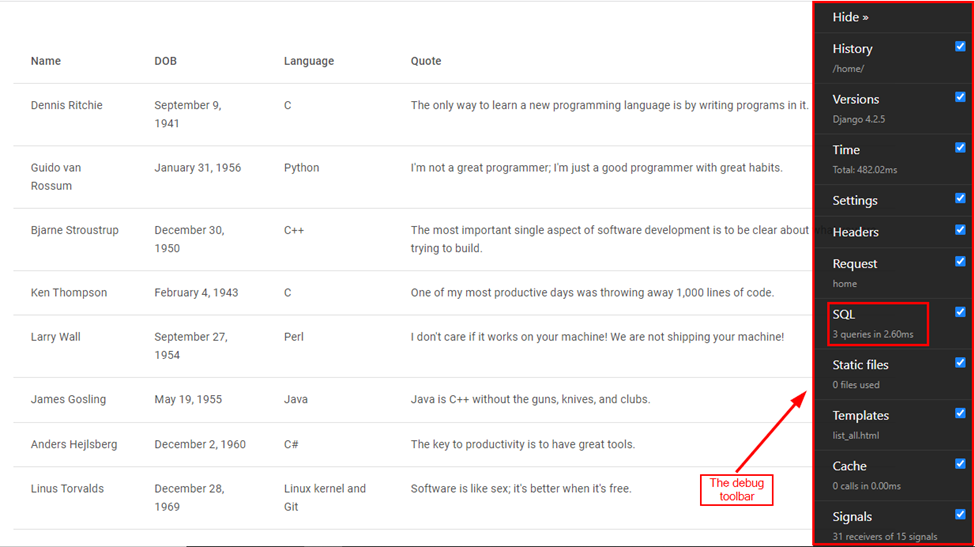
Each time you run the appliance utilizing this view, it’s going to make SQL queries. On this case, three queries have taken 2.60ms. So to keep away from making SQL queries for a similar information each time, we’ll implement the view caching.
View caching
Because the identify suggests, view caching caching includes caching the outcomes of particular person Django views. On this part, we’ll implement the view caching. To do that, we’ll make a number of modifications to the view.py file. Open it and add this import:
from django.views.decorators.cache import cache_page
Proper above the view, additionally add this decorator:
@cache_page(60*15)
(60*15) is the argument handed to @cache_page. It represents the cache timeout in seconds. The house view can be cached for quarter-hour.
Now go to the identical view and refresh the web page. We’ll get the outcome pictured beneath.
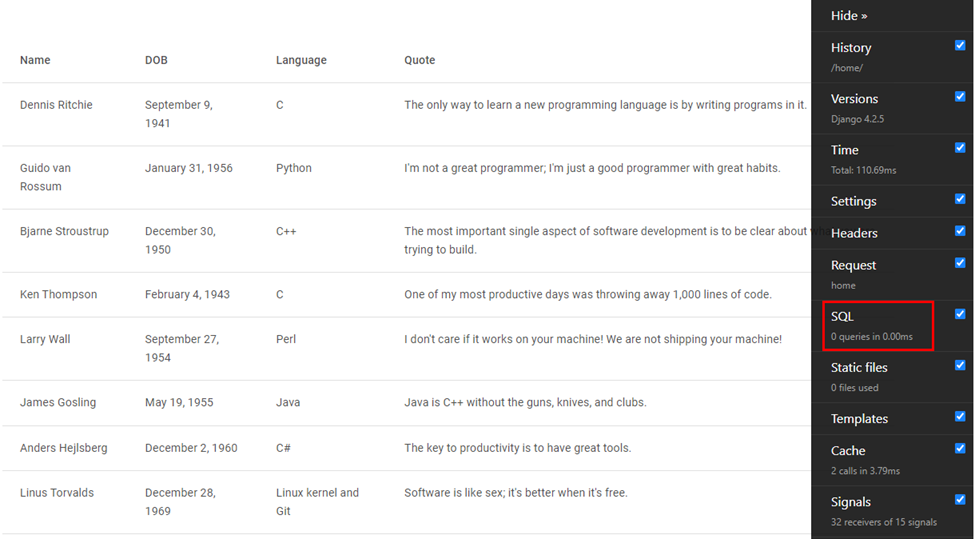
Within the picture above, we are able to see that there are 0 SQL queries carried out, as information is being fetched from the cache. This helps cut back the load on the server by serving cached content material to customers.
Template fragment caching
This caching includes caching particular elements of a template in your mission. When your template has parts with heavy calculations, template fragment caching is useful. To implement this caching, we use these tags: {% load cache %}, {% cache %}, and {% endcache %}. The {% cache %} tag takes two arguments: the cache timeout, and a novel cache key for figuring out a particular cached fragment.
Now strive operating the mission earlier than implementing this caching method. the picture beneath exhibits what we’ll get.
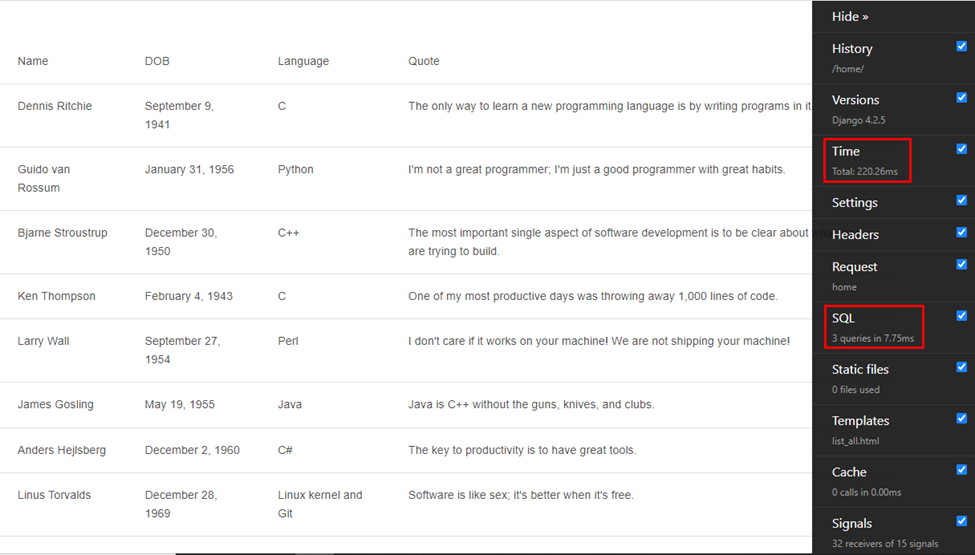
The full time is 220.26ms, and three SQL queries are carried out in 7.75ms.
Now let’s implement the caching method. We’ll cache the <div> portion of the template. Open the templates/list_all.html, and modify it to appear like this:
{% load cache %}
<!DOCTYPE html>
<html lang="en">
<head>
    <meta charset="UTF-8">
    <meta identify="viewport" content material="width=device-width, initial-scale=1.0">
    <title>Caching</title>
    <hyperlink href="https://cdnjs.cloudflare.com/ajax/libs/mdb-ui-kit/6.4.2/mdb.min.css" rel="stylesheet"/>
</head>
<physique>
   {% cache 500 programmers %}
    <div class="container py-5">
        <desk class="desk">
           <thead>
              <tr>
                 <th>Title</th>
                 <th>DOB</th>
                 <th>Language</th>
                 <th>Quote</th>
              </tr>
           </thead>
           <tbody>
              {% for programmer in programmers %}

              <tr>
                 <td>{{programmer.identify}}</td>
                 <td>{{programmer.dob}}</td>
                 <td>{{programmer.language}}</td>
                 <td>{{programmer.quote}}</td>
              </tr>
              {% endfor %}
           </tbody>
        </desk>
     </div>
   {% endcache %}
</physique>
</html>
On prime of the file, we’re loading the cache through {% load cache %} and we’ve enclosed the div portion with {% cache 500 programmers %} and {% endcache %}.
In case you run the mission once more you’re going to get the outcome pictured beneath.
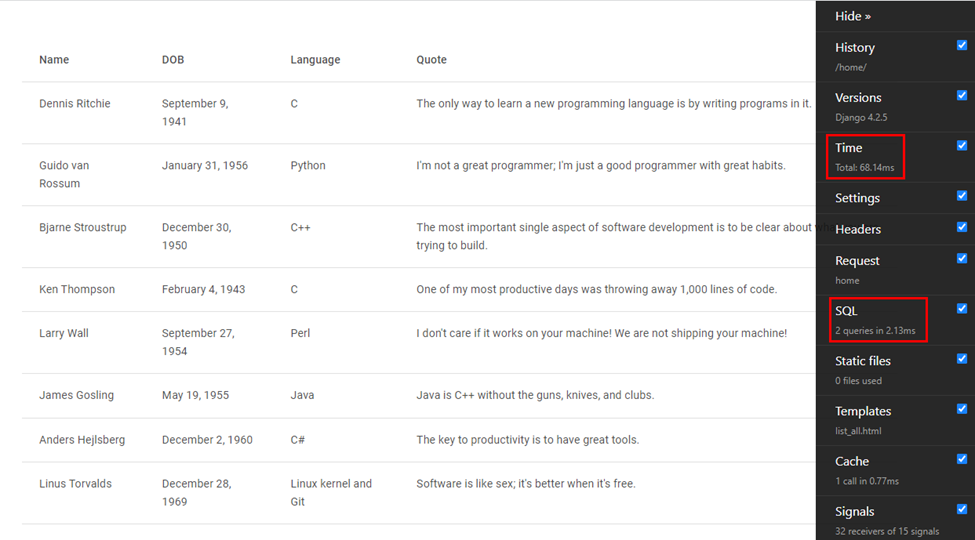
Within the picture above, we are able to see that the outcomes have improved after the caching has been carried out.
Per-site caching
Per-site caching is also referred to as whole-site caching. It includes caching the entire web site’s pages. To implement it, you want to add these middleware configurations within the settings.py file:
MIDDLEWARE = [

    'django.middleware.cache.UpdateCacheMiddleware',
    'django.middleware.common.CommonMiddleware',
    'django.middleware.cache.FetchFromCacheMiddleware',

]
And in addition add these traces:
CACHE_MIDDLEWARE_ALIAS  = ' '
CACHE_MIDDLEWARE_SECONDS = 600
CACHE_MIDDLEWARE_KEY_PREFIX = ''
Conclusion
In conclusion, understanding caching in Django is crucial for internet builders seeking to create high-performance internet purposes. This text has offered a complete information to caching in Django, masking matters corresponding to the advantages of caching, establishing caching in Django, and the perfect practices for implementation. Armed with this information, backend internet builders can confidently incorporate caching into their Django initiatives to optimize efficiency.
In case you loved this text, take a look at some extra Django articles on SitePoint.