On this article, we’ll take a look at some easy methods to fashion the HTML <particulars> aspect, which is a really helpful aspect for revealing and hiding bits of content material on an online web page.
It’s helpful to have a easy disclosure aspect in HTML that doesn’t require JavaScript, however the default styling of the <particulars> aspect is likely to be a turn-off for some. Thankfully, it’s fairly straightforward to vary the styling of this aspect.
The desk of contents beneath is an instance of the <particulars> aspect in use. We’ve added a easy border to it, together with some padding.
Introducing the small print Component
Right here’s the essential code for the <particulars> aspect:
<particulars>
  <abstract>Click on me!</abstract>
  <p>Peekaboo! This is some hidden content material!</p>
</particulars>
Mainly any HTML content material could be positioned contained in the <particulars> aspect. The <abstract> aspect gives the immediate for the person to click on on the aspect to disclose extra content material, and it should be the primary little one of the <particulars> aspect.
Right here’s a stay instance of this code:
Click on me!
Peekaboo! Right here’s some hidden content material!
Let’s take a look at all of the methods we will use CSS to reinforce the looks of our <particulars> aspect.
Background Colours, Borders and Padding
A very easy solution to improve the look of the <particulars> aspect is so as to add some padding together with a border or some background colours.
Including a border
As proven within the desk of contents above, a easy border can do rather a lot to reinforce and outline the <particulars> aspect, together with some padding and a slight border radius:
particulars {
  padding: 10px;
  border: 5px stable #f7f7f7;
  border-radius: 3px;
}
That’s the straightforward code we’ve used above to fashion our ToC.
Including some background shade
Let’s add a background shade to our <particulars> aspect as a substitute of a border:
particulars {
  padding: 10px;
  background-color: #e4eaef;
  border-radius: 5px;
}
The result’s proven within the Pen beneath.
The background shade provides the aspect higher definition, and the padding helps to create some house inside it.
We are able to additionally give a distinct background shade to the <abstract> aspect to tell apart it from the remainder of the content material, and alter its textual content shade:
abstract {
  background-color: #2196F3;
  shade: white;
  padding: 10px;
}
Notice that altering the textual content shade of the <abstract> aspect additionally adjustments the colour of the marker arrow. That’s as a result of the marker is definitely hooked up to the <abstract> aspect simply as markers (similar to bullets) are hooked up to checklist gadgets. We’ll see beneath easy methods to fashion them individually.
Styling the Marker
The <abstract> aspect is about to a show of list-item. So the default arrow (▶) that comes with it may be altered identical to the default markers on HTML checklist gadgets. We are able to change the character that’s used, and independently change its shade.
Altering the marker shade
Let’s set the default marker to a distinct shade. Only for enjoyable, let’s additionally bump up the font measurement of the marker. We are able to do that with the ::marker pseudo-element:
abstract::marker {
  shade: #e162bf;
  font-size: 1.2em;
}
The result’s proven beneath.
It’s a pleasant, easy resolution, though ::marker sadly isn’t supported in Safari, so see different choices beneath if that’s a dealbreaker.
Altering the marker spacing
By default, the marker arrow is fairly near the abstract textual content. Its list-style-position is about to inside. If we alter it to exterior, we will add house between the abstract textual content and the marker by including some left padding. We additionally want so as to add some left margin in order that the triangle doesn’t dangle exterior the container:
abstract {
  list-style-position: exterior;
  margin-left: 30px;
  padding: 10px 10px 10px 20px;
  border-radius: 5px;
}
The result’s proven beneath.
I’ve exaggerated the spacing between the arrow marker and the abstract textual content simply to make it apparent. Sadly, utilizing list-style-position: exterior; with the <abstract> aspect doesn’t work in Safari. Thankfully, there are different choices, as we’ll see beneath.
Altering the marker form
The marker on our <abstract> aspect doesn’t should be a triangle. We are able to substitute it with any character we please:
abstract {
  list-style-type: '⬇ ';
}
Notice that we’ve used '⬇ ' (with an area subsequent to the arrow), which is an alternative choice to the spacing we tried above.
We now have a down arrow as a substitute of a triangle. However … that down arrow gained’t change when the <particulars> aspect is open. That’s as a result of the <particulars> aspect has two states — closed and open — and we’ve solely set the marker fashion for the closed state. So let’s additionally set a marker for the open state:
particulars[open] > abstract {
  list-style-type: '⬆ ';
}
This time, we’ve used an up-pointing arrow. This offers us the consequence proven beneath.
Rattling! As soon as once more, Safari lets us down, because it doesn’t assist list-style-type on the <abstract> aspect both. Don’t despair, although, as we’ll take a look at fancier options beneath.
We are able to attempt all kinds of different characters, similar to + and –, ✓ and Χ or ✗, ⋁ and ⋀ , and even have enjoyable with different characters like ★ or colourful fruits like 🍏 🍌 🍓 🍋 and 🍐, however keep in mind that these characters could not work on all programs, so be a little bit cautious, and as soon as once more, list-style-type definitely gained’t work in Safari.
Making a Customized Marker for the abstract Component
As we noticed above, regardless that we can set a distinct character for the default marker, and provides it types similar to shade and font measurement, there could be points with doing so. A greater possibility is likely to be to take away the marker altogether and create a very customized various.
Eradicating the customized marker
As with checklist merchandise markers, we will take away the marker altogether:
abstract  {
  list-style: none;
}


abstract::-webkit-details-marker {
  show: none;
}
The usual list-style: none works on all browsers besides … (are you able to guess?) … Safari. A minimum of there’s a proprietary -webkit- possibility on this case.
Notice: one other solution to take away the marker from the <abstract> aspect is to present the <abstract> aspect a show worth of one thing apart from list-item — similar to block or flex. This works in each browser besides … (do I even must say it?) … Safari.
Now our aspect has no marker.
Having no marker provides no visible immediate in any respect that this aspect is clickable, so it’s not an incredible concept to depart it at that.
Utilizing a background picture as a marker
We may place a picture on the background, like so:
abstract {
  list-style: none;
  padding: 10px 10px 10px 40px;
  background: url(arrow.svg) no-repeat 14px 50%;
  background-size: 18px;
  font-weight: daring;
}
The result’s proven beneath.
The draw back of utilizing a background picture immediately on the <abstract> aspect is that we will’t rotate it when the <particulars> aspect is open, as a result of animations can’t be set immediately on background photographs in CSS. (We may, after all, use a distinct picture for the open state, however we nonetheless couldn’t animate it, which is rather more enjoyable.) So if we’re going to make use of a background picture, it’s higher to put it on a component that can be rotated and/or animated.
Utilizing a background picture as a marker with ::after
Let’s put the background picture inside an ::after pseudo-element:
abstract {
  show: flex;
}

abstract::after {
  content material: '';
  width: 18px;
  top: 10px;
  background: url('arrow.svg');
  background-size: cowl;
  margin-left: .75em;
  transition: 0.2s;
}

particulars[open] > abstract::after {
  remodel: rotate(180deg);
}
Right here’s a stay demo of this code.
We’ve used show: flex on the <abstract> aspect to make it straightforward to place the arrow horizontally.
The good factor about this setup is that we will add animation to the arrow. (The animation doesn’t appear to work in Safari, however the habits is nice sufficient, and I’m getting a bit fed up with this browser!)
Making the abstract aspect appear like a tab
We’ve been setting the <abstract> aspect to full width, however it doesn’t should be. We may make it look extra like a tab, with this straightforward change:
abstract {
  show: inline-flex;
}
An instance is proven beneath.
Limiting the width of the small print aspect
In all of our examples thus far, the <particulars> aspect has stretched to the complete width of its container, as a result of it’s a block-level aspect. We can provide it a distinct width, nevertheless, if we don’t need it so broad, similar to width: 50%;. Or we may may set it to an inline show in order that it’s simply as broad as its content material:
particulars {
  show: inline-block;
}
Click on on the tab beneath to disclose the narrower width of the <particulars> aspect.
Attempt altering show: inline-block to width: 50% within the Pen above.
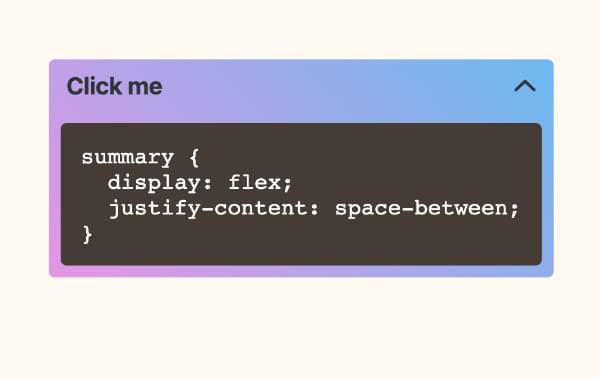
Putting the marker arrow on the far finish of the abstract
Let’s do one thing a bit completely different now, putting the marker arrow on the right-hand facet of the <abstract> aspect. As a result of we’ve been utilizing show: flex, shifting the arrow to the far proper is as straightforward as including justify-content: space-between to the <abstract> aspect:
abstract {
  show: flex;
  justify-content: space-between;
}
Utilizing ::after as a marker with no background picture
There are different methods we may use ::after with out an precise picture. Right here’s an instance that makes use of simply ::after with borders:
abstract::after {
  content material: '';
  width: 0;
  top: 0;
  border-top: 10px stable #15171b;
  border-inline: 7px stable clear;
  transition: 0.2s;
}
Right here’s a stay demo.
Now we’ve got an arrow that rotates between the closed and open state. We’ve additionally added a pleasant drop shadow to the <particulars> aspect.
One other approach to make use of ::after with out a picture is to put Unicode characters inside the content material property:
abstract::after {
  content material: "25BC";
  transition: 0.2s;
}
This units a triangle form (▼) as our marker, as proven in this CodePen demo.
There are millions of Unicode symbols, they usually’re fairly enjoyable to discover. Every comes with a code like U + 25BC or U + 025BC. To make use of that code contained in the content material property, take the characters after the + and place them contained in the content material quotes, with a on the entrance: content material: "25BC". If there’s a number of zeros at first, you’ll be able to depart them out. (For instance, U + 02248 can turn into "�2248" or "2248".)
To this point, the issues we’ve finished above are greater than sufficient, however there are different issues we will have enjoyable with, so let’s simply play with just a few of them right here.
Hover impact on the small print aspect
We are able to set varied hover results on the <particulars> aspect. For instance, we would do one thing like this:
particulars {
  transition: 0.2s background linear;
}

particulars:hover {
  background: #dad3b1;
}
Whereas we’re at it, let’s additionally transition the <abstract> textual content shade within the open state:
particulars > abstract {
  transition: shade 1s;
}

particulars[open] > abstract {
  shade: #d9103e;
}
The result’s proven beneath.
We may additionally simply set a background change on the <abstract> aspect as a substitute.
Animating the opening and shutting of the small print aspect
Haha, fooled ya! It seems it’s not attainable to animate the opening and shutting of the <particulars> aspect. In line with MDN:
Sadly, presently, there’s no built-in solution to animate the transition between open and closed.
Nonetheless, we will have a little bit of enjoyable by animating the contents of the <particulars> aspect. For instance, we may set the contents to fade in as soon as revealed:
particulars article {
  opacity: 0;
}

particulars[open] article {
  animation: fadeIn .75s linear forwards;
}

@keyframes fadeIn {
 0% {
   opacity: 0;
 }
 100% {
   opacity: 1;
 }
}
The result’s proven beneath.
One other trick is likely to be to slip within the content material, like so:
particulars {
  overflow: hidden;
}

particulars[open] article {
  animation: animateUp .5s linear forwards;
}

@keyframes animateUp {
  0% {
    opacity: 0;
    remodel: translatey(100%);
  }
  100% {
    opacity: 1;
    remodel: translatey(0);
  }
}
The result’s proven beneath.
It’s a bit tacky, and maybe overkill, however value attempting anyway. Sadly, these animations solely work the primary time the aspect is clicked (except the browser devtools are open, for some bizarre cause!). You principally want the intervention of JavaScript to make the impact work repeatedly.
Altering abstract content material in open and closed states
Within the demos above, the <choose> has at all times had the identical textual content, whether or not the <particulars> aspect is open or closed. However we may change that. Firstly, let’s depart the present “Click on me” textual content in place, but in addition add some additional textual content for every state utilizing the ::after pseudo-element:
abstract::after {
  content material: " to point out hidden content material";
}

particulars[open] abstract::after {
  content material: " to cover additional content material";
}
That offers us the consequence proven beneath.
Altering the abstract cursor
The default cursor (or mouse pointer) for the <particulars> aspect is type of bizarre. It’s a typical arrow for essentially the most half, and a textual content pointer (or I-beam) when hovering over the <abstract> textual content.
For enjoyable, let’s change to the hand cursor (or “pointer”):
abstract {
  cursor: pointer;
}
This units the mouse pointer to a hand when hovering anyplace over the <abstract> aspect, as proven beneath.
We may set the cursor on the <particulars> aspect as a substitute, which might power the hand cursor throughout the complete <particulars> aspect. I favor to maintain it simply on the factor we’re meant to click on, although.
Altering the accessibility focus types
If we’re navigating a web page by way of the keyboard, we will tab to the <particulars> aspect after which open it by hitting return. Throughout focus, the <abstract> aspect has a default define. The picture beneath exhibits what this appears to be like like in varied browsers.
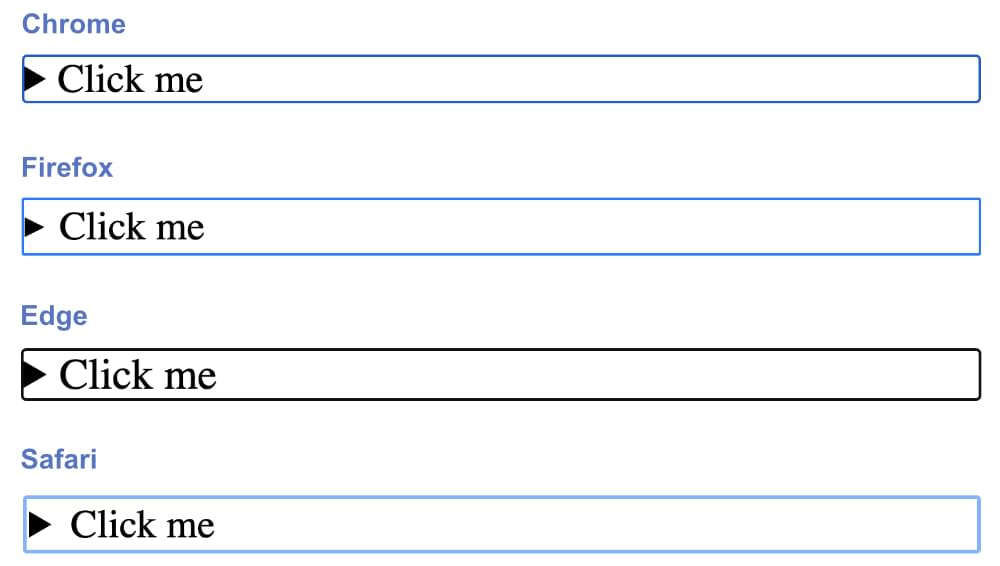
They’re a lot of a muchness: largely a easy, darkish (blue or black), stable define that’s about 3px broad.
There are a lot of types we may set for the centered <particulars> aspect, however let’s do one thing easy right here as proof of idea, altering the define to a purple dotted line:
abstract:focus {define: none;}
abstract:focus-visible {define: 3px dotted #ff0060;}
abstract {padding: 10px;}
By default, the main target define doesn’t show after we click on on the <abstract> aspect. But when we alter the main target fashion, that fashion does show even to non-keyboard customers (that’s, after we click on on the <particulars> aspect with a mouse). So within the code above, we’ve set the define to none and as a substitute used focus-visible to set the types, as this implies the main target types will solely be seen to keyboard customers (for whom it’s really helpful).
The picture beneath exhibits our new styling.

Right here’s a stay demo.
We may have quite a lot of enjoyable with this, utilizing animations, background colours and so forth when the <particulars> aspect is in focus. I’ll depart it to you to experiment additional.
Utilizing a number of particulars components like an accordion checklist
There are proposals to coordinate a number of particulars components in such a approach that one closes when one other one opens. The HTML specification even proposes a shared title attribute between a number of <particulars> components for this goal.
There’s presently no approach to do that with HTML and CSS alone, however there are some nifty examples of doing it with JavaScript (similar to right here, right here, and right here).
The perfect we will do with CSS is to fashion the presently open aspect in another way from the others, utilizing a number of the strategies we’ve lined above.
Right here’s a easy instance:
particulars {
  background-color: #2196F3;
}

particulars[open] {
  background-color: #ce0e99;
}
Styling a heading contained in the abstract
Some builders, involved in regards to the construction of their HTML, like to put a heading aspect contained in the <abstract> aspect. Whether or not that’s helpful or not is up for debate, however the default rendering shouldn’t be good, with the heading sitting on the road beneath the arrow. This may be fastened by setting the heading to show: inline or show: inline-block:
abstract h2 {
  show: inline;
}
You possibly can see try a demo of this on CodePen.
Conclusion
As we’ve tried to point out above, there are many easy methods to fashion the <particulars> aspect. Setting borders, padding and background colours is straightforward, and these in themselves enhance the look vastly. Among the strategies for styling the default marker are very helpful, however provided that Forrest’s fruit firm () has so many points with styling the marker, it might be higher to steer away from that possibility, in favor of making a very customized marker aspect. (That stated, styling the marker doesn’t break the <particulars> aspect in Safari.)
There have been makes an attempt to animate the opening and shutting of the <particulars> aspect simply with CSS, however they’re hacky at greatest, so it’s not value attempting to go down that rabbit gap. In the event you really need animated opening and shutting, you’ll want JavaScript.
To be taught extra in regards to the <particulars> aspect, try the next:
In the event you give you every other cool methods to fashion the <particulars> aspect, let me know on Twitter, and we would characteristic them right here.