Workflow
We are able to obtain this in primarily 3 steps in a Activity Sequence.
- Set the proper Package deal to obtain for the relevant mannequin (PowerShell script)
- Obtain Package deal to a customized path on the consumer
- Set up utilizing the Set up-HSA.ps1 script (offered right here)
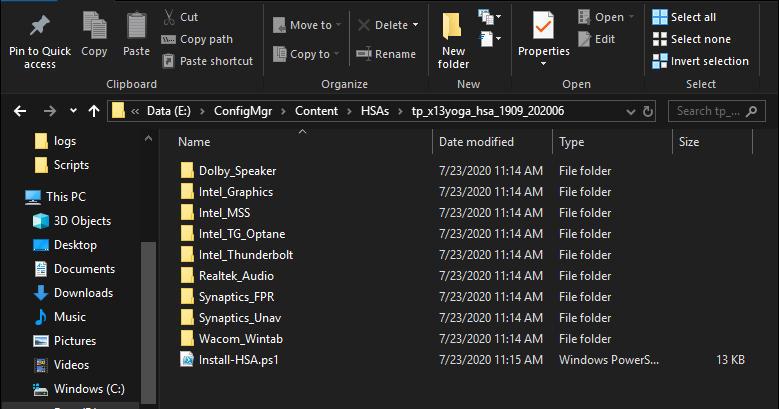
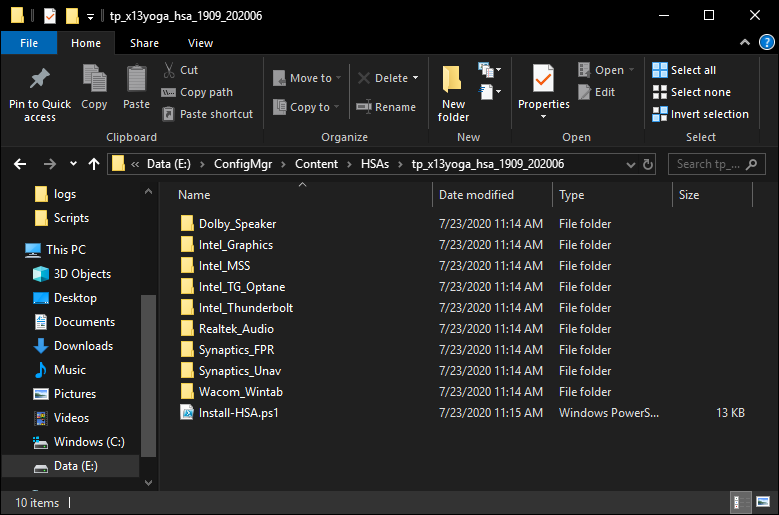
Step 1: Obtain HSA Pack
First, you will must obtain/extract the contents of the HSA pack to a desired location and place the Set up-HSA.ps1 file within the prime stage listing.
Step 2: Create Legacy Package deal(s)
Within the ConfigMgr console, create a Package deal (No Program) and enter the next particulars
- Title – Pleasant identify of the system. For instance, ThinkPad X13 Yoga Gen 1
- Model – That is optionally available, however I entered the HSA pack model, which may be discovered within the ReadMe
- Description/Remark – That is the primary 4 of the MTM. For Instance, 20SX,20SY
- Additionally discovered within the deployment recipe card
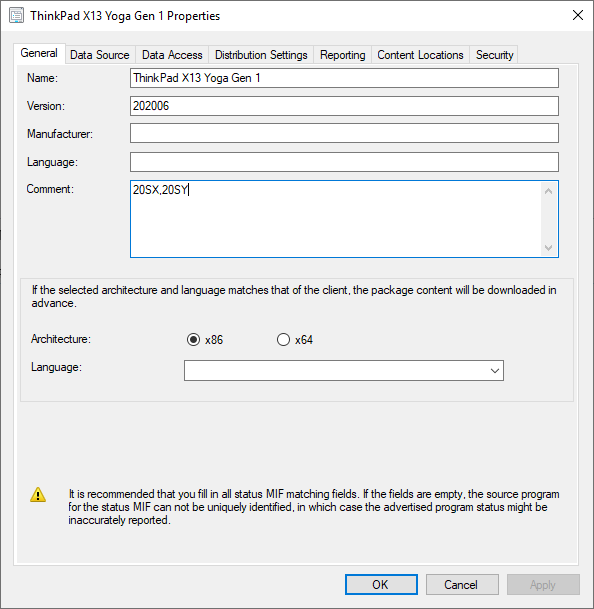
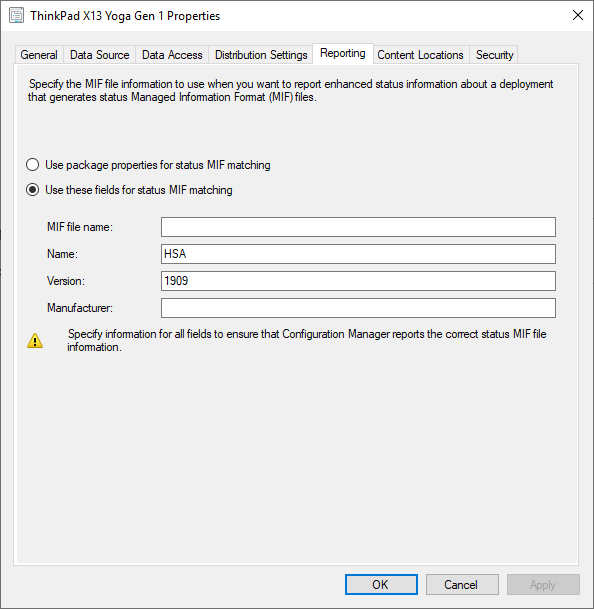
- MIF Title – HSA
- MIF Model – Home windows 10 Construct. For instance 1909
- The HSA pack will present which construct of Home windows 10 it is meant for within the ReadMe
When you do not have already got a Package deal containing your Scripts, create one other one for this function.
Step 3: Producing the Packages XML
# Hook up with ConfigMgr Web site

$SiteCode = $(Get-WmiObject -ComputerName "$ENV:COMPUTERNAME" -Namespace "rootSMS" -Class "SMS_ProviderLocation").SiteCode

# Get Package deal knowledge and export XML
Get-WmiObject -Class sms_package -Namespace rootsmssite_$sitecode | Choose-Object pkgsourcepath, Description, Producer, MifFileName, MifName, MIFVersion, Title, PackageID, ShareName, Model | Type-Object -Property Title | Export-Clixml -path '_Packages.xml' -force
When you open the XML, the contents needs to be much like this
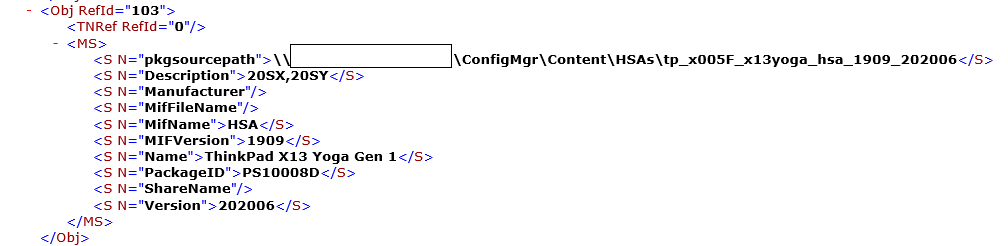
Copy this XML to your Scripts folder. Together with the XML, one other piece to the puzzle is required to have the ability to seize the proper HSA Package deal throughout the Activity Sequence. The beneath PowerShell script (Get-DynamicHsaPackages.ps1) will have a look at the Packages.xml, match the Title/MTM to it is corresponding HSA Package deal, and leverage the OSDDownloadDownloadPackages override variable within the Obtain Package deal Content material step. This script must be saved in your Scripts folder as effectively.
[CmdletBinding()]
param (

    [Parameter(ValueFromPipelineByPropertyName,
        Position = 0)]
    [string]
    $MatchProperty = 'Title',

    [Parameter(ValueFromPipelineByPropertyName,
        Position = 1)]
    [string]
    $ModelVersion = (Get-WmiObject -Class Win32_ComputerSystemProduct -Namespace rootcimv2).Model,

    [Parameter(ValueFromPipelineByPropertyName,
        Position = 1)]
    [string]
    $MTM = ((Get-WmiObject -Class Win32_ComputerSystem | Choose-Object -ExpandProperty Mannequin).SubString(0, 4)).Trim(),

    [Parameter(ValueFromPipelineByPropertyName,
        Position = 2)]
    [string]
    $PackageXMLLibrary = "._Packages.xml",

    [Parameter(ValueFromPipelineByPropertyName,
        Position = 3)]
    [ValidateSet("1909", "2004")]
    [string]
    $OSVersion = ""
)

#XML for all packages
[xml]$Packages = Get-Content material -Path $PackageXMLLibrary

#atmosphere variable name for process sequence solely

strive {
    $tsenv = New-Object -ComObject Microsoft.SMS.TSEnvironment
    $tsenvInitialized = $true
}
catch {
    Write-Host -Object 'Not executing in a tasksequence'
    $tsenvInitialized = $false
}

$PackageID = (Import-Clixml $PackageXMLLibrary | ? { $_.$MatchProperty.Break up(',').Accommodates($ModelVersion) -and $_.MifName -eq "HSA" -and $_.MifVersion -match $OSVersion -and $_.Description -match $MTM }).PackageID
$PackageID
if ($tsenvInitialized) {
    $tsenv.Worth('OSDDownloadDownloadPackages') = $PackageID
}
Step 4: Placing It All Collectively
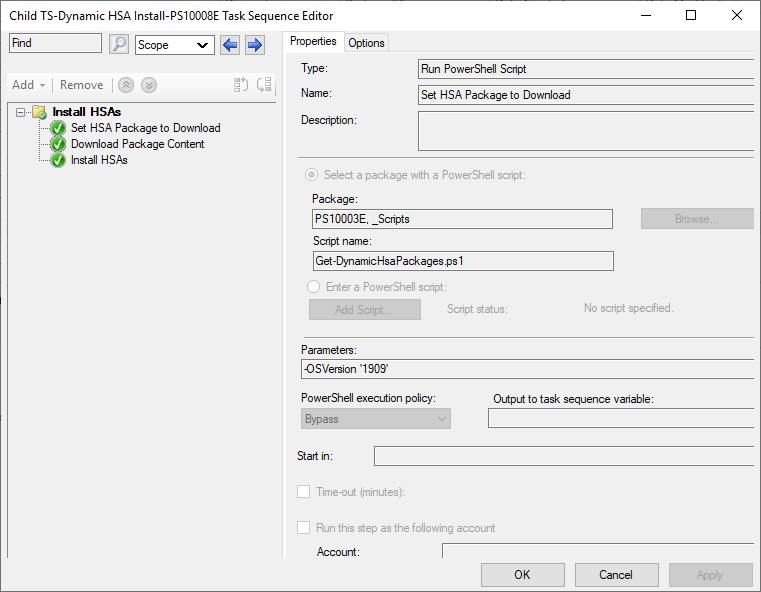
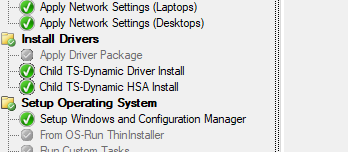
In my testing, I created a Baby Activity Sequence containing the whole lot above and have added to my predominant Activity Sequence. Here is what it might appear like
Run PowerShell Script: Choose the Scripts Package deal containing:
- _.Packages XML
- Get-DynamicHsaPackages.ps1
Script Title: Get-DynamicHsaPackages.ps1
Parameters: -OSVersion ‘1909’
- When you’re deploying Home windows 10 1909, that is the parameter you will set. As soon as the 2004 HSA Packs are launched and you’re deploying Home windows 10 2004, the parameter would then be set to -OSVersion ‘2004’
PowerShell execution coverage: Set to Bypass
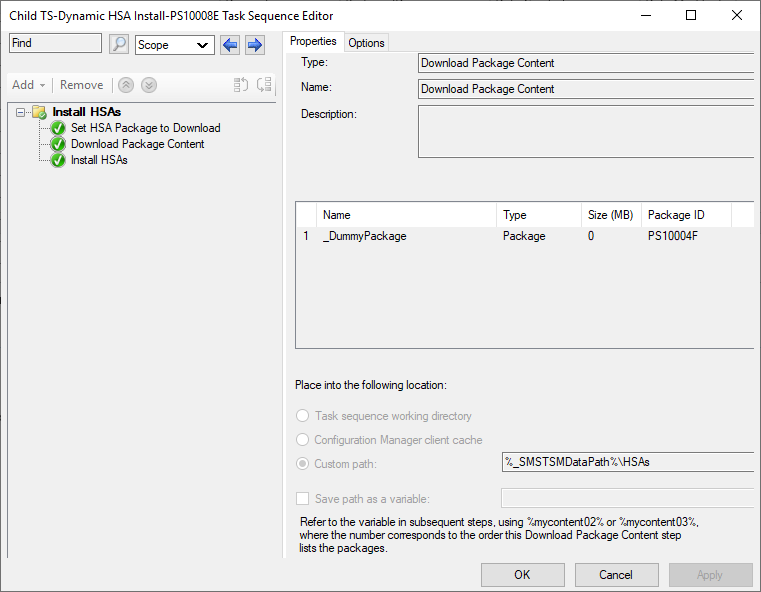
Obtain Package deal Content material: This step will finally get overridden as a result of OSDDownloadDownloadPackages variable being set within the Get-DynamicHsaPackages script. So create an empty Package deal and add it right here.
Customized path: That is the place the HSA Package deal shall be downloaded to on the consumer. Right here, I am utilizing the %_SMSTSMDataPath% (I’ve my drivers set to obtain right here as effectively). On the consumer, this can resolve to C:_SMSTaskSequenceHSAs<HSA PackageID>
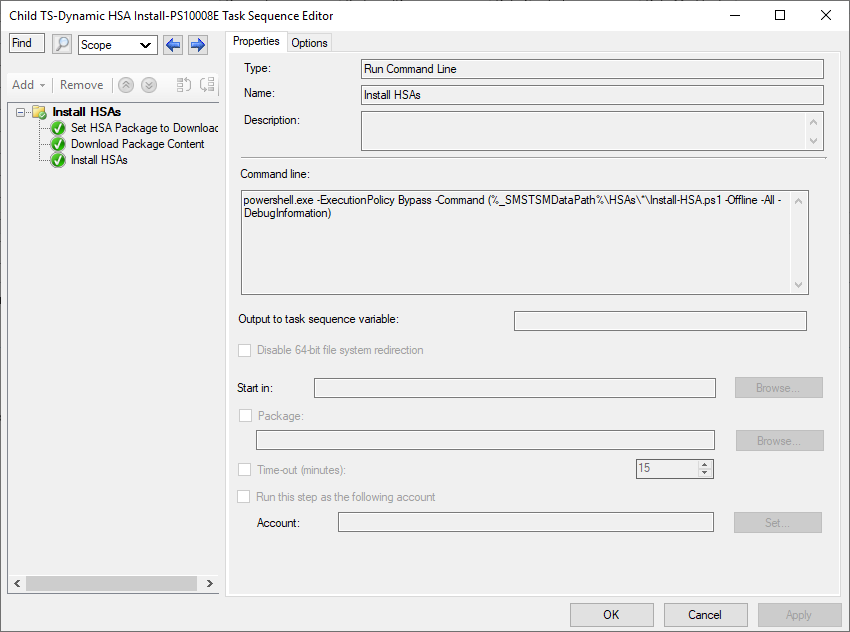
Run Command Line: This step calls PowerShell to execute the Set up-HSA.ps1 with parameters to put in all HSAs offline (WinPE).
powershell.exe -ExecutionPolicy Bypass -Command (%_SMSTSMDataPathpercentHSAs*Set up-HSA.ps1 -Offline -All -DebugInformation)
This being a Baby Activity Sequence, I’ve added it to my predominant Activity Sequence proper after my Set up Drivers step and earlier than the Setup Home windows and ConfigMgr Consumer step
Notes
It is essential to enter the proper data within the Packages, particularly the primary 4 characters of the system’s MTM which can reside within the Description/Remark of the Package deal. You probably have a mix of AMD and Intel containers, these techniques could have the identical pleasant identify in WMI however have separate HSA packs. While you create the ConfigMgr Packages, you’ll be able to have 2 equivalent Package deal names however the MTM’s needs to be totally different. The script will match the mandatory properties and obtain the proper Package deal.