
Introduction
In pc imaginative and prescient, totally different strategies for reside object detection exist, together with Quicker R-CNN, SSD, and YOLO. Every method has its limitations and benefits. Whereas Quicker R-CNN might excel in accuracy, it could not carry out as properly in real-time situations, prompting a shift in direction of the YOLO algorithm.
Object detection is prime in pc imaginative and prescient, enabling machines to establish and find objects inside a body or display. Over time, varied object detection algorithms have been developed, with YOLO rising as probably the most profitable. Lately, YOLOv8 has been launched, additional enhancing the algorithm’s capabilities.
On this complete information, we discover three distinguished object detection algorithms: Quicker R-CNN, SSD (Single Shot MultiBox Detector), and YOLOv8. We talk about the sensible elements of implementing these algorithms, together with establishing a digital surroundings and growing a Streamlit utility.
Studying Goal
- Perceive Quicker R-CNN, SSD, and YOLO, and analyze the variations between them.
- Acquire sensible expertise in implementing reside object detection programs utilizing OpenCV, Supervision, and YOLOv8.
- Understanding the picture segmentation mannequin utilizing the Roboflow annotation.
- Create a Streamlit utility for a simple consumer interface.
Let’s discover find out how to do picture segmentation with YOLOv8!
This text was revealed as part of the Information Science Blogathon.
Quicker R-CNN
Quicker R-CNN (Quicker Area-based Convolutional Neural Community) is a deep learning-based object detection algorithm. It’s evaluated utilizing the R-CNN and Quick R-CNN frameworks and might be thought of an extension of Quick R-CNN.
This algorithm introduces the Area Proposal Community (RPN) to generate area proposals, changing the selective search utilized in R-CNN. The RPN shares convolutional layers with the detection community, permitting environment friendly end-to-end coaching.
The generated area proposals are then fed right into a Quick R-CNN community for bounding field refinement and object classification.
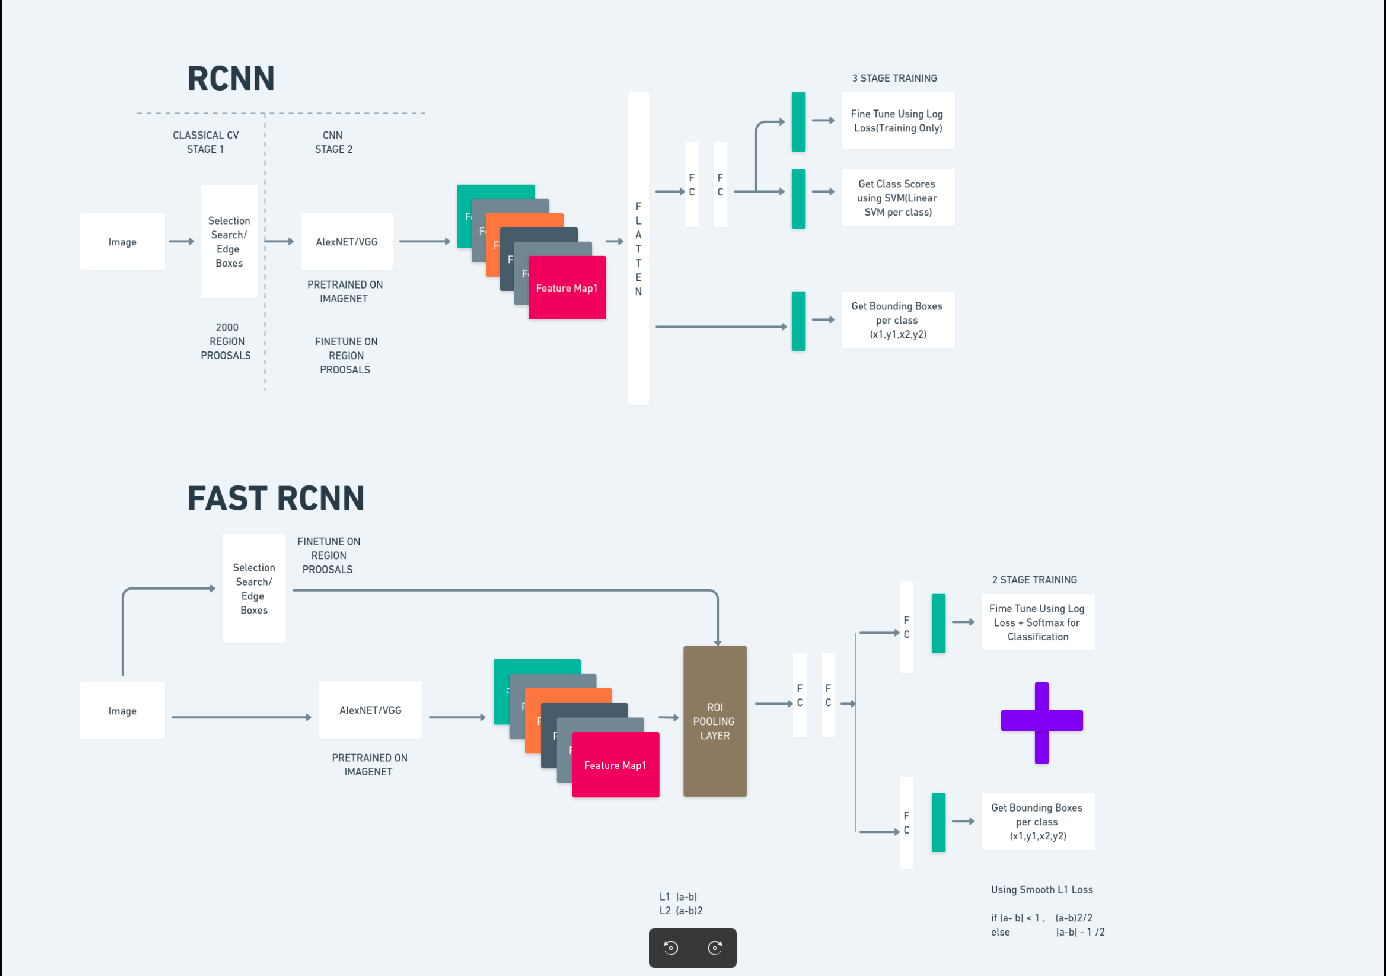
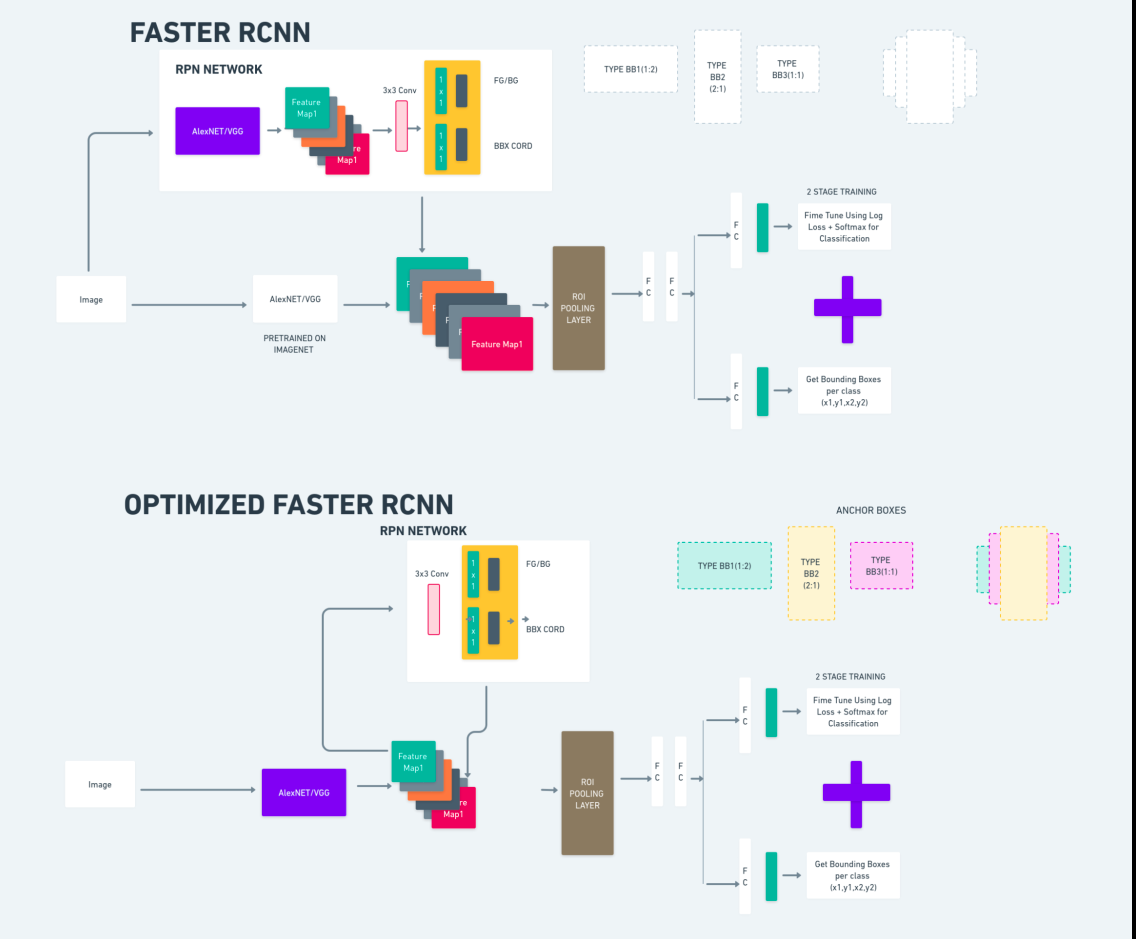
The diagram above illustrates the Quicker R-CNN household comprehensively and is straightforward to grasp for evaluating every algorithm.
Single Shot MultiBox Detector(SSD)
The Single Shot MultiBox Detector (SSD) is standard in object detection and primarily utilized in pc imaginative and prescient duties. Within the earlier technique, Quicker R-CNN, we adopted two steps: step one concerned the detection half and the second concerned regression. Nonetheless, with SSD, we solely carry out a single detection step. SSD was launched in 2016 to deal with the necessity for a quick and correct object detection mannequin.
SSD has a number of benefits over earlier object detection strategies like Quicker R-CNN:
- Effectivity: SSD is a single-stage detector, which means it instantly predicts bounding containers and sophistication scores with out requiring a separate proposal technology step. This makes it quicker in comparison with two-stage detectors like Quicker R-CNN.
- Finish-to-Finish Coaching: SSD might be skilled end-to-end, optimizing each the bottom community and the detection head collectively, which simplifies the coaching course of.
- Multi-scale Function Fusion: SSD operates on characteristic maps at a number of scales, permitting it to detect objects of various sizes extra successfully.
SSD strikes steadiness between velocity and accuracy, making it appropriate for real-time functions the place each efficiency and effectivity are crucial.
You Solely Look As soon as(YOLOv8)
In 2015, You Solely Look As soon as (YOLO) was launched as an object-detection algorithm in a analysis paper by Joseph Redmon, Santosh Divvala, Ross Girshick, and Ali Farhadi. YOLO is a single-shot algorithm that instantly classifies an object in a single move by having just one neural community predict bounding containers and sophistication chances utilizing a full picture as enter.
Now, Let’s perceive YOLOv8 as state-of-the-art developments in real-time object detection with improved accuracy and velocity. YOLOv8 permits you to leverage pre-trained fashions, that are already skilled on an enormous dataset comparable to COCO (Widespread Objects in Context). Picture segmentation supplies pixel-level details about every object, enabling extra detailed evaluation and understanding of the picture content material.
Whereas picture segmentation can be computationally costly, YOLOv8 integrates this technique into its neural-network structure, permitting for environment friendly and correct object segmentation.
Working Precept of YOLOv8
YOLOv8 works by first dividing the enter picture into grid cells. Utilizing these grid cells, YOLOv8 predicts the bounding containers (bbox) with chances of sophistication.
Afterwards, YOLOv8 employs the NMS algorithm to scale back overlapping. As an illustration, if there are a number of automobiles current within the picture leading to overlapping bounding containers, the NMS algorithm helps in decreasing this overlap.
Distinction between variants of Yolo V8: YOLOv8 is obtainable in three variants: YOLOv8, YOLOv8-L, and YOLOv8-X. The principle distinction between the variants is the scale of the spine community. YOLOv8 has the smallest spine community, whereas YOLOv8-X has the biggest spine community.
Distinction between Quicker R-CNN, SSD, and YOLO
| Side | Quicker R-CNN | SSD | YOLO |
|---|---|---|---|
| Structure | Two-stage detector with RPN and Quick R-CNN | Single-stage detector | Single-stage detector |
| Area Proposals | Sure | No | No |
| Detection Velocity | Slower in comparison with SSD and YOLO | Quicker in comparison with Quicker R-CNN, slower than YOLO | Very quick |
| Accuracy | Usually increased accuracy | Balanced accuracy and velocity | Respectable accuracy, particularly for real-time functions |
| Flexibility | Versatile, can deal with varied object sizes and side ratios | Can deal with a number of scales of objects | Can wrestle with correct localization of small objects |
| Unified Detection | No | No | Sure |
| Velocity vs Accuracy Tradeoff | Usually sacrifices velocity for accuracy | Balances velocity and accuracy | Prioritizes velocity whereas sustaining first rate accuracy |
What’s Segmentation?
As we all know segmentation means we’re dividing the massive picture into smaller teams primarily based on sure traits. Let’s perceive picture segmentation which is the pc imaginative and prescient method used to partition a picture into totally different a number of segments or areas. As the pictures are made from pixels and In Picture segmentation, pixels are grouped collectively in response to the similarity in color, depth, texture, or different visible properties.
For instance, if a picture accommodates bushes, automobiles, or individuals then the picture segmentation goes to divide the picture into totally different courses which characterize significant objects or elements of the picture. Picture segmentation is broadly utilized in totally different fields like medical imaging, satellite tv for pc picture evaluation, object recognition in pc imaginative and prescient, and extra.
Within the segmentation half, we initially create the primary YOLOv8 segmentation mannequin utilizing Robflow. Then, we import the segmentation mannequin to carry out the segmentation activity. The query arises: why will we create the segmentation mannequin when the duty may very well be accomplished with a detection algorithm alone?
Segmentation permits us to acquire the total physique picture of a category. Whereas detection algorithms concentrate on detecting the presence of objects, segmentation supplies a extra exact understanding by delineating the precise boundaries of objects. This results in extra correct localization and understanding of the objects current within the picture.
Nonetheless, segmentation sometimes includes increased time complexity in comparison with detection algorithms as a result of it requires extra steps comparable to separating annotations and creating the mannequin. Regardless of this downside, the elevated precision provided by segmentation can outweigh the computational value in duties the place exact object delineation is essential.
Step-by-Step Reside Detection and Picture Segmentation With YOLOv8
On this idea we ae exploring the steps for making a digital surroundings utilizing conda, activating the venv and putting in the necessities packages utilizing pip. first creating the conventional python script then we create the streamlit utility.
Step1: Create a Digital Surroundings utilizing Conda
conda create -p ./venv python=3.8 -yStep2: Activate the Digital Surroundings
conda activate ./venv
Step3: Create necessities.txt
Open the terminal and paste the beneath script:
contact necessities.txtStep4: Use the Nano Command and Edit the necessities.txt
After creating the necessities.txt wirte the next command for modifying necessities.txt
nano necessities.txtAfter operating the above script you’ll be able to see this UI.
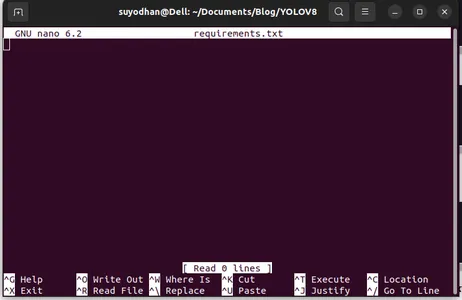
Write her required packages.
ultralytics==8.0.32
supervision==0.2.1
streamlit
Then press the “ctrl+o”(this command saving modifying half) then Press the “enter”
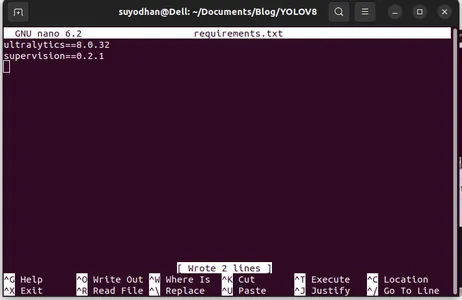
After urgent the “Ctrl+x”. you’ll be able to exit the file. and going to the primary path.
Step5: Putting in the necessities.txt
pip set up -r necessities.txtStep6: Create the Python Script
Within the terminal write the next script or we are able to say command.
contact primary.pyAfter creating primary.py open the vs code you employ the command write in terminal,
code Step7: Writing the Python Script
import cv2
from ultralytics import YOLO
import supervision as sv

# Outline the body width and top for video seize
frame_width = 1280
frame_height = 720

def primary():
    # Initialize video seize from default digicam
    cap = cv2.VideoCapture(0)
    cap.set(cv2.CAP_PROP_FRAME_WIDTH, frame_width)
    cap.set(cv2.CAP_PROP_FRAME_HEIGHT, frame_height)

    # Load YOLOv8 mannequin
    mannequin = YOLO("yolov8l.pt")

    # Initialize field annotator for visualization
    box_annotator = sv.BoxAnnotator(
        thickness=2,
        text_thickness=2,
        text_scale=1
    )

    # Essential loop for video processing
    whereas True:
        # Learn body from video seize
        ret, body = cap.learn()

        # Carry out object detection utilizing YOLOv8
        end result = mannequin(body, agnostic_nms=True)[0]
        detections = sv.Detections.from_yolov8(end result)

        # Put together labels for detected objects
        labels = [
            f"{model.model.names[class_id]} {confidence:0.2f}"
            for _, confidence, class_id, _
            in detections
        ]

        # Annotate body with bounding containers and labels
        body = box_annotator.annotate(
            scene=body,
            detections=detections,
            labels=labels
        )

        # Show annotated body
        cv2.imshow("yolov8", body)

        # Test for stop key
        if cv2.waitKey(1) & 0xFF == ord('q'):
            break

    # Launch video seize
    cap.launch()
    cv2.destroyAllWindows()

if __name__ == "__main__":
    primary()
After operating this command you’ll be able to see the your digicam is open and detecting a part of you. like gender and background elements.
Step7: Create streamlit App
import cv2
import streamlit as st
from ultralytics import YOLO
import supervision as sv

# Outline the body width and top for video seize
frame_width = 1280
frame_height = 720

def primary():
    # Set web page title and header
    st.title("Reside Object Detection with YOLOv8")

    # Button to begin the digicam
    start_camera = st.button("Begin Digicam")

    if start_camera:
        # Initialize video seize from default digicam
        cap = cv2.VideoCapture(0)
        cap.set(cv2.CAP_PROP_FRAME_WIDTH, frame_width)
        cap.set(cv2.CAP_PROP_FRAME_HEIGHT, frame_height)

        # Load YOLOv8 mannequin
        mannequin = YOLO("yolov8l.pt")

        # Initialize field annotator for visualization
        box_annotator = sv.BoxAnnotator(
            thickness=2,
            text_thickness=2,
            text_scale=1
        )

        # Essential loop for video processing
        whereas True:
            # Learn body from video seize
            ret, body = cap.learn()

            # Carry out object detection utilizing YOLOv8
            end result = mannequin(body, agnostic_nms=True)[0]
            detections = sv.Detections.from_yolov8(end result)

            # Put together labels for detected objects
            labels = [
                f"{model.model.names[class_id]} {confidence:0.2f}"
                for _, confidence, class_id, _
                in detections
            ]

            # Annotate body with bounding containers and labels
            body = box_annotator.annotate(
                scene=body,
                detections=detections,
                labels=labels
            )

            # Show annotated body
            st.picture(body, channels="BGR", use_column_width=True)

            # Test for stop key
            if cv2.waitKey(1) & 0xFF == ord('q'):
                break

        # Launch video seize
        cap.launch()

if __name__ == "__main__":
    primary()
On this script, we’re creating the streamlit utility and creating the button in order that after urgent the button your machine digicam is open and detecting the half within the body.
Run this script utilizing this command.
streamlit run app.py
# first create the app.py then paste the above code and run this script.
After operating the above command suppose you bought the reach-out error like,
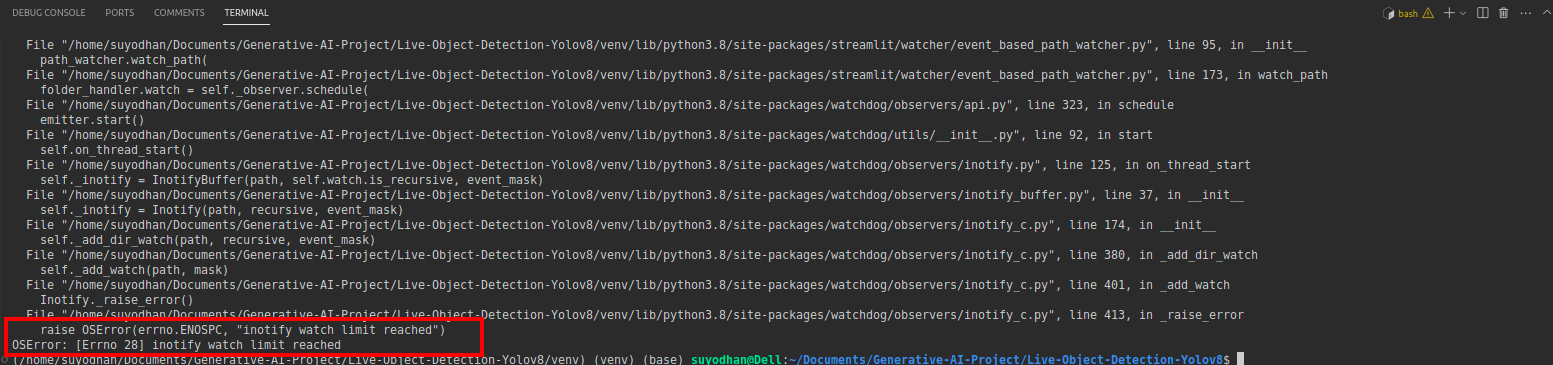
then press this command,
sudo sysctl fs.inotify.max_user_watches=524288After hitting the command you need to write your password by as a result of we’re utilizing the sudo command sudo is god:)
Run the script once more. and you’ll see the streamlit utility.
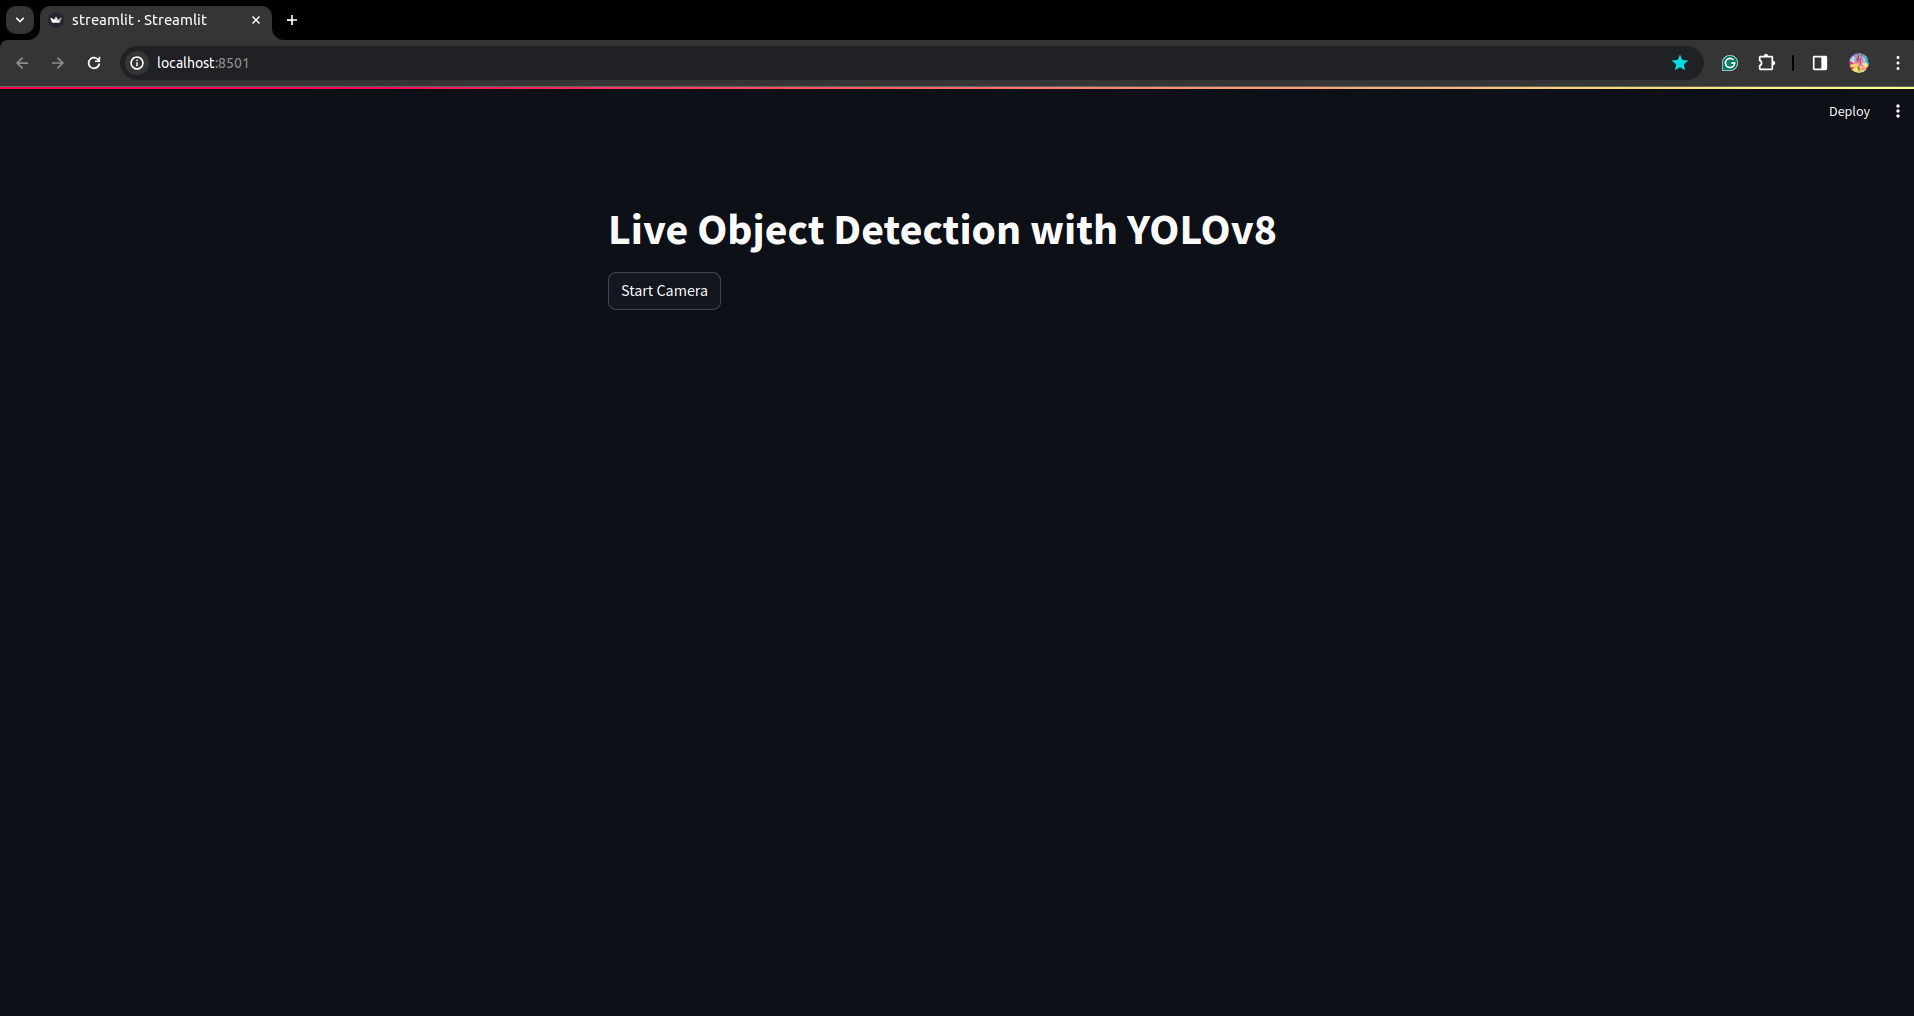
Right here we are able to create a profitable reside detection utility within the subsequent half we’ll see the segmentation half.
Steps For Annotation
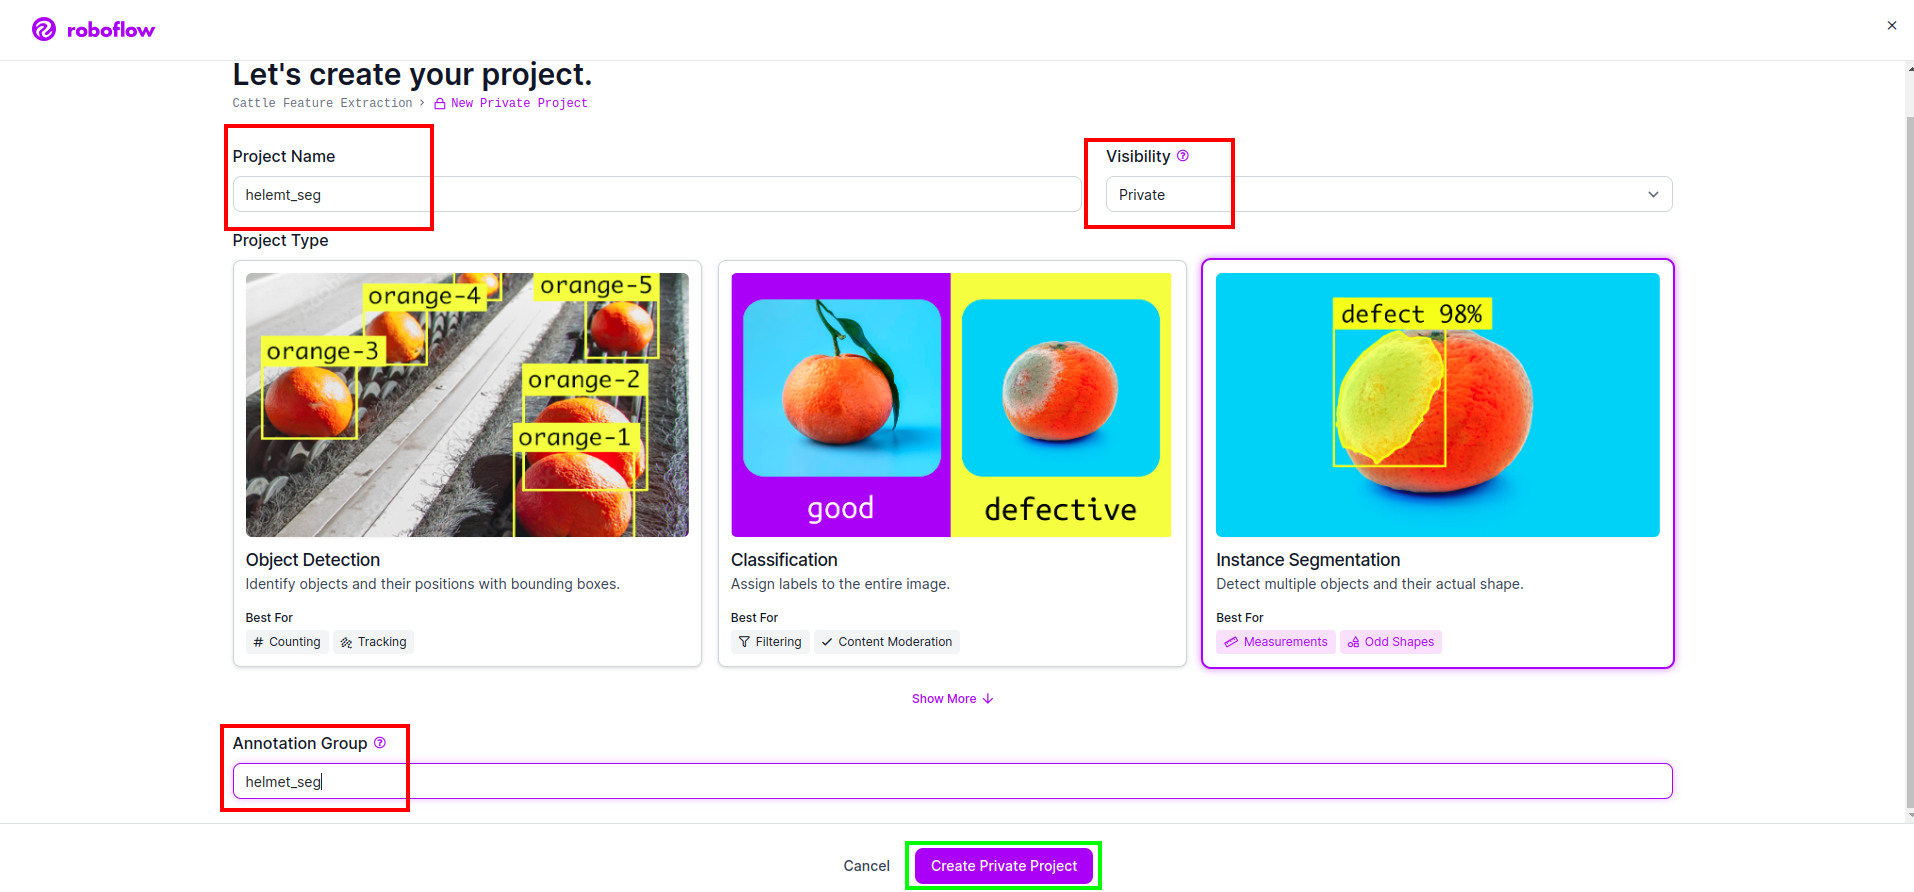
Step1: Roboflow Setup
After sigin the “Create Venture”. right here you’ll be able to create the challenge and annotation group.
Step2: Dataset Downloading
Right here we take into account the easy instance however you need to apply it to your drawback assertion so I’m utilizing right here duck dataset.
Go the this hyperlink and obtain the duck dataset.
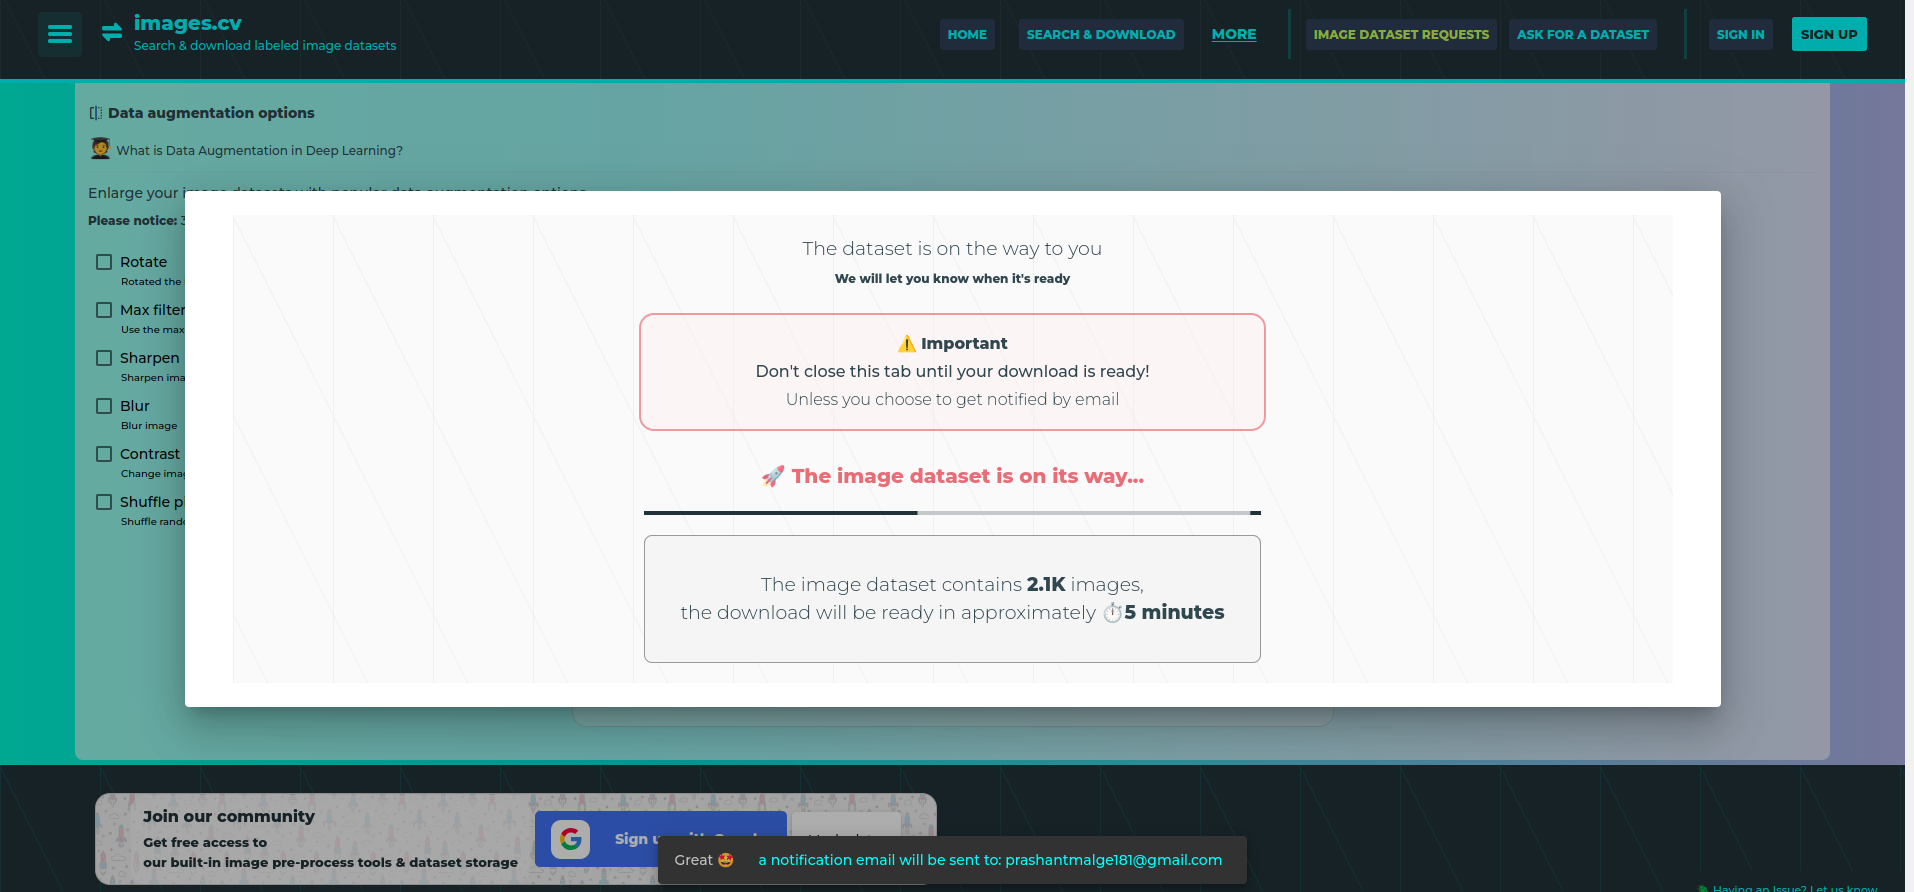
Extract the folder there you’ll be able to see the three folders: prepare, check and val.
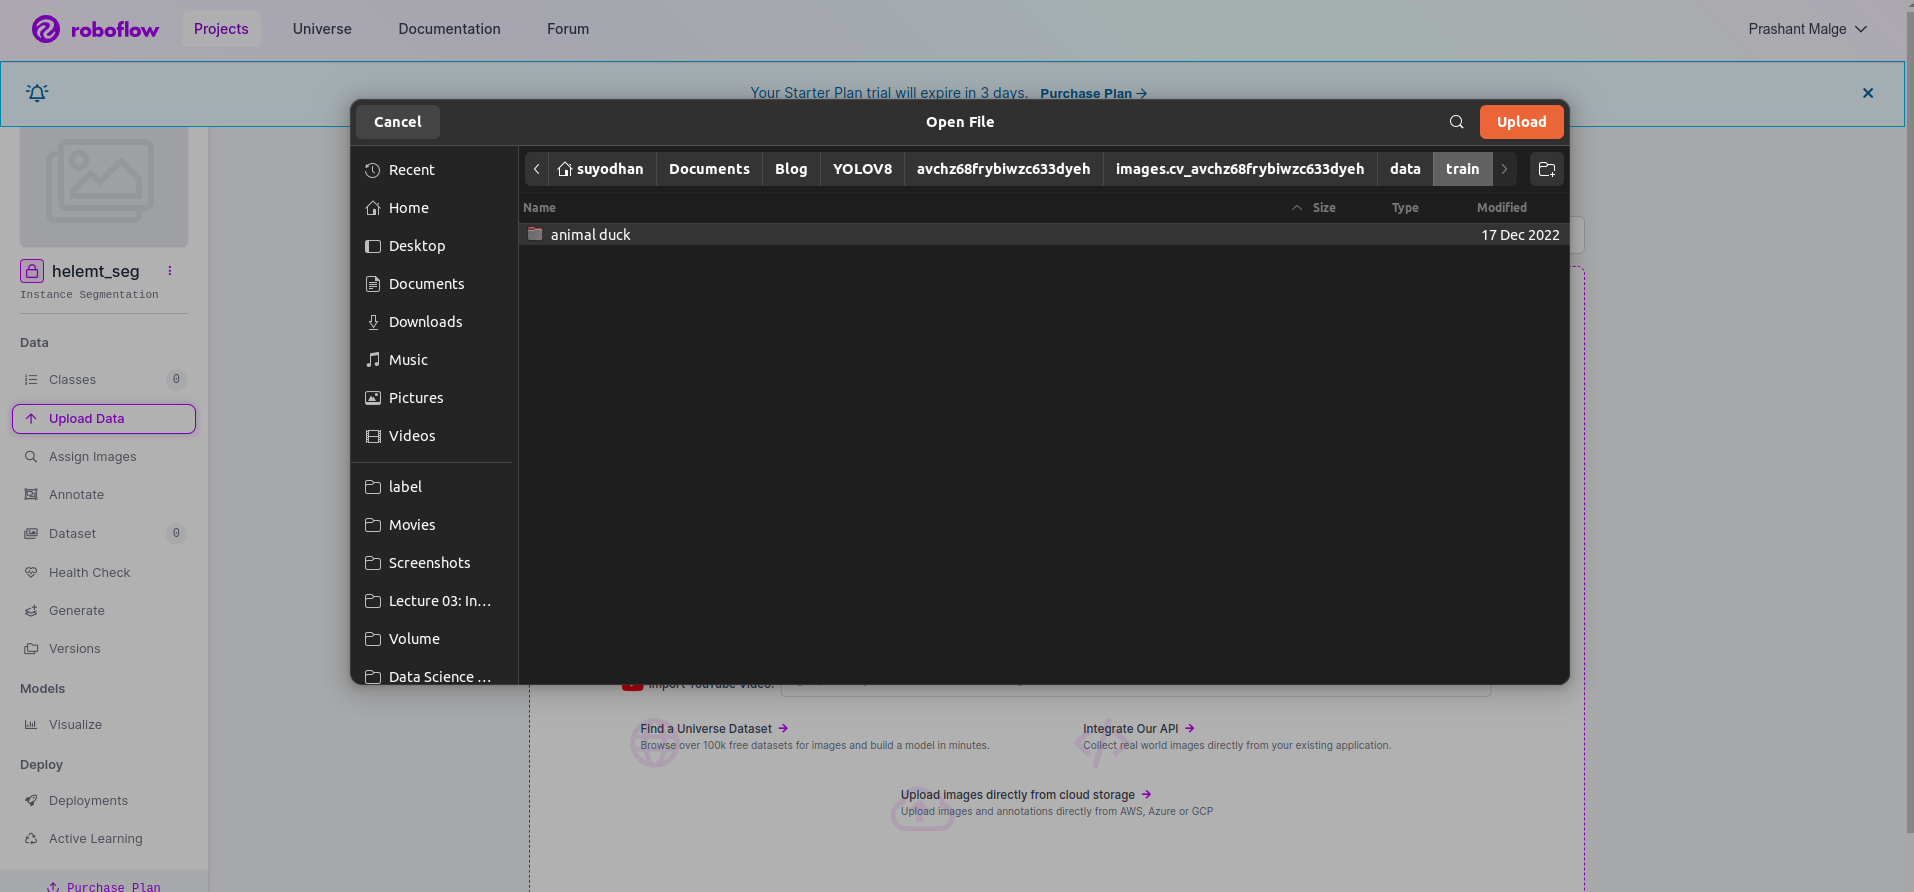
Step3: Importing the Dataset on roboflow
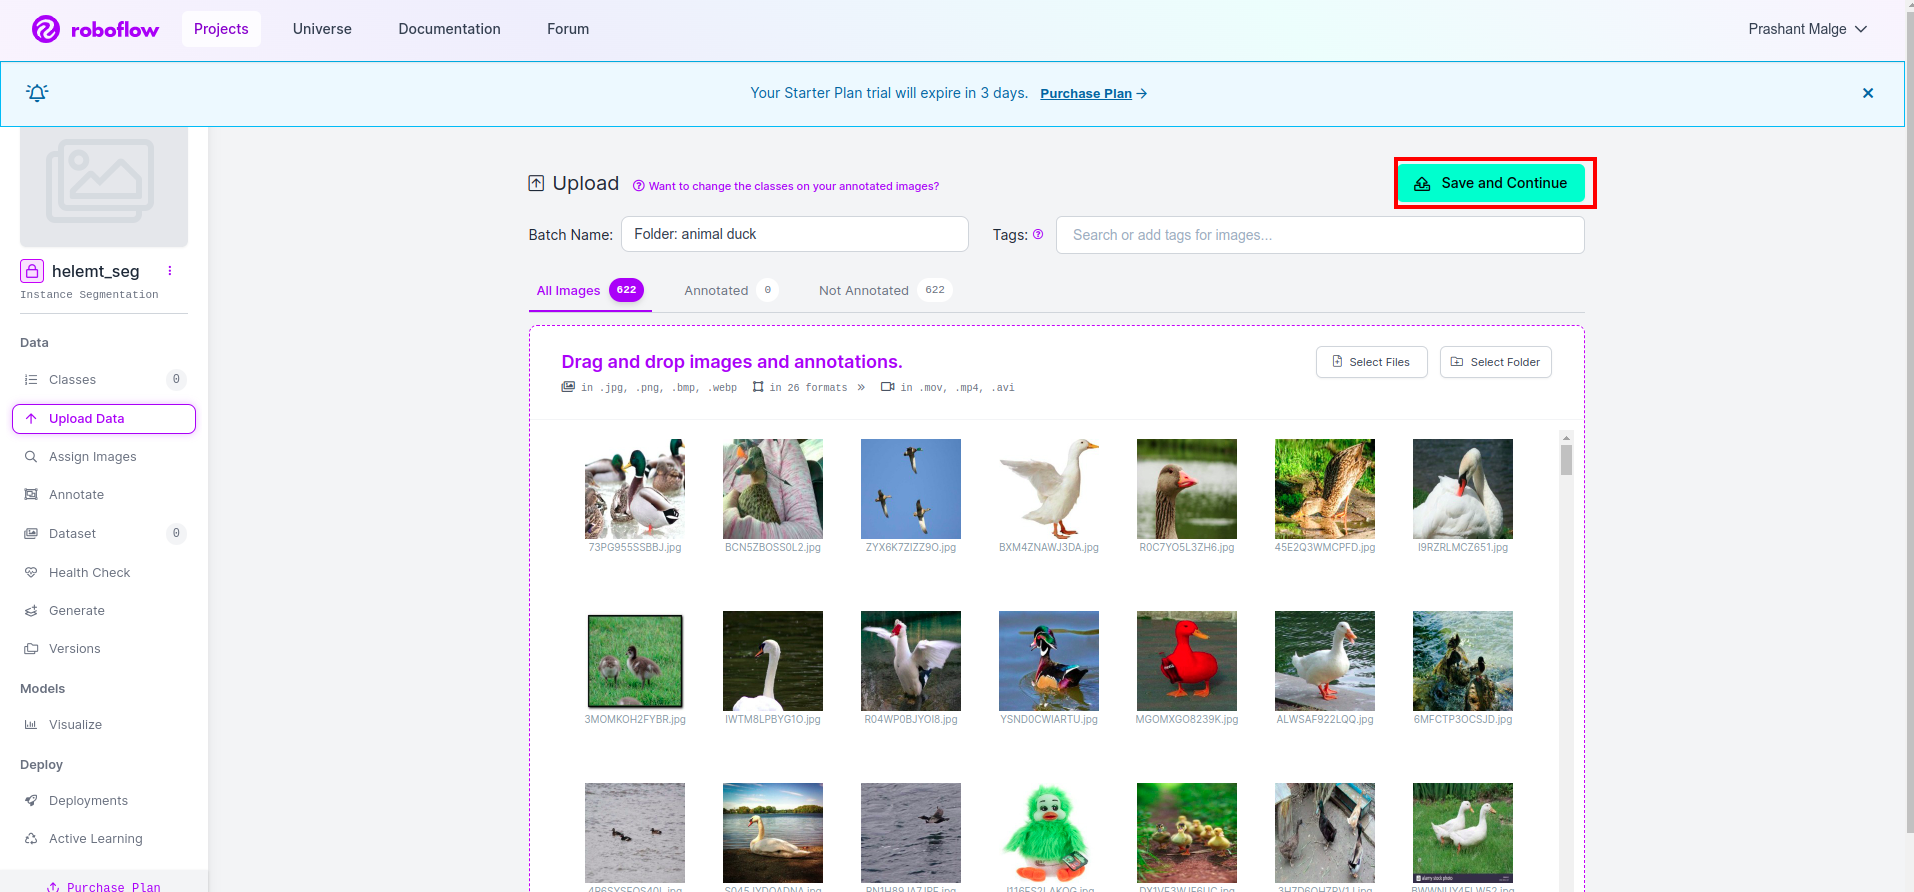
After creating the challenge in roboflow you’ll be able to see this UI right here you’ll be able to add your dataset so are importing solely prepare half photographs choose the “choose folder” choice.
Then click on the “save and proceed” choice as I mark in a purple rectangle field
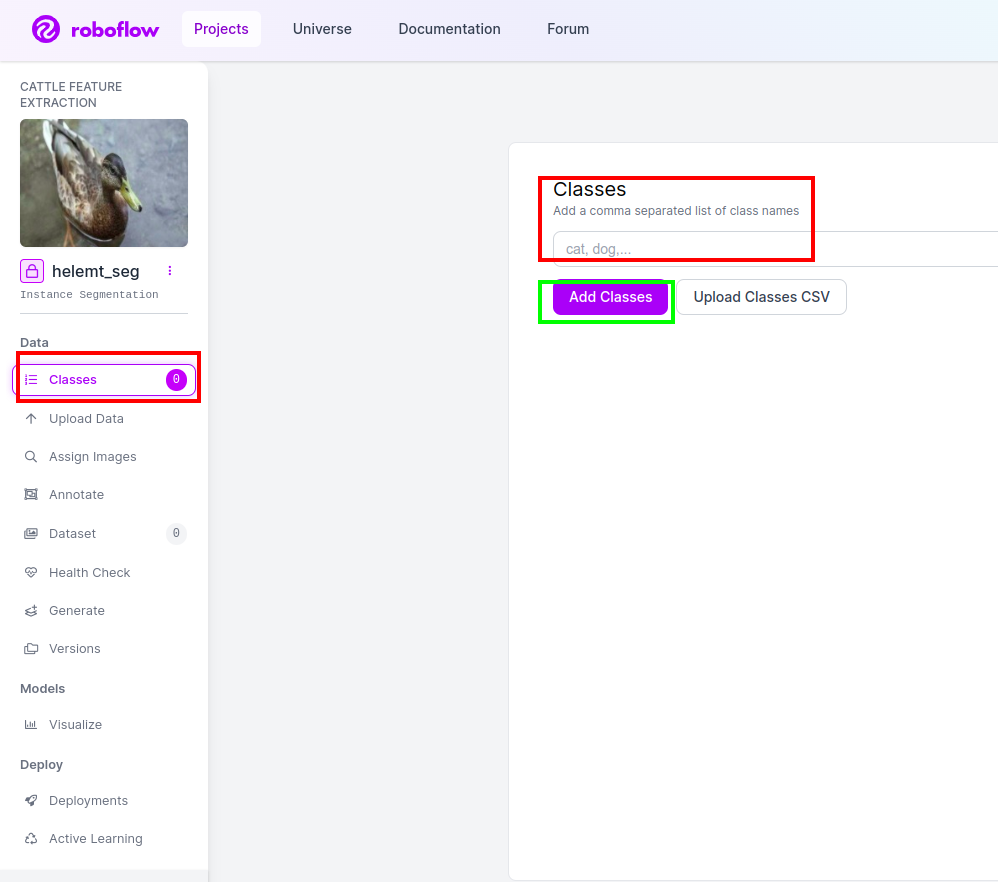
Step4: Add the Class Identify
Then go to the class half on the left facet of test the purple field. and write the category title as duck, after clicking the inexperienced field.
Now our setup is full and the following half just like the annotation half additionally easy.
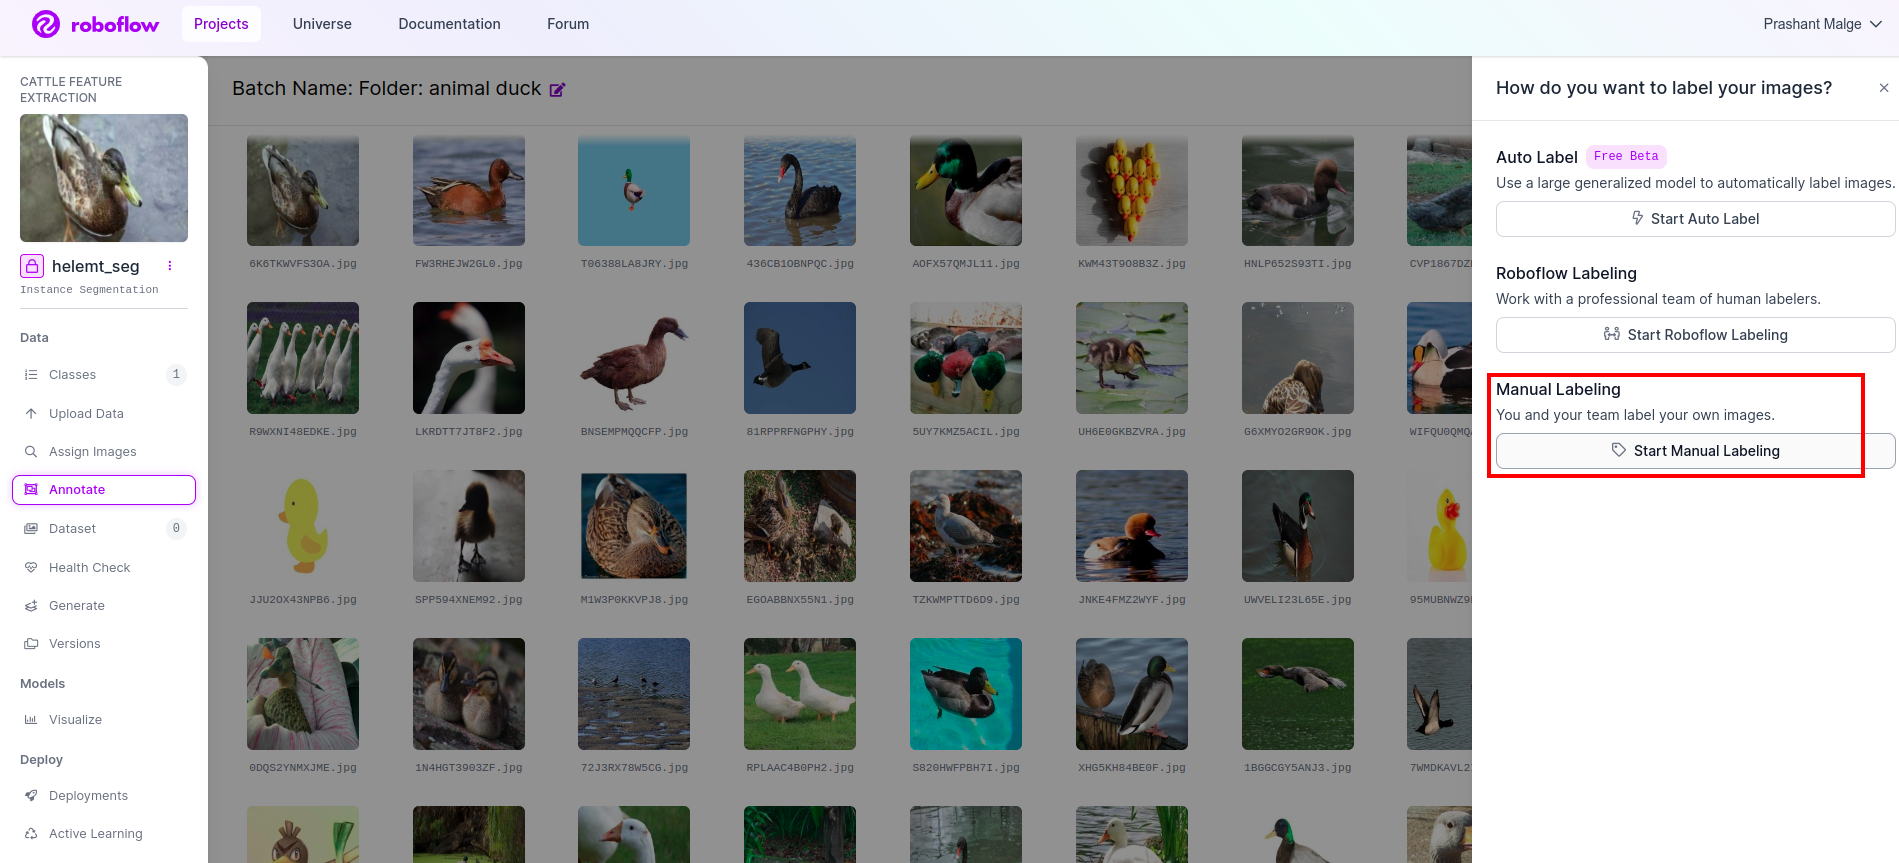
Step5: Begin the annotation half
Go to the annotation choice I marked within the purple field after which click on the beginning the annoataion half as I marked within the inexperienced field.
Click on the primary picture you’ll be able to see this UI. After seeing this click on the guide annotation choice.
Then add your e-mail id or your teammate’s title so you’ll be able to assign the duty.
Click on the primary picture you’ll be able to see this UI. right here click on the purple field so you’ll be able to choose the multi-polynomial mannequin.
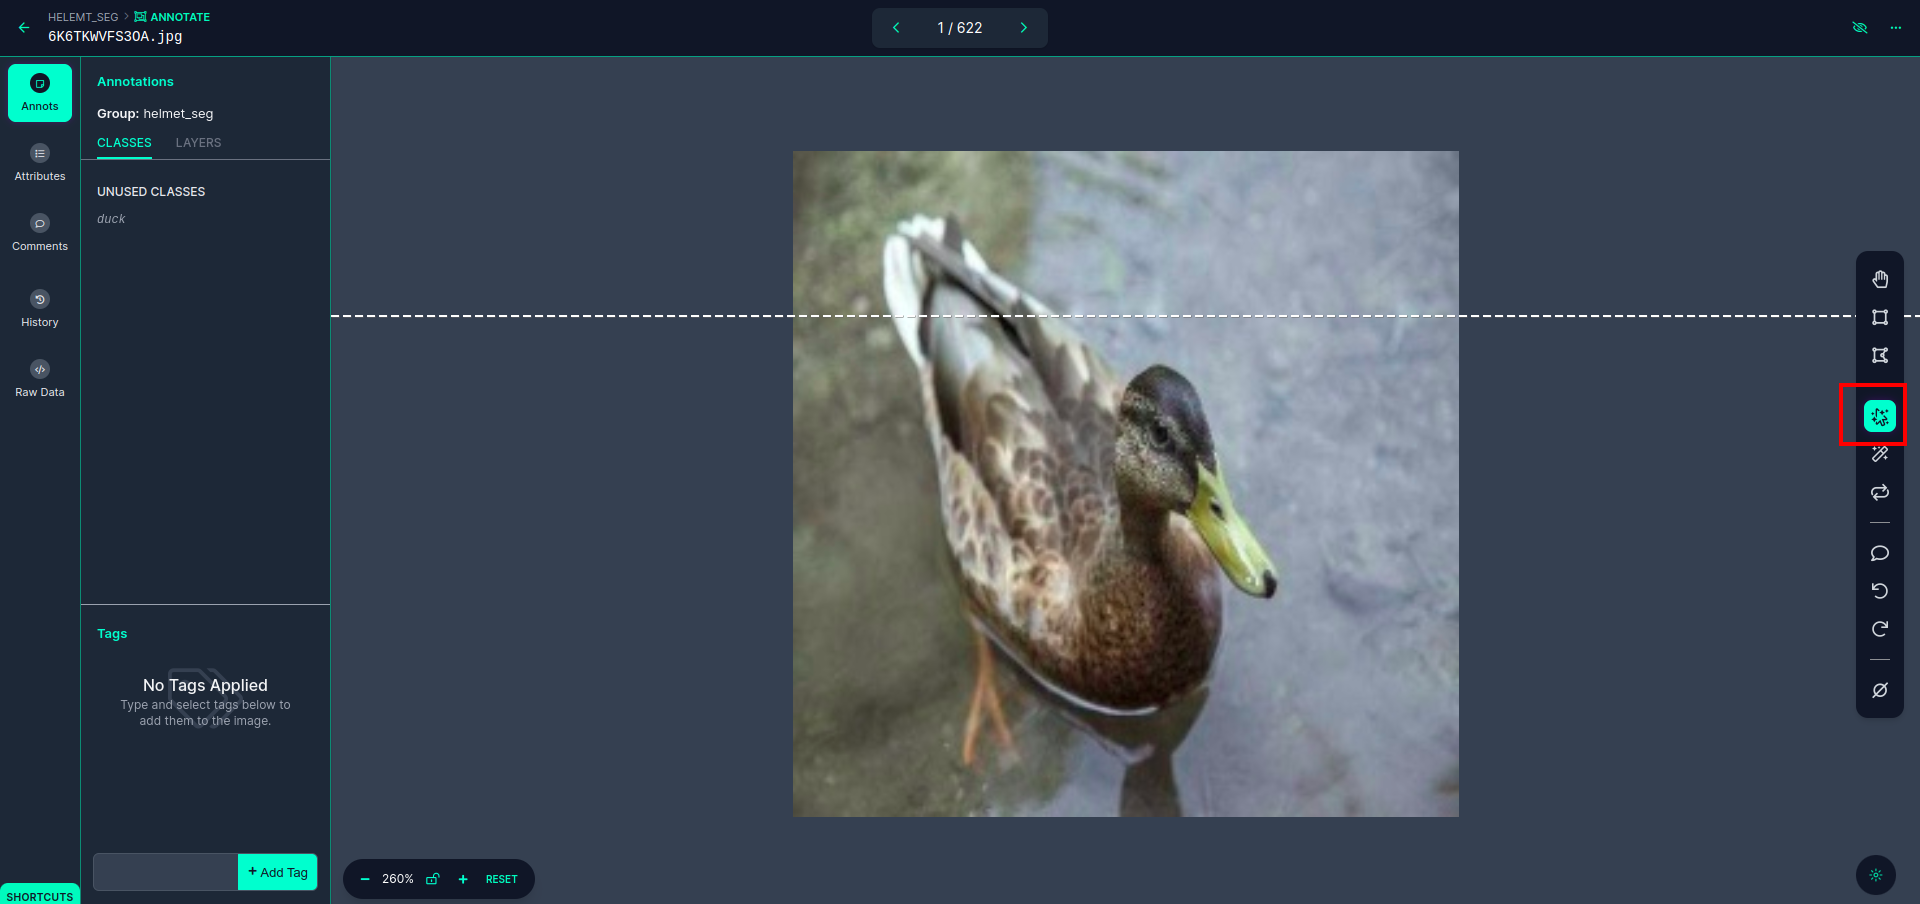
After clicking the purple field, choose the default mannequin and click on on the duck object. This can robotically section the picture. Then, click on on the following half and reserve it. You’ll then see the left facet marked in a purple field, the place you’ll be able to see the category title.
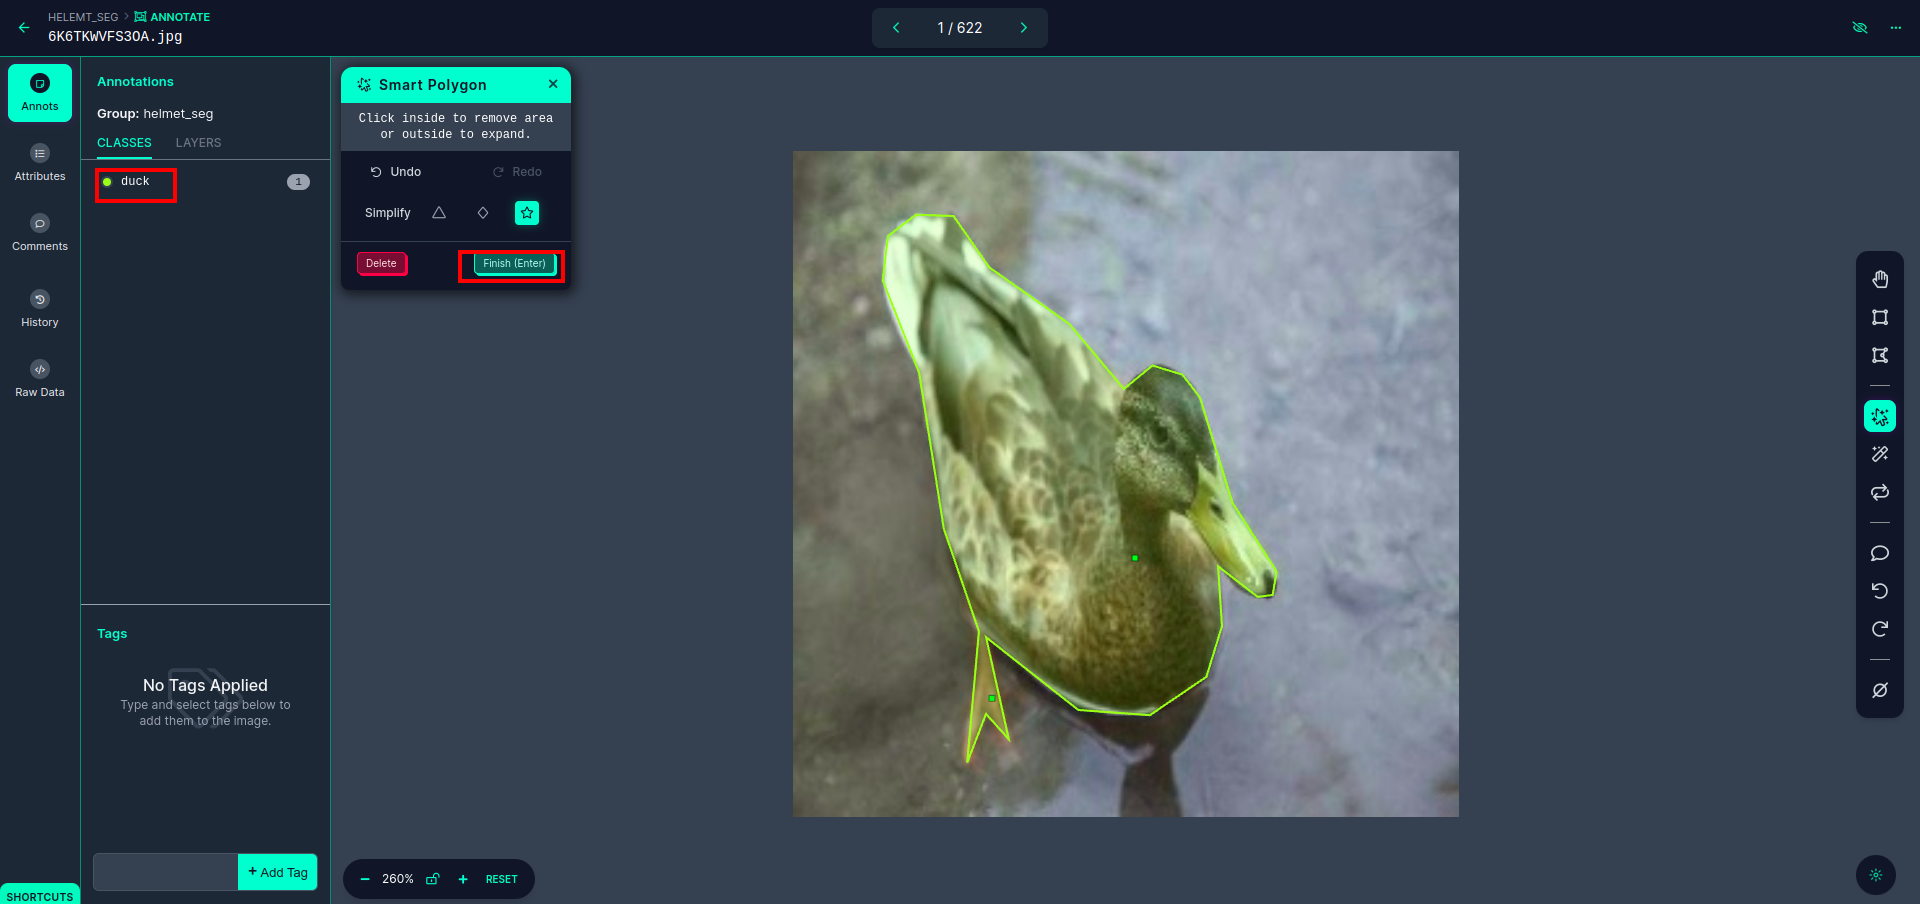
Click on the save&enter choice. annotate the all the pictures.
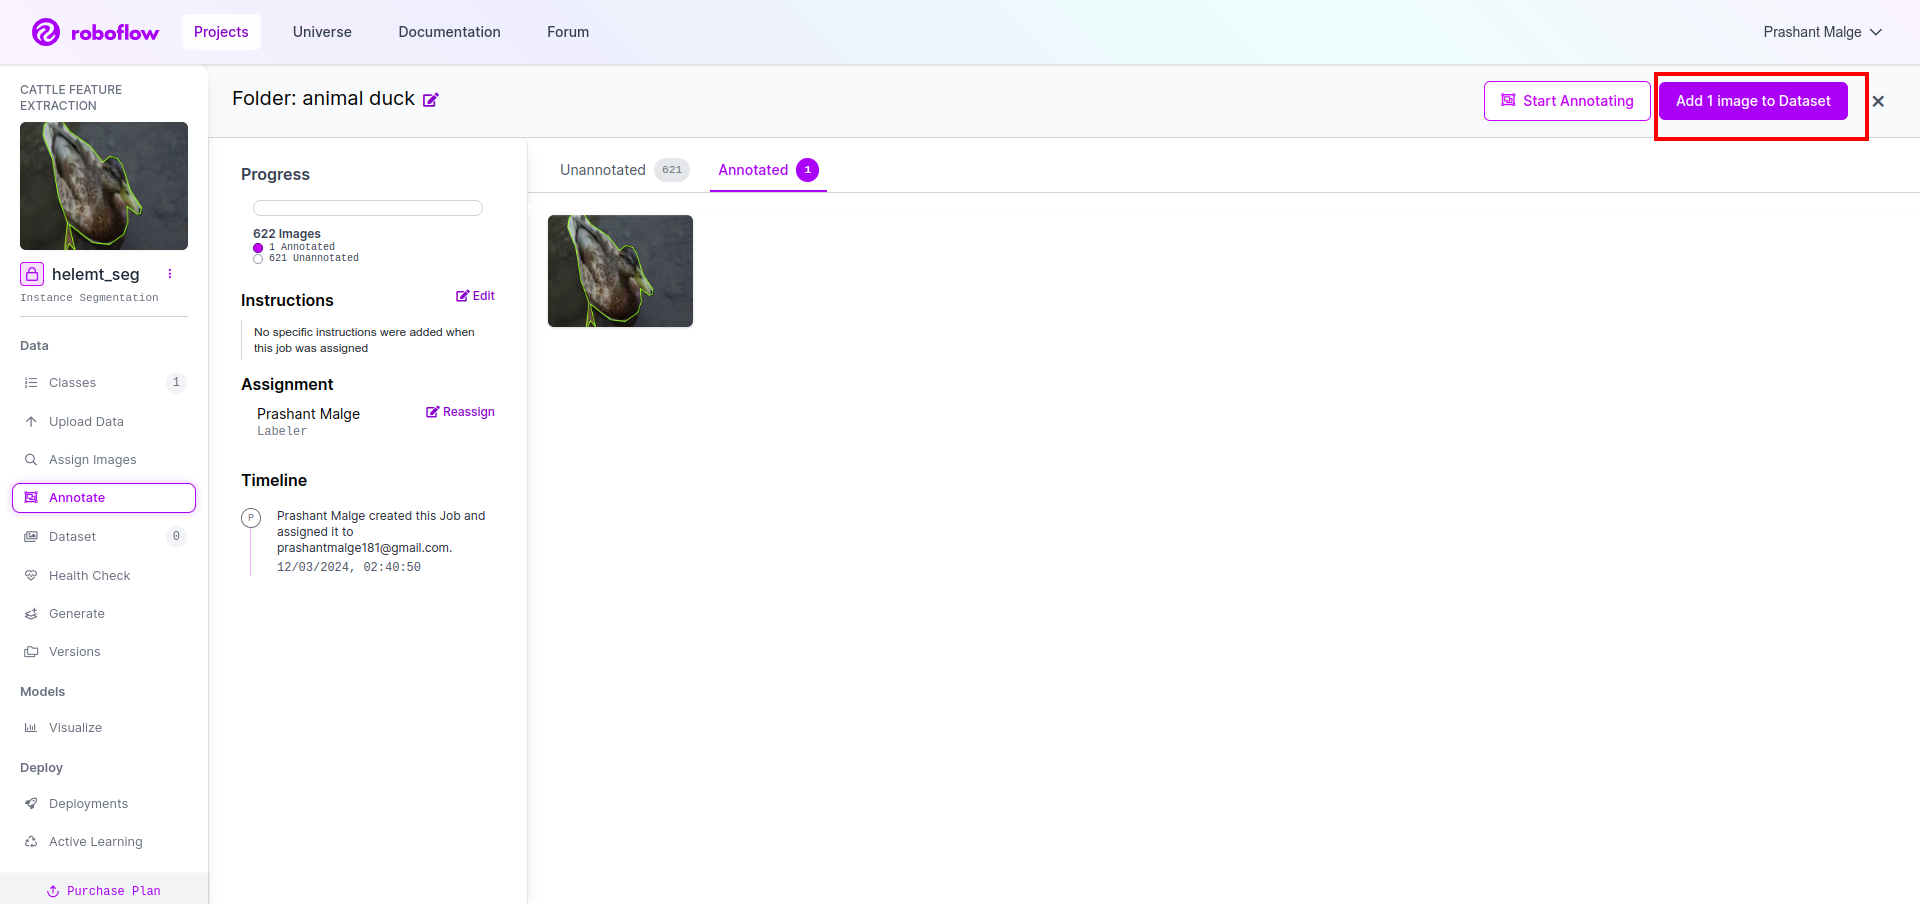
Add the pictures for YOLOv8 format. On the best facet, you will note the choice so as to add photographs within the annotation part. Right here, two elements are created: one for annotated photographs and one for unannotated photographs.
- First, click on the left-side “annotate” choice then add the pictures to the dataset.
- Then click on the following “Add Photos“.
Now final, we create the dataset so click on the “Generate” choice on the left facet then test the choice and press the conitune choice.

Then you definately get the UI of the dataset cut up choice right here you’ll be able to test the prepare, check and val folders their photographs robotically cut up. and click on the above purple field Export Dataset choice and obtain the zip file. the zip file folder construction is like…
root_file.zip
│
├── check
│   ├── Photos
│   └── labels
│
├── prepare
│   ├── Photos
│   └── labels
│
├── val
│   ├── Photos
│   └── labels
│
├── knowledge.yaml
└── Readme.roboflow.txt
Step6: Write the script for coaching the picture segmentation mannequin
On this half first, you create the Google Collab file utilizing Drive then add your dataset. and moute the Google Drive utilizing Google Collab.
1. Use this command for Mount Google Drive
from google.colab import drive

drive.mount('/content material/gdrive')
2. Outline knowledge listing Use the Fixed variable.
DATA_DIR = '/content material/drive/MyDrive/YoloV8/Information/'3. Putting in the required package deal, Set up ultralytics
!pip set up ultralytics4. Importing the libraries
import os

from ultralytics import YOLO
5. Load pre-trained YOLOv8 mannequin(right here we now have totally different mannequin additionally test the official documentation there you’ll be able to see the totally different mannequin)
mannequin = YOLO('yolov8n-seg.pt')
 # load a pretrained mannequin (really useful for coaching)
6. Prepare the Mannequin
mannequin.prepare(knowledge="/content material/drive/MyDrive/YoloV8/Information/knowledge.yaml", epochs=2, imgsz=640)

# Replace the trail & and be a part of this line collectively
No test your drive The mannequin title folder is created and there mannequin is saved for the prediction we wish this mannequin.
7. Predict the Mannequin
#Replace the trail
model_path="/content material/drive/MyDrive/YoloV8/Mannequin/train2/weights/final.pt"
#Replace the trail
image_path="/content material/drive/MyDrive/YoloV8/Information/val/1be566eccffe9561.png"

img = cv2.imread(image_path)
H, W, _ = img.form

mannequin = YOLO(model_path)

outcomes = mannequin(img)

for end in outcomes:
    for j, masks in enumerate(end result.masks.knowledge):

        masks = masks.numpy() * 255

        masks = cv2.resize(masks, (W, H))

        cv2.imwrite('./output.png', masks)
Right here you’ll be able to see the segmentation picture is saved.
Now lastly we are able to construct each reside detection and picture segmentation fashions.
Conclusion
On this weblog, we discover reside object detection and picture segmentation with YOLOv8. For reside detection, we import a pre-trained YOLOv8 mannequin and make the most of the pc imaginative and prescient library, OpenCV, to open the digicam and detect objects. Moreover, we create a Streamlit utility for a horny consumer interface.
Subsequent, we delve into picture segmentation with YOLOv8. We import a pre-trained mannequin and carry out switch studying on a customized dataset. Previous to this, we explored Roboflow for dataset annotation, offering an easy-to-use various to instruments like LabelImg.
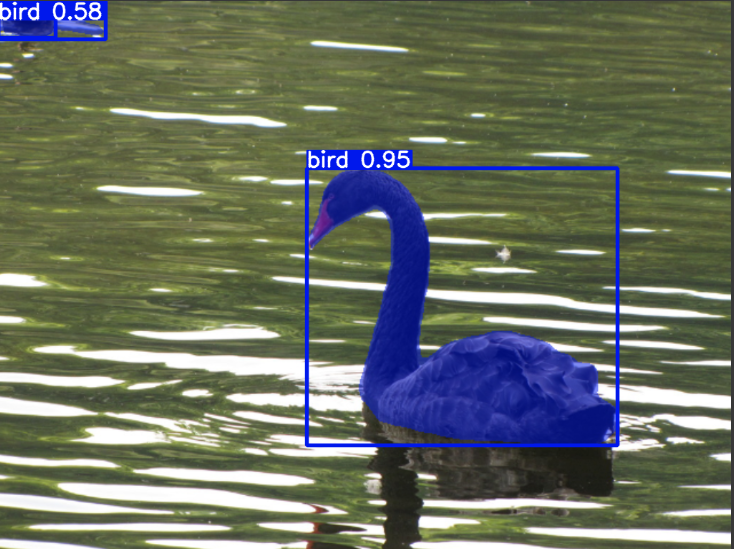
Lastly, we predict a picture containing a duck. Though the article within the picture seems to be a hen, we specify the category title as “duck” for demonstration functions.
Key Takeaways
- Studying about object detection fashions like Quicker R-CNN, SSD, and the newest YOLOv8.
- Understanding the annotation instrument Roboflow and its position in creating datasets for YOLOv8 segmentation fashions.
- Exploring reside object detection utilizing OpenCV (cv2) and Supervision, enhancing sensible abilities.
- Coaching and deploying a segmentation mannequin utilizing YOLOv8, gaining hands-on expertise.
Often Requested Questions
A. Object detection includes figuring out and finding a number of objects inside a picture, sometimes by drawing bounding containers round them. Picture segmentation, however, divides a picture into segments or areas primarily based on pixel similarity, offering a extra detailed understanding of object boundaries.
A. YOLOv8 improves upon earlier variations by incorporating developments in community structure, coaching strategies, and optimization. It could provide higher accuracy, velocity, and effectivity in comparison with YOLOv3.
A. YOLOv8 can be utilized for real-time object detection on embedded gadgets, relying on the {hardware} capabilities and mannequin optimization. Nonetheless, it could require optimizations comparable to mannequin pruning or quantization to attain real-time efficiency on resource-constrained gadgets.
A. Roboflow affords intuitive annotation instruments, dataset administration options, and assist for varied annotation codecs. It streamlines the annotation course of, permits collaboration, and supplies model management, making it simpler to create and handle datasets for pc imaginative and prescient initiatives.