Introduction
Matplotlib.pyplot.subplots() is a robust perform in Python that enables customers to create a grid of subplots inside a single determine. This perform is part of the Matplotlib library, which is extensively used for knowledge visualization in Python. With subplots(), customers can simply create a number of plots in a single determine, making evaluating and analyzing totally different datasets or variables simpler.

Advantages of Utilizing Matplotlib.pyplot.subplots()
Utilizing Matplotlib.pyplot.subplots() supply a number of advantages for knowledge visualization duties. Firstly, it supplies a handy strategy to set up and show a number of plots in a single determine. This may be significantly helpful when evaluating totally different facets of a dataset or when presenting varied visualizations.
Moreover, subplots() permit customers to customise the structure and association of the subplots. Customers can specify the variety of rows and columns within the subplot grid and the dimensions and spacing between every subplot. This flexibility permits customers to create visually interesting and informative plots.
Additionally Learn: Introduction to Matplotlib utilizing Python for Newbies
Understanding the Subplots Grid
The subplot grid is the association of subplots inside a determine created utilizing Matplotlib.pyplot.subplots(). It consists of rows and columns, every cell representing a subplot. The consumer can specify consumer can choose the variety of rows and columns relying on the specified structure.
The subplots are accessed utilizing indexing, much like accessing parts in a matrix. For instance, to entry the subplot within the first row and second columns, the indexing can be [0, 1]. This enables customers to change and customise particular person subplots inside the grid shortly.
The subplot grid could be created utilizing the subplots() perform, which returns a Determine object and an array of Axes objects. The Determine object represents the complete determine, whereas the Axes objects signify every subplot. These Axes objects can be utilized to change the properties of every subplot, such because the title, labels, and knowledge.
Making a Primary Subplot Grid
This part will discover learn how to create a primary subplot grid utilizing the `matplotlib.pyplot.subplots()` perform in Python. This perform permits us to create a grid of subplots inside a single determine, making it simpler to visualise a number of plots concurrently.
Syntax and Parameters
The syntax for making a subplot grid is as follows:
Code:
fig, axes = plt.subplots(nrows, ncols)Right here, `nrows` and `ncols` signify the variety of rows and columns within the subplot grid. The perform returns two objects: fig, which implies the complete determine and axes, which is an array of axes objects representing every subplot.
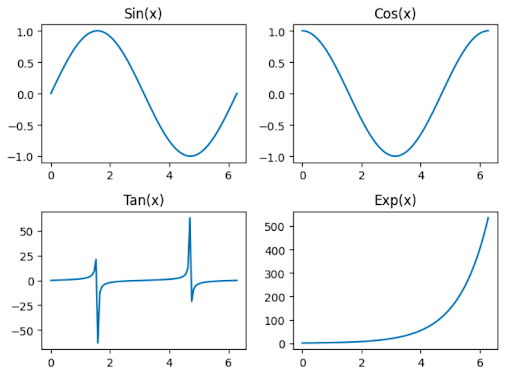
Instance: Making a 2×2 Subplot Grid
Let’s think about an instance to know learn how to create a 2×2 subplot grid. First, we have to import the required libraries:
Code:
import matplotlib.pyplot as plt

import numpy as np

x = np.linspace(0, 2*np.pi, 100)

y1 = np.sin(x)

y2 = np.cos(x)

y3 = np.tan(x)

y4 = np.exp(x)

fig, axes = plt.subplots(2, 2)

axes[0, 0].plot(x, y1)

axes[0, 0].set_title('Sin(x)')

axes[0, 1].plot(x, y2)

axes[0, 1].set_title('Cos(x)')

axes[1, 0].plot(x, y3)

axes[1, 0].set_title('Tan(x)')

axes[1, 1].plot(x, y4)

axes[1, 1].set_title('Exp(x)')

plt.tight_layout()

plt.present()
Output:
On this instance, we create a 2×2 subplot grid utilizing the `subplots()` perform. We then entry every subplot utilizing indexing on the `axes` array and plot our knowledge accordingly. Lastly, we use `tight_layout()` to regulate the spacing between subplots and `present()` to show the determine.
By utilizing the `matplotlib.pyplot.subplots()` perform, we will simply create and customise subplot grids in Python. This enables us to visualise a number of plots in a single determine, making knowledge evaluation and presentation handy.
Adjusting Subplot Spacing
You may modify the spacing between them when creating subplots utilizing the `subplots()` perform in Matplotlib. This may be helpful whenever you need to customise the structure of your plots or when you have got a number of subplots and need to optimize the spacing between them.
Utilizing the `wspace` and `hspace` Parameters:
To regulate the spacing between subplots, use the `wspace` and `hspace` parameters of the `subplots()` perform. These parameters management the width and top spacing between subplots, respectively.
The `wspace` parameter controls the horizontal spacing between subplots, whereas the `hspace` parameter controls the vertical spacing. Adjusting these parameters lets you create roughly area between your subplots.
For instance, you’ll be able to set the `wspace` and `hspace` parameters to a better worth to extend the spacing between subplots. Alternatively, if you wish to lower the spacing, you’ll be able to set these parameters to a decrease worth.
Instance: Adjusting Subplot Spacing
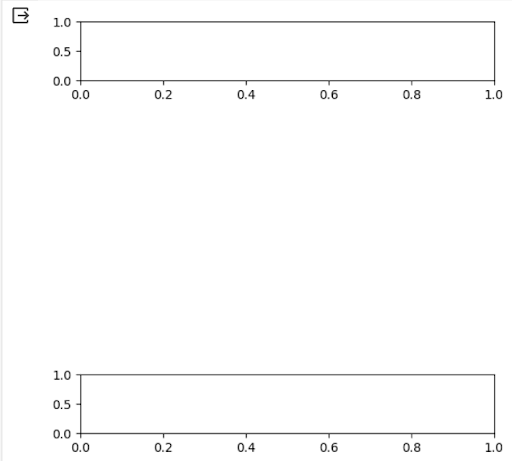
Let’s think about an instance to reveal learn how to modify subplot spacing. Suppose now we have a determine with two subplots organized vertically. We need to improve the spacing between these subplots.
We are able to set the `wspace` parameter to 0.2 and the `hspace` parameter to 0.5 to realize this. This may create extra space between the subplots, each horizontally and vertically.
Code:
import matplotlib.pyplot as plt

fig, axs = plt.subplots(2, 1, figsize=(6, 6))

fig.subplots_adjust(wspace=1, hspace=5)

# Plotting code for the subplots

plt.present()
Output:
Within the above instance, we first create a determine with two subplots utilizing the `subplots()` perform. Then, we use the `subplots_adjust()` perform to regulate the spacing between the subplots by setting the `wspace` and `hspace` parameters.
You may create visually interesting plots with the specified structure and spacing between subplots by customizing the subplot spacing.
Setting Subplot Titles and Axis Labels
On this part, we’ll discover learn how to add titles to subplots and axis labels to boost the visible illustration of our plots.
Including Titles to Subplots
We can use the `set_title()` perform so as to add titles to subplots. This perform permits us to specify the title for every subplot. We are able to present context and readability to our plots by giving a descriptive title.
For instance, let’s say now we have a determine with two subplots representing the distribution of two variables. We are able to add titles to those subplots utilizing the next code:
Code:
fig, (ax1, ax2) = plt.subplots(1, 2)

ax1.set_title("Distribution of Variable A")

ax2.set_title("Distribution of Variable B")
Utilizing the `set_title()` perform, we will simply customise the titles of our subplots to convey the data we need to current.
Including Axis Labels to Subplots
Axis labels are important for offering details about the variables represented on a plot’s x and y axes. So as to add axis labels to subplots, we will use the `set_xlabel()` and `set_ylabel()` features.
As an illustration, think about a determine with two subplots representing the connection between two variables. We are able to add axis labels to those subplots utilizing the next code:
Code:
fig, (ax1, ax2) = plt.subplots(1, 2)

ax1.set_xlabel("Variable A")

ax1.set_ylabel("Variable B")

ax2.set_xlabel("Variable C")

ax2.set_ylabel("Variable D")
By utilizing the `set_xlabel()` and `set_ylabel()` features, we will present clear labels for every subplot’s x and y axes, making it simpler for viewers to interpret the info.
Instance: Setting Subplot Titles and Axis Labels
As an instance the method of setting subplot titles and axis labels, let’s think about an instance the place now we have a determine with three subplots representing totally different facets of a dataset.
Code:
import matplotlib.pyplot as plt

import numpy as np

# Producing pattern knowledge

x = np.arange(1, 6)

y1 = np.random.randint(1, 10, measurement=5)

y2 = np.random.randint(1, 10, measurement=5)

y3 = np.random.randint(1, 10, measurement=5)

fig, (ax1, ax2, ax3) = plt.subplots(1, 3)

ax1.plot(x, y1)

ax1.set_title("Plot 1")

ax1.set_xlabel("X-axis")

ax1.set_ylabel("Y-axis")

ax2.scatter(x, y2)

ax2.set_title("Plot 2")

ax2.set_xlabel("X-axis")

ax2.set_ylabel("Y-axis")

ax3.bar(x, y3)

ax3.set_title("Plot 3")

ax3.set_xlabel("X-axis")

ax3.set_ylabel("Y-axis")

# Plotting code for the subplots

plt.present()
Output:

On this instance, we create a determine with three subplots, every representing a special sort of plot. We set titles for every subplot utilizing set_title () and supply axis labels utilizing set_xlabel () and set_ylabel (). This enables us to obviously label and describe every subplot, making it simpler for viewers to know the introduced knowledge.
By following these steps, we will successfully set subplot titles and axis labels to boost the visible illustration of our plots.
Controlling Subplot Sizes and Facet Ratios
When creating subplots utilizing Matplotlib’s `subplots()` perform, you’ll be able to see the facet ratios of the subplots. This lets you customise the structure of your plots to suit your wants greatest.
suitng the figsize Parameter
One strategy to management the dimensions of the subplots is through the use of the `figsize` parameter. This parameter takes in a tuple of two values, representing the determine’s width and top in inches. By adjusting these values, you’ll be able to change the general measurement of the subplots.
For instance, if you wish to create a determine with subplots which might be 8 inches extensive and 6 inches tall, you’ll be able to set the `figsize` parameter to `(8, 6)`:
import matplotlib.pyplot as plt
fig, axs = plt.subplots(2, 2, figsize=(8, 6))
This may create a determine with a grid of two rows and two columns, the place every subplot has a measurement of 8 inches by 6 inches.
Instance: Controlling Subplot Sizes and Facet Ratios
Let’s think about an instance to additional illustrate learn how to management subplot sizes and facet ratios. Suppose we need to create a determine with two subplots, the place the primary subplot is twice as extensive because the second subplot.
Code:
import matplotlib.pyplot as plt

fig, axs = plt.subplots(1, 2, figsize=(10, 5))

axs[0].plot([1, 2, 3, 4], [1, 4, 9, 16])

axs[0].set_title('Subplot 1')

axs[1].plot([1, 2, 3, 4], [1, 8, 27, 64])

axs[1].set_title('Subplot 2')

plt.present()
Output:
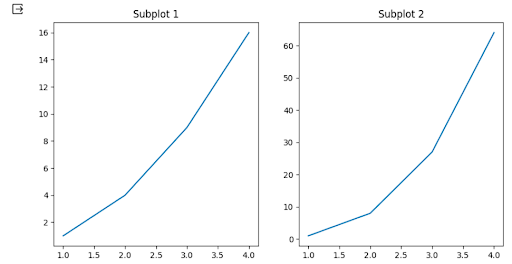
On this instance, we create a determine with a grid of 1 row and a pair of columns. We set the `figsize` parameter to `(10, 5)`, which implies the determine shall be 10 inches extensive and 5 inches tall.
The primary subplot is plotted utilizing the info `[1, 2, 3, 4]` for the x-axis and `[1, 4, 9, 16]` for the y-axis. The second subplot is plotted utilizing the info `[1, 2, 3, 4]` for the x-axis and `[1, 8, 27, 64]` for the y-axis.
Adjusting the `figsize` parameter lets you management the general measurement of the subplots, enabling you to create customized layouts that greatest fit your wants.
Conclusion
On this article about Matplotlib.pyplot.subplots() in Python, we discovered learn how to management the sizes and facet ratios of subplots in Matplotlib. Utilizing the `figsize` parameter, we will modify the general measurement of the subplots. This enables us to create customized layouts that greatest match our necessities. Experiment with totally different values for the `figsize` parameter to realize your plots’ desired subplot sizes and facet ratios.