Carry this venture to life
In 1996, NVIDIA entered the 3D accelerator market initially behind the competitors. Nevertheless, via fixed studying and enchancment, they achieved main success in 1999 with the introduction of the GeForce 256, acknowledged as the primary graphics card termed a GPU. Initially designed for gaming, GPUs later discovered a plethora of enterprise purposes in math, science, and engineering.
In 2003, Ian Buck and his workforce launched Brook, the preliminary broadly embraced programming mannequin that expanded C by incorporating data-parallel constructs. Buck later performed a key position at NVIDIA, main the 2006 launch of CUDA, the primary commercially accessible answer for general-purpose computing on GPUs.
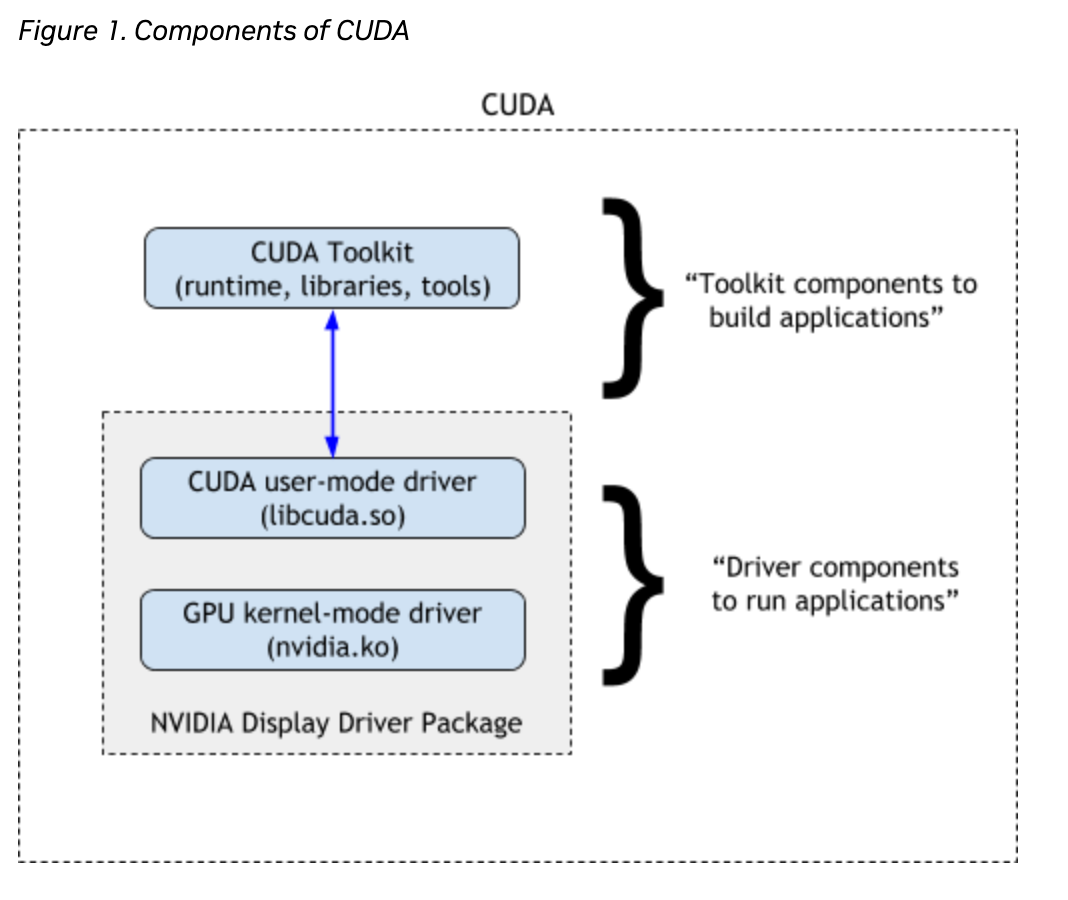
CUDA serves because the connecting bridge between Nvidia GPUs and GPU-based purposes, enabling standard deep studying libraries like TensorFlow and PyTorch to leverage GPU acceleration. This functionality is essential for optimizing deep studying duties and underscores the significance of utilizing GPUs within the discipline. At present, CUDA is broadly thought of important for any AI growth, and is a software program part of any AI growth pipeline.
What’s Parallel Computing?
In easier phrases, parallel computing is a means of fixing a single drawback by breaking it down into smaller chunks and fixing each concurrently. As a substitute of getting one highly effective pc full one advanced course of, parallel computing includes utilizing a number of computer systems or processors to work on totally different items of the issue on the similar time. This live performance strategy hastens the method of dealing with massive duties and effectively handles the duties. That is just like the strategy of a having a workforce of affiliates dealing with totally different assignments concurrently with a view to meet some aim collectively. Collectively, the smaller employees create an exponential improve in general processing speeds.
CUDA in Less complicated Phrases
CUDA or Compute Unified System Structure created by Nvidia is a software program platform for parallel computing. It has been utilized in many enterprise issues since its popularization within the mid-2000s in varied fields like pc graphics, finance, information mining, machine studying, and scientific computing. CUDA permits accelerated computing via its specialised programming language, appropriate with most working methods.
GPU vs CPU
A CPU, or central processing unit, serves as the first computational unit in a server or machine, this gadget is understood for its numerous computing duties for the working system and purposes. The CPU is answerable for executing mathematical and logical calculations in our pc. The first perform of this unit is to run code, dealing with duties reminiscent of copying information, deleting information, and processing consumer inputs. Furthermore, the CPU acts as a mediator for communication between totally different pc peripherals, making certain they do not immediately work together however undergo the CPU.
Whereas it might seem that the CPU can multitask, every core of the CPU can solely deal with one job at a time. Every core operates as an impartial processing unit, and the power to multitask is set by the variety of cores within the {hardware}. Typically, two to eight cores per CPU is sufficient for no matter duties a laymen might have, and efficiency of those CPUs are fairly environment friendly to the purpose that people cannot even discover that our duties are being executed in a sequence as an alternative of . That is the case for practically all of the issues we use CPUs for each day.
Whereas, a graphics processing unit (GPU) is a specialised {hardware} part that’s able to effectively dealing with parallel mathematical operations, surpassing the general-purpose capabilities of a CPU. Initially designed for graphics rendering in gaming and animation, GPUs have developed now to carry out a broader vary of duties past their authentic scope. Nevertheless, each of them are pc {hardware} designed to deal with sure duties.
Let’s check out some uncooked numbers. If we contemplate probably the most superior, client CPU methods to usually be geared up with 16 cores, probably the most superior, consumer-grade GPU (Nvidia RTX 4090) has 16,384 CUDA cores. This distinction is simply magnified when taking a look at H100s, which have 18,432 CUDA cores. These CUDA cores are usually much less highly effective than particular person CPU cores, and we can not make direct comparisons. Nevertheless, the sheer quantity of the CUDA cores by comparability ought to present why they’re comparatively ultimate for dealing with massive quantities of computations in parallel.
When evaluating CPUs and GPUs, it’d appear to be a good suggestion to solely depend on GPUs as a consequence of their parallel processing capabilities. Nevertheless, the necessity for CPUs continues, as a result of multitasking is not at all times probably the most environment friendly strategy. We additionally use CPUs for basic computing that might be nearly too easy for GPUs. In sure situations, executing duties sequentially may be extra time and resource-effective than parallel processing. The benefit of CUDA lies in its capacity to seamlessly change between CPU and GPU processing for particular duties. This flexibility permits programmers to strategically decide when to make the most of which {hardware} part, offering enhanced management over the pc’s operations.
CUDA’s Position in GPU
Carry this venture to life
Paperspace gives GPUs with preinstalled CUDA, therefore customers can skip the step to put in CUDA. Allow us to verify that by opening a Paperspace Pocket book, please be happy to click on the hyperlink offered above to run this demo. This may assist to spin up the Paperspace platform and begin the machine by clicking ‘Begin Machine.’
You may take a look at the CUDA model and GPU data by typing nvidia-smi into your terminal. In a Pocket book cell, we are able to do that by including a ! in the beginning of the road.
!nvidia-smiAs soon as we now have confirmed our machine has every part we’d like arrange, we are able to import the Torch bundle. It additionally has a pleasant CUDA checker perform we are able to use to make sure that Torch was correctly put in and might detect CUDA and the GPU.
# import the mandatory libraries
import torch

# this line of code will true or false relying upon cuda availability
use_cuda = torch.cuda.is_available
On this case it’ll return ‘True’
or,
if torch.cuda.is_available():
    gadget = torch.gadget('cuda')

else:
    gadget = torch.gadget('cpu')

print("utilizing", gadget, "gadget")
With CUDA, programmers can design and implement parallel algorithms that benefit from the 1000’s of cores current in trendy GPUs. This parallelization is essential for computationally intensive duties reminiscent of scientific research, machine studying, video enhancing and information processing. CUDA offers a programming mannequin and a set of APIs that allow builders to write down code that runs immediately on the GPU, unlocking the potential for important efficiency positive factors in comparison with conventional CPU-based computing. By offloading parallelizable workloads to the GPU, CUDA performs a central position in enhancing the computational capabilities of GPUs and driving developments in high-performance computing purposes.
Velocity Check
Carry this venture to life
Allow us to attempt to get some details about the cuda model and the GPU,
if gadget:
    print('__CUDA VERSION:', torch.backends.cudnn.model())
    print('__Number CUDA Units:', torch.cuda.device_count())
    print('__CUDA System Identify:',torch.cuda.get_device_name(0))
    print('__CUDA System Whole Reminiscence [GB]:',torch.cuda.get_device_properties(0).total_memory/1e9)
CUDA VERSION: 8302
__Number CUDA Units: 1
__CUDA System Identify: NVIDIA RTX A4000
__CUDA System Whole Reminiscence [GB]: 16.89124864
We’ll conduct three pace exams to check the efficiency of CPU versus GPU. Moreover, for the fourth take a look at, we’ll generate an artificial dataset utilizing steady diffusion and measure the pace at which the A4000 GPU can efficiently full the duty.
For penning this demo, we selected to make use of an NVIDIA RTX A4000. This demo ought to work on any Paperspace GPU or CPU machine.
Matrix Divison
The Python code under performs matrix division utilizing each CPU and GPU, and it measures the time it takes for the operation on every gadget.
The code creates random matrices, and performs the operation on the CPU, transfers the matrices to the GPU, after which measures the time taken for a similar operation on the GPU. The loop repeats this course of 5 occasions for extra correct timing outcomes for the GPU. The torch.cuda.synchronize() ensures that the GPU computation is full earlier than measuring the time.
import time

matrix_size = 43*15

# create random matrix
x = torch.randn(matrix_size, matrix_size)
y = torch.randn(matrix_size, matrix_size)

print("######## CPU SPEED ##########")
begin = time.time()
end result = torch.div(x,y)

print(time.time() - begin)
print("confirm gadget:", end result.gadget)

x_gpu = x.to(gadget)
y_gpu = y.to(gadget)
torch.cuda.synchronize()


for i in vary(5):
    print("######## GPU SPEED ##########")
    begin = time.time()
    result_gpu = torch.div(x_gpu,y_gpu)
    print(time.time() - begin)
    print("confirm gadget:", result_gpu.gadget)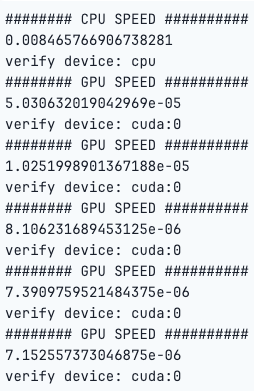
As we are able to see, the computations had been considerably quicker on the GPU than the CPU.
Construct a Synthetic Neural Community
The under python code will constructed a easy neural community mannequin utilizing each the CPU and GPU to exhibit a primary pace take a look at.
import tensorflow as tf
import time

# Generate random information
data_size = 10000
input_data = tf.random.regular([data_size, data_size])

# Outline a easy neural community mannequin
mannequin = tf.keras.Sequential([
    tf.keras.layers.Dense(1000, activation='relu', input_shape=(data_size,)),
    tf.keras.layers.Dense(1000, activation='relu'),
    tf.keras.layers.Dense(1)
])

# Compile the mannequin
mannequin.compile(optimizer="adam", loss="mse")

# Perform to check the pace of CPU and GPU
def speed_test(gadget):
    with tf.gadget(gadget):
        start_time = time.time()
        mannequin.match(input_data, tf.zeros(data_size), epochs=1, batch_size=32, verbose=0)
        end_time = time.time()
        return end_time - start_time

# Check CPU pace
cpu_time = speed_test('/CPU:0')
print("Time taken on CPU: {:.2f} seconds".format(cpu_time))

# Check GPU pace
gpu_time = speed_test('/GPU:0')
print("Time taken on GPU: {:.2f} seconds".format(gpu_time))
Construct a Convolutional Neural Community (CNN)
The under code will prepare a Convolutional Neural Community (CNN) on the MNIST dataset utilizing TensorFlow. The speed_test perform measures the time taken for coaching on each CPU and GPU, permitting to check their efficiency.
import tensorflow as tf
from tensorflow.keras import layers, fashions
import time

# Load MNIST dataset
(train_images, train_labels), (test_images, test_labels) = tf.keras.datasets.mnist.load_data()
train_images = train_images.reshape((60000, 28, 28, 1)).astype('float32') / 255
test_images = test_images.reshape((10000, 28, 28, 1)).astype('float32') / 255

# Outline a easy CNN mannequin
mannequin = fashions.Sequential()
mannequin.add(layers.Conv2D(32, (3, 3), activation='relu', input_shape=(28, 28, 1)))
mannequin.add(layers.MaxPooling2D((2, 2)))
mannequin.add(layers.Conv2D(64, (3, 3), activation='relu'))
mannequin.add(layers.MaxPooling2D((2, 2)))
mannequin.add(layers.Conv2D(64, (3, 3), activation='relu'))
mannequin.add(layers.Flatten())
mannequin.add(layers.Dense(64, activation='relu'))
mannequin.add(layers.Dense(10, activation='softmax'))

# Compile the mannequin
mannequin.compile(optimizer="adam",
              loss="sparse_categorical_crossentropy",
              metrics=['accuracy'])

# Perform to check the pace of CPU and GPU
def speed_test(gadget):
    with tf.gadget(gadget):
        start_time = time.time()
        mannequin.match(train_images, train_labels, epochs=5, batch_size=64, validation_data=(test_images, test_labels), verbose=0)
        end_time = time.time()
        return end_time - start_time

# Check CPU pace
cpu_time = speed_test('/CPU:0')
print("Time taken on CPU: {:.2f} seconds".format(cpu_time))

# Check GPU pace
gpu_time = speed_test('/GPU:0')
print("Time taken on GPU: {:.2f} seconds".format(gpu_time))
Create a Artificial Feelings Dataset with Steady Diffusion
Subsequent, allow us to attempt creating an artificial dataset with Steady Diffusion by creating 10 photographs of various feelings reminiscent of offended, unhappy, lonely, blissful. Observe the steps under to recreate the dataset.
💡
Please observe the under code would require a GPU
First, we have to set up the mandatory libraries.
!pip set up --upgrade diffusers transformers scipy
!pip set up --quiet ipyplot
Please, make certain to restart the kernel as soon as the libraries above are put in, or this will not work.
Set up the mandatory packages, and specify the mannequin id of the pre-trained mannequin.
We’ll assign the string “cuda” to the variable gadget. This means that the code intends to make use of a CUDA-enabled GPU for computation.
import torch
from torch import autocast
from diffusers import StableDiffusionPipeline
import ipyplot
import random
import os
import time

import matplotlib.pyplot as plt

model_id = "CompVis/stable-diffusion-v1-5"
gadget = "cuda"
Create an occasion of the StableDiffusionPipeline class by loading the pre-trained mannequin specified within the variable model_id. The from_pretrained methodology is usually utilized in deep studying frameworks to instantiate a mannequin and cargo pre-trained weights if accessible.
pipe = StableDiffusionPipeline.from_pretrained(model_id)
pipe = pipe.to(gadget)
Create the particular folder to retailer the pictures,
os.makedirs('/notebooks/blissful', exist_ok=True)
os.makedirs('/notebooks/unhappy', exist_ok=True)
os.makedirs('/notebooks/offended', exist_ok=True)
os.makedirs('/notebooks/shocked', exist_ok=True)
os.makedirs('/notebooks/lonely', exist_ok=True)
The following traces of code will generate photographs utilizing the StableDiffusionPipeline for various feelings and genders. It does so in a loop, creating 10 photographs for every emotion.
# create totally different ethnic teams photographs
genders = ['male', 'female']
# Create a dictionary that accommodates totally different feelings as keys, and the corresponding facial expressions as values.
emotion_prompts = {'blissful': 'smiling',
'shocked': 'shocked, opened mouth, raised eyebrows',
'unhappy': 'frowning, unhappy face expression, crying',
'offended': 'offended, fierce, irritated',
'lonely': 'lonely, alone, lonesome'}
print("######## GPU SPEED ##########")
begin = time.time()
# loop via every feelings and create totally different photographs based mostly on the prompts
for j in vary(10):
for emotion in emotion_prompts.keys():
emotion_prompt = emotion_prompts[emotion]
gender = random.selection(genders)
immediate="Medium-shot portrait of {}, {}, entrance view, trying on the digicam, coloration images, ".format(gender, emotion_prompt) +
'photorealistic, hyperrealistic, reasonable, extremely detailed, crisp focus, digital artwork, depth of discipline, 50mm, 8k'
negative_prompt="3d, cartoon, anime, sketches, (worst high quality:2), (low high quality:2), (regular high quality:2), lowres, regular high quality, ((monochrome)), " +
'((grayscale)) Low High quality, Worst High quality, plastic, pretend, disfigured, deformed, blurry, dangerous anatomy, blurred, watermark, grainy, signature'
picture = pipe(immediate=immediate, negative_prompt=negative_prompt).photographs[0]
picture.save('/notebooks/{}/{}.png'.format(emotion, str(j).zfill(4)))
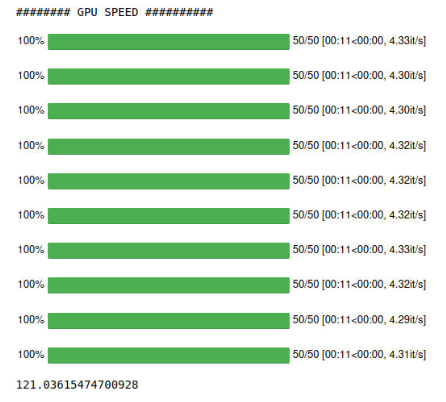
print(time.time() - begin)Now, let’s run the code, and take a look at how lengthy the duty takes for the A4000 GPU speeds, after which use a slight alteration to check it with the CPU speeds.
After which, to place our pipeline onto the CPU, merely use the next snippet earlier than operating the identical code:
pipe.to('cpu')This may get us our CPU occasions, proven under.

As we are able to see, the CPU was considerably slower. It is because photographs are represented by computer systems as arrays of numbers, and performing the multitude of parallel processes on a GPU is simply way more environment friendly.
Outcomes
Right here is an outline of all of our analyses from this weblog submit. GPUs had been persistently quicker throughout all of those information operation and machine studying duties.
Conclusion
The pairing of CUDA with NVIDIA GPUs holds a dominant place in varied software domains, notably within the discipline of deep studying. This mix serves as a cornerstone for powering among the world’s tremendous computer systems.
CUDA and NVIDIA GPU have efficiently powered industries reminiscent of Deep Studying, Information Science and Analytics, Gaming, Finance, Researches and plenty of extra. As an example Deep studying closely depends on quick computing, notably GPUs and specialised {hardware} like TPUs.
Using GPUs considerably accelerates the coaching course of, lowering it from months to per week. Numerous deep studying frameworks, together with TensorFlow, PyTorch, and others, depend upon CUDA for GPU help and cuDNN for deep neural community computations. Efficiency positive factors are shared throughout frameworks when these underlying applied sciences enhance, however variations in scalability to a number of GPUs and nodes exist amongst frameworks.
In abstract we are able to say that when choosing a GPU for deep studying or any A.I. duties one of many issues to bear in mind is the GPU ought to help CUDA. We extremely advocate utilizing the Paperspace platform because it comes with pre-installed CUDA and one can skip the effort of putting in the bundle.
We hope you loved studying the article.