
Aether 1 started as an inside experiment at OFF+BRAND: Might we craft a product‑launch website so immersive that guests would really feel the sound?
The earbuds themselves are fictional, however each pixel of the expertise is actual – an finish‑to‑finish sandbox the place our model, 3D, and engineering groups pushed WebGL, AI‑assisted tooling, and narrative design far past a typical product web page.
This technical case research is the residing playbook of that exploration. Inside you’ll discover:
- 3D creation workflow – how we sculpted, animated, and optimised the earphones and their charging case.
- Interactive WebGL structure – the particle stream‑fields, infinite scroll, audio‑reactive shaders, and customized controllers that make the positioning really feel alive.
- Efficiency methods – GPU‑pleasant supplies, fake depth‑of‑area, selective bloom, and different ways that saved the challenge operating at 60 FPS on cell {hardware}.
- Software stack & takeaways – what labored, what didn’t, and why each lesson right here can translate to your personal initiatives.
Whether or not you’re a developer, designer, or producer, the subsequent sections unpack the selections, experiments, and exhausting‑received optimizations that helped us show that “sound with out boundaries” can exist on the net.
1. 3D Creation Workflow
By Celia Lopez
3D creation of the headphone and case
For the headphone form, we wanted to create one from scratch. To assist ourselves shortly sketch out the concepts we had in thoughts, we used Midjourney. Due to references from the web and the assistance of AI, we agreed on an inventive route.

Dimension reference and headphone creation
To make sure the dimensions matched a real-life reference, we used Apple headphones and iterated till we discovered one thing attention-grabbing. We used Figma to current all of the iterations to the staff, exporting three pictures – entrance, aspect, and again – every time to assist them higher visualize the item.
Similar for the case.
Storyboard
For the storyboard, we first sketched our concepts and tried to match every particular scene with a 3D visualization.
We iterated for some time earlier than finalizing the nonetheless frames for every half. Some components had been too tough to symbolize in 3D, so we adjusted the workflow accordingly.
Movement
So that everybody agrees on the stream, look, and really feel, we created a full-motion model of it.
Unwrapping and renaming
To organize the scene for a developer, we wanted to spend a while unwrapping the UVs, cleansing the file, and renaming the weather. We used C4D completely for unwrapping because the shapes weren’t too complicated. It’s additionally crucial to rename all components and arrange the file so the developer can simply acknowledge which object is which. (Within the instance under, we present the method – not the total workflow or an ideal unwrap.)
Fluid stream baked
Nearly all of the animations had been baked from C4D to Blender and exported as .glb information.
Timing
We determined to start out with an infinite scroll and a looped expertise. When the person releases the scroll, seven anchors subtly and mechanically information the development. To make it simpler for the developer to divide the baked animation, we used particular timing for every step — 200 keyframes between every anchor.
AO baking
As a result of the headphones had been rotating, we couldn’t bake the lighting. We solely baked the Ambient Occlusion shadows to reinforce realism. For that, after unwrapping the objects, we mixed all of the completely different components of the headphones right into a single object, utilized a single texture with the Ambient Occlusion, and baked it in Redshift. Similar for the case.
Regular map baked
For the Play‑Stade touchpad solely, we wanted a standard map, so we exported it. Nevertheless, because the AO was already baked, the UVs needed to stay the identical.
Digicam path and goal
With the intention to guarantee a easy stream throughout the internet expertise, it was essential to make use of a single digital camera. Nevertheless, since we now have completely different focal factors, we wanted two separate round paths with completely different facilities and sizes, together with a null object to function a goal reference all through the stream.
2. WebGL Options and Interactive Structure
By Adrian Gubrica
GPGPU particles
Particles are a good way so as to add an additional layer of element to 3D scenes, as was the case with Aether 1. To enhance the calming movement of the audio waves, a stream‑area simulation was used — a method identified for producing plausible and pure motion in particle programs. With the proper settings, the ensuing movement may also be extremely enjoyable to observe.
To calculate the stream fields, noise algorithms — particularly Simplex4D — had been used. Since these might be extremely performance-intensive on the CPU, a GPGPU method (basically the WebGL equal of a compute shader) was carried out to run the simulation effectively on the GPU. The outcomes had been saved and up to date throughout two textures, enabling easy and high-performance movement.
Easy scene transitions
To create a seamless transition between scenes, I developed a customized controller to handle when every scene ought to or shouldn’t render. I additionally carried out a handbook method of controlling their scroll state, permitting me, for instance, to show the final place of a scene with out bodily scrolling there. By combining this with a customized transition perform that primarily makes use of GSAP to animate values, I used to be in a position to create each ahead and backward animations to the goal scene.
You will need to observe that each one scenes and transitions are displayed inside a “put up‑processing scene,” which consists of an orthographic digital camera and a full‑display airplane. Within the fragment shader, I merge all of the renders collectively.
This transition method turned particularly tough when transitioning on the finish of every scroll in the primary scene to create an infinite loop. To realize this, I created two situations of the primary scene (A and B) and swapped between them at any time when a transition occurred.
Customized scroll controller for infinite scrolling
As talked about earlier, the primary scene options an infinite loop at each the beginning and finish of the scroll, which triggers a transition again to the start or finish of the scene. This conduct is enhanced with some resistance throughout the backward motion and different delicate results. Reaching this required cautious handbook tweaking of the Lenis library.
My preliminary concept was to make use of Lenis’ infinite: true property, which at first appeared like a fast resolution – particularly for returning to the beginning scroll place. Nevertheless, this method required manually listening to the scroll velocity and predicting whether or not the scroll would cross a sure threshold to cease it on the proper second and set off the transition. Whereas attainable, it shortly proved unreliable, usually resulting in unpredictable conduct like damaged scroll states, unintended transitions, or a confused browser scroll historical past.
Due to these points, I made a decision to take away the infinite: true property and deal with the scroll transitions manually. By combining Lenis.scrollTo(), Lenis.cease(), and Lenis.begin(), I used to be in a position to recreate the identical looping impact on the finish of every scroll with better management and reliability. An additional benefit was having the ability to retain Lenis’s default easing in the beginning and finish of the scroll, which contributed a easy and polished really feel.
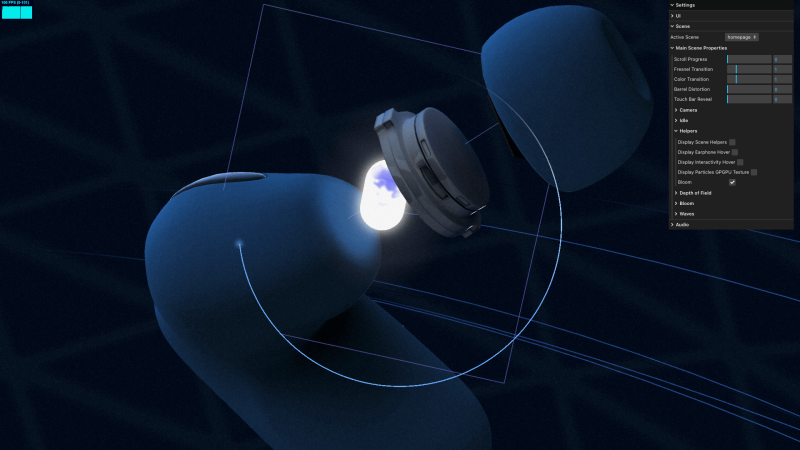
Cursor with fluid simulation cross
Fluid simulation triggered by mouse or contact motion has grow to be a serious development on immersive web sites lately. However past simply being fashionable, it constantly enhances the visible enchantment and provides a satisfying layer of interactivity to the person expertise.
In my implementation, I used the fluid simulation as a blue overlay that follows the pointer motion. It additionally served as a masks for the Fresnel cross (defined in additional element under) and was used to create a dynamic displacement and RGB shift impact within the closing render.
As a result of fluid simulations might be efficiency‑intensive – requiring a number of passes to calculate practical conduct – I downscaled it to simply 7.5 p.c of the display decision. This optimization nonetheless produced a visually compelling impact whereas sustaining easy total efficiency.
Fresnel cross on the earphones
Within the first half of the primary scene’s scroll development, customers can see the interior components of the earphones when hovering over them, including a pleasant interactive contact to the scene. I achieved this impact through the use of the fluid simulation cross as a masks on the earphones’ materials.
Nevertheless, implementing this wasn’t easy at first, because the earphones and the fluid simulation use completely different coordinate programs. My preliminary concept was to create a separate render cross for the earphones and apply the fluid masks in that particular cross. However this method would have been expensive and launched pointless complexity to the put up‑processing pipeline.
After some experimentation, I noticed I might use the digital camera’s view place as a sort of display‑house UV projection onto the fabric. This allowed me to precisely pattern the fluid texture instantly within the earphones’ materials – precisely what I wanted to make the impact work with out further rendering overhead.
Audio reactivity
For the reason that challenge is a presentation of earphones, some scene parameters wanted to grow to be audio‑reactive. I used one of many background audio’s frequency channels – the one which produced probably the most noticeable “jumps,” as the remainder of the observe had a really steady tone – which served because the enter to drive numerous results. This included modifying the tempo and form of the wave animations, influencing the energy of the particles’ stream area, and shaping the touchpad’s visualizer.
The background audio itself was additionally processed utilizing the Internet Audio API, particularly a low‑cross filter. This filter was triggered when the person hovered over the earphones within the first part of the primary scene, in addition to throughout the scene transitions at first and finish. The low‑cross impact helped amplify the influence of the animations, making a delicate sensation of time slowing down.
Animation and empties
A lot of the animations had been baked instantly into the .glb file and managed through the scroll progress utilizing THREE.js’s AnimationMixer. This included the digital camera motion in addition to the earphone animations.
This workflow proved to be extremely efficient when collaborating with one other 3D artist, because it gave them management over a number of elements of the expertise – corresponding to timing, movement, and transitions – whereas permitting me to focus solely on the actual‑time interactions and logic.
Talking of actual‑time actions, I prolonged the scene by including a number of empties, animating their place and scale values to behave as drivers for numerous interactive occasions – corresponding to triggering interactive factors or adjusting enter energy throughout scroll. This method made it straightforward to fantastic‑tune these occasions instantly in Blender’s timeline and align them exactly with different baked animations.

3. Optimization Strategies
Visible expectations had been set very excessive for this challenge, making it clear from the beginning that efficiency optimization could be a serious problem. Due to this, I intently monitored efficiency metrics all through growth, always searching for alternatives to save lots of assets wherever attainable. This usually led to sudden but efficient options to issues that originally appeared too demanding or impractical for our targets. A few of these optimizations have already been talked about – corresponding to utilizing GPGPU strategies for particle simulation and considerably lowering the decision of the cursor’s fluid simulation. Nevertheless, there have been a number of different key optimizations that performed a vital position in sustaining stable efficiency:
Synthetic depth of area
Certainly one of that was utilizing depth of area throughout the shut‑up view on the headphones. Depth of area is often used as a put up‑processing layer utilizing some sort of convolution to simulate progressive blurring of the rendered scene. I thought-about this as an excellent‑to‑have from the start in case we shall be left with some further fps, however not as a practical possibility.
Nevertheless, after implementing the particles simulation, which used smoothstep perform within the particle’s fragment shader to attract the blue circle, I used to be questioning if it won’t be sufficient to easily modify its values to make it seem like it’s blurred. After few little tweaks, the particles turned blurry.
The one downside left was that the blur was not progressive like in an actual digital camera, which means it was not getting blurry in response to the main focus level of the digital camera. So I made a decision to attempt the digital camera’s view place to get some sort of depth worth, which surprisingly did the job properly.
I utilized the identical smoothstep method to the rotating tube within the background, however now with out the progressive impact because it was virtually at a continuing distance more often than not.
Voilà. Depth of area for nearly free (not good, however does the job properly).
Synthetic bloom
Bloom was additionally a part of the put up‑processing stack – usually a expensive impact because of the further render cross it requires. This turns into much more demanding when utilizing selective bloom, which I wanted to make the core of the earphones glow. In that case, the render cross is successfully doubled to isolate and mix solely particular parts.
To work round this efficiency hit, I changed the bloom impact with a easy airplane utilizing a pre‑generated bloom texture that matched the form of the earphone core. The airplane was set to at all times face the digital camera (a billboard method), creating the phantasm of bloom with out the computational overhead.
Surprisingly, this method labored very properly. With a little bit of fantastic‑tuning – particularly adjusting the depth write settings – I used to be even in a position to keep away from seen overlaps with close by geometry, sustaining a clear and convincing look.
Customized performant glass materials
A serious a part of the earphones’ visible enchantment got here from the shiny floor on the again. Nevertheless, attaining practical reflections in WebGL is at all times difficult – and sometimes costly – particularly when utilizing double‑sided supplies.
To deal with this, I used a technique I usually depend on: combining a MeshStandardMaterial for the bottom bodily lighting mannequin with a glass matcap texture, injected through the onBeforeCompile callback. This setup supplied an excellent stability between realism and efficiency.
To reinforce the impact additional, I added Fresnel lighting on the perimeters and launched a slight opacity, which collectively helped create a convincing glass‑like floor. The ultimate consequence intently matched the visible idea supplied for the challenge – with out the heavy value of actual‑time reflections or extra complicated supplies.
Simplified raycasting
Raycasting on excessive‑polygon meshes might be gradual and inefficient. To optimise this, I used invisible low‑poly proxy meshes for the factors of curiosity – such because the earphone shapes and their interactive areas.
This method considerably diminished the efficiency value of raycasting whereas giving me way more flexibility. I might freely modify the dimensions and place of the raycastable zones with out affecting the visible mesh, permitting me to fantastic‑tune the interactions for the absolute best person expertise.


Cell efficiency
Due to the optimisation strategies talked about above, the expertise maintains a stable 60 FPS – even on older gadgets just like the iPhone SE (2020).
- Three.js: For a challenge of this scale, Three.js was the clear selection. Its constructed‑in supplies, loaders, and utilities made it superb for constructing extremely interactive WebGL scenes. It was particularly helpful when establishing the GPGPU particle simulation, which is supported through a devoted addon supplied by the Three.js ecosystem.
- lil‑gui: Generally used alongside Three.js, was instrumental in making a debug setting throughout growth. It additionally allowed designers to interactively tweak and fantastic‑tune numerous parameters of the expertise while not having to dive into the code.
- GSAP: Most linear animations had been dealt with with GSAP and its timeline system. It proved significantly helpful when manually syncing animations to the scroll progress supplied by Lenis, providing exact management over timing and transitions.
- Lenis: As talked about earlier, Lenis supplied a easy and dependable basis for scroll conduct. Its
syncTouchparameter helped handle DOM shifting on cell gadgets, which is usually a frequent problem in scroll‑primarily based experiences.
5. Outcomes and Takeaways
Aether 1 efficiently demonstrated how model narrative, superior WebGL interactions, and rigorous 3D workflows can mix right into a single, performant, and emotionally participating internet expertise.
By baking key animations, utilizing empties for occasion triggers, and leaning on instruments like Three.js, GSAP, and Lenis, the staff was in a position to iterate shortly with out sacrificing polish. In the meantime, the 3D pipeline- from Midjourney idea sketches by way of C4D unwrapping and Blender export ensured the visible constancy stayed aligned with the model imaginative and prescient.
Most significantly, each method outlined right here is transferable. Whether or not you might be contemplating audio‑reactive visuals, infinite scroll adventures, or just making an attempt to squeeze additional frames per second out of a heavy scene, the options documented above present that considerate planning and a willingness to experiment can push WebGL far past typical product‑web page expectations.
6. Creator Contributions
Common – Ross Anderson
3D – Celia Lopez
WebGL – Adrian Gubrica
7. Web site credit
Artwork Route – Ross Anderson
Design – Gilles Tossoukpe
3D – Celia Lopez
WebGL – Adrian Gubrica
AI Integration – Federico Valla
Movement – Jason Kearley
Entrance Finish / Webflow – Youness Benammou