
You probably have a router from manufacturers like TP-Hyperlink, D-Hyperlink, or NETGEAR, it’s possible you’ll discover the IP tackle 192.168.l.0 useful in accessing the router’s admin panel.
This tackle configures WiFi passwords, SSID, and community safety settings. For those who’re unfamiliar with logging into your router or making adjustments, this publish supplies an in depth step-by-step strategy that will help you handle your router settings successfully.
Logging Into the 192.168.l.0 Admin Panel
To start, open the net browser you sometimes use to entry the web. The subsequent steps will information you thru logging into your router’s admin panel.
- Open Your Internet Browser: Launch your web browser, whether or not it’s Google Chrome, Firefox, or every other browser.
- Sort the IP Handle: Within the browser’s tackle bar, kind 192.168.l.0 and press Enter. Keep away from including “www” or “https” at the start, because the browser wants to attach on to the IP tackle.
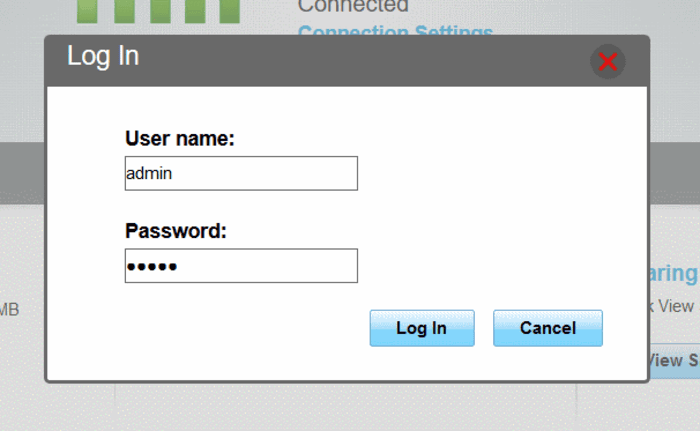
- Login Web page Seems: The login web page ought to seem when you press Enter. That is the place you’ll be able to enter the username and password.
- Enter Login Credentials: The default credentials are often admin for username and password for a lot of routers. Enter these particulars to entry the settings web page.
- Entry the Admin Panel: After getting into the right login particulars, you’ll be directed to the router’s admin interface, the place you’ll be able to start managing settings.
Essential Tip: Double-check that you simply’ve typed the right IP tackle. Generally, individuals mistakenly kind 192.168.o.0 as a substitute of 192.168.l.0.
The letter “o” is commonly confused with the quantity “0,” so getting the digits proper is essential.
Altering Your WiFi Settings
When you’re contained in the admin panel, updating the WiFi settings is without doubt one of the most typical duties you’ll possible wish to carry out.
This course of permits you to change your WiFi password and your community’s SSID to boost safety.
How you can Change the WiFi Password?
Updating your WiFi password is a vital step in conserving your community safe. Right here’s how you are able to do it:
- Login to Your Admin Panel: As beforehand talked about, entry the router’s admin panel by typing 192.168.l.0 in your browser’s tackle bar and logging in utilizing the default username and password.
- Go to Wi-fi Settings: Search for the Wi-fi Settings part within the admin panel. Click on on it, and it’ll open the choices to vary your WiFi settings.
- Go to Wi-fi Safety: Beneath Wi-fi Settings, you need to discover an possibility known as Wi-fi Safety. Click on on it to view security-related choices.
- Allow WPA/WPA2 Safety: To safe your WiFi community, make sure that WPA/WPA2 safety is enabled. It will stop unauthorized customers from connecting to your community.
- Enter New Password: Within the Password discipline, enter the brand new WiFi password that you simply wish to use. Select a powerful password that mixes letters, numbers, and particular characters to boost safety.
- Save Modifications: After getting into the brand new password, click on the Save button. The router will robotically reboot, disconnecting all units linked to the community. You have to to reconnect to the WiFi utilizing the brand new password.
How you can Change the SSID (Community Title)?
Altering the SSID (Service Set Identifier) or your WiFi community title helps distinguish your community from others. To alter the SSID:
- Open the Admin Panel: Once more, kind 192.168.l.0 in your browser’s tackle bar and login.
- Entry Wi-fi Settings: Go to the Wi-fi Settings web page after logging in.
- Replace the SSID: Search for the Wi-fi Community Title (SSID) discipline. Enter a novel title in your community. Make certain it’s one thing recognizable however not readily identifiable for added safety.
- Save Your Modifications: After you’ve up to date the SSID, click on the Save button to use the brand new settings.
Widespread Points and How you can Troubleshoot Entry to 192.168.l.0
In case you are having hassle accessing the 192.168.l.0 tackle, there are just a few potential points to verify.
Guarantee Correct Connection to Your WiFi
Whereas an lively web connection isn’t required to entry the router’s settings, you do should be linked to your router’s WiFi community.
With out this connection, the web-based administration web page gained’t load. Double-check that your system is linked to the right WiFi community.
Verify the Appropriate IP Handle
It’s attainable that the default gateway tackle of your router isn’t 192.168.l.0. On this case, you’ll want to seek out the right IP tackle. To take action:
- On Home windows: Open the Command Immediate and kind ipconfig. Search for the Default Gateway below your lively community connection.
- On Mac: Go to System Preferences, choose Community, and discover your router’s IP below the Router part.
As soon as you realize the right IP tackle, enter it into the browser’s tackle bar and attempt to entry the admin panel.
Clear Your Browser Cache
Clearing your browser’s cache and cookies may assist if you happen to proceed encountering points. Right here’s how:
- Go to your browser’s Settings.
- Search for Privateness and Safety or Historical past.
- Select the choice to Clear searching knowledge and choose Cache and Cookies.
- After clearing, attempt reaccessing the admin web page.
Replace Your Browser and Router Firmware
Older variations of browsers or outdated router firmware could trigger compatibility points. Make certain each your browser and router firmware are up-to-date.
You possibly can sometimes discover firmware updates in your router producer’s web site or within the admin panel.
Resetting Your Router
If not one of the above options work, you may have to reset your router to manufacturing unit settings.
Resetting will revert all personalized settings to their defaults, together with the login credentials.
Right here’s how one can reset your router:
- Find the Reset Button: The reset button is often tiny on the router’s again. It’s usually recessed, so it’s possible you’ll want a pin or toothpick to press it.
- Press and Maintain the Reset Button: Maintain the reset button for 5-10 seconds. It’s best to see the SYS LED lights blinking, indicating that the reset course of is full.
- Re-login with Default Credentials: After the reset, the router will restart, and you may entry it utilizing the default IP tackle (192.168.l.0) and the default username and password (usually admin/admin).
By following these steps, you need to now be capable to log in to your router’s settings utilizing 192.168.l.0.
From right here, you’ll be able to change your WiFi password and SSID and carry out varied different duties to enhance your community safety and configuration.
Make certain to verify for any connectivity or IP tackle points, and if obligatory, reset your router to regain entry.