

Three.js has been step by step rolling out the brand new WebGPURenderer, constructed on WebGPU, whereas additionally introducing their node system and the Three Shading Language. It’s rather a lot to unpack, and though it’s not absolutely production-ready but, it exhibits nice promise.
On this article, I’ll stroll you thru an experimental Three.js demo utilizing the brand new WebGPURenderer, BatchedMesh, and a few playful post-processing results to push the boundaries of real-time 3D on the net.
The Demo
This demo highlights the potential of Three.js’s newest options by showcasing:
- The BatchedMesh object, which permits for quick rendering of a set variety of geometries
- Ambient occlusion and depth of discipline post-processing passes
- Some gentle use of TSL
Within the demo, the BatchedMesh is randomly composed after which animated alongside fractal noise with interactive pointer controls, plus a light-to-dark mode swap with extra animations.
WebGPURenderer
WebGPURenderer is the evolution of the WebGLRenderer in Three.js. It goals to be a unified interface for each WebGL/2 and WebGPU back-ends inside a streamlined bundle. Many options from the prevailing renderer have already been ported, with acceptable fallbacks relying on the consumer’s gadget.
The BatchedMesh works with each WebGLRenderer and WebGPURenderer, however I encountered some fallback points on sure browsers. Moreover, I needed to make use of the brand new post-processing instruments, so this demo runs solely on WebGPU.
It’s initialized precisely the identical because the WebGLRenderer:
Demo.ts line 52
this.renderer = new WebGPURenderer({ canvas: this.canvas, antialias: true });
this.renderer.setPixelRatio(1);
this.renderer.setSize(window.innerWidth, window.innerHeight);
this.renderer.toneMapping = ACESFilmicToneMapping;
this.renderer.toneMappingExposure = 0.9;
When working with WebGPU in Three.js make sure to import from “three/webgpu” as it’s its personal department.
BatchedMesh
The BatchedMesh is a current addition to the Three.js toolkit, providing computerized optimization for rendering a lot of objects with the identical materials however totally different world transformations and geometries. Its interface and utilization are similar to that of InstancedMesh, with the important thing distinction being that it is advisable know the entire variety of vertices and indices required for the mesh.
Demo.ts line 269
const maxBlocks: quantity = this.blocks.size * 2; // high and backside
this.blockMesh = new BatchedMesh(maxBlocks, totalV, totalI, mat);
this.blockMesh.sortObjects = false; // is determined by your use case, right here I've had higher performances with out sorting
There are two essential choices to steadiness for efficiency, each dependent in your particular use case:
- perObjectFrustumCulled: defaults to true, that means every particular person object is frustum culled
- sortObjects: types the objects within the BatchedMesh to scale back overdraw (rendering already painted fragments)
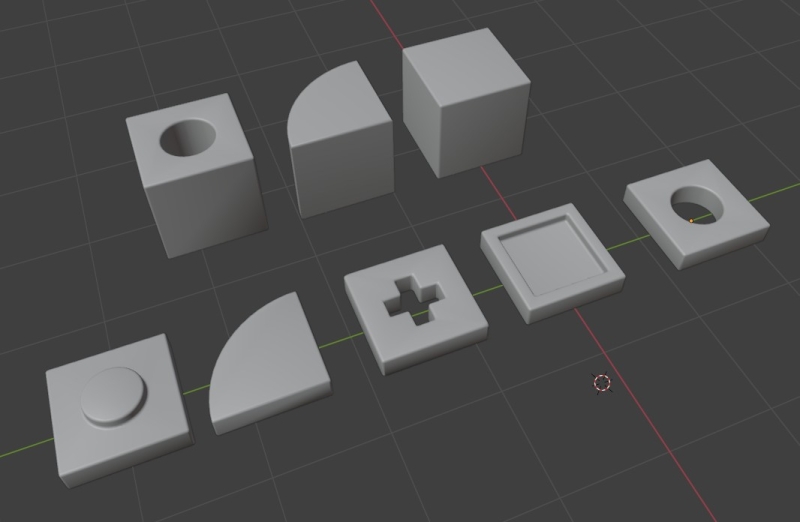
As soon as the item is created, we have to outline what it incorporates. Within the demo, I’ve a complete of 9 totally different geometries to show—three backside components and 6 high components. These geometries have to be handed to the BatchedMesh so it is aware of what it’s working with:
Demo.ts line 277
const geomIds: quantity[] = [];
for (let i: quantity = 0; i < geoms.size; i++) {
    // all our geometries
    geomIds.push(this.blockMesh.addGeometry(geoms[i]));
}
The addGeometry perform returns a novel ID that you need to use to affiliate an object occasion within the BatchedMesh with its geometry.
Subsequent, we have to specify which occasion makes use of which geometry by merely linking the geometry IDs to the occasion IDs:
Demo.ts line 283
// one high and one backside for every block
for (let i: quantity = 0; i < this.blocks.size; i++) {
   const block: ABlock = this.blocks[i];
   this.blockMesh.addInstance(geomIds[block.typeBottom]);
   this.blockMesh.addInstance(geomIds[block.typeTop]);
   this.blockMesh.setColorAt(i * 2, block.baseColor);
   this.blockMesh.setColorAt(i * 2 + 1, block.topColor);
}
Right here, I exploit the block definitions I beforehand generated to match every block with two cases within the mesh—one for the highest geometry and one other for the underside. In the event you’re going to make use of the colour attribute, you’ll additionally have to initialize it earlier than rendering.
Within the render loop, we cross transformation matrices and colours to the mesh following the identical indexing we pre-established, which is in the identical order because the blocks array. The matrices are created by manipulating a dummy object.
Demo.ts from line 375
block = blocks[i];
// our indices for this block within the batched mesh, a high and a backside
baseI = i * 2;
topI = i * 2 + 1;

...

// replace the block mesh with matrices and colours
// first the underside, colour adjustments on the primary ripple
dummy.rotation.y = block.rotation;
dummy.place.set(blockCenter.x, 0, blockCenter.y);
dummy.scale.set(blockSize.x, block.top, blockSize.y);
dummy.updateMatrix();
blockMesh.setMatrixAt(baseI, dummy.matrix);
blockMesh.getColorAt(baseI, tempCol);
tempCol.lerp(this.baseTargetColor, ripple);
blockMesh.setColorAt(baseI, tempCol);

// then the highest, colour adjustments on the second ripple
dummy.place.y += block.top;
dummy.scale.set(blockSize.x, 1, blockSize.y);
dummy.updateMatrix();
blockMesh.setMatrixAt(topI, dummy.matrix);
blockMesh.getColorAt(topI, tempCol);
tempCol.lerp(this.topTargetColors[block.topColorIndex], echoRipple);
blockMesh.setColorAt(topI, tempCol);
Publish-Processing / TSL / Nodes
Alongside the rollout of WebGPURenderer, Three.js has launched TSL, the Three Shading Language—a shader-like, node-based JavaScript interface for GLSL / WGSL that you need to use to write down shaders, together with compute shaders.
On this demo, TSL is used primarily to outline the rendering and post-processing pipeline. Nonetheless, there are additionally quite a few interactions with the brand new node-based supplies, that are equal to plain Three.js supplies (for instance, MeshStandardNodeMaterial as an alternative of MeshStandardMaterial).

Right here, I aimed to create a tilt-shift impact to emphasise the playfulness of the topic and colours, so I applied a powerful depth of discipline impact with dynamic parameters up to date every body utilizing a easy auto-focus approximation. I additionally added additional quantity with screen-space ambient occlusion, a vignette impact, and a few anti-aliasing.
Every little thing is outlined in a number of traces of TSL.
Demo.ts line 114
const scenePass = cross(this.scene, this.digital camera);
   scenePass.setMRT(mrt({
   output: output,
   regular: transformedNormalView
}));

const scenePassColor = scenePass.getTextureNode('output');
const scenePassNormal = scenePass.getTextureNode('regular');
const scenePassDepth = scenePass.getTextureNode('depth');
const aoPass = ao(scenePassDepth, scenePassNormal, this.digital camera);
...
const blendPassAO = aoPass.getTextureNode().mul(scenePassColor);
const scenePassViewZ = scenePass.getViewZNode();
const dofPass = dof(blendPassAO, scenePassViewZ, effectController.focus, effectController.aperture.mul(0.00001), effectController.maxblur);
const vignetteFactor = clamp(viewportUV.sub(0.5).size().mul(1.2), 0.0, 1.0).oneMinus().pow(0.5);
this.submit.outputNode = fxaa(dofPass.mul(vignetteFactor));
Lots of the capabilities used are nodes of assorted sorts (e.g., cross, transformedNormalView, ao, viewportUV, and many others.), and there are already a number of them within the library. I encourage everybody to discover the Three.js supply code, learn the TSL documentation, and browse the offered examples.
Some notable factors:
- viewportUV returns the normalized viewport coordinates, which may be very helpful.
- The properties of effectController are outlined as uniform() to be used within the shader. When these properties are up to date at runtime, the shader updates as nicely.
- Commonest GLSL operations have a TSL equal which you could chain with different nodes (e.g., clamp, mul, pow, and many others.).
Within the render loop, I regulate the main focus and aperture values with elastic damping to simulate an auto-focus impact:
Demo.ts line 455
this.effectController.focus.worth = MathUtils.lerp(this.effectController.focus.worth, this.camDist * .85, .05);
this.effectController.aperture.worth = MathUtils.lerp(this.effectController.aperture.worth, 100 - this.camDist * .5, .025);
Conclusion
When writing the unique code for this demo, I used to be merely experimenting with the most recent Three.js launch, attempting to think about an internet use case for the BatchedMesh—therefore the marginally over-the-top gentle/darkish mode toggle.
With this brief article, I hope to encourage a few of you to dive into Three.js and discover these new options. Whereas the WebGPURenderer isn’t but as suitable with all browsers and units as the unique, we’re getting there.
Thanks for studying!