
During the last a number of years, browsers have made enormous strides in bringing native parts to HTML. In 2020, the primary Net Element options reached parity throughout all main browsers, and within the years since, the listing of capabilities has continued to develop. Particularly, early this 12 months, streaming Declarative Shadow DOM (DSD) lastly reached common help when Firefox shipped its implementation in February. It’s this strategic addition to the HTML commonplace that unlocks quite a lot of new, highly effective server prospects.
On this article, we’ll take a look at easy methods to leverage present server frameworks individuals already use, to degree as much as native parts, with out piling on mounds of JavaScript. Whereas I’ll be demonstrating these strategies with Node.js, Categorical, and Handlebars, practically each trendy internet framework at this time helps the core ideas and extensibility mechanisms I’ll be exhibiting. So, whether or not you’re working with Node.js, Rails, and even C# and .NET, you’ll have the ability to translate these strategies to your stack.
If you’re new to Net Parts or should you discover the next exploration fascinating, I’d prefer to suggest you to my very own Net Element Engineering course. Its 13 modules, 170+ movies, and interactive studying app will information you thru DOM APIs, Net Parts, modular CSS, accessibility, types, design techniques, instruments, and extra. It’s an effective way to up your internet requirements recreation.
Background
Earlier than we leap into the code, it might be value reminding ourselves of some issues.
As I discussed, the primary Net Element options had been universally supported by browsers by early 2020. This included just a few core capabilities:
- Inert HTML and fundamental templating via the
<template>ingredient. - The flexibility to outline new HTML tags with the
customElements.outline(...)API. - Platform protected encapsulation of HTML and CSS, together with DOM composition, offered by Shadow DOM and
<slot>. - Primary theming via shadow-piercing CSS Properties.
By combining these requirements with just a few smaller ones, anybody may create totally native, interoperable parts on the net. Nonetheless, except CSS Properties, utilizing all of those APIs required JavaScript. For instance, discover how a lot JavaScript code is concerned in making a easy card part:
class UICard {
  static #fragment = null;
  #view = null;

  constructor() {
    tremendous();
    this.attachShadow({ mode: "open" });
  }

  connectedCallback() {
    if (this.#view === null) {
      this.#view = this.#createView();
      this.shadowRoot.appendChild(this.#view);
    }
  }

  #createView() {
    if (UICard.#fragment === null) {
      // discover the template and types within the DOM
      const template = doc.getElementById("ui-card");
      UICard.#fragment = doc.adoptNode(template.content material);
    }

    return UICard.#fragment.cloneNode(true);
  }
}

customElements.outline("ui-card", UICard);
That is an unlucky quantity of boilerplate code, significantly for a part consisting solely of fundamental HTML and CSS, with no actual conduct. The code above works to search out the template, clone it, create the Shadow DOM, and append the cloned template to it. So, sadly, the browser can’t render this card till after the JavaScript hundreds, parses, and runs. However what if there was a technique to do all of this completely in HTML, with no JavaScript?
Enter Declarative Shadow DOM (DSD). With DSD we’ve an HTML-first mechanism for declaring cases of a part, together with its Shadow DOM content material and types. Your entire card part could be carried out with solely the next HTML:
<ui-card>
  <template shadowrootmode="open">
    <type>
      :host {
        show: block;
        include: content material;
        box-sizing: border-box;
        box-shadow: var(--shadow-raised);
        border: var(--stroke-thicknessMinus1) var(--stroke-style) var(--color-layerBorder);
        border-radius: var(--border-radius);
        background: var(--background, clear);
        shade: var(--foreground, var(--color-onLayerBase));
      }
    </type>

    <slot></slot>
  </template>

  Card content material goes right here...
</ui-card>
That’s it. Put that HTML in your web page and the <ui-card> will render with an robotically connected shadow root, totally encapsulated HTML and CSS, and slot-based composition of the cardboard’s content material. That is all completed via the addition of the shadowrootmode attribute, which tells the browser to not create a <template> however to as an alternative connect a shadow root and stream the contents of the template ingredient into the foundation it simply created. This function is carried out on the degree of the HTML parser itself. No JavaScript required!
At first look, that is incredible. We are able to create fundamental parts with no JavaScript, encapsulated HTML and CSS, slot-based composition, and so forth. However what if we’ve 100 playing cards on the web page? We not have our HTML and CSS in only one place the place our part is outlined, however as an alternative it’s duplicated all over the place we use the cardboard. Yikes!
However that is no new downside. It’s as previous as the online itself and is without doubt one of the causes that internet frameworks had been created within the first place. And as we’ll see all through the remainder of this text, we are able to use all our commonplace server-side instruments to not solely resolve this downside, however make additional enhancements to the answer as nicely.
The Demo App
We’d like a easy internet app to assist us display how all of the items come collectively. So, I threw collectively slightly listing/element UI based mostly on the Star Wars API.
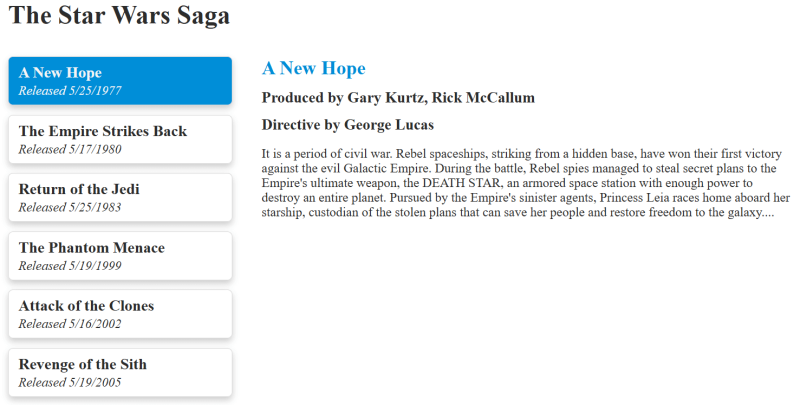
Alongside the left facet of the display, there’s a listing of some Star Wars movies. The listing and the person objects are all carried out as Net Parts, rendered completely on the server. On the appropriate of the display, we’ve a element view of the movie that’s presently chosen within the listing. The element view can also be carried out as a Net Element, rendered on the server. Because the listing choice modifications, declarative HTMX attributes within the listing part HTML set off AJAX requests for the related movie element part from the server.
I name some of these Net Parts “Server-first” as a result of all rendering is completed on the server. There is no such thing as a client-side JavaScript code for rendering. In reality, there may be hardly any JavaScript in any respect on this resolution. As we’ll see shortly, we solely want just a few small items to allow the HTMX integration and progressively improve our listing with choice styling.
If you wish to get the complete code and take a look at issues out your self, yow will discover it on this GitHub repo. The readme file comprises directions for setting every little thing up and operating the app.
The construction of the demo is stored comparatively easy and commonplace. On the root there are two folders: shopper and server. Within the shopper folder, you will discover page-level css, the pictures, and the JavaScript. Within the server folder, I’ve damaged down the code into controllers and views. That is additionally the place the mock information resides in addition to some core infrastructure code we’ll be going over shortly.
Basic Method
For the demo, I’ve adopted a reasonably commonplace MVC-style strategy. The server is comprised of two controllers:
/– The house controller hundreds the listing of movies and renders the “house” view, displaying the listing and the default choice./movies/:id– The movies controller handles requests for particular movies. When it’s invoked through an AJAX request, it hundreds the movie particulars information and returns a partial view, together with solely the movie particulars. When it’s invoked usually, it renders your complete house view, however with the desired movie chosen within the listing and its element view off to the facet.
Every controller invokes the “backend” as wanted, builds up a view mannequin, after which passes that information alongside to the view engine, which renders the HTML. To enhance ergonomics and allow a few of the extra superior options of the structure, Handlebars partial views and HTML helpers are used.
There’s nothing distinctive about this. It’s all commonplace fare for anybody utilizing MVC frameworks since Rails emerged on the scene within the early 2000s. Nonetheless, the satan is within the particulars…
Rendering Net Parts
On this structure, Net Element templates (views) and types, in addition to their information inputs, are totally outlined on the server, not the shopper. To perform this, we use a partial view per part, very like one would do in a standard MVC structure. Let’s check out the Handlebars server code for a similar <ui-card> we mentioned beforehand.
<ui-card>
  <template shadowrootmode="open">
    {{{shared-styles "./ui-card.css"}}}
    <slot></slot>
  </template>

  {{>@partial-block}}
</ui-card>
This code defines our <ui-card> partial. It doesn’t have any information inputs, however it may possibly render little one content material with Handlebars’ {{>@partial-block}} syntax. The opposite fascinating factor to notice is the shared-styles customized HTML helper. We’ll take a look at that intimately later. For now, simply know that it robotically contains the CSS situated within the specified file.
With the essential card outlined, now we are able to construct up extra fascinating and sophisticated parts on the server. Right here’s a <structured-card> that has particular opinions about how header, physique, and footer content material needs to be structured and styled in card type.
<structured-card>
  <template shadowrootmode="open">
    {{{shared-styles "./structured-card.css"}}}

    {{#>ui-card}}
      <div half="content material">
        <slot identify="header"></slot>
        <slot></slot>
        <slot identify="footer"></slot>
      </div>
    {{/ui-card}}
  </template>

  {{>@partial-block}}
</structured-card>
We observe the identical fundamental sample as <ui-card>. The principle distinction being that the <structured-card> really composes the <ui-card> in its personal Shadow DOM with {{#>ui-card}}...{{/ui-card}} (as a result of it’s a Handlebars partial block itself).
Each these parts are nonetheless extremely generic. So, let’s now take a look at the film-card, which is simply a regular partial view. It doesn’t outline a Net Element, however as an alternative makes use of the <structured-card> by merging it with movie information:
{{#>structured-card}}
  <h3 slot="header">{{movie.title}}</h3>
  <span slot="footer">Launched {{movie.release_date}}</span>
{{/structured-card}}
Now that we’ve a partial that may render movie playing cards, we are able to put these collectively in an inventory. Right here’s a barely extra superior <film-list> Net Element:
<film-list>
  <template shadowrootmode="open">
    {{{shared-styles "./film-list.css"}}}

    <ul hx-boost="true" hx-target="international #film-detail">
      {{#every movies}}
        <li>
          <a href="/movies/{{id}}">
            {{>film-card movie=.}}
          </a>
        </li>
      {{/every}}
    </ul>
  </template>
</film-list>
Right here, we are able to see how the <film-list> has a movies array as enter. It then loops over every movie within the array, rendering it with a hyperlink that encompasses our film-card, which internally renders the movie information with a <structured-card>.
Should you’ve been constructing MVC apps for some time, you could acknowledge that these are all acquainted patterns for decomposing and recomposing views. Nonetheless, you in all probability seen just a few important modifications.
- First, every partial that serves as a Net Element has a single root ingredient. That root ingredient is a customized HTML tag of our selecting, following the platform customized ingredient naming guidelines (i.e. names should embrace a hyphen). Examples:
<film-list>,<structured-card>,<ui-card>. - Second, every Net Element comprises a
<template>ingredient with theshadowrootmodeattribute utilized. This declares our Shadow DOM and permits us to supply the particular HTML that may get rendered therein, every time we use the part. - Third, every part makes use of a customized Handlebars HTML helper referred to as
shared-stylesto incorporate the types inside the Shadow DOM, guaranteeing that the part is at all times delivered to the browser with its required types, and that these types are totally encapsulated. - Lastly, parts which can be supposed to be wrappers round different content material use
<slot>parts (an internet commonplace), mixed with Handlebar’s particular{{>@partial-block}}helper to permit the server view engine to correctly render the wrapped HTML as a toddler of the customized ingredient tag.
So, the sample roughly appears to be like like this:
<tag-name>
  <template shadowrootmode="open">
    {{{shared-styles "./tag-name.css"}}}

    Element HTML goes right here.
    Add <slot></slot> and the partial block helper under if it's essential to render little one content material.
  </template>

  {{>@partial-block}}
</tag-name>
These are the essential steps that allow us to creator server-rendered Net Parts. Hopefully, you possibly can see from the a number of examples above how we are able to use these easy steps to create all kinds of parts. Subsequent, let’s dig slightly deeper into the technical particulars of the server and shopper infrastructure that make styling and dynamic behaviors work easily.
Tips of the Commerce: Sharing Types
Once we first checked out our guide DSD-based <ui-card> part, we inlined the types. As a reminder, it seemed like this:
<ui-card>
  <template shadowrootmode="open">
    <type>
      :host { ...host types right here... }
    </type>

    <slot></slot>
  </template>

  Card content material goes right here...
</ui-card>
One massive downside with this HTML is that each time we’ve an occasion of the cardboard, we’ve to duplicate the types. This implies the server is sending down CSS for each single card occasion, as an alternative of simply as soon as, shared throughout all cases. When you have 100 playing cards, you’ve gotten 100 copies of the CSS. That’s definitely not ideally suited (although a few of the value could be mitigated with GZIP compression).
ASIDE: At the moment, W3C/WHATWG is engaged on a brand new internet commonplace to allow declaratively sharing types in DSD in addition to representing a number of type sheets in the identical file. As soon as this requirements work is full and shipped in browsers, the answer introduced under will not be wanted.
We are able to resolve this downside although. There are two items to the puzzle:
- We’d like a method for the server to ship the types for the primary occasion of any part it renders, and know to not ship the types for any successive cases of the identical part in the identical HTTP request.
- We’d like a method for the browser to seize the types despatched by the server and propagate them throughout all cases of the identical part.
To perform this, we’ll create a easy shared type protocol. To be able to clarify it, let’s take a look at what we’ll have the server ship when it must render two card parts:
<ui-card>
  <template shadowrootmode="open">
    <type style-id="./ui-card.css">
      :host { ...host types right here... }
    </type>
    <shared-styles style-id="./ui-card.css"></shared-styles>

    <slot></slot>
  </template>

  Card 1 Content material Right here.
</ui-card>

<ui-card>
  <template shadowrootmode="open">
    <shared-styles style-id="./ui-card.css"></shared-styles>

    <slot></slot>
  </template>

  Card 2 Content material Right here.
</ui-card>
Discover that the primary card occasion has the inline <type> ingredient, with a particular attribute added: style-id. That is adopted by a particular customized ingredient referred to as <shared-styles> that additionally has an attribute referencing the identical style-id. Within the second occasion of the cardboard, we don’t have the repeated <type> ingredient anymore. We solely have the <shared-styles> ingredient, referencing the identical style-id.
The primary a part of getting this working is in how we implement the <shared-styles> customized ingredient within the browser. Let’s check out the code:
const lookup = new Map();

class SharedStyle extends HTMLElement {
  connectedCallback() {
    const id = this.getAttribute("style-id");
    const root = this.getRootNode();
    let types = lookup.get(id);

    if (types) {
      root.adoptedStyleSheets.push(types);
    } else {
      types = new CSSStyleSheet();
      const ingredient = root.getElementById(id);
      types.replaceSync(ingredient.innerHTML);
      lookup.set(id, types);
    }

    this.take away();
  }
}

customElements.outline("shared-styles", SharedStyle);
The <shared-styles> ingredient can have its connectedCallback() invoked by the browser because it streams the HTML into the DSD. At this level, our ingredient will learn its personal style-id attribute and use it to search for the types in its cache.
If the cache already has an entry for the id:
- The ingredient provides the types to the
adoptedStyleSheetsassortment of the containing shadow root. - Then, the
<shared-styles>removes itself from the DSD.
If the types aren’t current within the cache:
- First, the ingredient constructs a
CSSStyleSheetoccasion. - Second, it locates the
<type>ingredient contained in the containing DSD utilizing the id. - Third, the
<type>ingredient’s contents are used to supply the types for theCSSStyleSheet. - Fourth, the type sheet is cached.
- And eventually, the
<shared-styles>ingredient removes itself from the DSD.
There are a pair different particulars of the implementation value mentioning:
- We use
this.getRootNode()to search out the shadow root that the<shared-styles>ingredient is inside. If it’s not inside a shadow root, this API will return thedoc, which additionally has anadoptedStyleSheetsassortment. - If it’s the first time
<shared-styles>is seeing a selectedstyle-id, it doesn’t must push the types into theadoptedStyleSheetsof the foundation as a result of an in-line<type>ingredient is already current, fulfilling the identical objective.
Now that we’ve the shopper facet of our protocol carried out, we’d like a method for the server to generate this code. That is the function of the {{{shared-styles}}} Handlebars HTML helper that we’ve been utilizing. Let’s take a look at the implementation of that:
// excerpted from the server handlebars configuration
helpers: {
  "shared-styles": perform(src, choices) {
    const context = getCurrentContext();
    const stylesAlreadySent = context.get(src);
    let html = "";

    if (!stylesAlreadySent) {
      const types = loadStyleContent(src);
      context.set(src, true)
      html = `<type id="${src}">${types}</type>`;
    }

    return html + `<shared-styles style-id="${src}"></shared-styles>`;
  }
}
Every time the shared-styles helper is used, it performs the next steps:
- Get the present request context (extra on this later).
- Examine the request context to see if the type supply has already been emitted throughout this request.
- If it has beforehand been requested, return solely the HTML for the
<shared-styles>ingredient, with thesrcbecause thestyle-id. - If it has NOT beforehand been requested, load the CSS and emit it right into a
<type>ingredient, following that with the<shared-styles>ingredient, each arrange with the identicalstyle-id.
This straightforward HTML helper lets us monitor requests for a similar types throughout your complete request, emitting the right HTML relying on the present request state.
The final requirement is to trace the request context throughout controllers, views, and async capabilities, after we wouldn’t in any other case have entry to it. For this, we’re going to make use of the Node.js async_hooks module. Nonetheless, as soon as standardization is full, AsyncContext shall be an official a part of JavaScript, and the very best strategy for this piece of the puzzle.
Right here’s how we leverage async_hooks:
import { AsyncLocalStorage } from "async_hooks";

const als = new AsyncLocalStorage();

export const getCurrentContext = () => als.getStore();
export const runInNewContext = (callback) => als.run(new Map(), callback);
export const contextMiddleware = (req, res, subsequent) => runInNewContext(subsequent);
The AsyncLocalStorage class permits us to supply state, on this case a Map, that’s accessible to something that runs inside a callback. Within the above code, we create a easy Categorical middleware perform that ensures that every one request handlers are run inside the context, and obtain a novel per-request occasion of the Map. This will then be accessed with our getCurrentContext() helper at any time inside the HTTP request. Consequently, our shared-styles Handlebars HTML helper is ready to monitor what types it has already despatched to the shopper inside a given request, regardless that it doesn’t have direct entry to Categorical’s request objects.
With each the server and shopper items in place, we are able to now share types throughout parts, with out duplication, at all times guaranteeing that precisely one copy of the wanted CSS is offered to the browser for a given request.
Tips of the Commerce: Deal with Widespread Habits with HTMX
Should you’ve constructed just a few web pages/apps in your life, it’s probably you’ve seen a lot of them share a core set of wants. For instance, making fundamental HTTP requests, altering out DOM nodes, historical past/navigation, and so forth. HTMX is a small JavaScript library that gives a declarative mechanism for attaching many widespread behaviors to HTML parts, with out the necessity to write customized JavaScript code. It suits nice with Net Parts, and is an particularly good companion when specializing in server rendering.
In our demo software, we use HTMX to AJAX within the movie particulars every time an merchandise within the <film-list> is clicked. To see how that’s setup, let’s look once more on the HTML for the <film-list> Net Element:
<film-list>
  <template shadowrootmode="open">
    {{{shared-styles "./film-list.css"}}}

    <ul hx-boost="true" hx-target="international #film-detail">
      {{#every movies}}
        <li>
          <a href="/movies/{{id}}">
            {{>film-card movie=.}}
          </a>
        </li>
      {{/every}}
    </ul>
  </template>
</film-list>
HTMX could be immediately recognized by its hx- prefixed attributes, which add the widespread behaviors I discussed above. On this instance, we use hx-boost to inform HTMX that any little one <a> ought to have its href dynamically fetched from the server. We then use hx-target to inform HTMX the place we wish it to place the HTML that the server responds with. The international modifier tells HTMX to look in the principle doc, relatively than the Shadow DOM. So, HTMX will execute the question selector “#film-detail” in doc scope. As soon as situated, the HTML returned from the server shall be pushed into that ingredient.
This can be a easy however widespread want in web pages, one which HTMX makes straightforward to perform, and could be totally laid out in our server HTML without having to fret about customized JavaScript. HTMX supplies a strong library of behaviors for all types of situations. Positively, test it out.
Earlier than we transfer on, it’s necessary to notice that there are a few methods to getting the above HTMX markup working with Net Parts. So, let’s go over these rapidly.
First, by default, HTMX searches the worldwide doc for its hx- attributes. As a result of our Net Parts are utilizing Shadow DOM, it received’t discover them. That’s no downside, all we have to do is name htmx.course of(shadowRoot) to allow that (extra on the place we hook this up later).
Second, when HTMX performs an AJAX and processes the HTML to insert into the DOM, it makes use of some previous browser APIs which don’t deal with DSD. I’m hopeful that HTMX will quickly be up to date to make use of the newest requirements, however within the meantime, we are able to resolve this very simply with the next steps:
- Use a
MutationObserverto observe the DOM for any modifications that HTMX makes by including nodes. - Any time a component is added, course of the DSD ourselves by turning templates into shadow roots.
This may be completed with a small quantity of code as follows:
perform attachShadowRoots(root) {
  root.querySelectorAll("template[shadowrootmode]").forEach(template => {
    const mode = template.getAttribute("shadowrootmode");
    const shadowRoot = template.parentNode.attachShadow({ mode });
    shadowRoot.appendChild(template.content material);
    template.take away();
    attachShadowRoots(shadowRoot);
  });
}

// For much more superior strategies, see Devel with out a Causes's
// wonderful put up on streaming fragments:
// https://weblog.dwac.dev/posts/streamable-html-fragments/
new MutationObserver((information) => {
  for (const file of information) {
    for (const node of file.addedNodes) {
      if (node instanceof HTMLElement) {
        attachShadowRoots(node);
      }
    }
  }
}).observe(doc, { childList: true, subtree: true });
Lastly, HTMX has a really explicit method that it manages historical past. It converts the earlier web page into an HTML string and shops it in native storage earlier than navigating. Then, when the person navigates again, it retrieves the string, parses it, and pushes it again into the DOM.
This strategy is the default, and is usually not adequate for a lot of apps, so HTMX supplies varied configuration hooks to show it off or customise it, which is strictly what we have to do. In any other case, HTMX received’t deal with our DSD appropriately. Listed here are the steps we have to take:
- Every time we navigate to a brand new web page, we filter out HTMX’s historical past cache by calling
localStorage.removeItem('htmx-history-cache'). - We then instruct HTMX to refresh the web page every time it navigates and may’t discover an entry in its cache. To configure that we set
htmx.config.refreshOnHistoryMiss = true;at startup.
That’s it! Now we are able to use any HTMX conduct in our Shadow DOM, deal with historical past/navigation, and guarantee AJAX’d server HTML renders its DSD appropriately.
Tips of the Commerce: Deal with Customized Habits with Net Element Islands
Whereas HTMX can deal with many widespread conduct situations, we regularly nonetheless want slightly little bit of customized JavaScript. In reality, minimally we’d like the customized JavaScript that permits HTMX for Shadow DOM.
Due to our use of customized parts, that is very simple. Any time we need to add customized conduct to a part, we merely create a category, register the tag identify, and add any JS we wish. For instance, right here’s how we may write a little bit of code to allow HTMX throughout an arbitrary set of customized parts.
perform defineHTMXComponent(tag) {
  customElements.outline(tag, class {
    connectedCallback() {
      htmx.course of(this.shadowRoot);
    }
  });
}
With that tiny little bit of code, we are able to do one thing like this:
["film-list" /* other tags here */ ].forEach(defineHTMXComponent);Now, within the case of our <film-list>, we don’t need to do that as a result of we need to add different conduct. However, for any customized ingredient the place we solely want HTMX enabled, we simply add its tag to this array.
Turning our consideration extra totally to <film-list>, let’s take a look at how we are able to setup slightly JavaScript “island” to make sure that no matter route we’re visiting will get styled correctly:
export class FilmList extends HTMLElement {
  #hyperlinks;

  connectedCallback() {
    this.#hyperlinks = Array.from(this.shadowRoot.querySelectorAll("a"));

    htmx.course of(this.shadowRoot);
    globalThis.addEventListener("htmx:pushedIntoHistory", this.#selectActiveLink);

    this.#selectActiveLink();
  }

  #selectActiveLink = () => {
    for (const hyperlink of this.#hyperlinks) {
      if (hyperlink.href.endsWith(location.pathname)) {
        hyperlink.classList.add("lively");
      } else {
        hyperlink.classList.take away("lively");
      }
    }

    localStorage.removeItem('htmx-history-cache');
  }
}

customElements.outline("film-list", FilmList);
Now we are able to see every little thing coming collectively. Right here’s what occurs:
- Once we outline the ingredient, the browser will “improve” any customized parts it finds within the DOM that match our specified tag identify of “film-list”, making use of the conduct we’ve laid out in our class.
- Subsequent, the browser will name the
connectedCallback(), which our code makes use of to allow HTMX on its shadow root, pay attention for HTMX historical past modifications, and choose the hyperlink that matches the present location. Every time HTMX modifications the historical past, the identical lively hyperlink code can even get run. - Every time we set the lively hyperlink, we bear in mind to filter out the HTMX historical past cache, so it doesn’t retailer HTML in native storage.
And that’s all of the customized JavaScript in your complete app. Utilizing commonplace customized parts, we’re in a position to outline small islands of JavaScript that apply the customized conduct we’d like solely the place we’d like it. Widespread conduct is dealt with by HTMX, and lots of parts don’t want JavaScript in any respect.
Wrapping Up
Hopefully, you’ve been in a position to see how straight ahead it may be to server render Net Parts with DSD, leverage widespread behaviors declaratively, and incrementally add customized JavaScript “islands” as your software evolves. The steps are primarily:
- Use your server framework’s view engine to create partials for every Net Element.
- Select a novel customized tag as the foundation of your partial and declare a template utilizing
shadowrootmodeif you wish to allow DSD. Reminder: You don’t have to make use of Shadow DOM. Merely having the customized tag permits customized ingredient islands. You solely want Shadow DOM if you need HTML and CSS encapsulation and composition. - Use your server framework’s HTML helper mechanism to ship shared types in your DSD part.
- Leverage HTMX attributes in server HTML as wanted for widespread behaviors, being positive to register the tag to allow HTMX in Shadow DOM.
- When customized code is required, merely outline a customized ingredient that matches your tag identify to allow your JavaScript island.
We don’t must undertake advanced JavaScript frameworks to make the most of trendy browser options. Leveraging the patterns current in any mature MVC server framework, we are able to evolve our codebases to make use of Net Parts, DSD, and Islands. This allows us to be agile in our growth, incrementally adopting and evolving our functions in response to what issues most: our prospects.
Don’t overlook to take a look at the demo on GitHub and if you wish to dig deeper into Net Parts and associated internet requirements, take a look at my Net Element Engineering course.
Cheers!