
On this article, we’ll stroll via construct a web site that you should use to create new surveys, share your surveys, after which analyze the outcomes. Your web site can be lightning quick and can be search engine optimisation pleasant, counting on all the newest options in Subsequent.js. It can even be versatile and simple to construct because of SurveyJS, which makes working with surveys easy.
This text will assume you perceive the fundamentals of React and Subsequent.js, however it’s going to stroll you thru construct each part and web page of the web site. You possibly can observe together with the article for all of the code, or you possibly can soar to the top and use the instance repository right here. You too can check out the ultimate model of the web site that I’ve deployed for you right here.
Subsequent.js is a React-based framework that helps you construct full-stack web sites completely in React. Subsequent.js handles all of the bundling and provides you highly effective APIs to determine render every web page in order that it may be lightning quick. On this article, we’ll be sure that all our pages may be rendered at construct time. Because of this we will simply expose a sitemap that Google can use to index your web site, which is important for ensuring your search engine optimisation efficiency is nice.
SurveyJS is an open-source kind administration device that provides you the power to create, share and analyze your surveys and types. They supply a React API that we’ll use to create a survey administration system with Subsequent.js.
Setting Up Subsequent.js
First, let’s setup our Subsequent.js utility. It’s fast and simple to get began with Subsequent.js, as they supply a CLI device that allows you to create a fundamental app based mostly on the preferences you give.
To make use of the device you could be sure to have npx put in after which run the next command:
npx create-next-app@newest
When you run the create-next-app command it’s going to ask you a collection of questions concerning the undertaking you need to create. Many of the questions are completely based mostly on private desire, so you possibly can reply them nevertheless you want. For this text, we’ll be utilizing pure JavaScript (slightly than Typescript) and we’ll even be utilizing the brand new app router in Subsequent.js slightly than the outdated file router.
Now that you’ve your Subsequent.js app arrange, you possibly can run it with:
yarn run dev
This can go away you with a dev server operating that may replace any time you make modifications to your information. For now, let’s hold this operating so we will add pages with out having to rebuild each time.
Setting Up SurveyJS
To arrange SurveyJS, we’re going to have to put in all of the totally different dependencies. We’re going to make use of all of the totally different components of SurveyJS together with the shape creator, the shape show and the outcomes package deal, so we want to ensure to put in all of them.
To put in the packages, be sure that to run the next set up command:
yarn add survey-analytics survey-core survey-creator-core survey-creator-react survey-react-ui
Setting Up the Type Creator
First, let’s begin of by including the shape creator web page. I’m going to make mine obtainable at /creator, so to try this I create a file at /creator/web page.js.
The creator doesn’t want any server-side information to render, in order that signifies that our web page part could be very easy; it simply renders our Creator part, which I’ll define later. It appears to be like like this:
export const metadata = {
  title: "Survey Creator",
};

export default operate Web page() {
  return <Creator />;
}
Within the code above, you possibly can see that I export each the web page and a metadata object. The metadata object will then be used for the search engine optimisation meta tags by Subsequent.js. For this web page, we at all times need to use the identical string, so we simply export an object.
The Creator part is the place we truly use the SurveyJS API. Let’s check out the part:
"use consumer";

import { useEffect, useState } from "react";
import { SurveyCreatorComponent, SurveyCreator } from "survey-creator-react";

export default operate Creator() {
  let [creator, setCreator] = useState();

  useEffect(() => {
    const newCreator = new SurveyCreator({
      showLogicTab: true,
      showTranslationTab: true,
    });
    setCreator(newCreator);
  }, []);

  return <div>{creator && <SurveyCreatorComponent creator={creator} />}</div>;
}
The very first thing you’ll discover is we use the use consumer directive on this part. It’s because the SurveyJS elements aren’t designed to be run as server elements. To not fear, although; they’ll nonetheless be rendered on the server first earlier than being despatched to the consumer.
The following factor you’ll see is that we run a useEffect with an empty dependency array. Because of this the operate will run as soon as and create the SurveyCreator. You possibly can see at that time we will cross in any choices into the creator relying on what options we need to allow.
All we have to do is render the SurveyCreatorComponent and cross it the creator object. We optionally render it in order that it doesn’t break earlier than the creator is ready up.
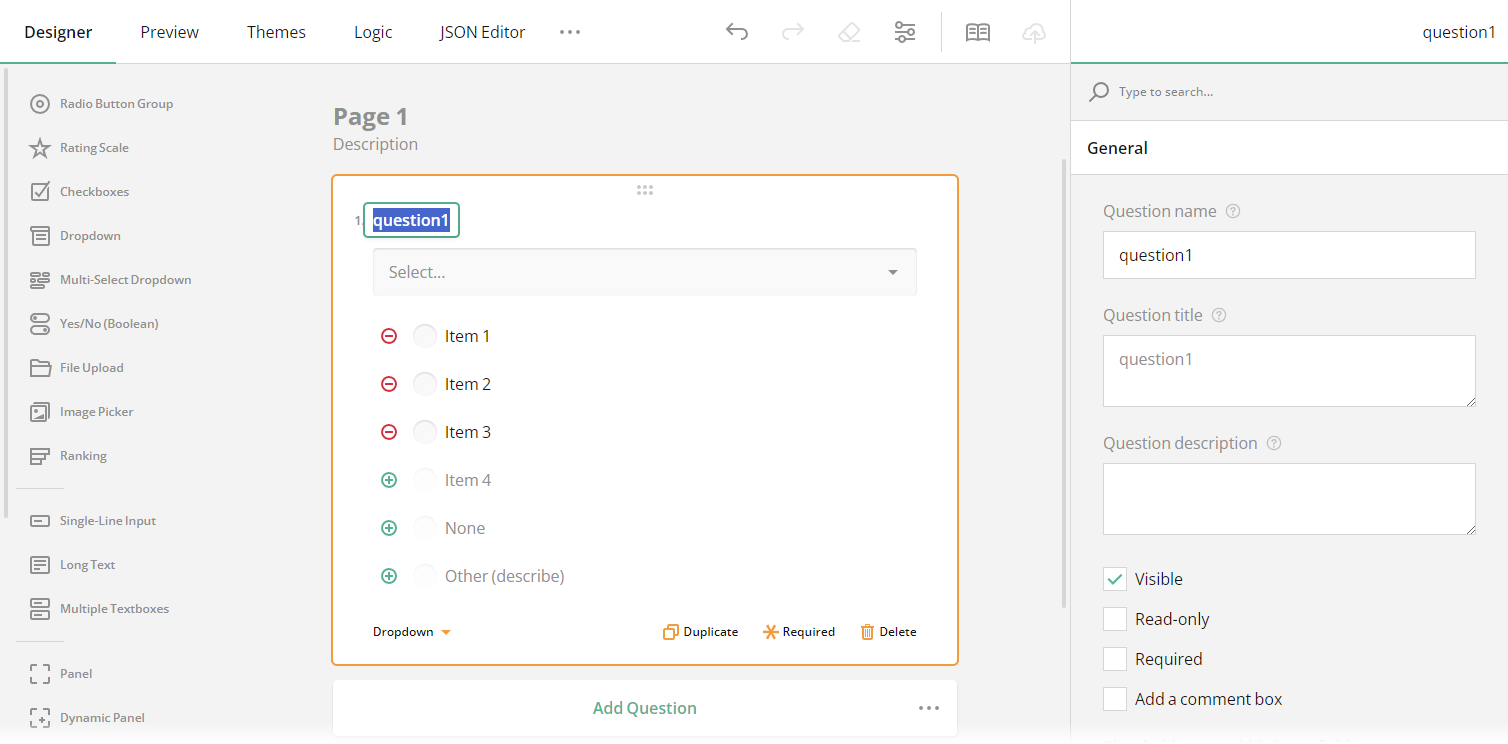
Your dev server ought to have been reloading as you go, so in the event you now go to /creator, you’ll be capable of entry the creator and use all of the options like you possibly can see within the screenshot under.
Create a Web page to View the Type
Subsequent we need to create a web page to view the types that we’ve constructed. When you’ve created the shape within the designer, the output can be a JSON object that may comprise your questions and the preferences you setup as you construct the survey, together with any logic or kinds.
For our kind web page, we need to use a dynamic setup in order that we will render any variety of kind pages with out having to create a brand new file for each new kind. We do that through the use of Subsequent.js dynamic routes. To create a dynamic route, we have to create a brand new file at /app/kind/[slug]/web page.js which is able to give all our types a separate web page at /kind/form-slug.
In our new file, now we have to create just a few features to help Subsequent.js to create our pages. First, let’s begin with generateStaticParams, which we will use to inform Subsequent.js which pages we need to generate. Beneath you possibly can see the contents of the operate:
export async operate generateStaticParams() {
  return surveys.map((x) => ({ slug: x.slug }));
}
For this undertaking, we arrange a file that exports an inventory of surveys (which comprise a slug) and a survey (which is the article supplied by the survey designer). If we need to add a brand new survey, we simply want so as to add one other entry to our surveys array. Our generateStaticParams operate must export an inventory of slugs, which Subsequent.js will then use to render our pages at construct time. For us, that is very easy; we simply must map our survey array to suit the format:
export async operate generateMetadata({ params }) {
  const survey = surveys.discover((x) => x.slug === params.slug);

  return {
    title: survey.survey.title,
    description: survey.survey.description,
  };
}
The following operate we are going to have a look at is generateMetadata. This takes within the parameters from the static params operate we simply outlined, after which it returns our title and outline, that are used for the metadata on our net web page. As you possibly can see above, our operate finds the proper survey object based mostly on the slug we’re given. Then we will use the identical title and outline that we wrote after we created our survey.
The very last thing we have to outline in our web page.js file is the React web page itself. The web page part for our kind web page can also be quite simple. It finds the survey object once more, then passes it via to the SurveyComponent:
export default operate Web page({ params: { slug } }) {
  const survey = surveys.discover((x) => x.slug === slug);

  return (
    <div>
      <SurveyComponent surveyData={survey.survey} />
    </div>
  );
}
The SurveyComponent then needs to be outlined individually. Check out the part:
"use consumer";

import { useCallback } from "react";
import { Mannequin } from "survey-core";
import { Survey } from "survey-react-ui";

export default operate SurveyComponent({ surveyData }) {
  const mannequin = new Mannequin(surveyData);

  const alertResults = useCallback(async (sender) => {
    fetch("/api/submit", {
      methodology: "POST",
      headers: {
        "Content material-Kind": "utility/json;charset=UTF-8",
      },
      physique: JSON.stringify({ consequence: sender.information }),
    });
  }, []);

  mannequin.onComplete.add(alertResults);

  return <Survey mannequin={mannequin} />;
}
Once more, you’ll discover that now we have the use consumer directive to ensure Subsequent.js is aware of it’s not a server part. We then create a mannequin with SurveyJS and cross it into the SurveyJS Survey part. Earlier than we try this, you’ll discover that we arrange an onComplete operate. In our case, the operate simply sends the uncooked information to /api/submit, which may then be dealt with there.
You need to use Subsequent.js to create API endpoints. In our case, we will do it by making a file at /api/submit/route.js and placing a POST operate in it, like so:
export async operate POST(request) {
  const res = await request.json();

  console.log(res);

  return Response.json({ message: "Performed" });
}
In our case, the POST operate could be very easy: it grabs the article that’s despatched after which logs it to the console and responds with a message. That is the place you’d need to save the consequence to your database when you’ve got one. You may also select to validate the consequence additional and return a consequence to show on the frontend. At this level, it’s completely as much as you what you do with the information.
Making a Web page to View the Outcomes
Now that now we have arrange a technique to create and show types, we have to arrange a method to have a look at the outcomes we’ve collected from our types. Clearly, a technique to have a look at the outcomes is simply to look straight on the database, however that received’t offer you any insights into traits which can be showing in your surveys. If we need to establish traits, we will use the surveyjs-analytics package deal.
For this undertaking, I’ve created some pretend consequence information so we will create a outcomes dashboard. I’ve added a outcomes array to every survey object that we used earlier. Every consequence appears to be like one thing like this:
  {
    "nps-score": 9,
    "disappointing-experience": [
      "The service is great, i highly recommend you use it.",
    ],
    "improvements-required": [
      "The service is great, i highly recommend you use it.",
    ],
    "promoter-features": ["ui"],
    rebuy: [true, false],
  }
As you possibly can see, every result’s merely an object that has the query ID as a key and the reply as a worth. That is precisely what we get from the onComplete operate when the shape is submitted.
First, we need to create a brand new dynamic web page, as we’ll need to create a brand new net web page for every totally different kind so we will present the outcomes for that kind particularly. For this web page, we need to create a brand new file at /outcomes/[slug]/web page.js.
Once more, we need to outline a generateMetadata and a generateStaticParams like we did to show the types. In our generateMetadata operate, we make a slight tweak to the title so it’s clear that we’re trying on the outcomes slightly than the shape itself. The one distinction this time is that, inside our generateStaticParams, we filter a number of the types that don’t have outcomes so we don’t generate a web page for types with none outcomes. Our generateStaticParams operate finally ends up trying like this:
export async operate generateStaticParams() {
  return surveys
    .filter((x) => x.outcomes.size > 0)
    .map((x) => ({ slug: x.slug }));
}
Once more, we need to additionally export a Web page part. Our web page part is similar to the web page part from the earlier part, besides as a substitute we render the part Outcomes. However we nonetheless do a discover to seize the fitting survey information and cross that via to the part.
Our Outcomes part hundreds in the entire required packages after which renders them to the web page. It requires just a few useEffect hooks to arrange, and the entire part appears to be like like this:
"use consumer";

import { useEffect } from "react";
import { Mannequin } from "survey-core";

export default operate Outcomes({ surveyData }) {
  useEffect(() => {
    (async () => {
      const survey = new Mannequin(surveyData.survey);

      const { VisualizationPanel } = await import("survey-analytics");

      const currentPanel = new VisualizationPanel(
        survey.getAllQuestions(),
        surveyData.outcomes,
        {
          allowHideQuestions: false,
        }
      );

      currentPanel.render("surveyVizPanel");

      return () => {
        const panelElement = doc.getElementById("surveyVizPanel");

        if (panelElement) {
          panelElement.innerHTML = "";
        }
      };
    })();
  }, [surveyData]);

  return (
    <div>
      <div id="surveyVizPanel" />
    </div>
  );
}
As you possibly can see, we once more begin with the use consumer directive for all the identical causes as earlier than. The part begins with a useEffect that’s used to arrange the panel that reveals all of the charts. It firstly makes use of the surveyData object, which defines the survey itself to create a Mannequin. This lets the outcomes package deal know which graphs to indicate, as it could perceive every query.
The following factor the useEffect does is load the survey-analytics package deal. We do that through a dynamic import, so it isn’t loaded at construct time. This method prevents build-time errors attributable to client-side particular code within the package deal.
After getting the required package deal, we arrange the visualization object with the entire questions after which we can provide it an inventory of all of the submissions for it to undergo and create graphs from. At this level you possibly can configure your visualizations with the choices supplied. After that, all you must do is let the panel object know which ID to make use of to render to within the DOM, which in our case is surveyVizPanel, which we render additional down. Lastly, now we have to ensure to supply a clean-up operate to our hook in order that it clears out the aspect when it’s carried out.
You’ll discover that we solely cross within the surveyData to the dependency array in order that we solely re-render all of the graphs if the enter information modifications, which could be the case if we ever hyperlink between totally different outcomes pages.
Additional Work
This text has given you adequate of an concept to get began integrating SurveyJS into your Subsequent.js utility. To have a totally functioning system, you’ll need to look into including some form of authentication system in an effort to be sure that solely verified customers can entry the totally different components of the system.
You’ll additionally need to combine with some form of information supply, each for the creator to create new types and to gather the outcomes from the top consumer. All of those additions are made very simple in Subsequent.js and SurveyJS.
Conclusion
This information has proven you construct a complete survey administration system in Subsequent.js with SurveyJS. You get so many advantages out of the field with Subsequent.js, so though you won’t have written that a lot code, you’ll discover that what you’ve gotten created will scale to as many types as you need with none trouble.
Thanks for taking the time to learn this information. As I beforehand talked about, you possibly can try the total repo right here or you possibly can play with the hosted model of the system right here.