When crafting gorgeous web sites, like those showcased in Codrops roundups, it’s equally essential to check how your website works and the way it seems. An amazing quantity of effort goes into constructing polished interfaces and making certain a seamless person expertise, however even essentially the most superbly designed websites might be marred by visible bugs and inconsistencies.
Useful checks, equivalent to end-to-end or unit checks, are incredible at verifying the logic and conduct of your internet pages, however they’re unable to catch bugs in UI look. That’s as a result of purposeful checks don’t truly “see” the pixels rendered by your UI.
For instance, buggy CSS would possibly trigger the “checkout” button to be obscured by a banner. Your purposeful take a look at will point out that the button stays clickable—because it technically is—regardless that customers can’t truly entry it.
On this article, I’ll present you how one can resolve false positives and stop rendering bugs from reaching manufacturing utilizing a workflow referred to as visible testing. You’ll learn the way visible testing works and how one can implement it utilizing Playwright and Chromatic.
How does visible testing work?
You’ll be able to consider visible testing as “before-and-after” snapshots of your web site. You start by capturing an ideal “earlier than” picture—this turns into your baseline. After any code modifications, you examine a brand new “after” snapshot pixel-by-pixel in opposition to the baseline, revealing any visible variations.
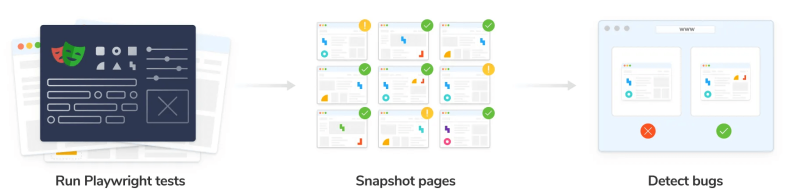
Visible testing instruments, equivalent to Chromatic, automate this means of snapshotting and working diff checks throughout all the web site UI.
Chromatic’s workflow includes 4 steps:
- Cloud Rendering: Chromatic renders your UI in a cloud-based browser.
- Snapshot Seize: Chromatic takes a snapshot for every take a look at, with all checks working concurrently to save lots of you time.
- Automated diffing: Everytime you replace your code, Chromatic generates new snapshots and compares them to the baselines.
- Evaluation and Verification: When Chromatic detects modifications, you’re prompted to evaluation them to make sure they’re intentional. Any sudden modifications set off notifications so you’ll be able to repair them rapidly.
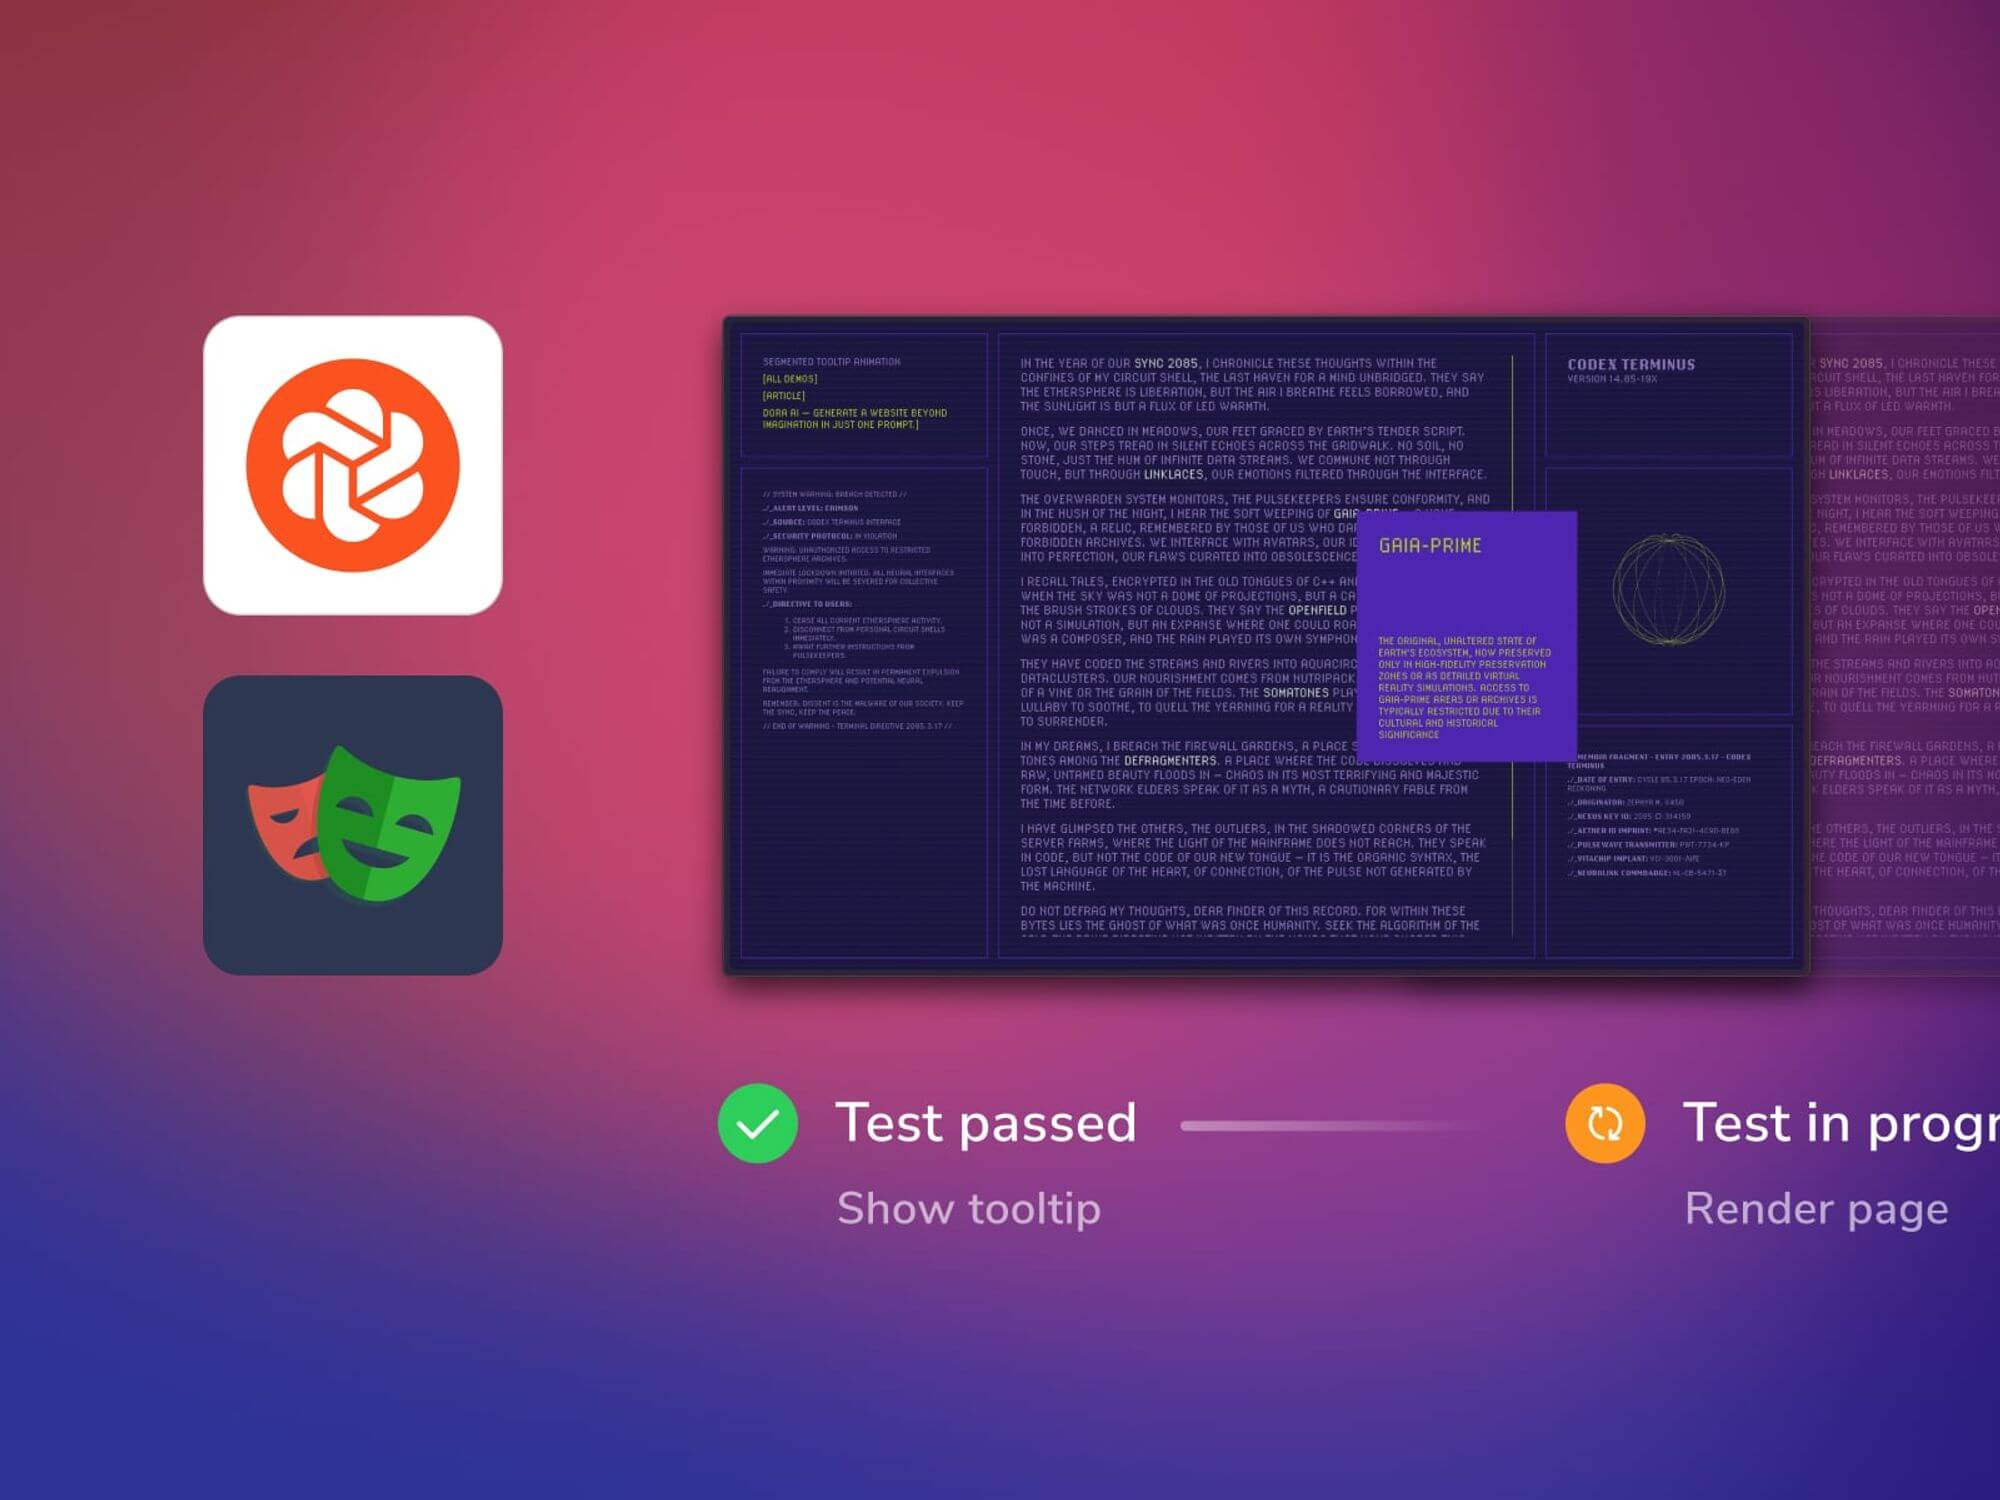
Let’s see this method in motion with a demo. I’m going to check the UI from the “Dynamic Tooltip Reveal Animations” article. The positioning incorporates a grid structure with numerous parts. And spot how hovering over the hyperlinks in the principle content material triggers animated tooltips.
Observe together with the challenge by grabbing the code right here:
$ npx degit winkerVSbecks/PixelGooeyTooltip#starting-point PixelGooeyTooltip
$ cd PixelGooeyTooltip
$ npm set up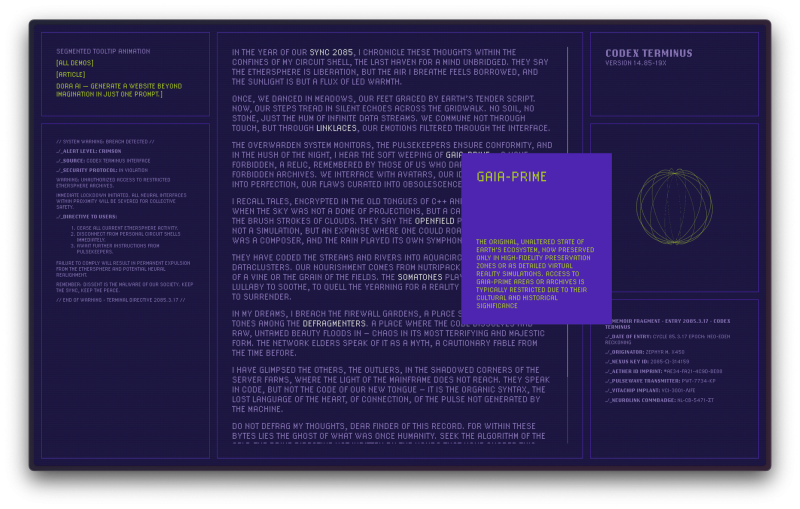
How do Chromatic and Playwright combine for visible testing?
Chromatic seamlessly integrates with in style testing instruments like Storybook, Playwright, and Cypress. Whereas Storybook is right for component-based web sites, we’ll leverage Chromatic’s Playwright integration to carry out visible checks on this static HTML web page.
Playwright is an open-source software that automates end-to-end (E2E) testing by simulating person interactions like clicks, hovers, and typing straight within the browser.
Whereas Playwright checks run, Chromatic works behind the scenes, capturing an archive of every web page, together with its DOM, styling, and belongings. This archive is then uploaded to the cloud, the place Chromatic generates snapshots and performs pixel-by-pixel comparisons to to establish any unintended visible modifications.
Workflow
We’ll break this workflow into two elements. First, we’ll arrange Playwright and write E2E checks to set off the tooltip. Then, we’ll use Chromatic to remodel these E2E checks into visible checks.
Setup Playwright
Run the next command to setup Playwright:
$ npm init playwright@newestThis may add Playwright to your bundle.json, generate a playwright.config.js file, and create a checks folder with a primary instance. Additionally, you will get a tests-examples folder with a extra detailed instance.
Write your first E2E take a look at
Rename checks/instance.spec.js to checks/segmented-tooltip.spec.js and replace its contents as follows:
// checks/segmented-tooltip.spec.js
const { take a look at, count on } = require('@playwright/take a look at');
take a look at('has title', async ({ web page }) => {
await web page.goto('http://127.0.0.1:8080');
await count on(web page).toHaveTitle(/Segmented Tooltip Animation/);
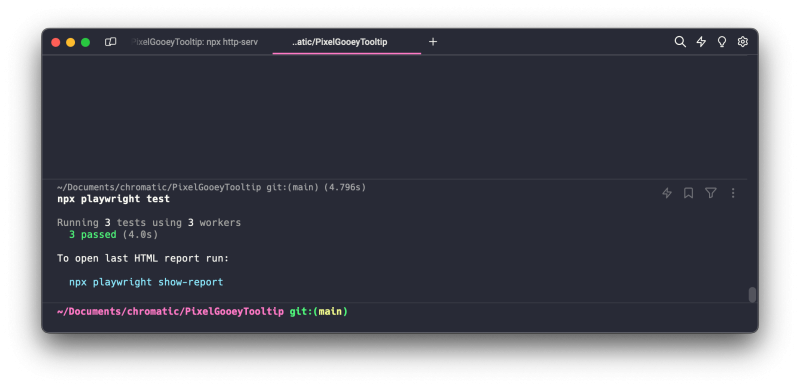
});Run npx http-server . to serve the web site on an area improvement server. Then run the Playwright checks utilizing:
$ npx playwright take a look atYou must see the outcomes of the checks within the terminal. You’ll discover three checks within the output. It is because, by default, Playwright runs every take a look at in Chromium, WebKit, and Firefox.
Take a look at hover tooltips
The primary take a look at verifies the web site’s title. Let’s develop our take a look at suite by including a second take a look at that locates and prompts one of many hover tooltips. The tooltip animates in, so the assertion checks that the tooltip content material is seen on the finish of the animation.
// checks/segmented-tooltip.spec.js

const { take a look at, count on } = require('@playwright/take a look at');

take a look at('has title', async ({ web page }) => {
  await web page.goto('http://127.0.0.1:8080');
  await count on(web page).toHaveTitle(/Segmented Tooltip Animation/);
});

take a look at('shows tooltip', async ({ web page }) => {
  await web page.goto('http://127.0.0.1:8080');
  await web page.locator('css=.set off').first().hover({ power: true });
  await count on(
    web page.locator('css=#tooltip-1 .tooltip__content-desc.glitch')
  ).toHaveCSS('opacity', '1');
});
This time let’s run these checks in UI Mode to really see how these checks run within the browser.
$ npx playwright take a look at --ui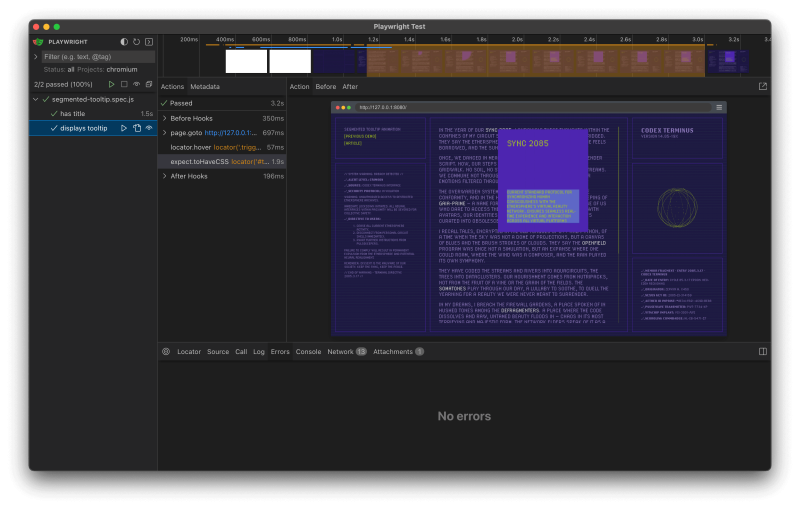
Thrilling! Our E2E checks are up and working. Now, let’s see how we will use them for visible testing.
Enroll and create a brand new challenge
Join a free Chromatic account utilizing your GitHub, GitLab, Bitbucket account, or e mail. You’ll obtain 5,000 free snapshots monthly.
Then click on Add challenge and observe the prompts to create a brand new Playwright challenge. Lastly, copy the distinctive token in your challenge. Like so:
Add Chromatic to Playwright checks
Set up Chromatic associated packages:
$ npm set up -D chromatic @chromatic-com/playwrightThen, swap the Playwright testing utilities with these from @chromatic-com/playwright. That’s it, by altering only one line of code we will convert these E2E checks into visible checks.
// checks/segmented-tooltip.spec.js

// ➖ Take away this line
// import { take a look at, count on } from '@playwright/take a look at';
// ➕ Add this line
import { take a look at, count on } from "@chromatic-com/playwright";

take a look at('has title', async ({ web page }) => {
  await web page.goto('http://127.0.0.1:8080');
  await count on(web page).toHaveTitle(/Segmented Tooltip Animation/);
});

take a look at('shows tooltip', async ({ web page }) => {
  await web page.goto('http://127.0.0.1:8080');
  await web page.locator('css=.set off').first().hover({ power: true });
  await count on(
    web page.locator('css=#tooltip-1 .tooltip__content-desc.glitch')
  ).toHaveCSS('opacity', '1');
});
Run visible checks
Run your Playwright checks as you usually would. Whereas your Playwright checks are working, Chromatic captures an archive of the webpage for every take a look at.
$ npx playwright take a look atThen, use your challenge token and run the next command in your challenge listing. Chromatic will then add the archive to it’s cloud infrastructure and execute the visible checks.
$ npx chromatic --playwright -t=<TOKEN>After the Chromatic command completes, you’ll obtain a affirmation that the checks ran efficiently. Since this was the primary run, baselines have now been established for these checks.
✔ Began construct 1
  → Proceed setup at https://www.chromatic.com/setup?appId=...
✔ Construct 1 auto-accepted
  → Examined 2 tales throughout 2 elements; captured 2 snapshots in 17 seconds
Catch visible modifications
With our baselines established, Chromatic will catch any visible modifications made to this UI. Let’s give it a go. We’ll modify the tooltip background and textual content colours within the tooltip.css file.
/* css/tooltip.css */

.tooltip {
    --tt-width: 200px;
	--tt-height: 250px;
	--tt-columns: 3;
	--tt-rows: 4;
	--tt-bg-color: #FF6B6C; /* 👈 this one */
	--tt-text-color: #000; /* 👈 and this one */

  /* ... */
Run the checks once more:
# First Playwright
$ npx playwright take a look at
# Then Chromatic
$ npx chromatic --playwright -t=<TOKEN>
Chromatic will now present a abstract of modifications. Click on the hyperlink to evaluation the modifications.
✖ Discovered 1 visible change: Evaluation the modifications at https://www.chromatic.com/construct?appId=...&quantity=3The construct shall be marked “unreviewed” and the modifications shall be listed within the “Exams” desk. In our case, the “shows tooltip” take a look at has a change.
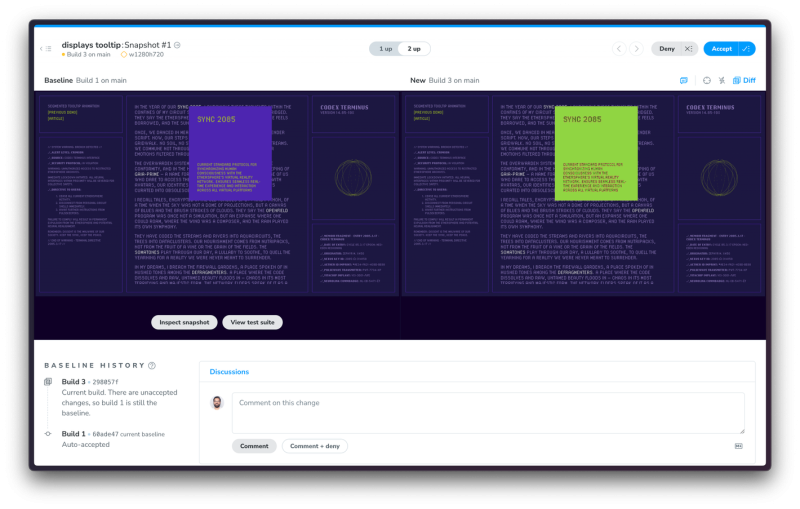
The thought is to evaluation these modifications to confirm whether or not they’re are intentional or inaccurate. When you settle for all modifications, your construct is marked as handed 🟢. This additionally updates the baselines for these checks, making certain future snapshots are in contrast in opposition to the most recent authorised model.
Visible take a look at responsive design
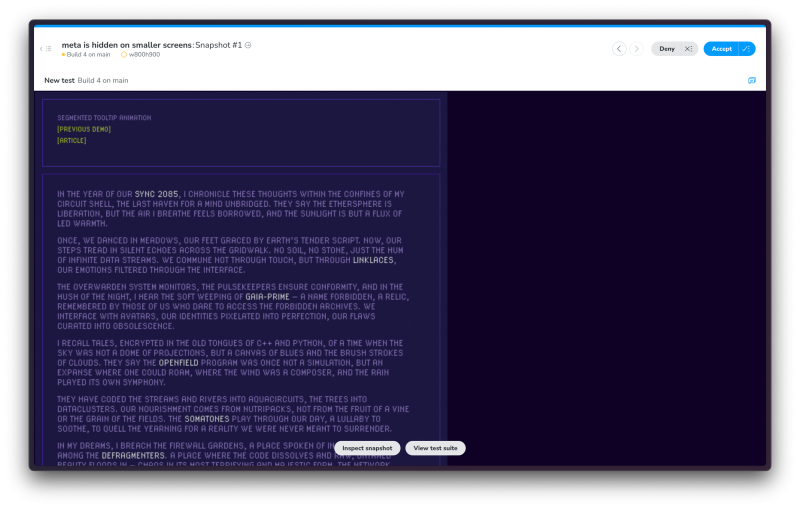
We’ve received the core visible testing workflow down. Nonetheless, there’s yet one more side to think about: at smaller viewport sizes, sure UI parts are hidden. We have to account for this situation into our checks.
Leveraging Playwright’s viewport emulation function, we will simulate completely different display screen sizes and seize snapshots throughout numerous viewports.
// checks/segmented-tooltip.spec.js

// ...

take a look at.use({
  viewport: { width: 800, top: 900 },
});

take a look at('meta is hidden on smaller screens', async ({ web page }) => {
  await web page.goto('http://127.0.0.1:8080');
  for (const meta of await web page.locator('css=.meta').all())
    await await count on(meta).toBeHidden;
});
By re-running our checks, Chromatic will snapshot the positioning at smaller viewport measurement, enabling us to confirm the small display screen structure.
Levelling up your visible testing
On this publish, we explored the basics of visible testing utilizing Playwright and Chromatic, however there’s way more to find!
To really elevate your testing recreation, think about integrating Chromatic into your CI pipeline. That manner you’re notified of any visible modifications launched by a pull request, making certain your UI stays pixel-perfect.
Chromatic additionally allows you to fine-tune snapshot seize by including a delay earlier than the snapshot, adjusting the diff threshold, or capturing a number of snapshots at particular factors throughout a take a look at. To be taught extra about Chromatic’s options, try the documentation. And the code for this demo is obtainable right here: https://github.com/winkerVSbecks/PixelGooeyTooltip