
ASP.NET Core presents a simplified internet hosting mannequin, known as minimal APIs, that permits us to construct light-weight APIs with minimal dependencies. Nonetheless, “minimal” doesn’t imply minimal safety. Minimal APIs want authentication too.
We’ve explored JWT authentication in an earlier submit right here. On this article we’ll study how we will construct a primary authentication handler for minimal APIs in ASP.NET Core. Under we’ll implement a primary authentication handler that can determine and authenticate the person. As a result of we are going to validate the person’s id utilizing credentials saved in a database, we are going to make use of Entity Framework Core.
To make use of the code examples offered on this article, it is best to have Visible Studio 2022 put in in your system. Should you don’t have already got a duplicate, you’ll be able to obtain Visible Studio 2022 right here.
Create an ASP.NET Core Internet API venture in Visible Studio 2022
To create an ASP.NET Core Internet API venture in Visible Studio 2022, comply with the steps outlined beneath.
- Launch the Visible Studio 2022 IDE.
- Click on on “Create new venture.”
- Within the “Create new venture” window, choose “ASP.NET Core Internet API” from the listing of templates displayed.
- Click on Subsequent.
- Within the “Configure your new venture” window, specify the title and site for the brand new venture. Optionally examine the “Place answer and venture in the identical listing” examine field, relying in your preferences.
- Click on Subsequent.
- Within the “Further Info” window proven subsequent, choose “.NET 8.0 (Lengthy Time period Assist)” because the framework model and uncheck the examine field that claims “Use controllers,” as we’ll be utilizing minimal APIs on this venture.
- Elsewhere within the “Further Info” window, go away the “Authentication Sort” set to “None” (the default) and ensure the examine containers “Allow Open API Assist,” “Configure for HTTPS,” and “Allow Docker” stay unchecked. We gained’t be utilizing any of these options right here.
- Click on Create.
We’ll use this ASP.NET Core Internet API venture to work with the code examples given within the sections beneath.
Create a minimal API in ASP.NET Core
You may change the generated code with the next piece of code to create a primary minimal API.
var builder = WebApplication.CreateBuilder(args);
var app = builder.Construct();
app.MapGet("https://www.infoworld.com/", () => "Howdy, World!");
app.Run();
If you execute the appliance, the textual content “Howdy World!” will probably be displayed in your internet browser.
Allow authentication in a minimal API
Authentication is the method of figuring out who the person is and validating the person’s id. (As soon as the person is authenticated, we will decide the roles the person ought to have entry to within the software. This course of is named authorization.)
You may allow authentication in a minimal API in ASP.NET Core by utilizing the AddAuthentication() technique as proven within the code snippet given beneath.
var builder = WebApplication.CreateBuilder(args);
builder.Providers.AddAuthentication();
var app = builder.Construct();
app.MapGet("https://www.infoworld.com/", () => "Howdy World!");
app.Run();
Set up the EF Core NuGet package deal
We’ll use the in-memory capabilities of Entity Framework Core to retailer our person credentials for authentication. So as to add the Microsoft.EntityFrameworkCore.InMemory package deal to your venture, choose the venture within the Resolution Explorer window, then right-click and choose “Handle NuGet Packages.” Within the NuGet Bundle Supervisor window, seek for the Microsoft.EntityFrameworkCore.InMemory package deal and set up it.
Alternatively, you’ll be able to set up the package deal through the NuGet Bundle Supervisor console by getting into the command proven beneath.
PM> Set up-Bundle Microsoft.EntityFrameworkCore.InMemory
Create a brand new DbContext in EF Core
The DbContext is an integral element of Entity Framework Core that represents a connection session with the database. Create a brand new class named CustomDbContext by extending the DbContext class of EF Core and enter the next code in there.
public class CustomDbContext : DbContext
{
    protected override void OnConfiguring
   (DbContextOptionsBuilder optionsBuilder)
    {
        optionsBuilder.UseInMemoryDatabase(databaseName: "IDGSampleDb");
    }
    public DbSet<Consumer> Customers { get; set; }
}
Create a Consumer class in ASP.NET Core
Create a brand new class named Consumer in a file known as Consumer.cs and write the next code in there. We’ll use this class to retailer our customers and their passwords for authentication.
public class Consumer
{
    public string Username { get; set; }
    public string Password { get; set; }
}
An occasion of our Consumer class right here will retailer the credentials of a person in reminiscence. Usually after all the credentials of a person would completely reside within the database.
Create a UserService class to validate person credentials
Subsequent let’s create a category known as UserService that encapsulates the logic required to validate person credentials. The Authenticate technique returns an occasion of the Consumer class if the credentials of the person handed to it as parameters are legitimate.
The next code snippet exhibits the UserService class.
public class UserService : IUserService
{
    non-public readonly CustomDbContext _dbContext;
    public UserService(CustomDbContext customDbContext)
    {
        this._dbContext = customDbContext;
    }
    public async Process<Consumer> Authenticate(string username, string password)
    {
        var person = await Process.Run(() =>
        _dbContext.Customers.SingleOrDefault
        (x => x.Username == username && x.Password == password));
        return person;
    }
}
The IUserService interface is given beneath on your reference.
public interface IUserService
{
    Process<Consumer> Authenticate(string username, string password);
}
Authentication schemes and authentication handlers
In ASP.NET Core, an authentication scheme is used to specify how authentication needs to be carried out for a request. An authentication scheme contains a named set of choices and conduct which can be encapsulated by an authentication handler.
An authentication handler in ASP.NET Core is a sort that implements the conduct of an authentication scheme. An authentication handler extends the IAuthenticationHandler interface or the AuthenticationHandler<TOptions> kind. An authentication handler ought to return success or failure relying on whether or not the authentication course of has succeeded or failed.
Create an authentication scheme for a minimal API
Earlier than you create a customized authentication handler, it is best to first create a customized AuthenticationSchemeOptions kind as proven beneath.
public class CustomAuthenticationSchemeOptions : AuthenticationSchemeOptions
{
    public const string DefaultScheme = "BasicAuthentication";
    public const string AuthorizationHeaderName = "Authorization";
}
Subsequent create a brand new class named Consumer in a file known as Consumer.cs and enter the next code.
public class Consumer
{
    public string Username { get; set; }
    public string Password { get; set; }
}
Within the above code snippet, be aware how we’ve specified the authentication scheme. Authentication schemes are used to thwart any unauthorized entry to delicate info by verifying the id of a person, machine, or entity earlier than entry to a useful resource is granted. On this instance, the default authentication scheme has been specified as BasicAuthentication.
In primary authentication, a shopper passes credentials in plaintext whereas making an HTTP request to a server. The server will return a HTTP 401 Unauthorized standing code, indicating that the authentication has failed, if the request is just not reputable. AuthorizationHeaderName signifies the title of the HTTP header that will probably be used to transmit the credentials as a part of a HTTP request.
Create an authentication handler for a minimal API
In ASP.NET Core, the HandleAuthenticateAsync technique is utilized in an authentication handler to encapsulate the code for authenticating a request. This technique is part of the AuthenticationHandler class.
It’s best to implement the HandleAuthenticateAsync technique in your customized authentication handler together with your customized code to authenticate a request. The next code itemizing exhibits the implementation of the HandleAuthenticateAsync overridden technique.
protected override async Process<AuthenticateResult> HandleAuthenticateAsync()
{
    if (!Request.Headers.ContainsKey(CustomAuthenticationOptions.AuthorizationHeaderName))
    {
        return AuthenticateResult.Fail("Unauthorized");
    }
    var authenticationHeaderValue = Request.Headers[CustomAuthenticationOptions.AuthorizationHeaderName];
    if (string.IsNullOrEmpty(authenticationHeaderValue))
    {
        return AuthenticateResult.NoResult();
    }
    Consumer person;
    strive
    {
        var authenticationHeader = AuthenticationHeaderValue.Parse(authenticationHeaderValue);
        var credentialBytes = Convert.FromBase64String(authenticationHeader.Parameter);
        var credentials = Encoding.UTF8.GetString(credentialBytes).Cut up(new[] { ':' }, 2);
        var username = credentials[0];
        var password = credentials[1];
        person = new Consumer()
        {
             Username = username,
             Password = password
        };

    person = await _userService.Authenticate(username, password);

        if (person == null)
            return AuthenticateResult.Fail("Invalid Username or Password");
    }
    catch
    {
        return AuthenticateResult.Fail("Invalid Authorization Header");
    }
    var claims = new Listing<Declare>()
    {
        new Declare("Username", person.Username)
    };
    var claimsIdentity = new ClaimsIdentity(claims, Scheme.Title);
    var claimsPrincipal = new ClaimsPrincipal(claimsIdentity);
    return AuthenticateResult.Success
        (new AuthenticationTicket(claimsPrincipal,
        this.Scheme.Title));
}
The HandleAuthenticateAsync technique verifies whether or not the authorization header exists. If it doesn’t exist, the authentication handler returns an AuthenticateResult occasion indicating a failure. If the authorization header is current, the handler retrieves the information current within the authorization header. This knowledge is then parsed to retrieve the username and password of the person that was handed within the authorization header of the HTTP request.
The retrieved credentials are then validated towards the database. If the credentials will not be legitimate, an AuthorizationResult occasion is returned indicating failure. If the credentials are legitimate, a claims occasion is created after which handed over an authorization ticket. This ticket is then returned utilizing an occasion of AuthenticateResult to permit the remaining modules of the pipeline to execute as ordinary.
Register the authentication handler in ASP.NET Core
To register the customized authentication handler with the request processing pipeline, it is best to embrace the next piece of code within the Program.cs file.
builder.Providers.AddAuthentication
    (CustomAuthenticationOptions.DefaultScheme)
    .AddScheme<CustomAuthenticationOptions, CustomAuthenticationHandler>
    (CustomAuthenticationOptions.DefaultScheme,
        choices => { });
Lastly, it is best to embrace the next piece of code within the Program.cs file to make the most of authentication and authorization.
app.UseAuthentication();
app.UseAuthorization();
Full authentication handler instance in ASP.NET Core
The entire supply code of the customized authentication handler is given beneath on your reference.
public class CustomAuthenticationHandler :
    AuthenticationHandler<CustomAuthenticationOptions>
{
    public CustomAuthenticationHandler
        (IOptionsMonitor<CustomAuthenticationOptions> choices,
        ILoggerFactory logger, UrlEncoder encoder,
        ISystemClock clock)
        : base(choices, logger, encoder, clock)
    { }
    protected override async Process<AuthenticateResult> HandleAuthenticateAsync()
    {
        if (!Request.Headers.ContainsKey(CustomAuthenticationOptions.AuthorizationHeaderName))
        {
            return AuthenticateResult.Fail("Unauthorized");
        }
        var authenticationHeaderValue = Request.Headers[CustomAuthenticationOptions.AuthorizationHeaderName];
       if (string.IsNullOrEmpty(authenticationHeaderValue))
        {
            return AuthenticateResult.NoResult();
        }
        Consumer person = null;
        strive
        {
            var authenticationHeader = AuthenticationHeaderValue.Parse(authenticationHeaderValue);
            var credentialBytes = Convert.FromBase64String(authenticationHeader.Parameter);
            var credentials = Encoding.UTF8.GetString(credentialBytes).Cut up(new[] { ':' }, 2);
            var username = credentials[0];
            var password = credentials[1];
            person = new Consumer()
            {
                 Username = username,
                 Password = password
            };
            if (person == null)
                return AuthenticateResult.Fail("Invalid credentials");
        }
        catch
        {
            return AuthenticateResult.Fail("Authorization Header is invalid");
        }
        var claims = new Listing<Declare>()
        {
            new Declare("Username", person.Username)
        };
        var claimsIdentity = new ClaimsIdentity(claims, Scheme.Title);
        var claimsPrincipal = new ClaimsPrincipal(claimsIdentity);
        return AuthenticateResult.Success
            (new AuthenticationTicket(claimsPrincipal,
            this.Scheme.Title));
    }
}
Create an HTTP endpoint to check the authentication handler
Take into account the next code snippet that exhibits how one can create a HttpGet endpoint that requires authorization. This endpoint will probably be invoked provided that you present the proper credentials.
app.MapGet("/take a look at", [Authorize] async ([FromBody] Consumer person) =>
{
    var userName = person.Username;
    var password = person.Password;
    return Outcomes.Okay();
});
Lastly, run each the appliance and the Postman device to invoke the endpoint. Determine 1 exhibits how one can specify the username and password for the request in Postman.
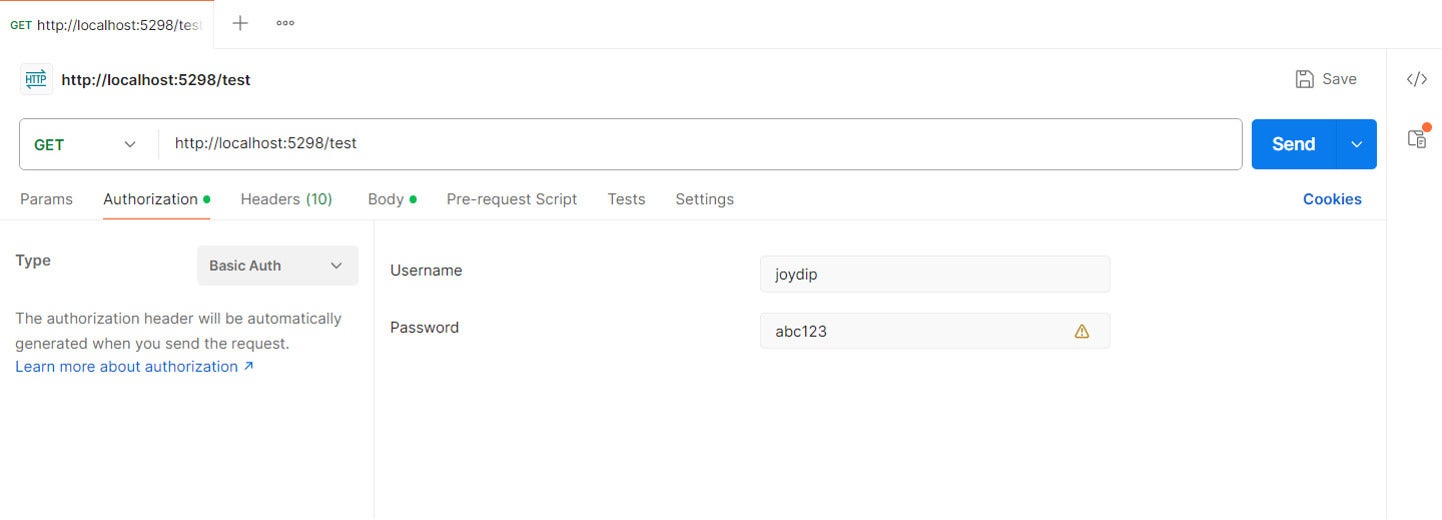 IDG
IDGDetermine 1: Configuring primary authentication in Postman.
Now you can invoke the /take a look at endpoint from Postman. Determine 2 exhibits the /take a look at endpoint invoked from Postman.
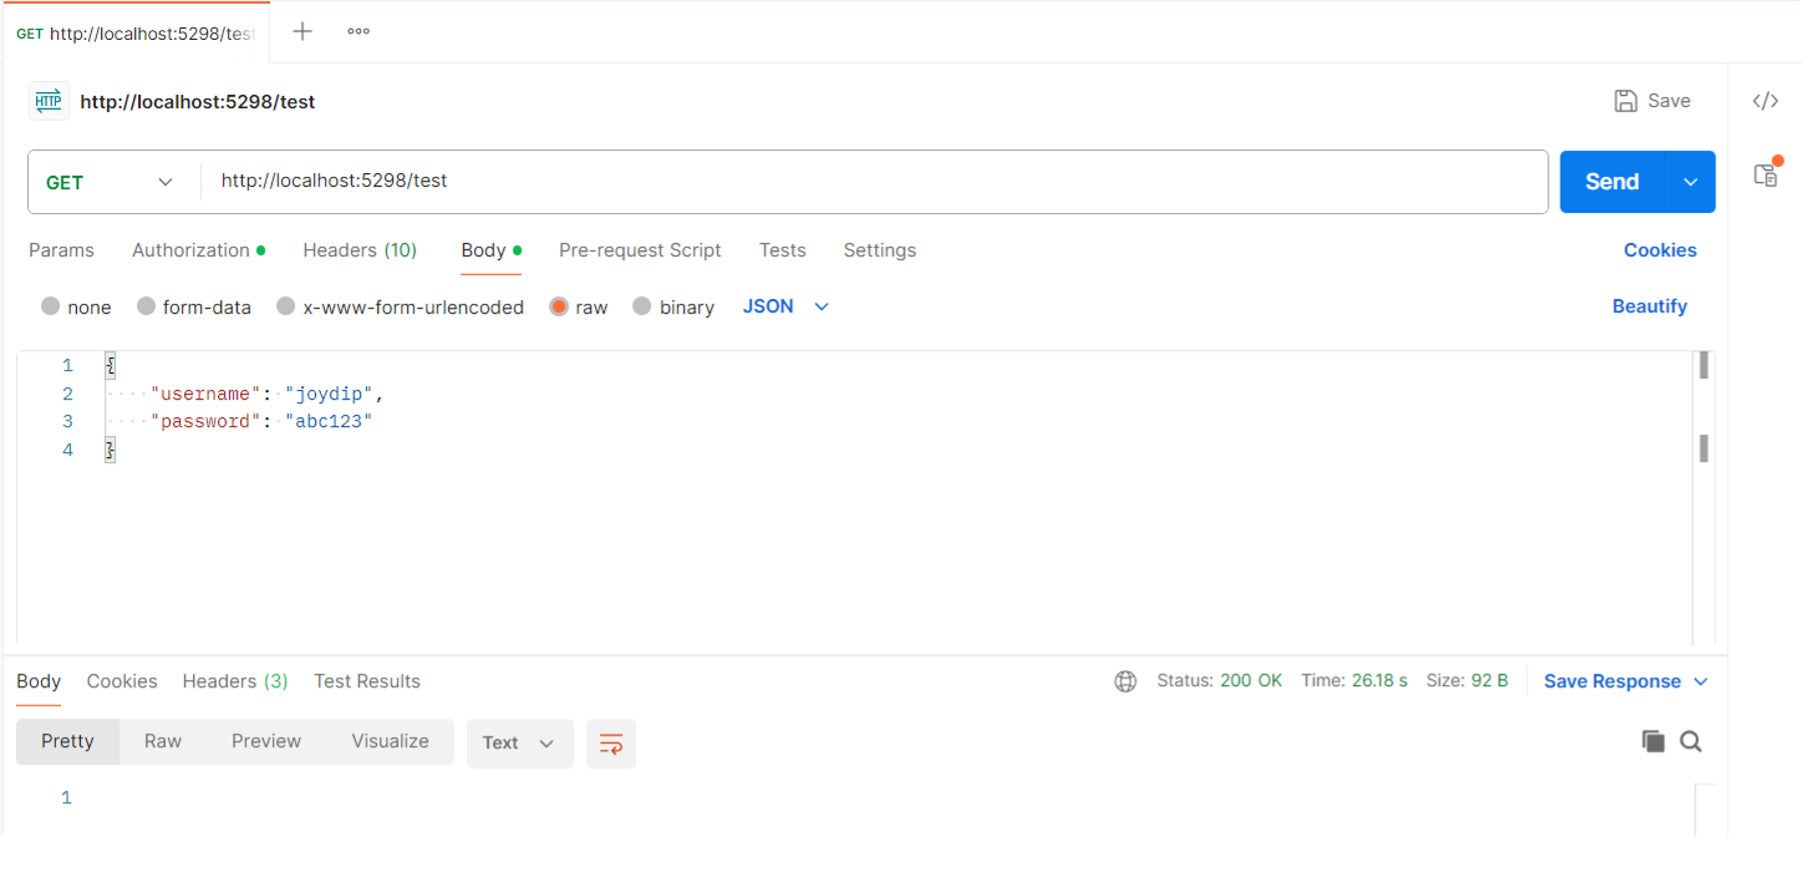 IDG
IDGDetermine 2: Invoking the endpoint utilizing Postman.
If the authentication is profitable, the API endpoint will return the HTTP 200 OK standing code. If authentication fails, then the API endpoint will return the HTTP 401 Unauthorized standing code.
A minimalistic implementation
Be aware that our minimalistic implementation right here doesn’t embrace any code to retailer the credentials of the person within the database. It’s best to write your individual implementation to just accept credentials from the person after which retailer them within the underlying database. Additionally, for the sake of simplicity we’ve used an in-memory database right here. It’s best to after all use a persistent retailer for person credentials in an actual software.
Copyright © 2024 IDG Communications, Inc.